Simulators
This section provides details on how to use and configure the IoT Simulator Console.
Simulators are runtime engines for testing IoT Gateways and Things. When you open the IoT Simulator Console, it connects to the IoT Cloud and detects all of the Simulators corresponding to this Salesforce org. These Simulators can “impersonate” devices by generating the messages typically sent from the actual devices.
Simulator Console
Note
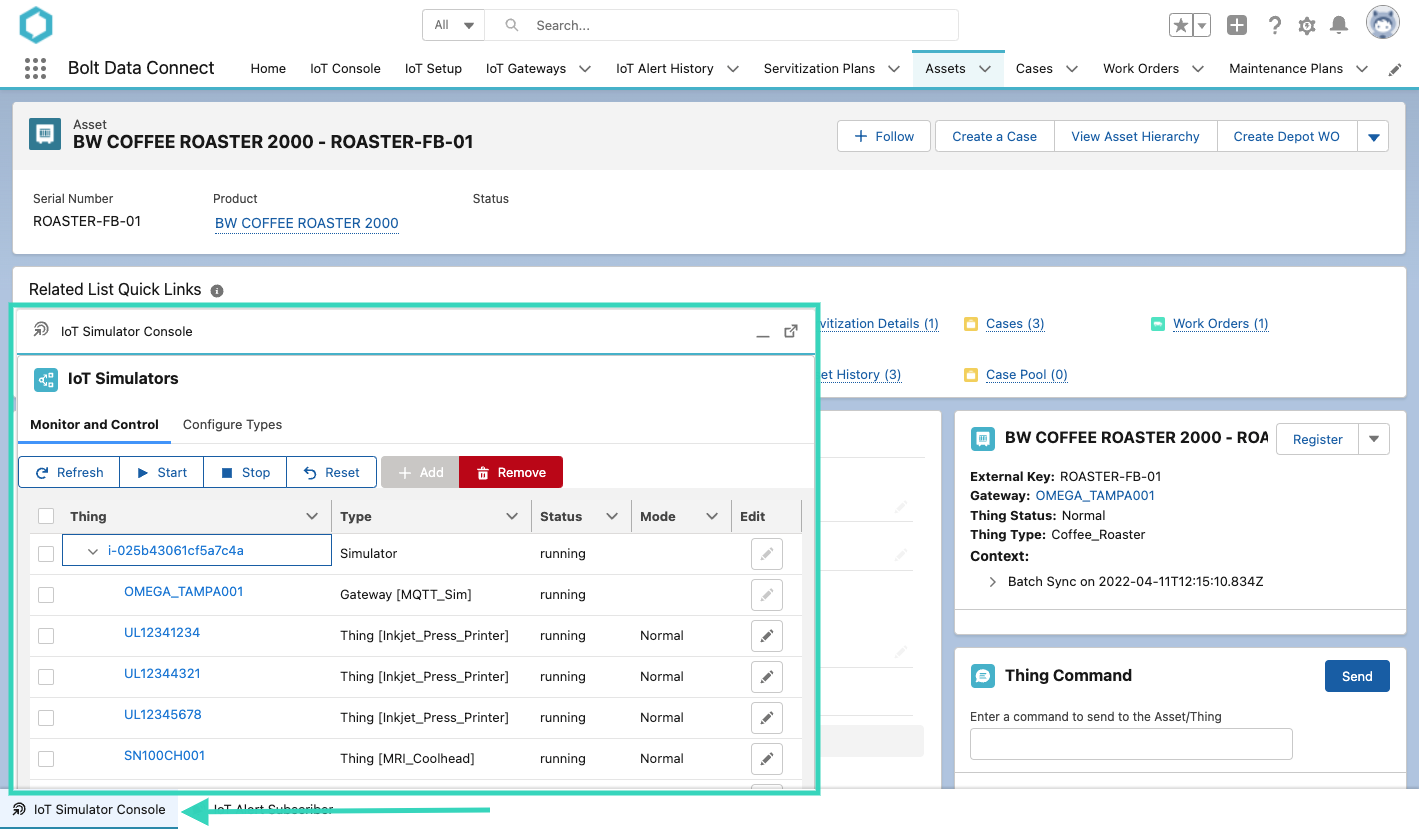
The Simulator Console is available as a “Utility” item anywhere inside the Bolt Data Connect App in Salesforce. The utility items appear at the bottom left corner of the browser. It can be minimized/restored or you can use the “pop-out” feature.Local Simulators
As of the Winter ‘24 Release, we’ve added a new “Local” Simulator. This new kind of Simulator runs in the browser and comes with a few new features, as well as a few differences in behavior.
- They support all the same Simulator Configurations, Start/Stop/Reset functions and Edit Mode capabilities
- Local simulators cannot host Gateways. Things added to this Simulator still need to be registered to a Gateway, but that Gateway cannot run in this Local Simulator. It should be either a Virtual or IoT Cloud Simulated Gateway
- Because Local Simulators do not run in the IoT Cloud, they can be used in BDC-Lite and the BDC Demo-Kit (without an IoT Cloud)
- When the browser window is closed (or refreshed), the Simulator stops sending messages. If you need a Simulator to run in the background for long periods of time we recommend using the IoT Cloud Simulators
- Only Local Simulators support the new Replay File mode
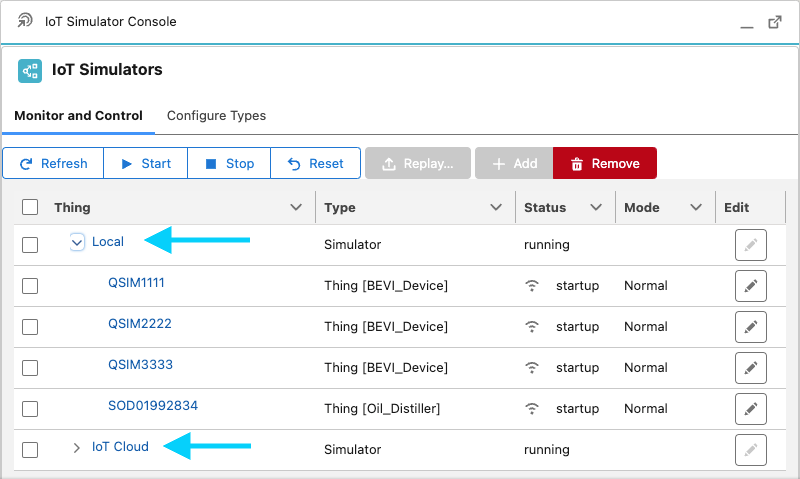
Local Simulator
Controlling Simulators
There are different types of devices that show in the grid below:
- Simulators (#1): Runtime Engine for simulated devices
- Gateways (#2): Simulated IoT Gateways, complete with Rules Engine and all other features
- Things (#3): Simulated IoT Things, connected to a Gateway
You can use the command actions (#4) to control the status (#5) of the simulated devices. First select the checkbox on the left of the devices, then click the following buttons:
- Start: Changes the device to “running” status. It will begin to send messages.
- Stop: Changes the device to “idle” status. It will stop sending messages.
- Reset: Changes the device to “startup” status, and resets the in-memory values back to defaults. It will not send messages.
- Add: You must first select a simulator you which to add a new simualted device to. Then, enter the “External Key” of either a Thing or Gateway into the Add dialog.
- Remove: Removes the selected simulated device. (Does NOT remove it from Salesforce, only from the Simulator)
Modes (#6) are configured below, and define the different combinations of values being sent from the simulated devices. You can see which Mode every device is in, as well as change the mode using the edit button. This will cause the device to send different values, possibly resulting in an Alert Condition, to aid in testing and validation of the configured automation.
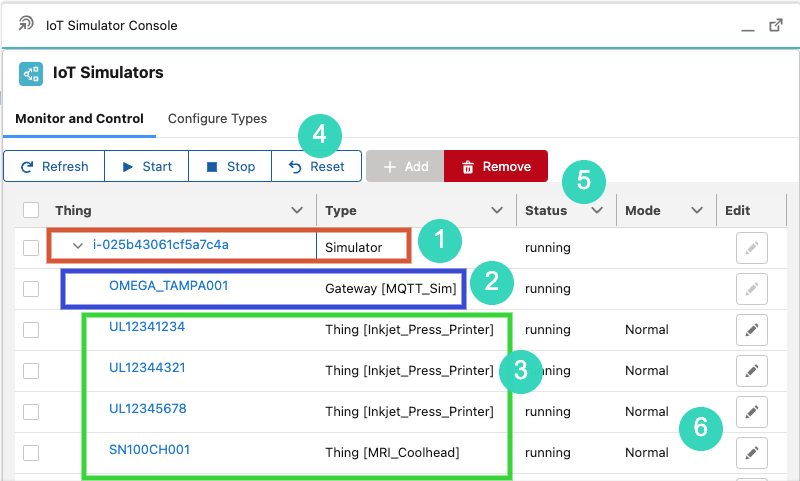
Simulator Console Controls
Note
If your simulated Thing shows “running”, but is not connected or sending data, it is possible there is a problem with the Simulator Config (next section). Double check all parameter values and types (Numbers, etc). It’s also possible that the Gateway might need to be re-registered.Replay Files
An alternative to using the Simulator Config and Modes is to instead upload a “Replay File” of time-series data for the Simulator to echo back.
Admins can now download Thing Chart data, representing an interesting use-case or problematic scenario, (optionally) modify the data, and upload to a Local Simulator to replay the same data. This enables them to test very specific scenarios and have complete control over simulated values.
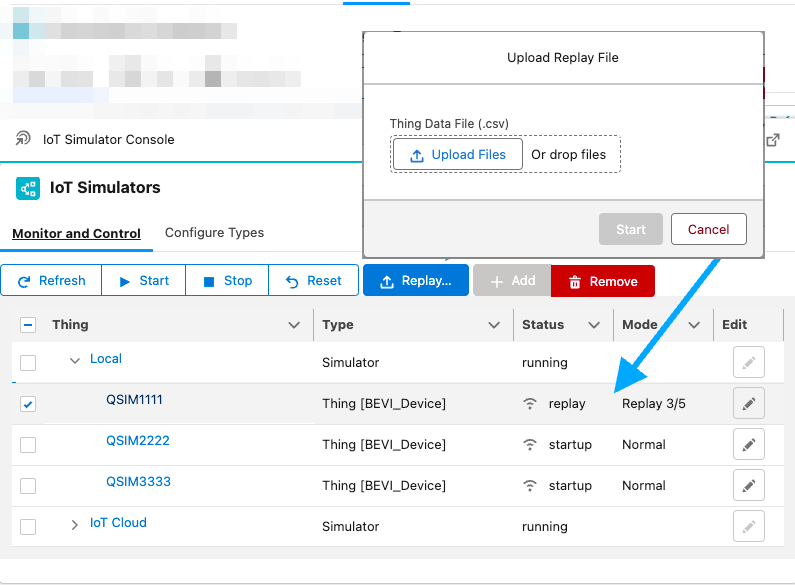
Simulator Replay Files
- Select the Simulated Thing to replay
- Click the Replay Upload button
- Drag-and-Drop the time-series CSV file
You will notice that the Simulator Mode will indicate which message it has processed as it moves through the messages.
Note
This feature is only supported in Local Simulators currently.Configuring Simulators
In the Configure Types tab, you can select any active Thing Type, and edit or create Simulator configurations to control how Simulated Things of that type will behave.
Each Thing Type (#1) can be setup with multiple “modes” (#2). You should always start with the default “Normal” mode, then configure alternate modes.
BEST PRACTICE
It’s a best practice to configure a mode to correspond to each Alert Condition to enable easy testing.Each mode can define what simulated value will be returned for each Sensor. Click the Add Parameter button (#3) to add a new sensor value simulation, or click the Edit icon (#4) to edit an existing one.
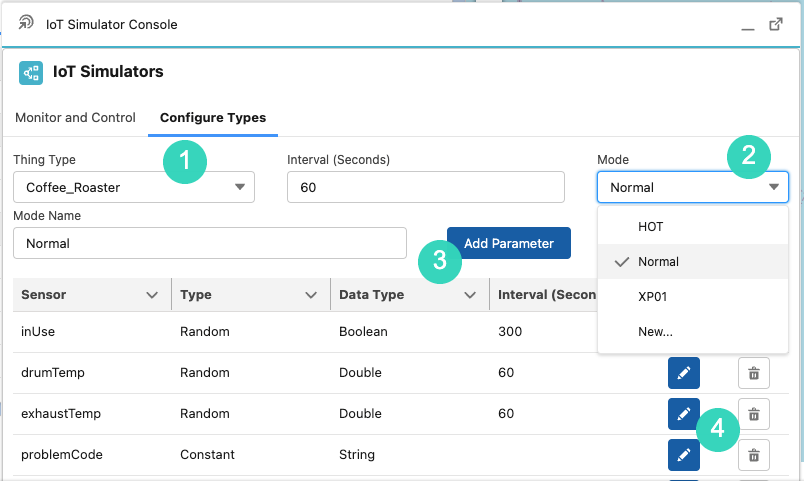
Simulator Console Config
The following types of Sensor Parameters are currently supported:
-
Constant Constants will send the same “Constant Value” consistently.
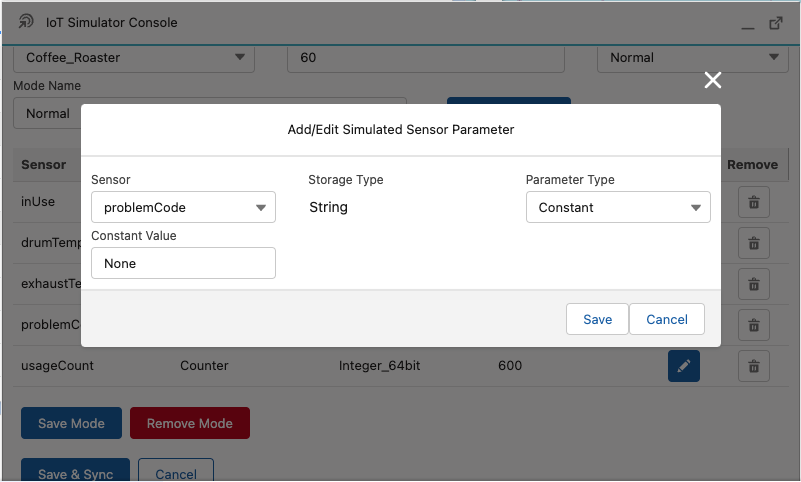
Simulator Console Parameter - Constant
-
Counter The Counter is a numeric value. It will default to the “Start” value, and will change by the “Step” amount at each “Interval”. When it reaches the “End”, it will start over again.

Simulator Console Parameter - Counter
-
Random-Uniform The Random / Uniform is a numeric value. It will be a random number between the “Lower” and “Upper” values, and will change at every “Interval”.
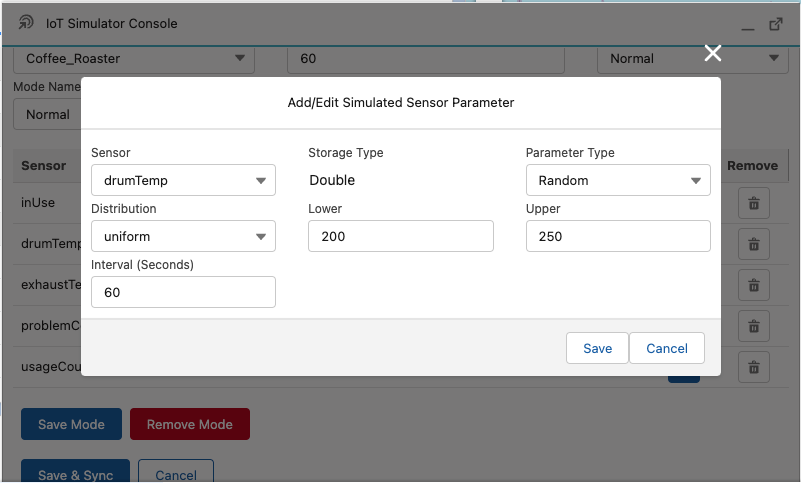
Simulator Console Parameter - Random
-
Random-Choice The Random / Choice can be numeric, boolean, text, etc. It will randomly choose between the provided “Choice Values”, and will change at every “Interval”.
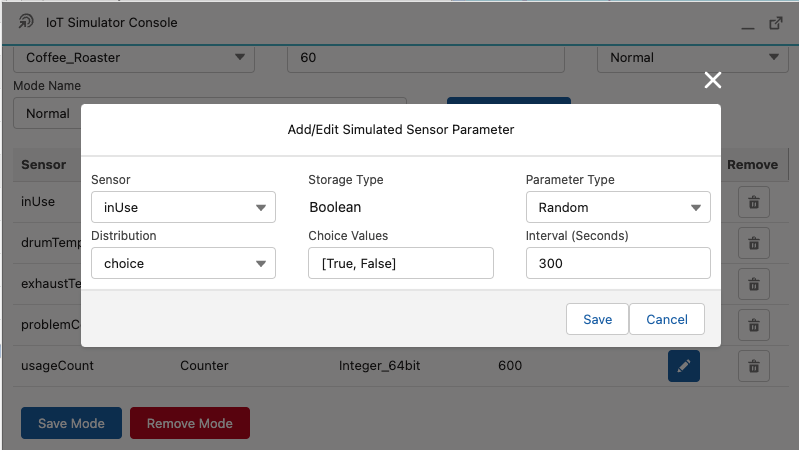
Simulator Console Parameter - Choice
-
Datetime The Datetime can be numeric or text. It will be recalculated on every message, relative to the current date/time. The Offset can be either positive (future) or negative (past), or 0 for current date/time. The format can either be epoch (to return the epoch in milliseconds) or a valid Python datetime format (e.g. %Y-%m-%d_%H:%M:%S) to return any textual date or time format.
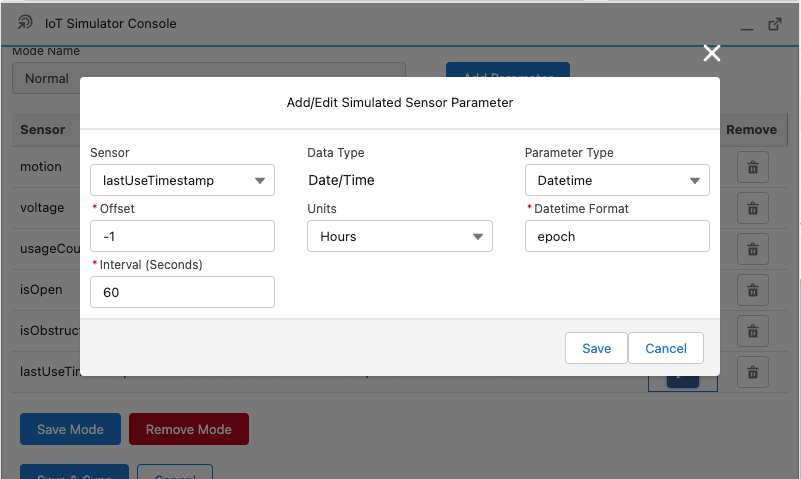
Simulator Console Parameter - Choice
SAVE
After adding or editing the modes, don’t forget to Save Mode and then Save & Sync.Simulator Configuration Co-Pilot
In the Simulator Configuration Editor, use the Co-Pilot “Generate” button to automatically create/update Simulator Definitions using analytics and introspection of the rules, based on the Thing Type setup. Multiple simulator modes are generated, saving the admin time and ensuring all alert conditions are covered.
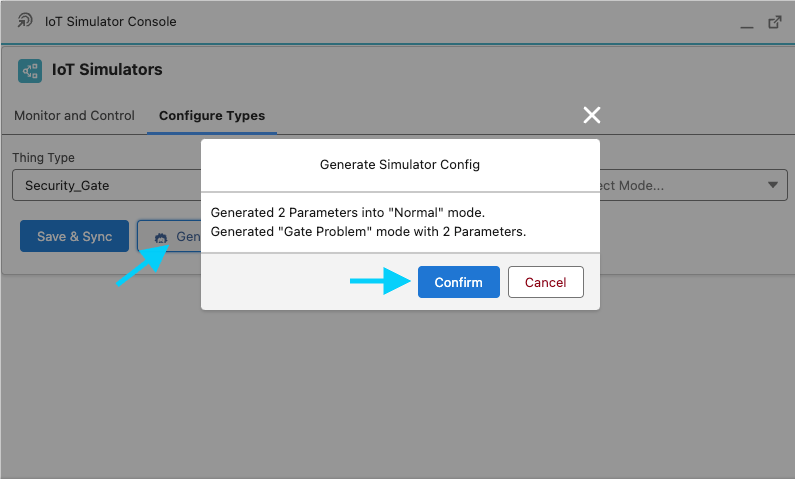
Simulator Configuration Co-Pilot
Note
The Generate is safe to use as it doesn’t save anything, only makes changes in memory. If you’re not happy with the results, either Cancel or Edit them before Saving.Simulator Console Permissions
The Simulator Console is only available to Licensed Bolt Data Connect Users, and only if they have been given one or both of the following Custom Permissions:
- IoT Simulators: This Permission gives the user the ability to view and control Simulators (the “Monitor and Control” tab)
- IoT Simulators Configure: This Permission gives the user the ability to create or edit the Simulator Configurations (the “Configure Types” tab)