Thing Type Editing
Thing-Types define the configuration for Edge Processing.
Top Level Configuration
- Label
- The label to use for the Thing-Type specification.
- Is Active
- If a Thing’s Thing-Type is not active (i.e. this option is deselected), the Thing’s data will not be aggregated and every message will be forwarded from the Gateway to the Cloud. It is not recommended to deactivate a Thing-Type that is assigned to Things, except for brief troubleshooting; otherwise, it could potentially result in higher costs and missed Alerts.
- Sample Message
- Used to auto-populate the Sensors section of the Thing-Type Specification.
- Aggregate Type
- Determines when to send the aggregated messages. It can be configured to “None”, “Seconds”, or “Count”.
- None: Forward every message received from the device to the cloud.
- Seconds: Aggregate the last N seconds of Thing data, where N is defined by the Aggregate Interval field.
- Count: Aggregate the last N messages from a Thing, where N is defined by the Aggregate Interval field.
- Aggregate Interval
- Used in conjunction with the Aggregate Type field to determine the frequency of aggregation performed on the Gateway.
- Offline Timeout (Seconds)
- Used to determine if a Thing is offline. If a device has not communicated in the time specified in this field, then an Offline Alert is sent to Salesforce.
Digital Twin Children
See the Digital Twins page for details on configuring this section.
Sensors
This section defines all the Sensors for the Thing-Type. Note if you have a sample message in JSON format, you can paste the message in the Sample Message field and select Parse to auto-fill the Sensors section.
- Label
- The display name of the sensor data on plots.
- Sensor Name
- The name of the field in the actual Thing’s data message.
Example
Sensor Name =sensorABC, expects a field like {... "sensorABC": 123, ...} to be in the data message from the Thing.
- Data Type
- Specifies the type of data expected from each Sensor.
- Aggregate Function
- Determines how the data is aggregated in the Gateway.
- NONE: Use the last received value as the value for the Sensor for Calculations, Alerts, and Cloud updates.
- SUM: Sum all values received during the Aggregate Interval as the value for the Sensor for Calculations, Alerts, and Cloud updates.
- AVG: Average all values received during the Aggregate Interval as the value for the Sensor for Calculations, Alerts, and Cloud updates.
- MIN: Use the minimum of all values received during the Aggregate Interval as the value for the Sensor for Calculations, Alerts, and Cloud updates.
- MAX: Use the maximum of all values received during the Aggregate Interval as the value for the Sensor for Calculations, Alerts, and Cloud updates.
Sensor Settings

Sensor Settings
- Include Undefined Sensors
- When not selected any unrecognized sensor value(s) will be trimmed from the messages before processing
- Enable Sensor Type Conversion
- When selected the raw sensor values will be convereted into the Data Types specified below
Context Fields
Context Fields are configured in the Context Data Setup Page.
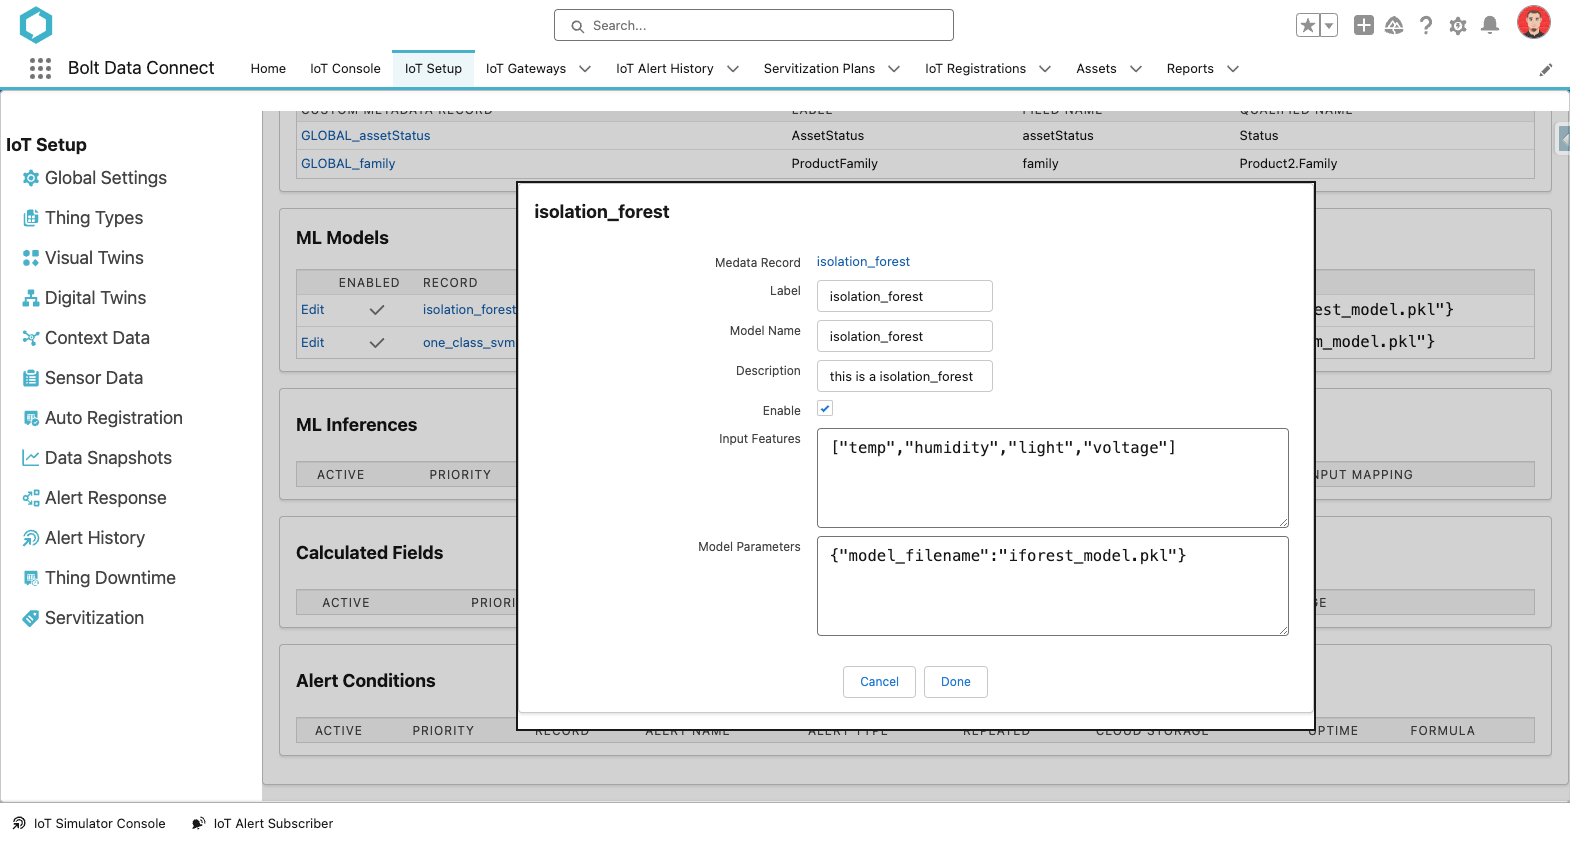
ML Models
This section defines all the ML Models available on a Gateway. These Models have been developed by a Data Scientist and uploaded to the BDC IoT Cloud. NOTE: This section is only available on Gateway Thing Types.
See Machine Learning for more information.
- Label
- The label to use for the Calculated Field.
- Model Name
- The unique name of the model.
- Input Features
- The features required by this model. These will be mapped in the ML Inferences.
- Model Parameters
- Configuration values for the model itself.
ML Models
ML Inferences
This section defines all the ML Inference Fields for a Thing-Type. Each of these represent a result of executing an ML Model with a set of input values from IoT Sensors.
- Label
- The label to use for the ML Inference field.
- Name
- The name of the ML Inference field. It’s also the name referenced by other Calculations and Alerts.
- Model
- The ML Model (defined on the corresponding Gateway Thing Type) that will be executed.
- Data Type
- Determines the assumed data type for the result of the Calculation.
- Formula
- The mapping of Model Input Features to IoT Sensor values.

ML Inferences
Calculated Fields
This section defines all the Calculated Fields for a Thing-Type. All Sensor data is aggregated prior to computing the Calculated Fields. It can be assumed that all Sensor data is up-to-date in conformance with the aggregation settings defined by each Sensor.
- Label
- The label to use for the Calculated Field.
- Field Name
- The name of the field when this calculation is sent to the Cloud. It’s also the name referenced by other Calculations and Alerts.
Example
Field Name =calcABC results in {... "calcABC": 123, ...}, when data is sent to the Cloud and referenced as calculation.calcABC in other Calculations and Alerts.
- Data Type
- Determines the assumed data type for the result of the Calculation.
- Formula
- The actual formula to evaluate. The formula should be any Javascript statement that returns an assignable value. The formula can use any Sensor, Calculated Field, or Context Field in the computation. Sensor values are available in the
sensornamespace (e.g.sensor.sensorABC), other Calculated Fields are available in thecalculationnamespace (e.g.calculation.calcABC), and Context Fields are available in thecontextnamespace (e.g.context.contextABC).
Alert Conditions
This section defines all the Alert Conditions for a Thing-Type. Alerts are a special subset of Calculated Fields. Alerts are computed after all Calculated Fields have been computed, so it can be assumed that all Calculated Fields are using the most recent data. The result of the Alert calculation should be a boolean value, True if an Alert should be sent to Salesforce, False otherwise.
- Label
- The label to use for the Alert Condition.
- Condition Name
- The name of the field when this alert is sent to the Cloud.
Example
Condition Name =alertABC results in {... "alertABC": 123, ...}, when data is sent to the Cloud.
- Alert Type
- Determines the type of Alert sent to Salesforce. Each Alert sent to Salesforce will include this Alert Type, which can be used in your Processes to take actions (like update the IoT Thing Status for a given Thing).
- Alert Interval / Units
- Determines how often this Alert is re-broadcasted. If the Alert condition has persisted longer than the amount of time specified by this field, the Alert will be sent to Salesforce again, to retrigger any automated processes. It is recommended to keep the Alert Interval at rather large values to avoid retriggering your processes.
- Impacts Uptime
- When enabled, this Alert Type will impact Uptime calculations for “Downtime Periods” and “Servitization”
- Formula
- The actual formula to evaluate. The formula should be a Javascript statement, and can use any Sensor or Calculated Field in the calculation. The formula should result in a boolean value; It will be evaluated as if it’s boolean — i.e. if the value is “falsy” it will result in no Alert. Otherwise it will result in an Alert. Sensor values are available in the
sensornamespace (e.g.sensor.sensorABC), Calculated Fields are available in thecalculationnamespace (e.g.calculation.calcABC), Context Fields are available in thecontextnamespace (e.g.context.contextABC), and other Alert Conditions are available in thealertnamespace (e.g.alert.alertABC).
Examples
- The formula,
sensor.SensorA > 40executes the relational operation, comparing SensorA to the literal 40. If this Condition Name was,DeviceThawed, then the resulting message to the Cloud could be:
{
 "sensor": {
  "SensorA": 39
 },
 "alert": {
  "DeviceThawed": false
 }
}
- OR -
{
 sensor: {
  "SensorA": 41
 },
 alert: {
  "DeviceThawed": true
 }
}
… with the later triggering an Alert with the defined Alert Type to Salesforce. Anytime an Alert is sent to Salesforce, the accompanying data message is included and can be used in your Process Builders or Flows. See the Processes section for more details.
- The formula,
calculation.CalcA === "Cold"executes the strictly-equal equality operator, comparingCalcAto the literal"Cold". If this Condition Name was,DeviceCold, then the resulting message to the Cloud could be:
{
 "sensor": {
  "SensorA": 39
 },
 "calculation": {
  CalcA: "Cold"
 },
 "alert": {
  "DeviceCold": true
 }
}
- Sample Result
- This field is automatically calculated based on the formula entered using the data provided in the sample message to populate the sensor and calculation namespaces.
Formula Editor
The Formula Editor now helps in writing formulas (both Calculated Fields and Alert Conditions). It allows the user to select any sensor, calculated field, digital twin value, function, or operator and will insert them at your cursor position.
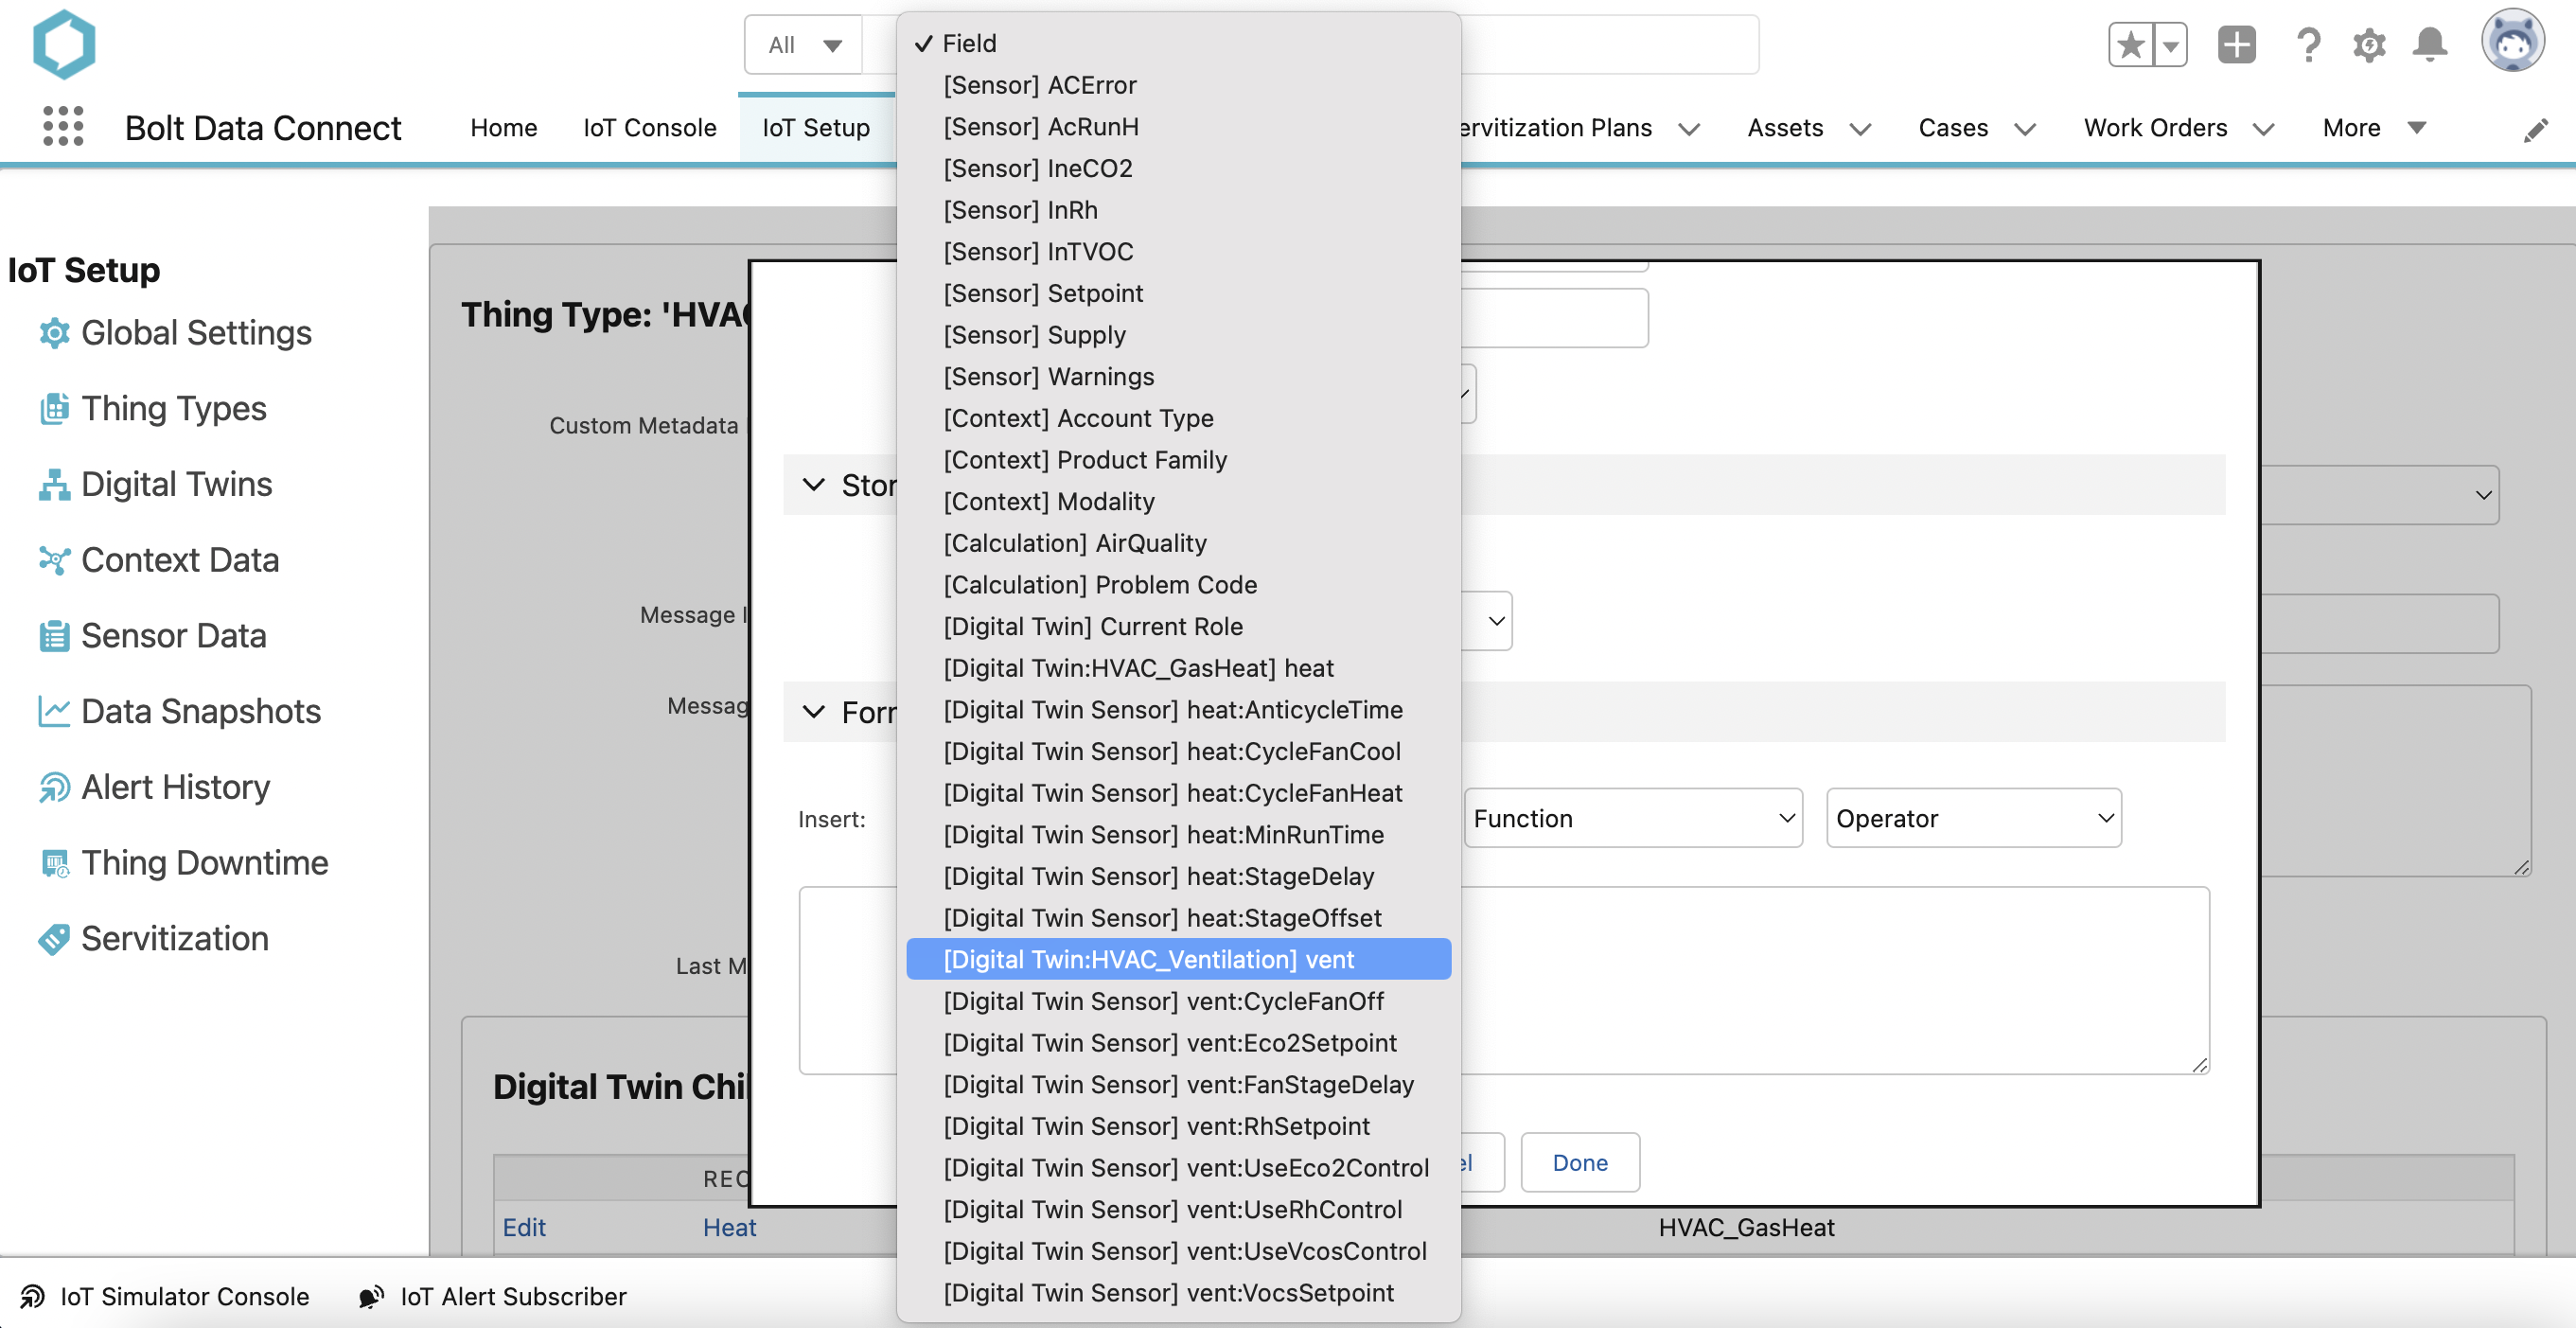
Formula Editor
Examples
- The formula,
sensor.SensorA + sensor.SensorB, will add the aggregated value of SensorA to the aggregated value of SensorB. If this Calculated Field name wasCalcA, then the resulting message to the Cloud could be:
{
 sensor: {
  "SensorA": 40,
  "SensorB": 2
 },
 calculation: {
  "CalcA": 42
 }
}
- The formula,
(sensor.SensorA > 40) ? "Not Cold" : "Cold", will execute the Javascript ternary operator (basically an assignable if-else statement). If this Calculated Field name wasColdState, then the resulting message to the Cloud could be:
{
 sensor: {
  "SensorA": 39
 },
 calculation: {
  "ColdState": "Cold"
 }
}
- OR -
{
 "sensor": {
  "SensorA": 41
 },
 "calculation": {
  "ColdState": "Not Cold"
 }
}.
- Sample Result
- This field is automatically calculated based on the formula entered using the data provided in the sample message to populate the sensor and calculation namespace.
State Machine Editor
A State Machine is a special kind of Calculated Field which tracks the active “State”, as well as any other custom local variables. When one of the conditional transitions changes the state, actions will be executed allowing you to implement any custom business logic necessary. For a full overview of the undelying State Machine engine see: State Machines.
The editor simplifies the creation / updating of these State Machines. Use the buttons at the top of the window for adding new Local Variable, States and Transitions.
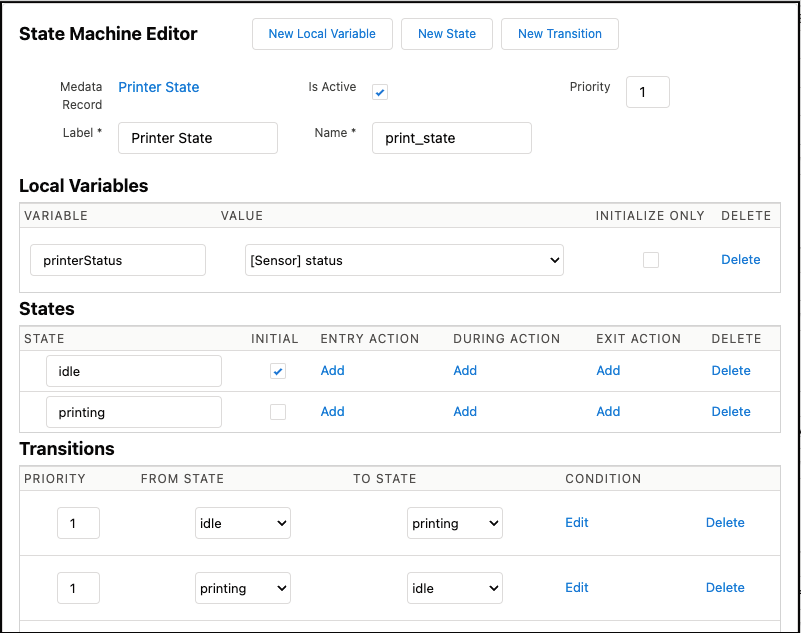
State Machine Editor
Local Variables
- Variable
- The unique name of this variable
- Value
- Typically a sensor value. If instead you’d like to create a track a non-sensor value, use the “Formula…” option
- Initialize Only
- This variable will only be updated on initialization, not on every step. This allows you to modify and save the value in entry / during / exit actions
States
- State
- The unique name of the state. These state names can use a dot-notation to create sub-states as well (e.g. “running.normal” & “running.hot” would be sub-states of “running”)
- Initial
- Exactly 1 State must be marked as the initial state for each “level” (for sub-states). This is the state the machine will begin in for that “level”
- Entry / During / Exit Actions
- Click Add / Edit to modify the formulas. These actions are executed corresponding to state changes / steps.
Transitions
- Priority
- Numeric sort order for transitions, should be unique to the “From State”
- From State
- When the machine is in this active state, the condition will be evaluated. The first transition condition, ordered by Priority, which evalues to true will be executed.
- To State
- The state which will become active after the transition
- Condition
- Must evaluate to true/false. If true, this transition will execute.