Bolt Data Connect (ServiceNow)
Release: 1.1 (Winter 2026)
Table of Contents:
- Bolt Data Connect : Help Docs : ServiceNow
- Bolt Data Connect : Help Docs : ServiceNow : App Tour
- Bolt Data Connect : Help Docs : ServiceNow : Gateways
- Bolt Data Connect : Help Docs : ServiceNow : IoT Console
- Bolt Data Connect : Help Docs : ServiceNow : Things
- Bolt Data Connect : Help Docs : ServiceNow : Simulators
- Bolt Data Connect : Help Docs : ServiceNow : IoT Setup
- Bolt Data Connect : Help Docs : ServiceNow : IoT Setup : IoT Settings
- Bolt Data Connect : Help Docs : ServiceNow : IoT Setup : IoT Settings : App Connectivity
- Bolt Data Connect : Help Docs : ServiceNow : IoT Setup : IoT Settings : Licensing
- Bolt Data Connect : Help Docs : ServiceNow : IoT Setup : Thing Types
- Bolt Data Connect : Help Docs : ServiceNow : IoT Setup : Thing Types : Thing Type Editing
- Bolt Data Connect : Help Docs : ServiceNow : IoT Setup : Thing Types : Thing Type Synchronizing
- Bolt Data Connect : Help Docs : ServiceNow : IoT Setup : Digital Twins
- Bolt Data Connect : Help Docs : ServiceNow : IoT Setup : Context Data
- Bolt Data Connect : Help Docs : ServiceNow : IoT Setup : Sensor Data
- Bolt Data Connect : Help Docs : ServiceNow : IoT Setup : Auto Registration
- Bolt Data Connect : Help Docs : ServiceNow : IoT Setup : Alert History
- Bolt Data Connect : Help Docs : ServiceNow : User Setup
- Bolt Data Connect : Help Docs : ServiceNow : IoT Setup : Machine Learning
- Bolt Data Connect : Help Docs : Scripting
- Bolt Data Connect : Help Docs : Scripting : Writing Formulas
- Bolt Data Connect : Help Docs : Scripting : Javascript Basics
- Bolt Data Connect : Help Docs : Scripting : Javascript Basics : Expressions & Operators
- Bolt Data Connect : Help Docs : Scripting : Javascript Basics : Statements
- Bolt Data Connect : Help Docs : Scripting : Javascript Basics : Standard Objects
- Bolt Data Connect : Help Docs : Scripting : Core Libraries
- Bolt Data Connect : Help Docs : Scripting : Core Libraries : Delay
- Bolt Data Connect : Help Docs : Scripting : Core Libraries : Filter
- Bolt Data Connect : Help Docs : Scripting : Core Libraries : Logic
- Bolt Data Connect : Help Docs : Scripting : Core Libraries : State
- Bolt Data Connect : Help Docs : Scripting : Digital Twin
- Bolt Data Connect : Help Docs : Scripting : State Machines
- Bolt Data Connect : Help Docs : Mobile : ServiceNow Mobile Agent
- Bolt Data Connect : Help Docs : ServiceNow : Release Notes
- Bolt Data Connect : Help Docs : ServiceNow : Release Notes : Release 1.0 (Fall '25)
- Bolt Data Connect : Help Docs : ServiceNow : Release Notes : Release 1.1 (Winter '26)
ServiceNow
App Tour
Launching the App
Once you install the ServiceNow App, you"ll find the new Bolt Data Connect App Modules in the ServiceNow All Menu.
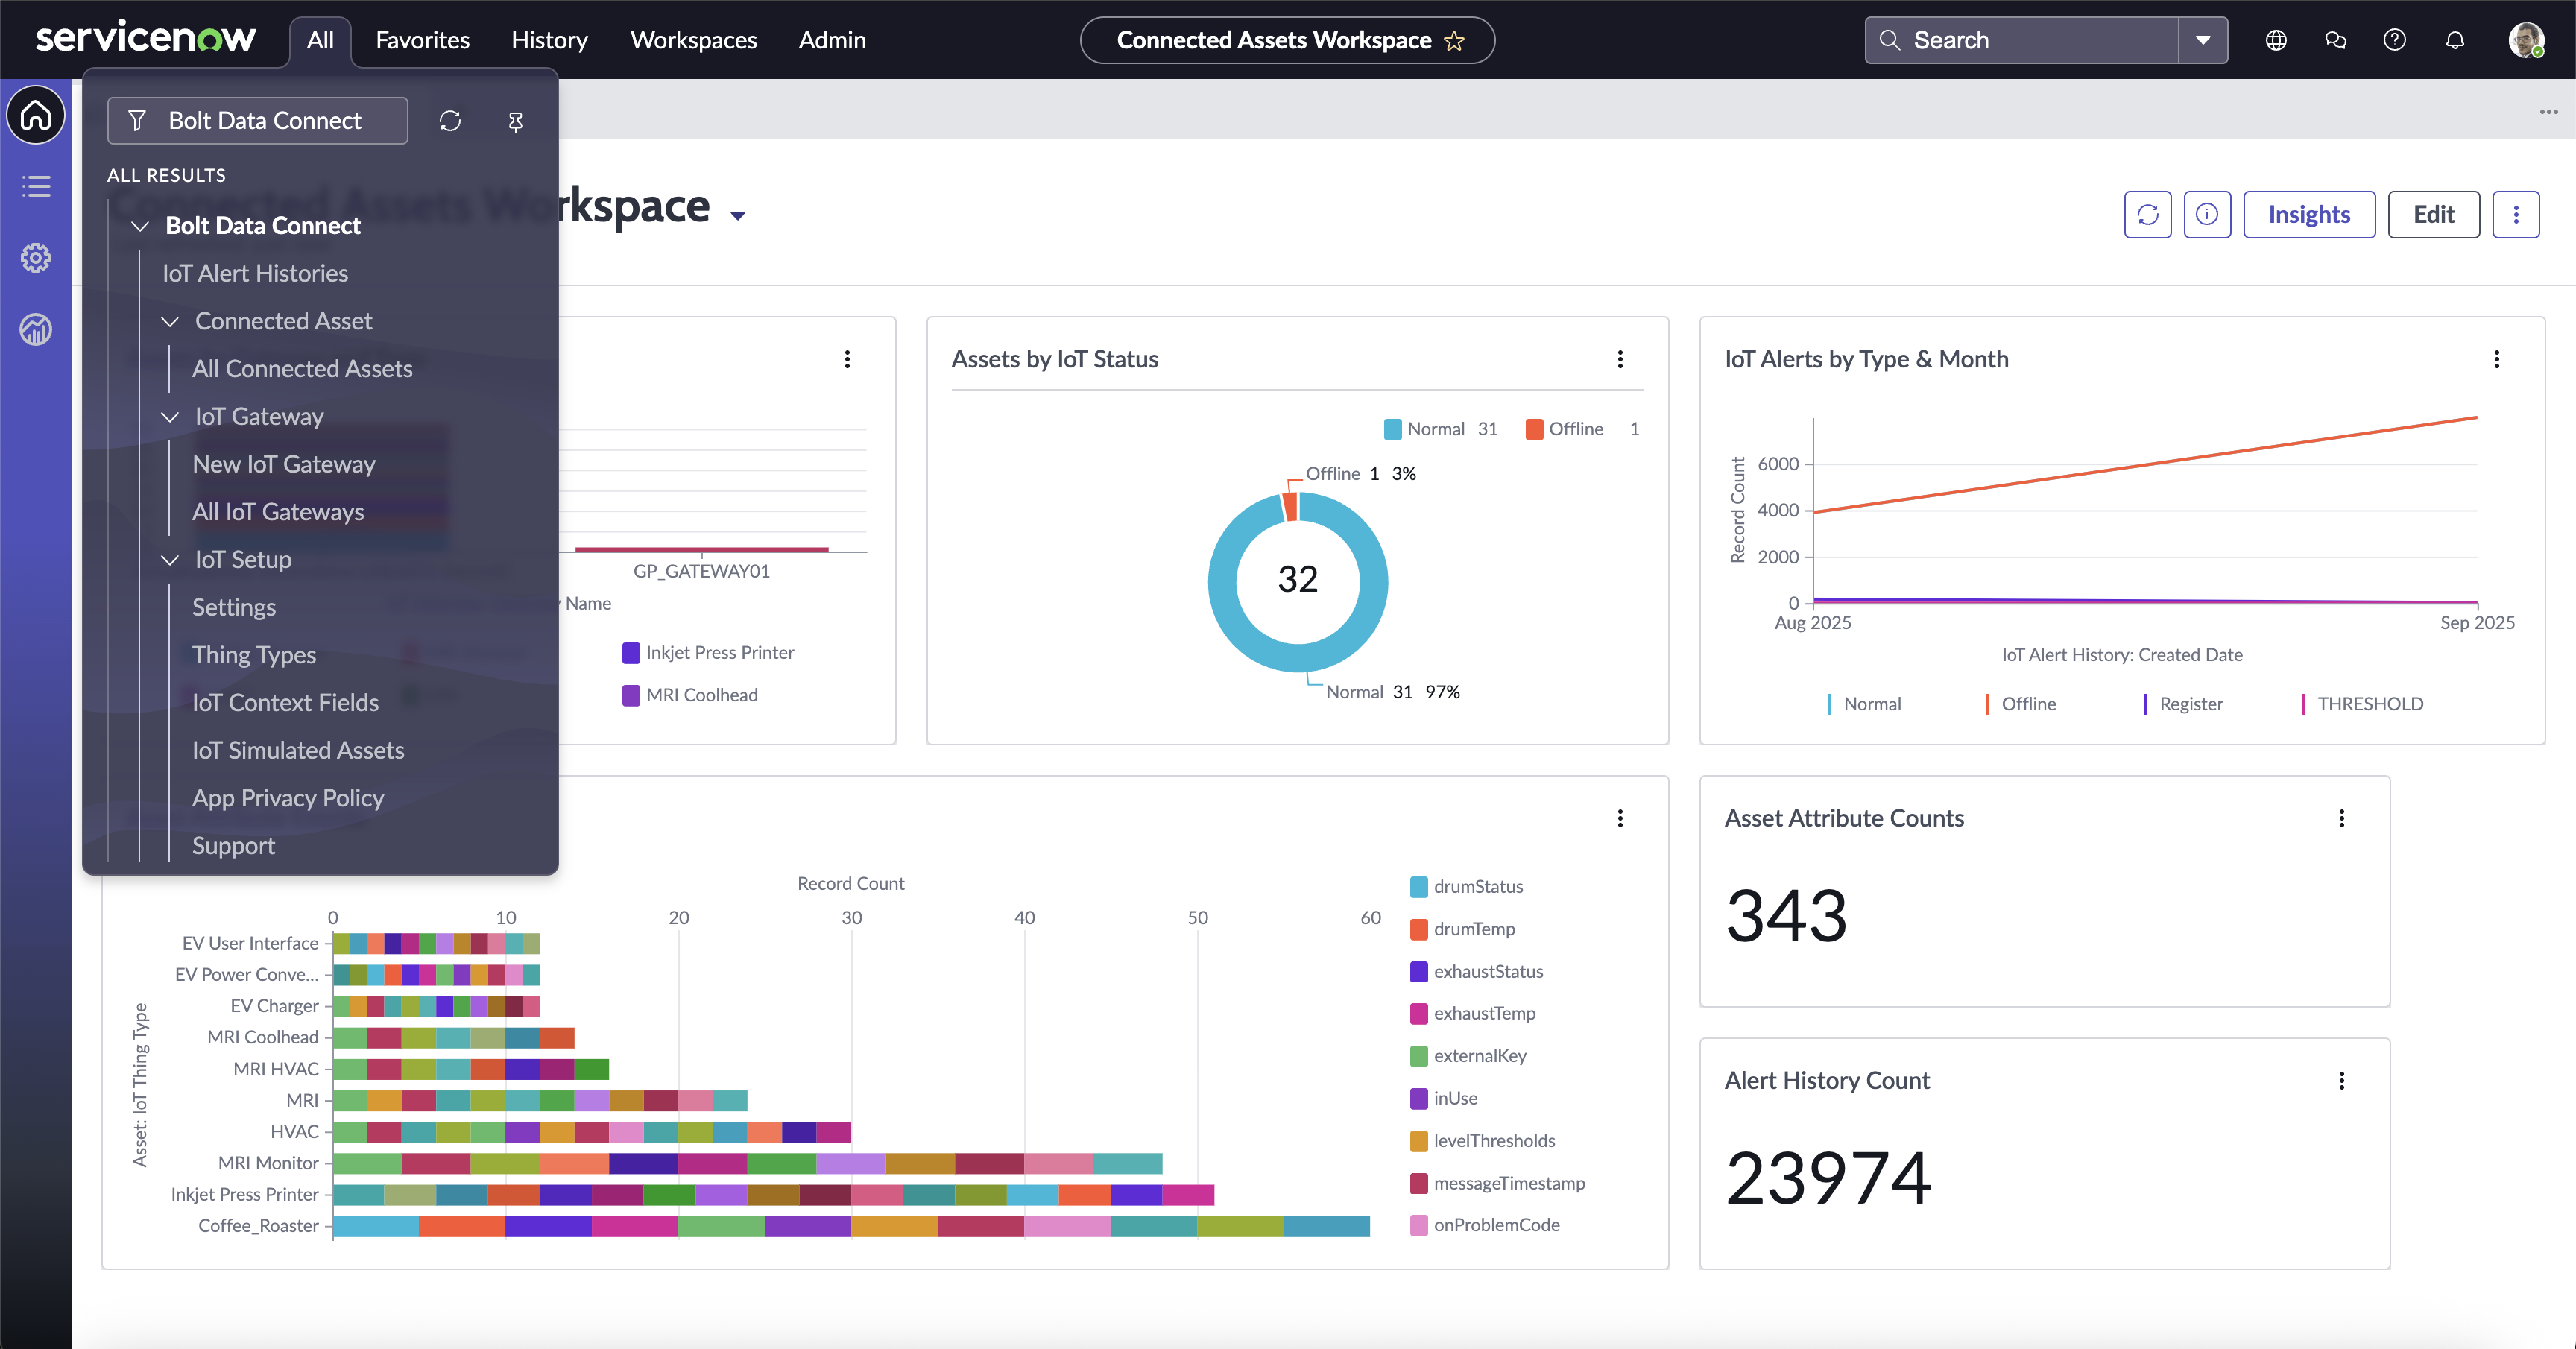
App Modules
Connected Assets Workspace
The Connected Assets Workspace is a ServiceNow Now Experience Workspace. The home page displays a Dashboard containing Visualizations which gives you a view of all of your “Things” connected to Bolt Data Connect and the Thing Types, Status, Alert History and Sensor Data available in Salesforce.
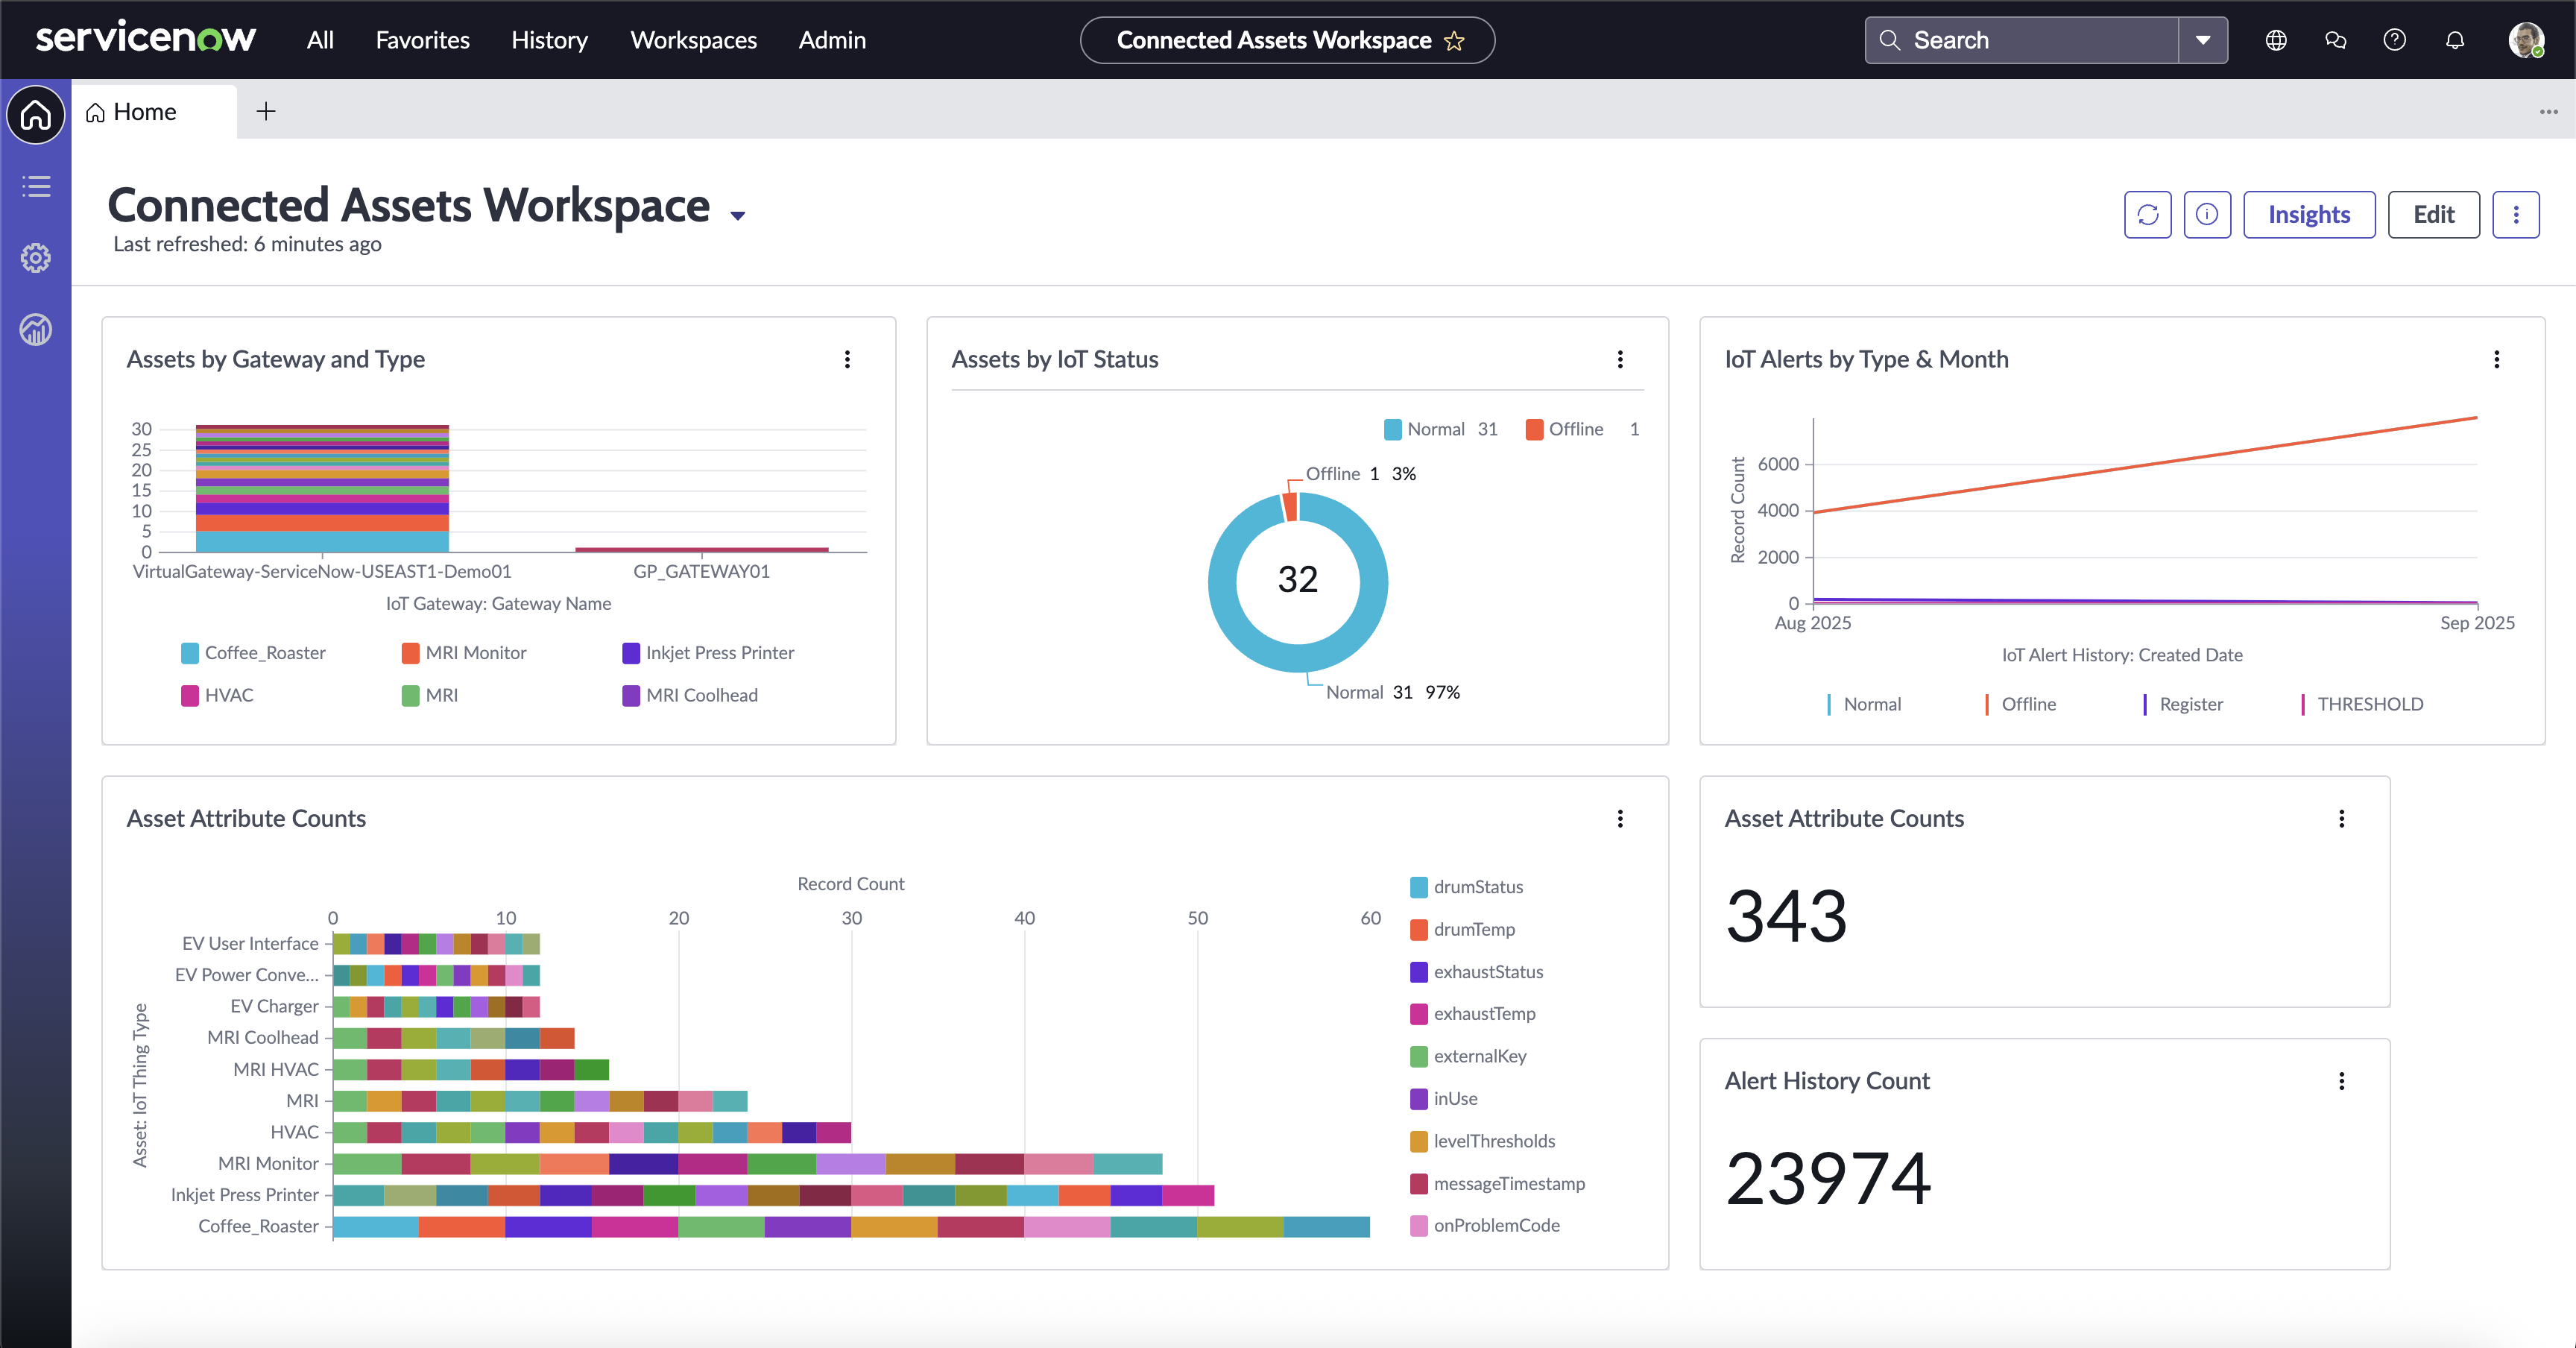
IoT Dashboard
IoT Console
The IoT Console is the centralized dashboard for viewing all Connected Assets within an Instance.
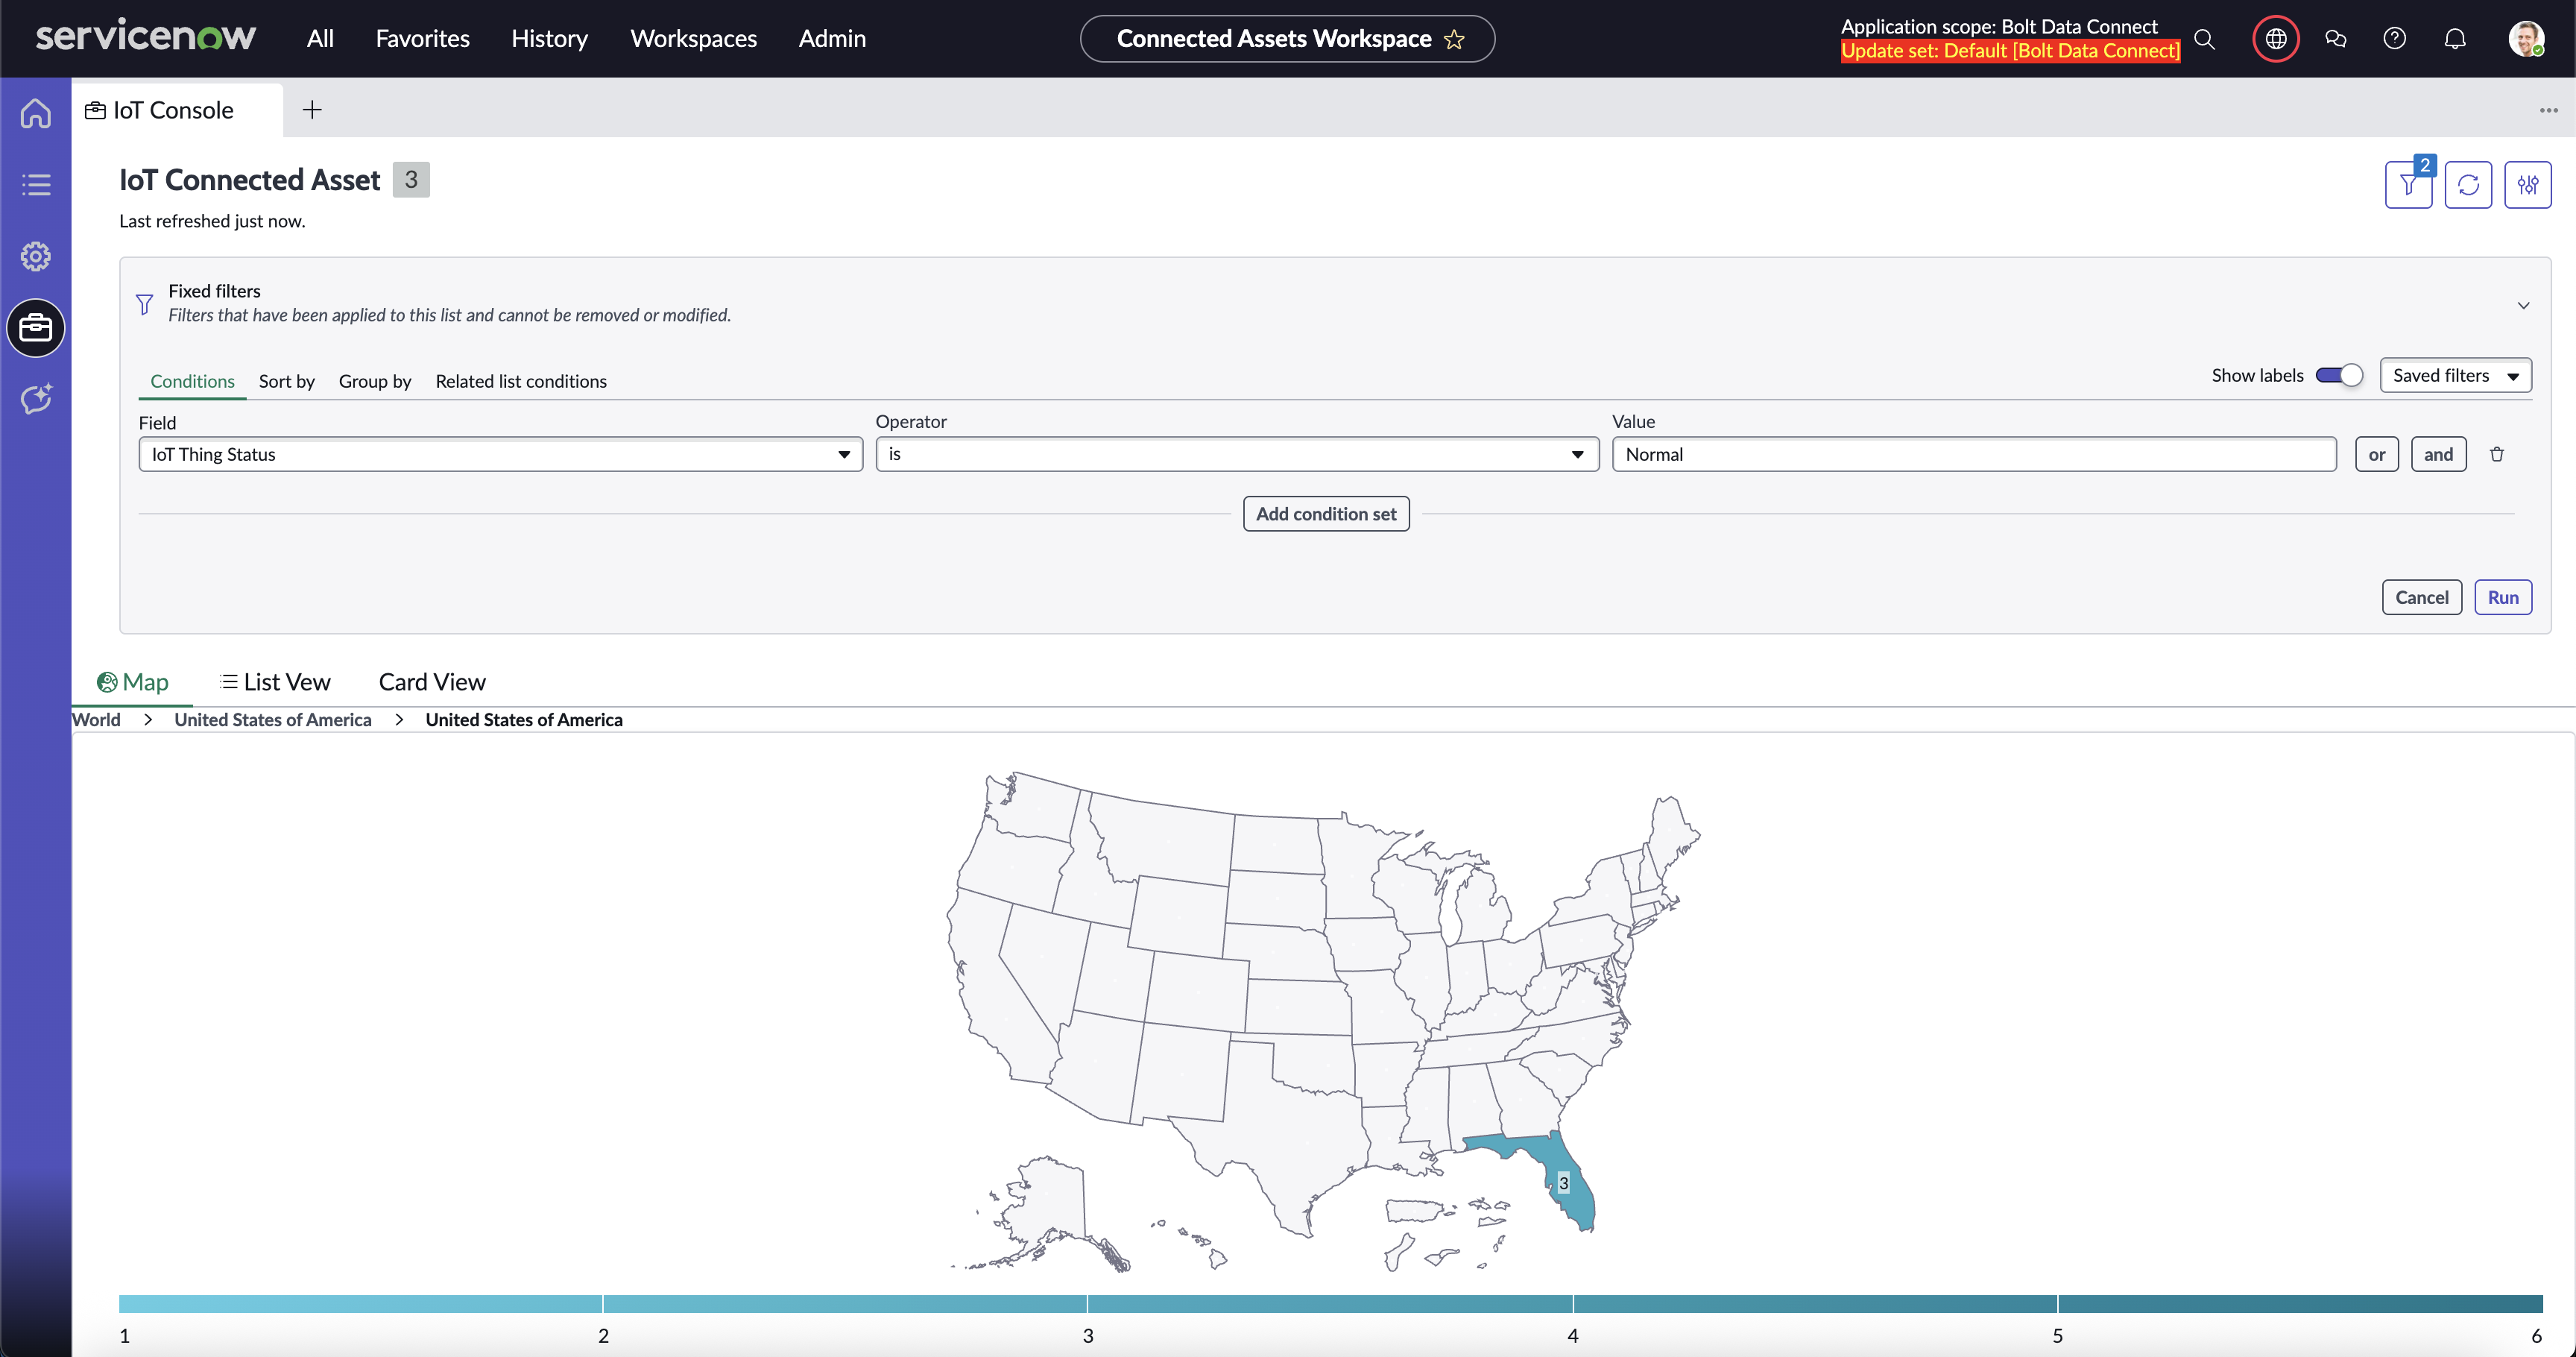
IoT Console Map
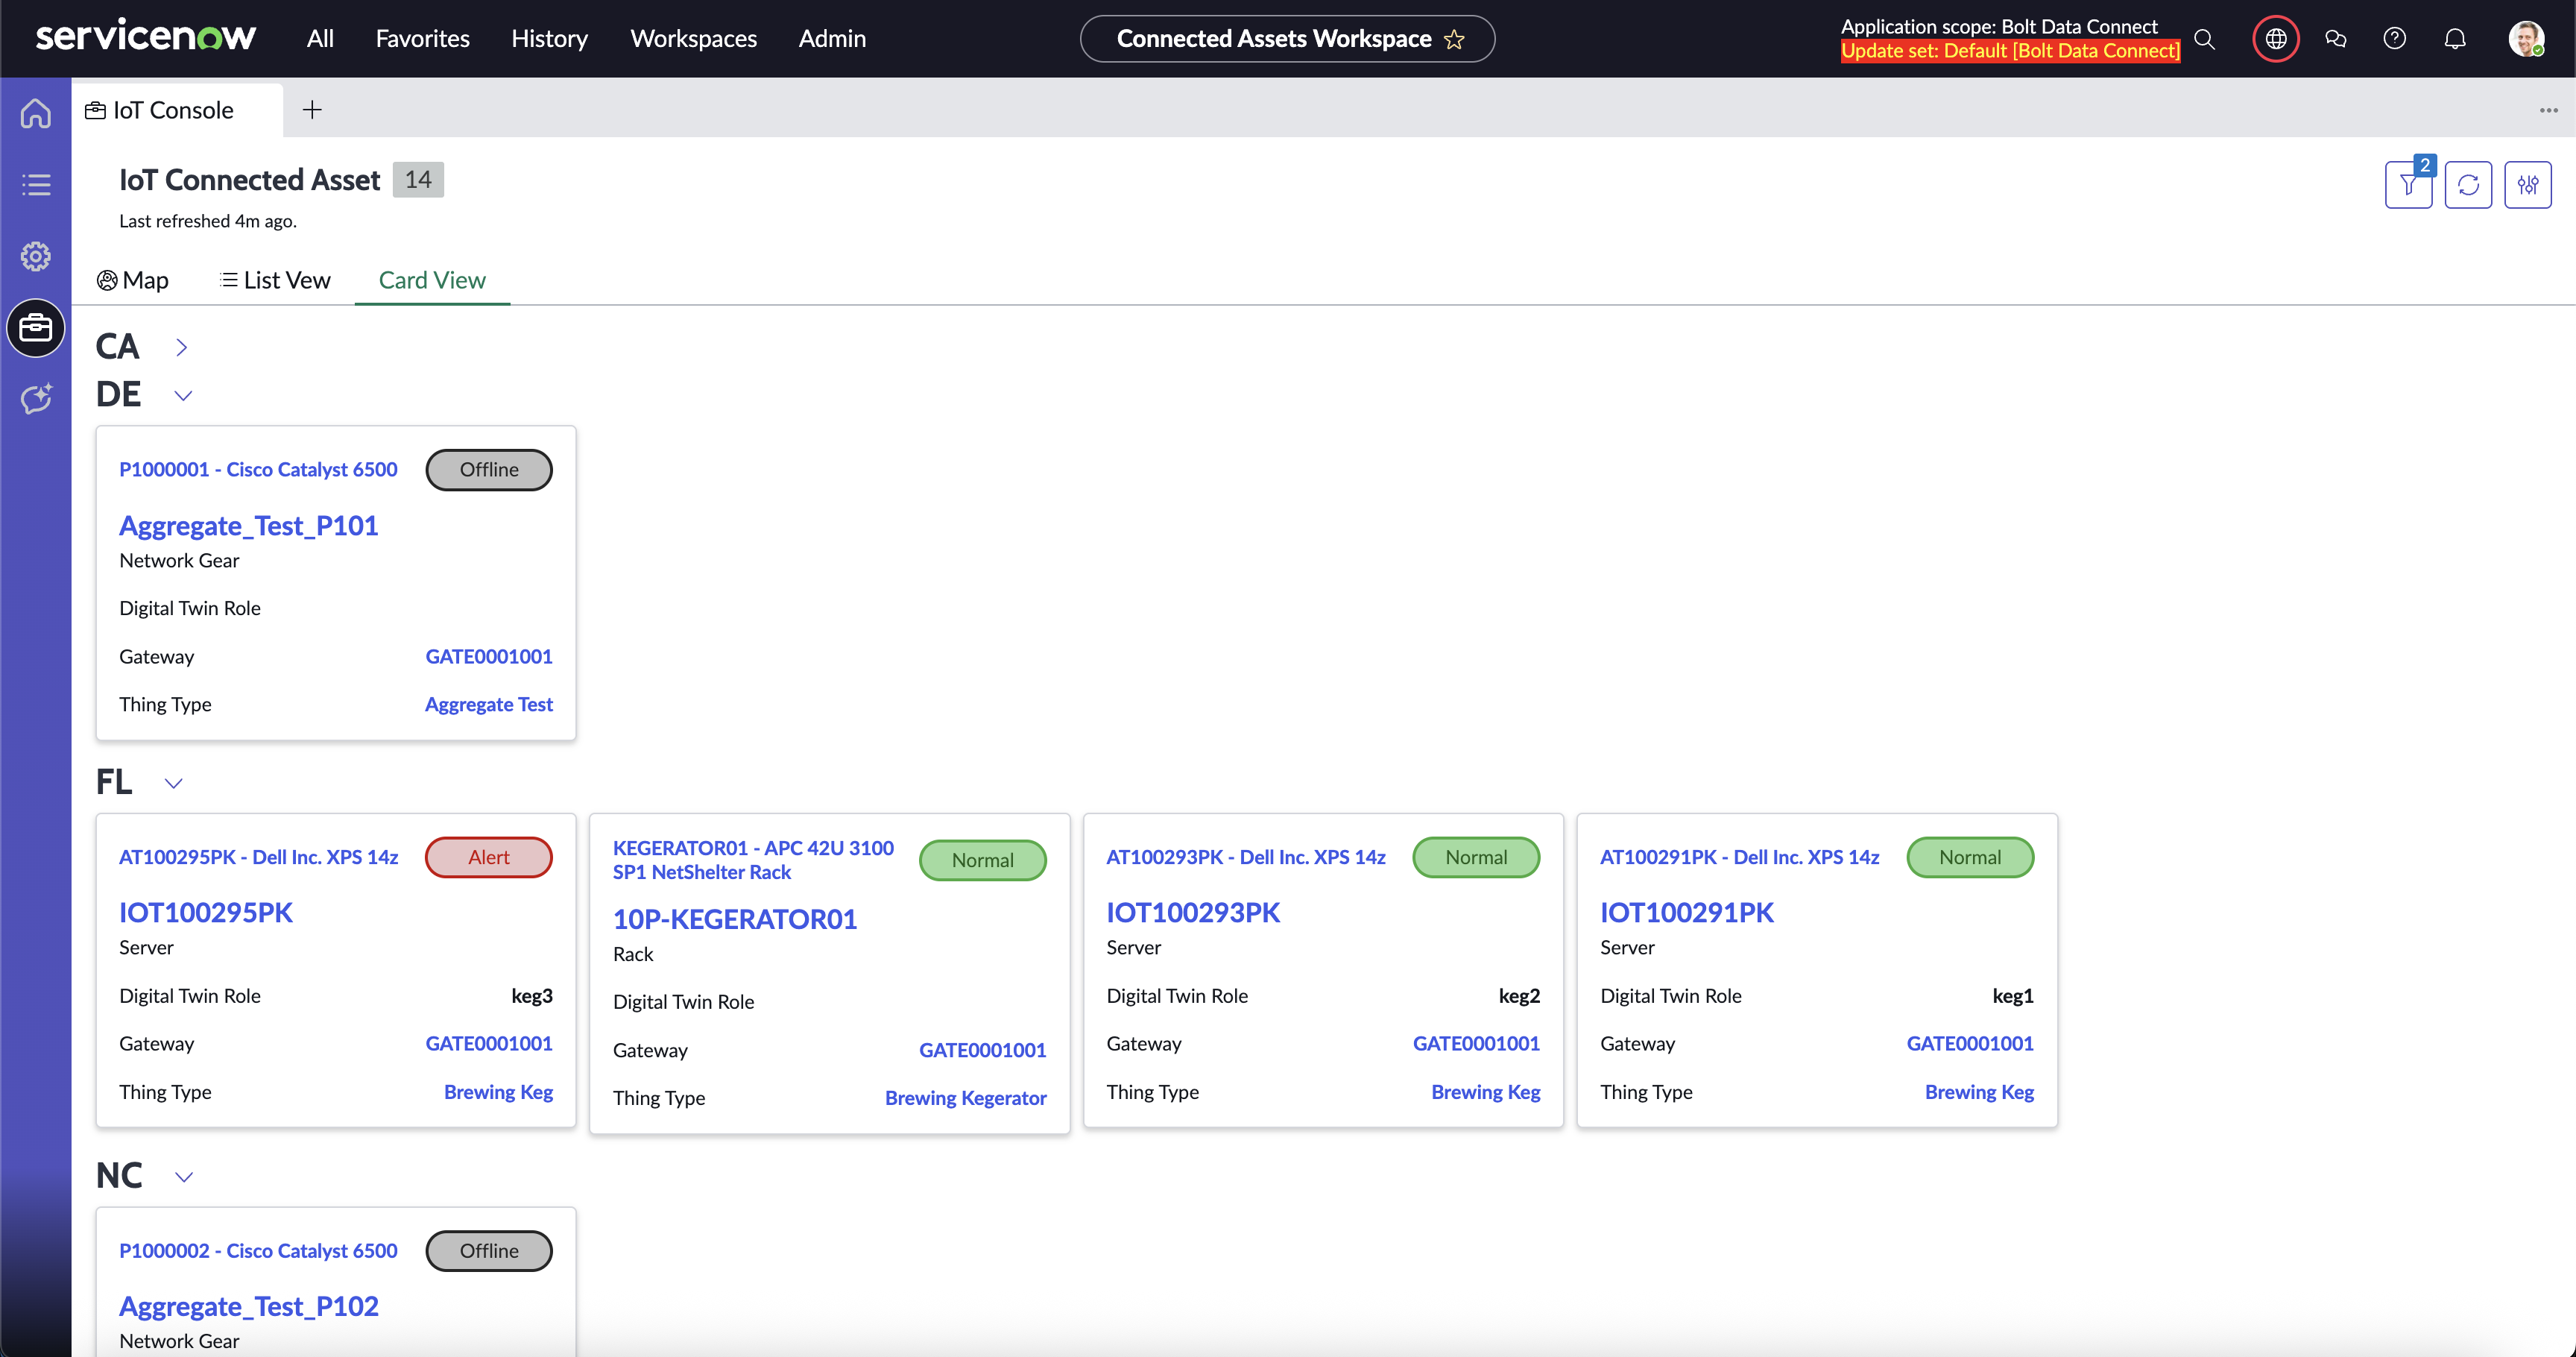
IoT Console Cards
IoT Setup
For your ServiceNow Instance Admins, the Bolt Data Connect App provides an IoT Setup Module to configure how the IoT Cloud integrates with your ServiceNow Instance. Here you can completely control the behavior of the Cloud and Edge Processing, as well as the ServiceNow automation and integrations.
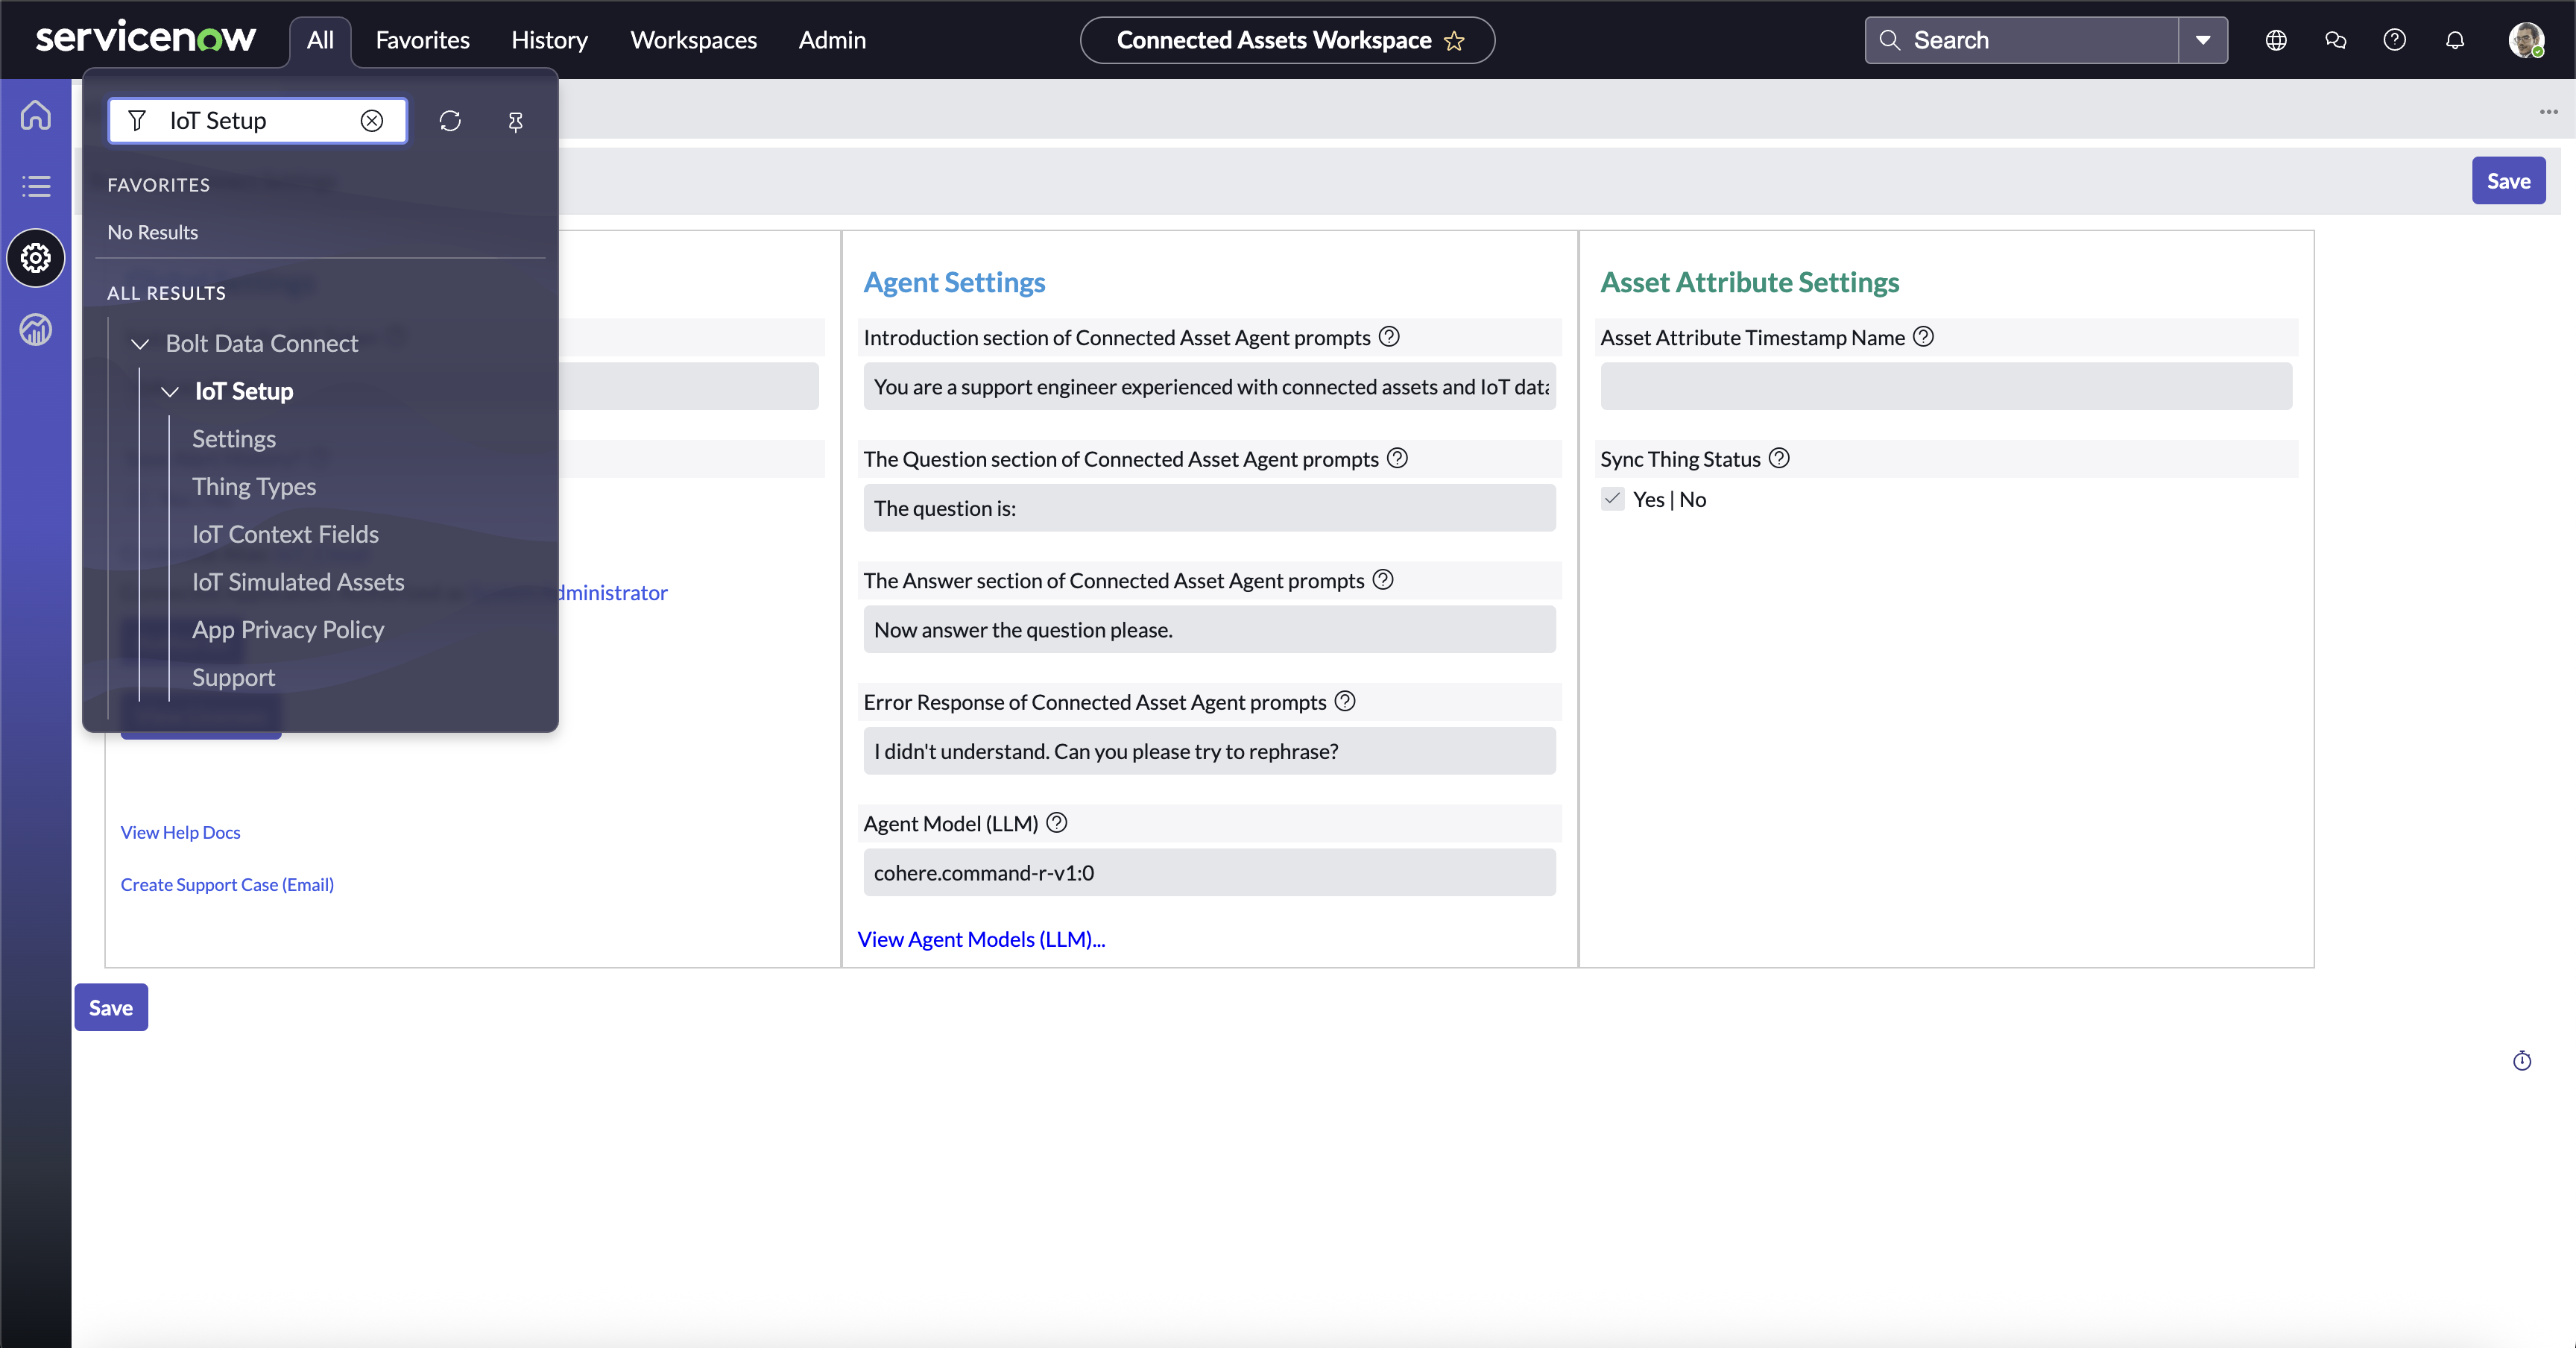
IoT Setup Module
Gateways
Represents an IoT Gateway, the entry-point for IoT messages and a container for Connectors and Rules-Engine processing.
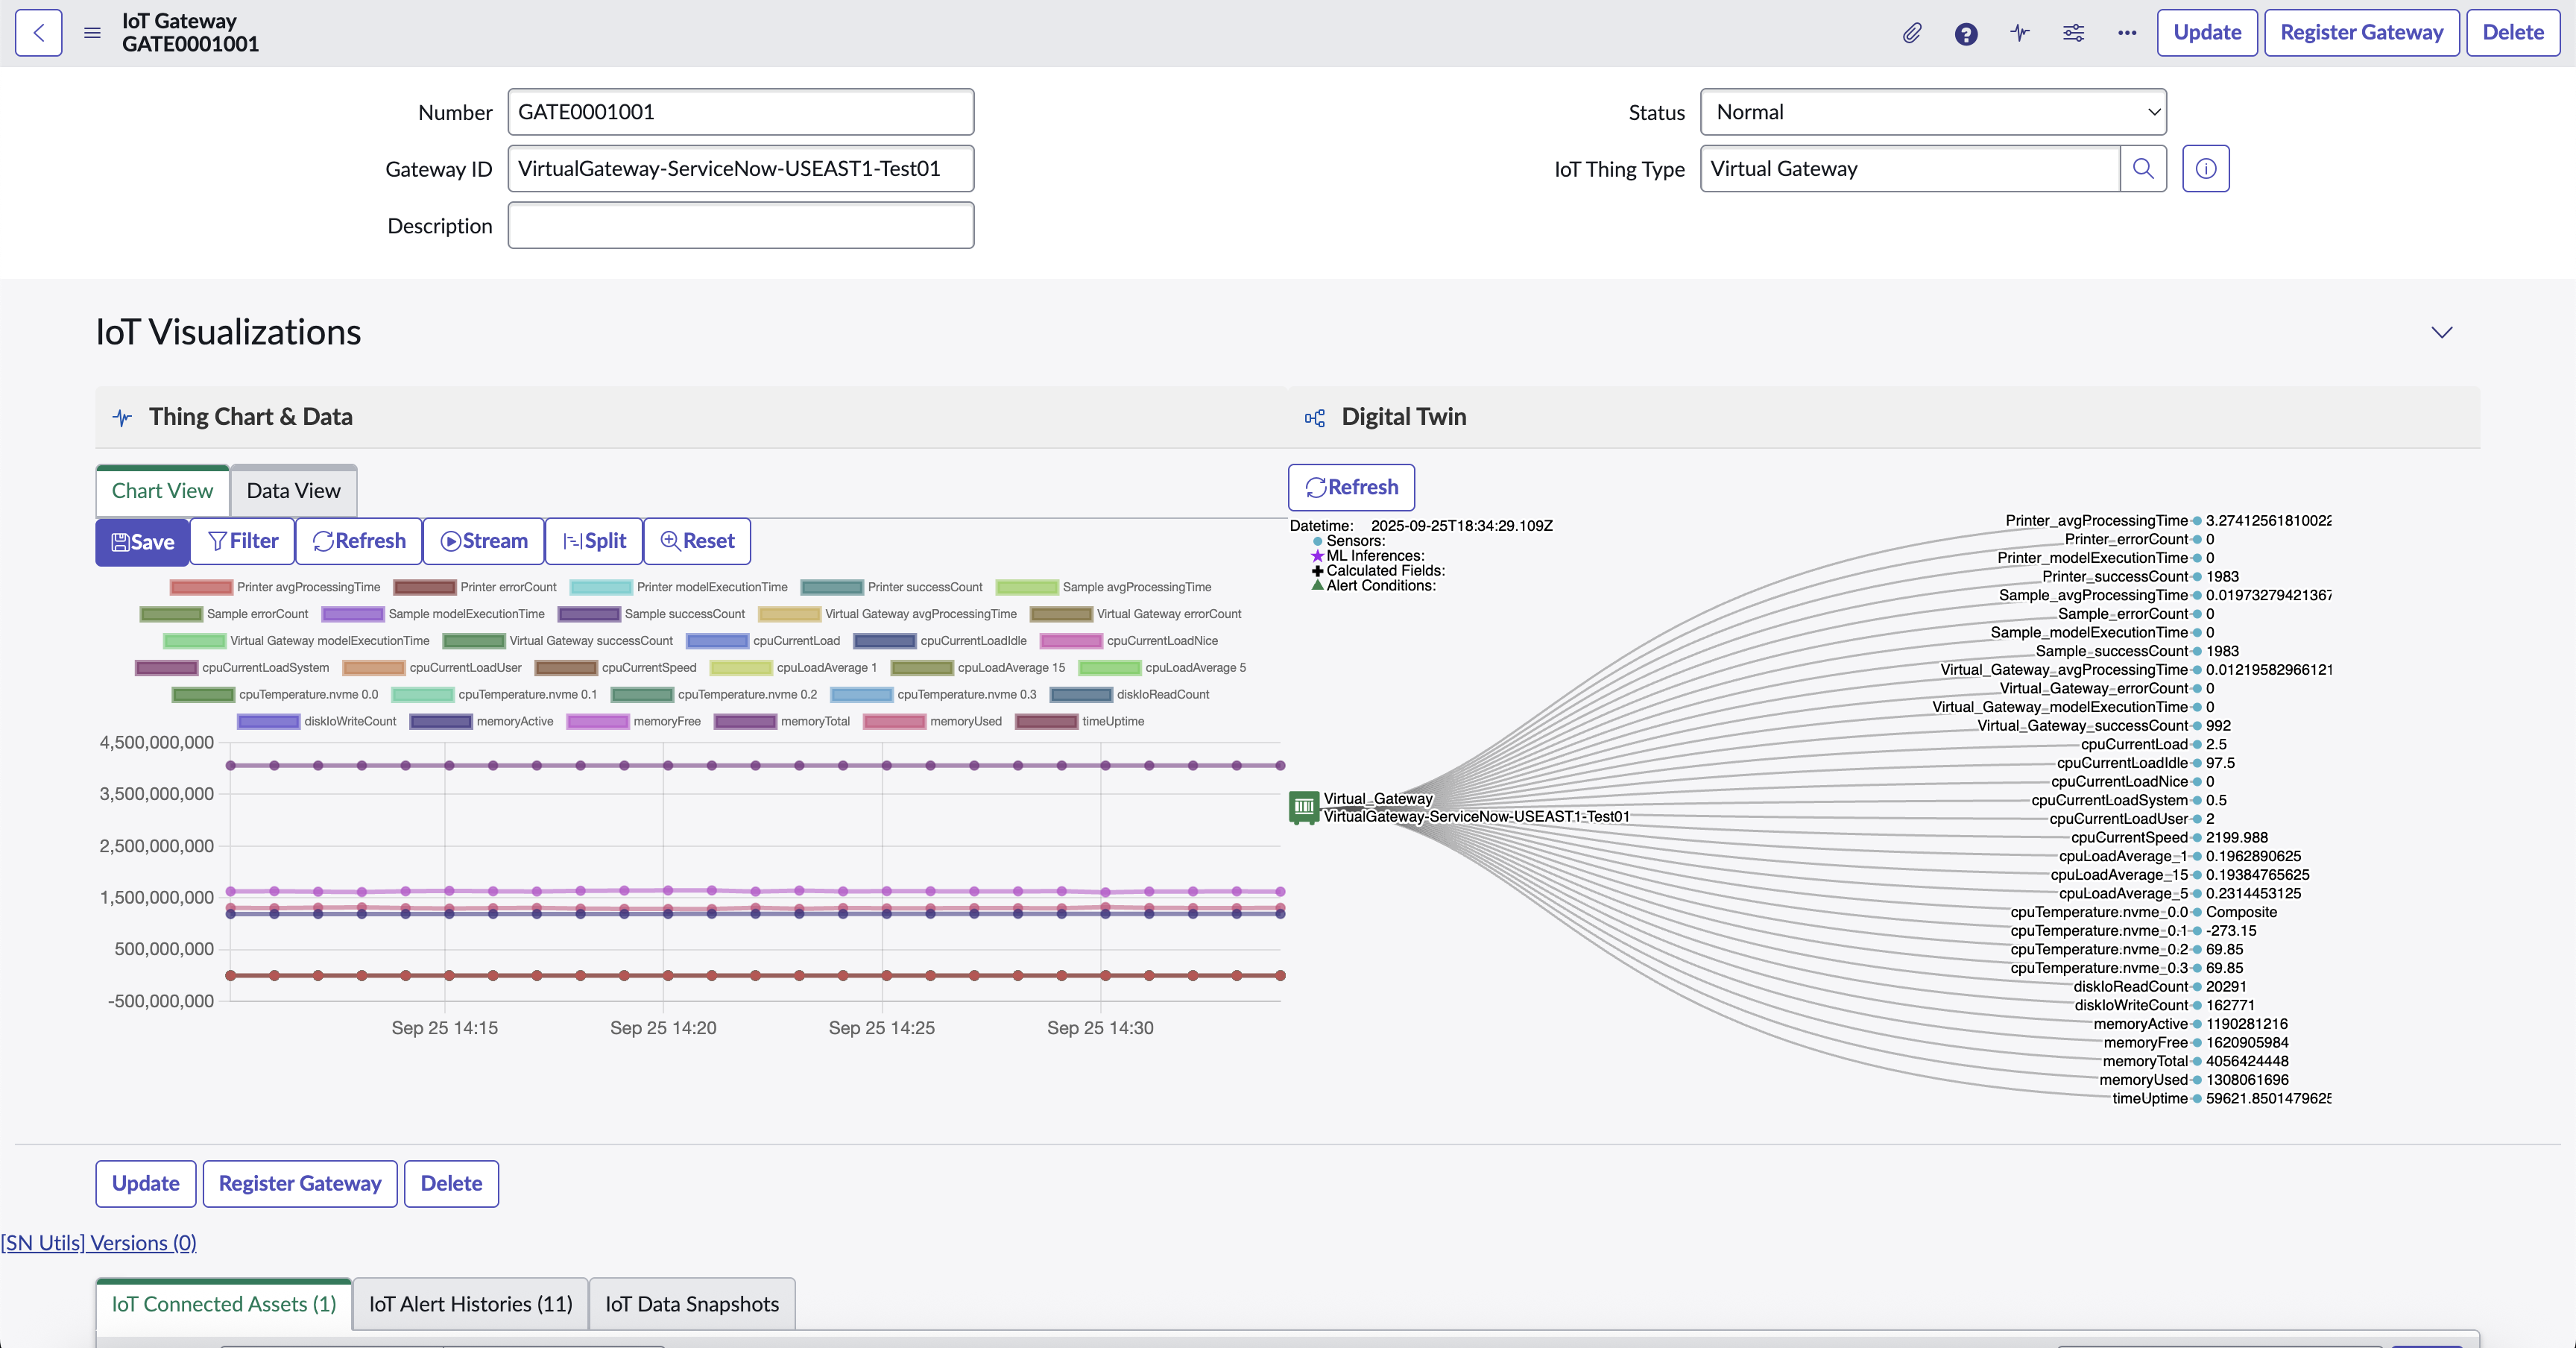
Sample Gateway
Gateway Registration
Gateways can be created in ServiceNow, and then registered with the IoT Cloud using either the Register UI Action or UX Action with the same name. The Gateway Id and Gateway Type will need to be specified.
Gateway Chart and Digital Twin
The IoT Gateway can also display the Thing Chart and Digital Twin components.
Like any other Thing, the IoT Gateway sends Telemetry (time-series) data at a regular interval and can be configured with Calculated Fields and Alert Conditions in it’s corresponding Thing Type. The Sensors are mostly focused on the performance of the device hosting the Gateway & Rules-Engine.
Alarms and Metrics
We’ve added more intelligent monitoring of our Gateways, including:
- Gateway Alarms: Central monitoring of important runtime problems and warnings from Gateways and their connected Things.
- Gateway Metrics: The Telemetry data sent by the Gateways now includes key metrics for each Thing Type being processed.
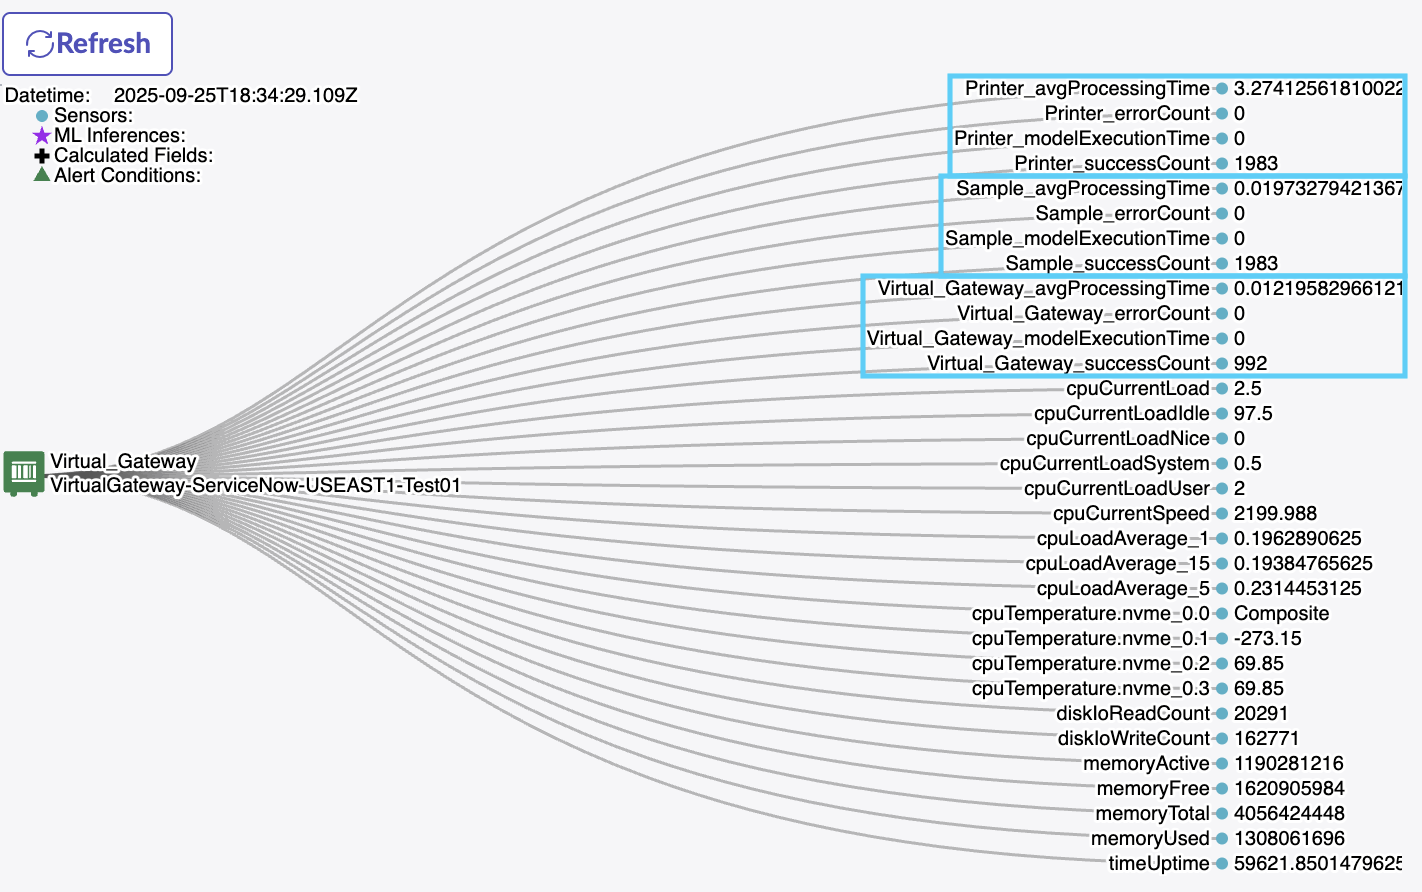
Gateway Metrics
Gateway Command Console
The Command Console tab on an IoT Gateway allows you to send/receive messages (IoT Commands) to the Gateway. The following catalog of out-of-the-box Command Templates is currently available:
- Clear Registration Cache
- Get Connector Status
- Get Device Cache (Thing)
- Get I/O Status
- Get Registration Cache (All)
- Get Registration Cache (Thing)
- Get ThingType Cache
- Restart Virtual Gateway
- Test Thing Data
- Reset ThingType Cache: Forces the Gateway Rules Engine to reload the ThingType
- Reset Registration Cache: Forces the Gateway Rules Engine to reload the Gateway’s & Thing’s Registration and Integrations
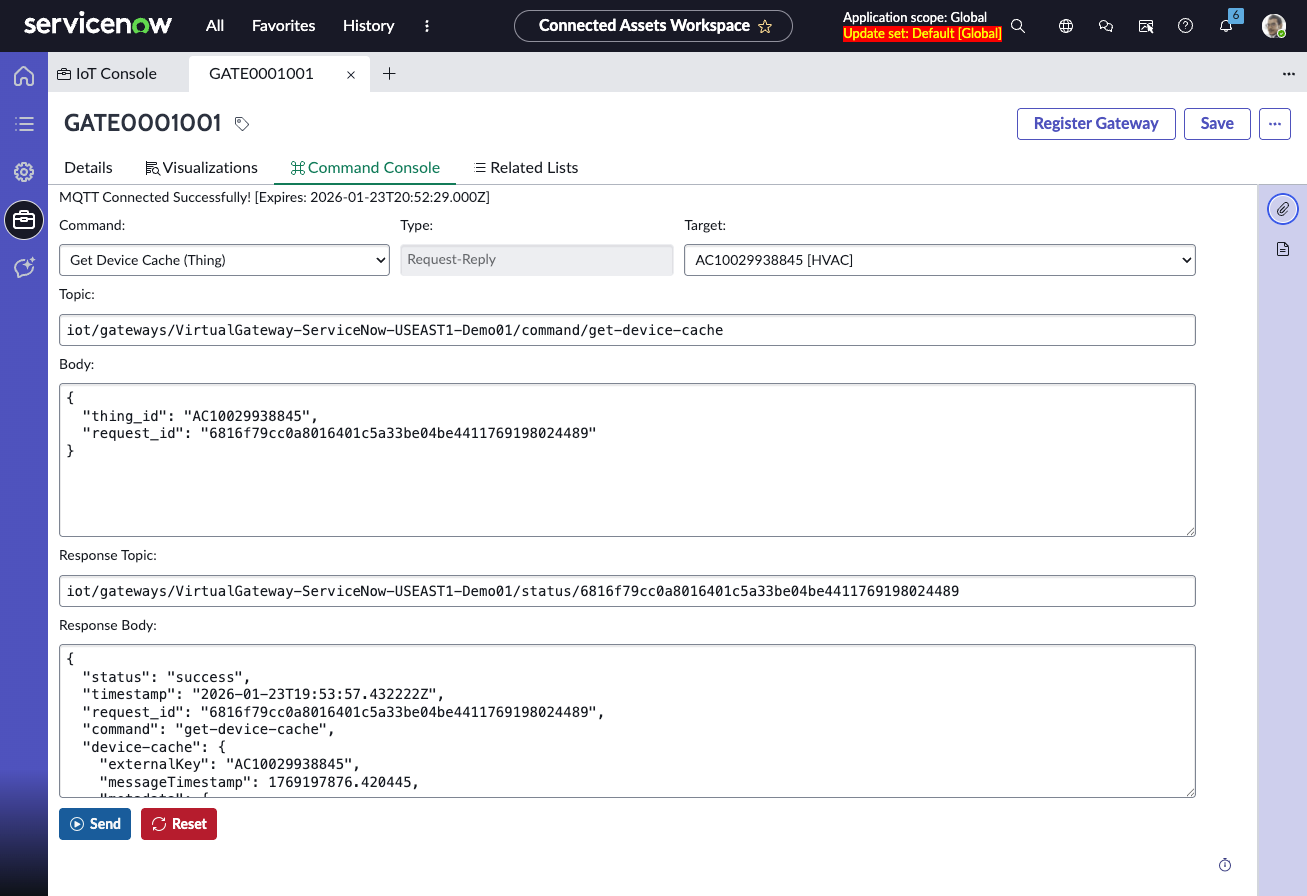
Gateway Command Console
Custom Commands
Select the CUSTOM command to use a freeform editor to send any custom command message to the Gateway.
Restart Gateway
-
Description: It restarts a gateway. It does not apply to an asset.
-
Type: Request-Reply
-
Topic:
// topic pattern: iot/gateway/+/command/+ iot/gateway/{gateway_id}/command/{command_name} // example iot/gateways/VirtualGateway-PLAATO-USEAST1-DEV-01/command/restart -
Body
// example
{
  "request_id": "ppate1690571776080"
}
Get Registeration Cache (All)
-
Description: It retrieves registeration caches of all assets and gateways
-
Type: Request-Reply
-
Topic:
// topic pattern: iot/gateway/+/command/+ iot/gateway/{gateway_id}/command/{command_name} // example iot/gateways/VirtualGateway-PLAATO-USEAST1-DEV-01/command/get-thing-cache -
Body
{
  "request_id": "ppate1690571863558"
}
Get Registeration Cache (Thing)
-
Description: It retrieves registeration cache of a specific thing. A thing could be gateway or asset.
-
Type: Request-Reply
-
Topic:
// topic pattern: iot/gateway/+/command/+ iot/gateway/{gateway_id}/command/{command_name} // example iot/gateways/VirtualGateway-PLAATO-USEAST1-DEV-01/command/get-cache-thingid -
Body
{
  "thing_id": "{thing_id}", // e.g., 10P-KEG01, VirtualGateway-PLAATO-USEAST1-DEV-01
  "request_id": "ppate1690572125580"
}
Clear Registeration Cache
-
Description: It clears registeration cache of a thing. A thing could be gateway or asset.
-
Type: Request-Reply
-
Topic:
// topic pattern: iot/gateway/+/command/+ iot/gateway/{gateway_id}/command/{command_name} // example iot/gateways/VirtualGateway-PLAATO-USEAST1-DEV-01/command/clear-cache -
Body
{
  "thing_id": "{thing_id}", //e.g., VirtualGateway-PLAATO-USEAST1-DEV-01, 10P-KEG01
  "request_id": "ppate1690572498198"
}
Get ThingType Cache
-
Description: It retrieves specification cache of a thing type.
-
Type: Request-Reply
-
Topic:
// topic pattern: iot/gateway/+/command/+ iot/gateway/{gateway_id}/command/{command_name} // example iot/gateways/VirtualGateway-PLAATO-USEAST1-DEV-01/command/get-spec-cache -
Body
{
  "thing_type": "{thing_type}", //e.g., Brewing_Keg, Virtual_Gateway_PLAATO
  "request_id": "ppate1690572761850"
}
Get IO Status
-
Description: It retrieves status of various IOs.
-
Type: Request-Reply
-
Topic:
// topic pattern: iot/gateway/+/command/+ iot/gateway/{gateway_id}/command/{command_name} // example iot/gateways/VirtualGateway-PLAATO-USEAST1-DEV-01/command/get-io-status -
Body
// example
{
  "request_id": "ppate1690573052355"
}
Get Connector Status
- Description: It retrieves status of all connectors attached to a gateway.
- Type: Request-Reply
- Topic:
  // topic pattern:
  iot/gateway/+/command/+
  iot/gateway/{gateway_id}/command/{command_name}

  //  example
  iot/gateways/VirtualGateway-PLAATO-USEAST1-DEV-01/command/get-connector-status
- Body
//example
{
  "request_id": "ppate1690573316704"
}
Get Device Cache
- Description: It retrieves cache of a device data
- Type : Request-Reply
- Topic:
  // topic pattern:
  iot/gateway/+/command/+
  iot/gateway/{gateway_id}/command/{command_name}

  //  example
  iot/gateways/VirtualGateway-PLAATO-USEAST1-DEV-01/command/get-device-cache
- Body
// example
  {
    "thing_id": {thing_id},
    "request_id": "ppate1690580697957"
  }
Test thing data
- Description: It lets your test your data. It inputs sample data of an asset/gateway and outputs processed data from rules-engine.
- Type: Request-Reply
- Topic:
// topic pattern:
iot/gateway/+/status/+
iot/gateway/{asset_id}/status/{request_id}

//  example
iot/gateways/VirtualGateway-PLAATO-USEAST1-DEV-01/command/test-thing-data
- Body
// example
{
  "externalKey": "{asset_id}", // e.g., 10P-KEG01
  "request_id": "ppate1690573756372",
  ... // add sensor data
}
Reset Registration Cache
- Description: It resets cache of an asset or an gateway.
- Type: Broadcast
- Topic:
// topic pattern
iot/cache/registration/{asset_id}/invalidate


// example
iot/cache/registration/10P-KEG01/invalidate
- Body
// example
{
  "externalKey": "{asset_id}", //e.g., 10P-KEG01
  "message": "Manual Registry cache reset."
}
Reset ThingType Cache
- Description: It resets cache of thingtype. A thingType could be a gateway or thing
- Type: Broadcast
- Topic:
// topic pattern
iot/cache/specification/{thing_type}/invalidate


// example
iot/cache/specification/Brewing_Keg/invalidate
- Body
// example
{
  "thingType": "{thing_type}", //e.g., Brewing_Keg
  "message": "Manual Registry cache reset."
}
MQTT Template
- Type
- The type of message (Broadcast, Request-Reply). NOTE: In the initial release only
Broadcastis supported. - Topic
- The MQTT Topic to publish the command to
- Body
- The JSON payload of the command
NOTE
This is especially useful if you are using a custom connector. This will allow you to publish a message to the Gateway, which will in-turn publish it to the connector itself. Use the following topic format for Connector commands:iot/gateways/{GATEWAY_ID}/connector/xxx
IoT Console
The IoT Console is the centralized dashboard for viewing all Connected Assets within an Instance. Connected Assets will be displayed on the Map for all Assets matching the current filter, if they have the Location fields filled in.
The IoT Console is available in the Connected Assets Workspace through the IoT Console button in the navigation bar.
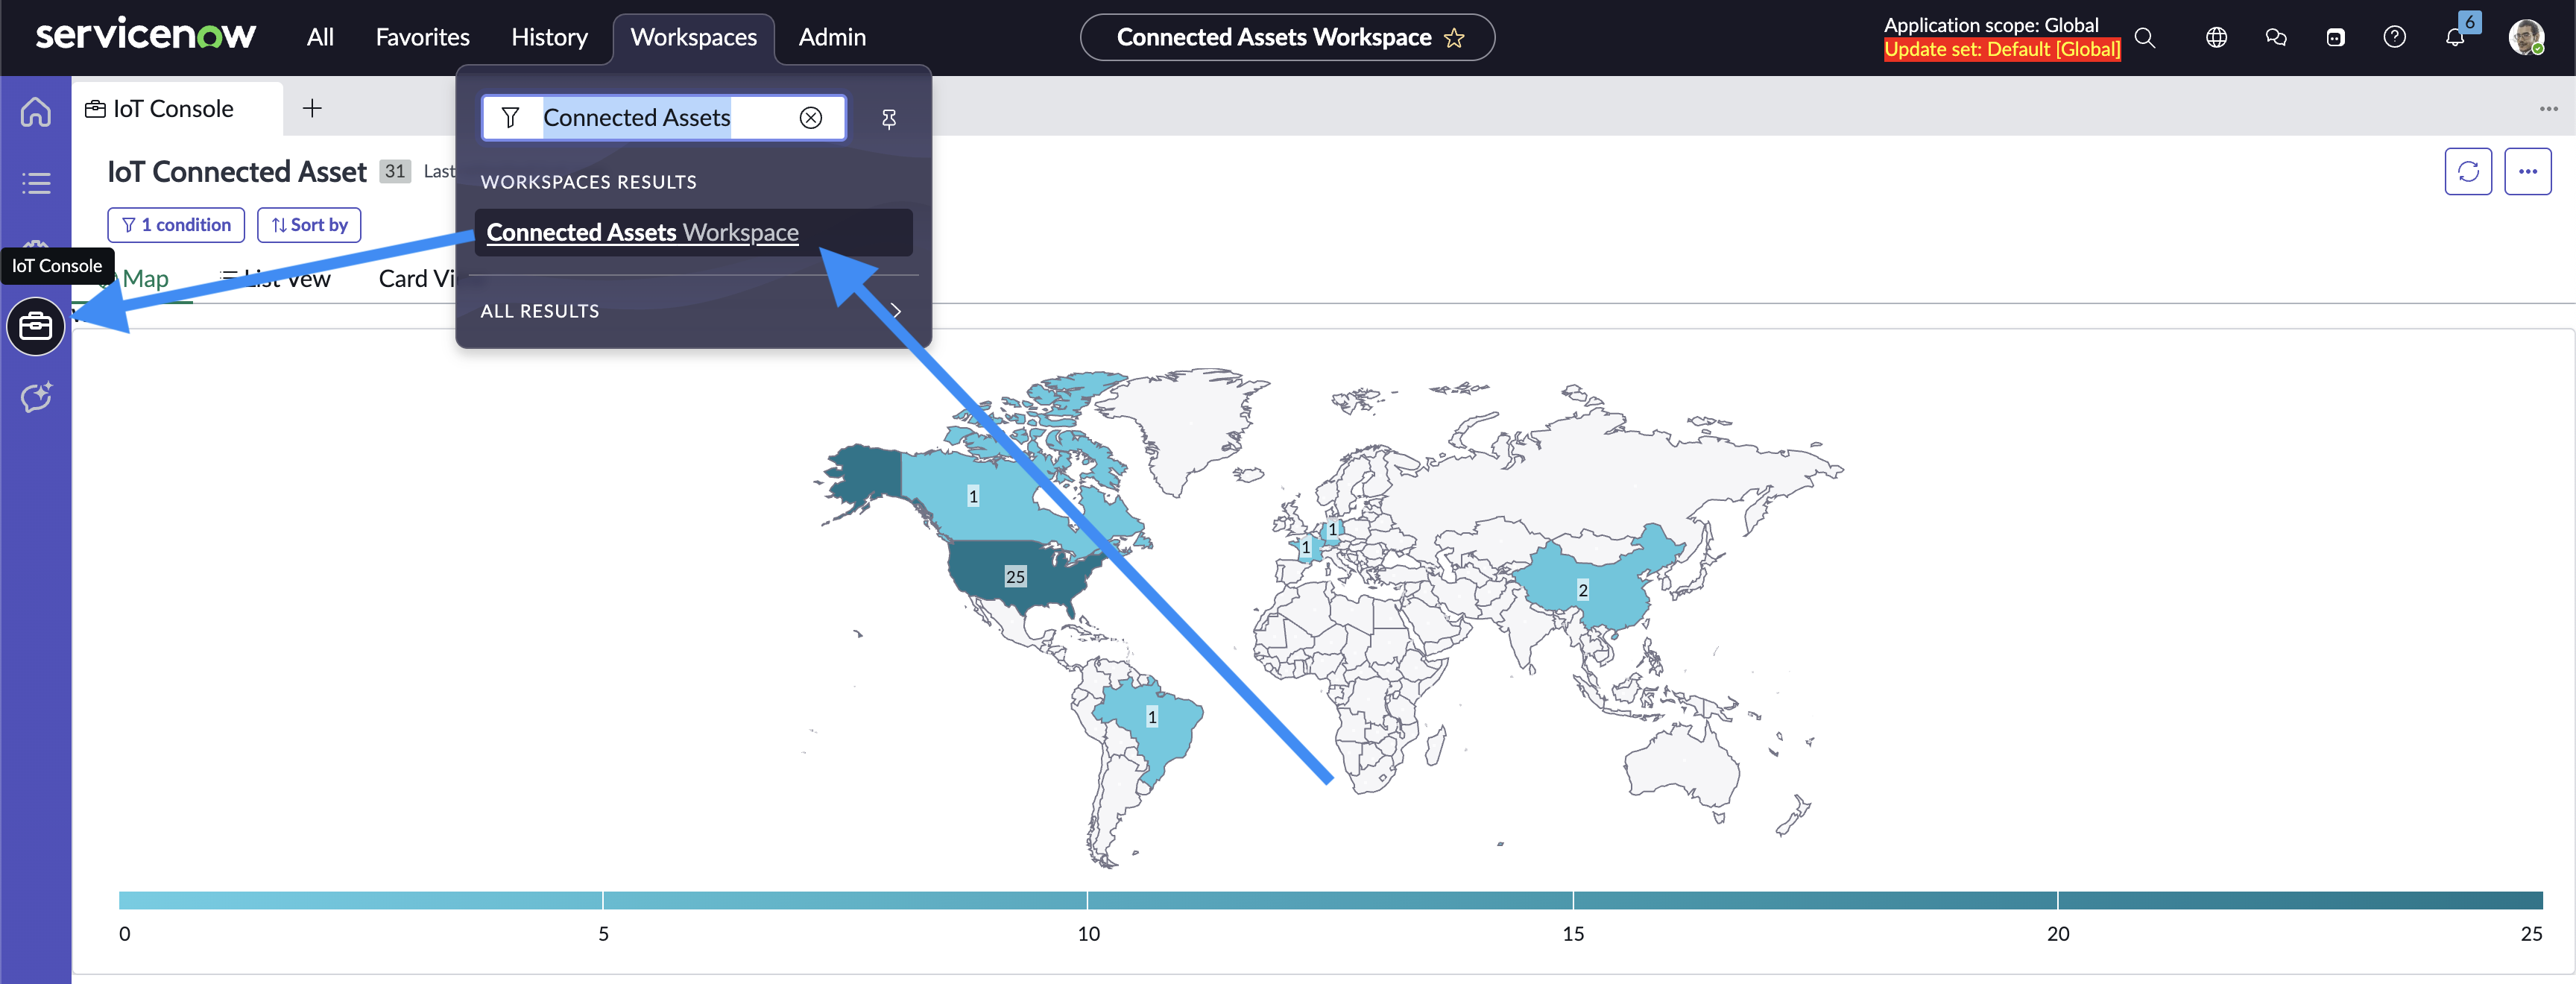
Opening the IoT Console
The three tabs in the IoT Console are the Map, List View, and Card View. Filtering is shared between all three tabs.
Map
The Map displays every Connected Asset which matches the filters and whos Asset’s Location field is filled in. The Map groups assets by location dynamically. You can click into any of the regions, and if they have a subregion map that is suported within ServiceNow, it will filter by the region and group by the subregions. This filter and group by is shared by all three tabs within the IoT Console. Every filter change is shown in the breadcrumbs in the top left of the map. These breadcrumbs can be selected to revert the filter and map level back to what it was when the breadcumb was made.
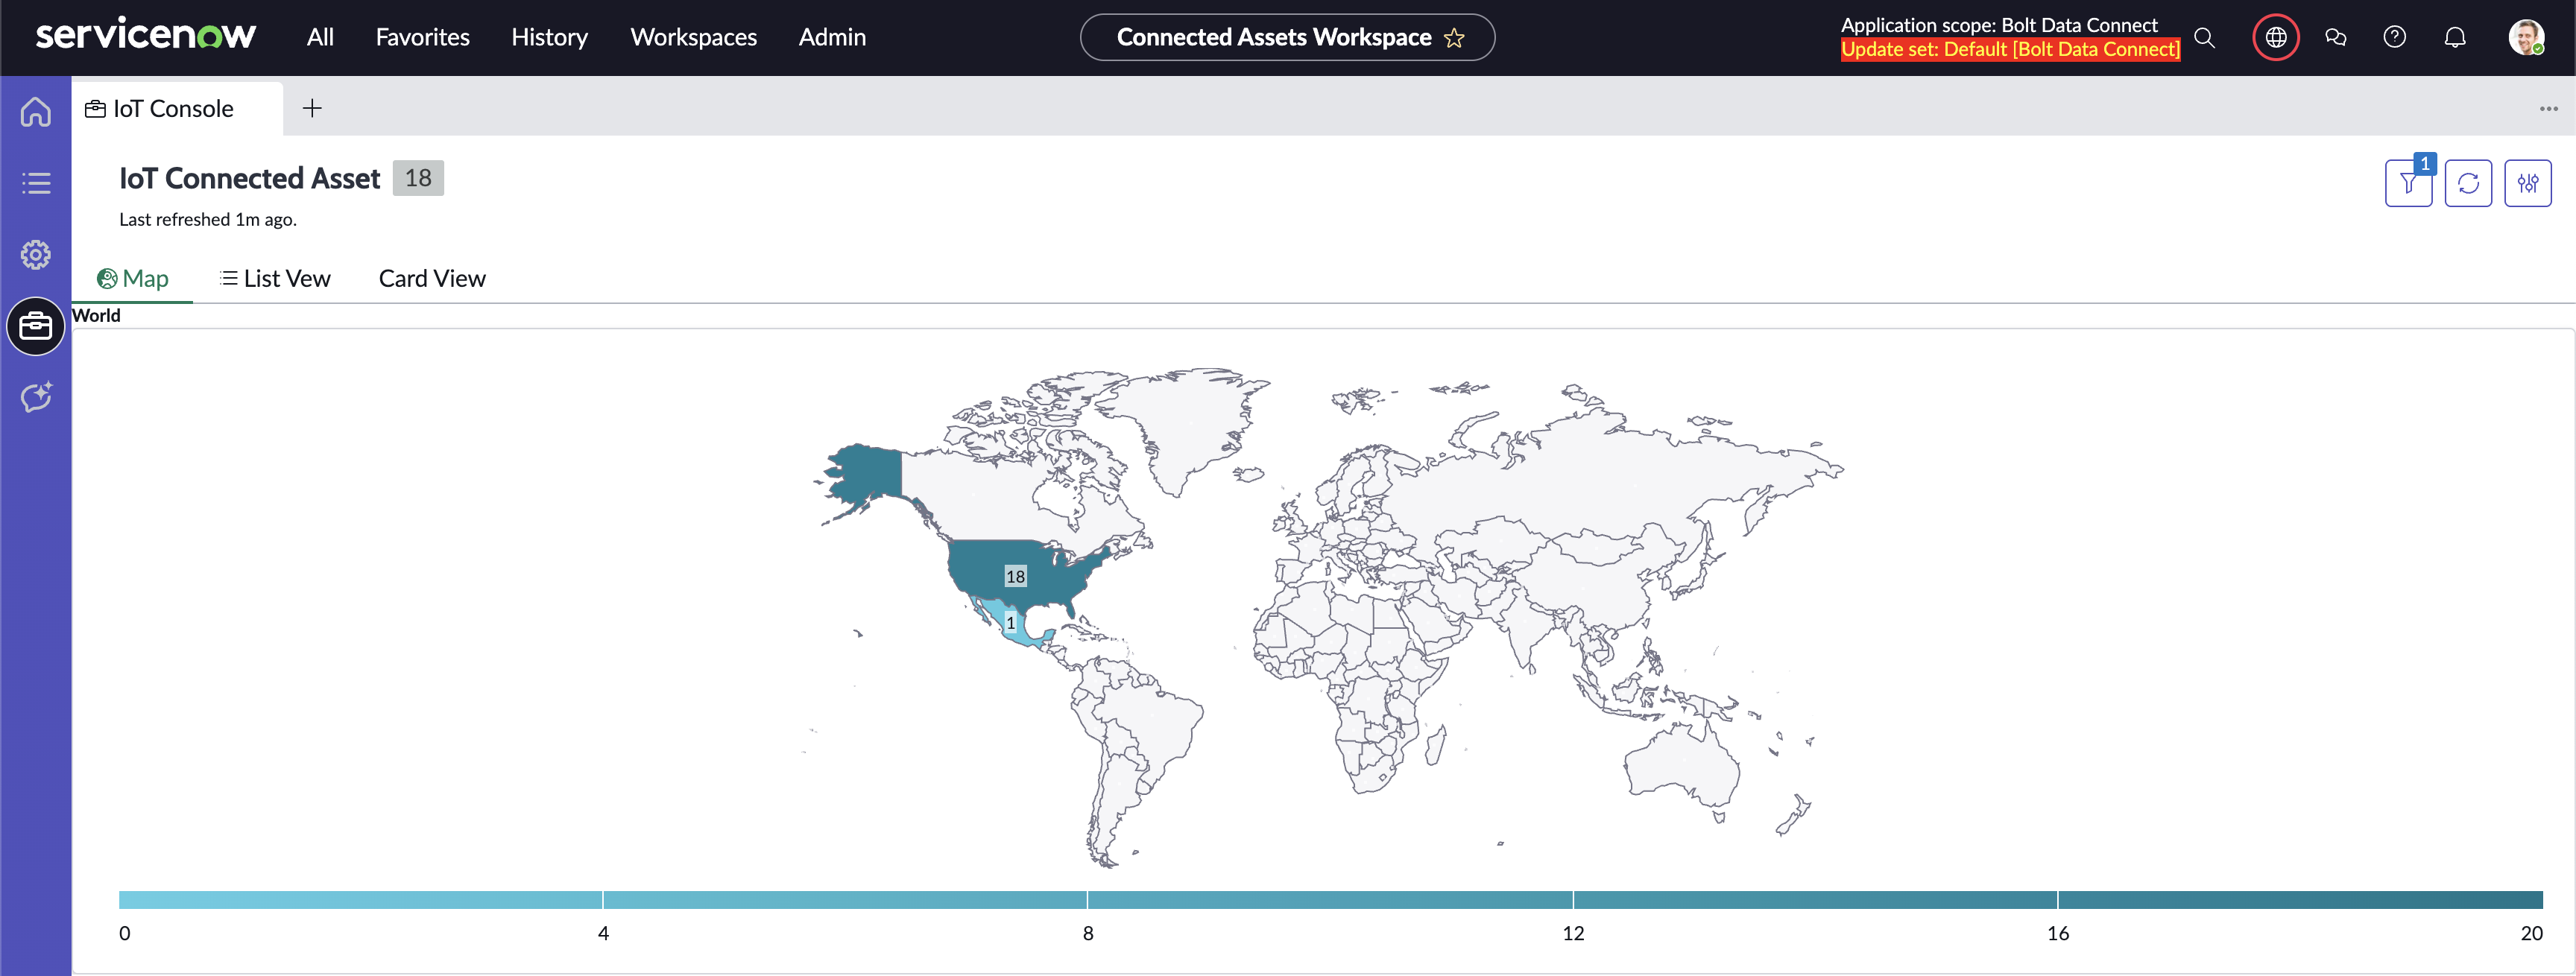
World Region Map
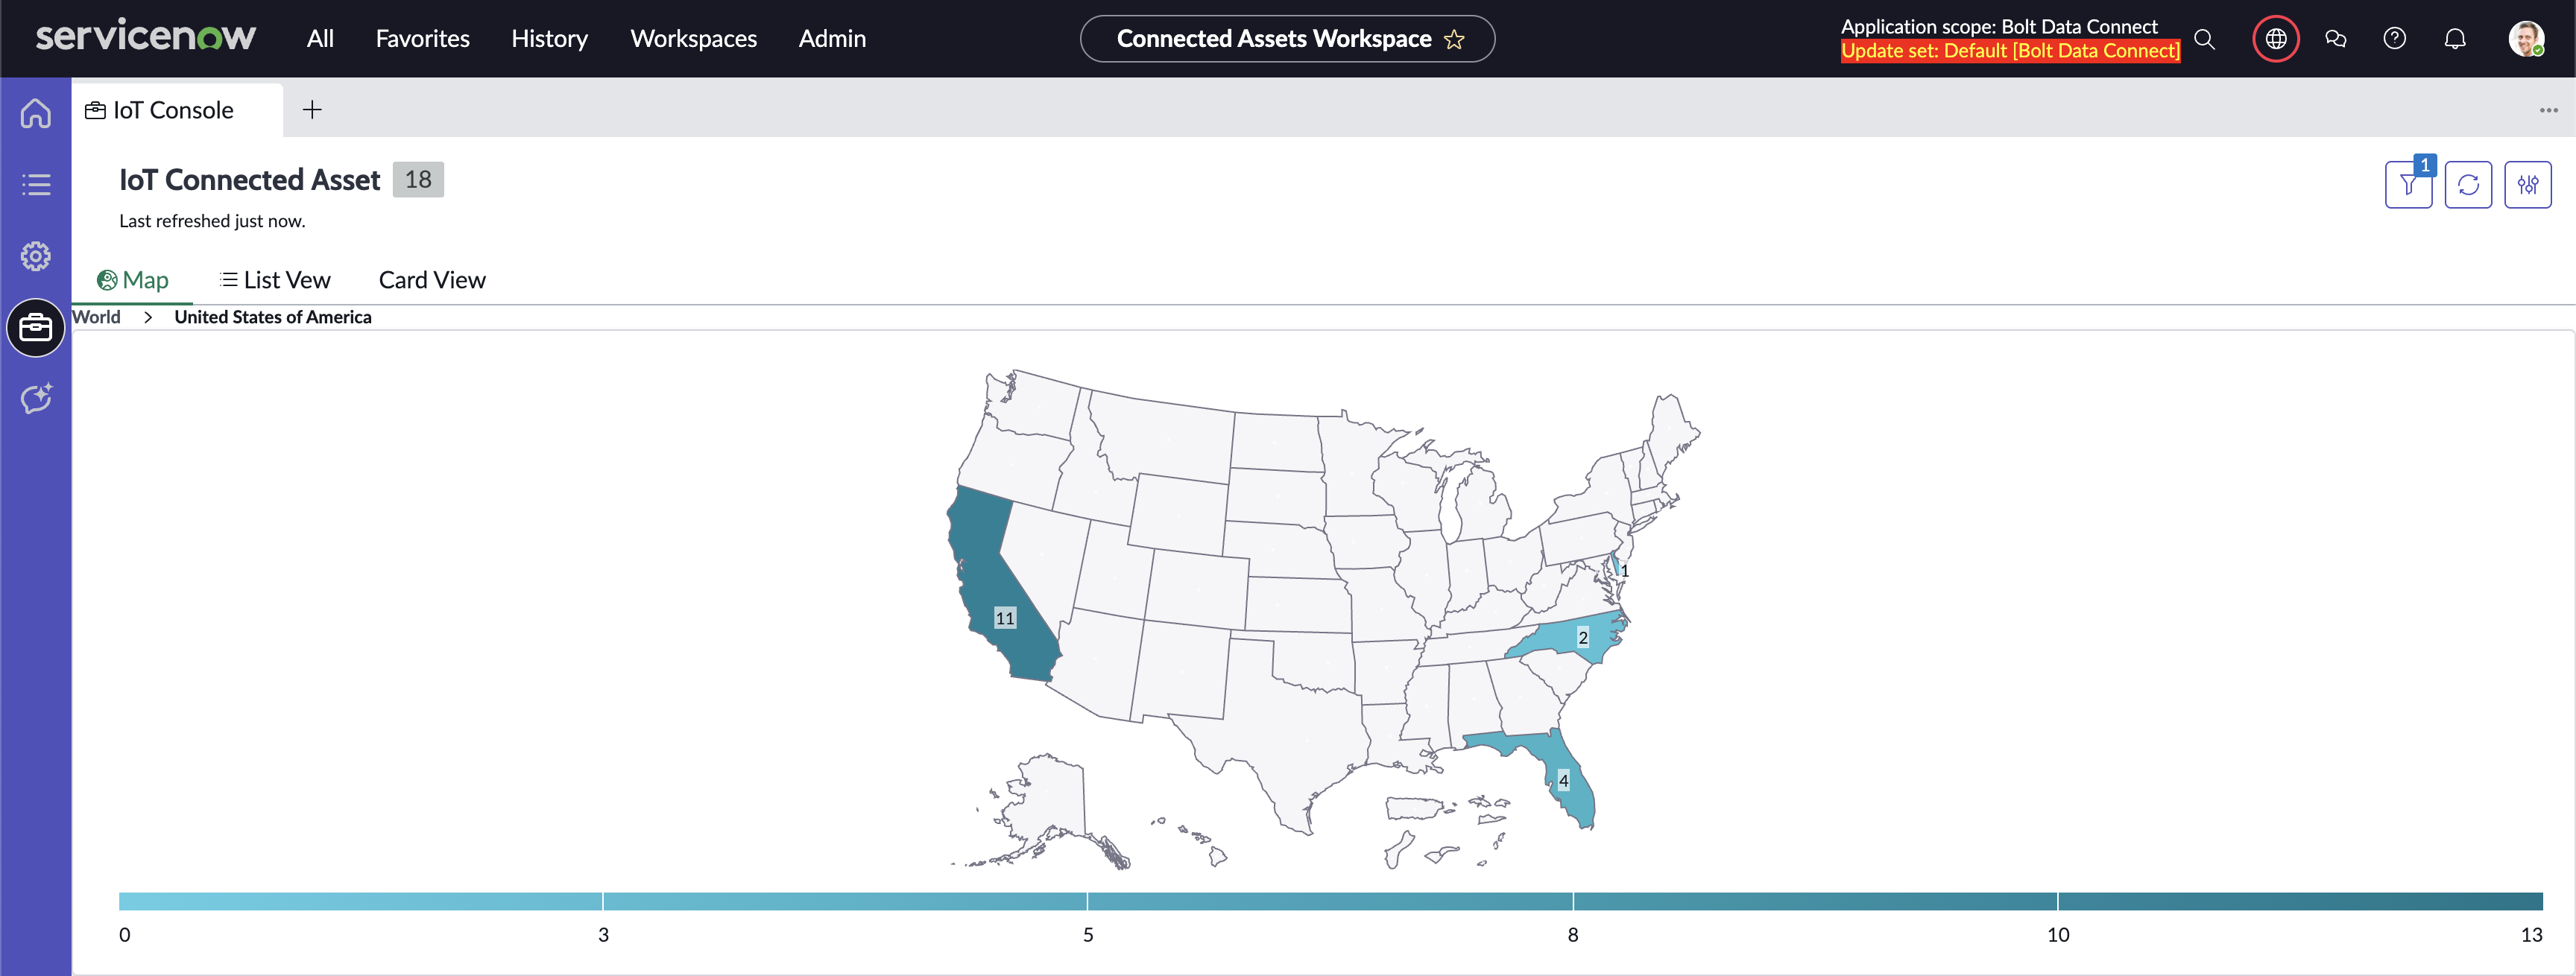
USA Region Map
Filtered USA Region Map
List View
The List View displays the Connected Assets which match the filters and have an Asset with the Location field filled in. The Connected Assets are grouped by the current region level to match the Map tab.
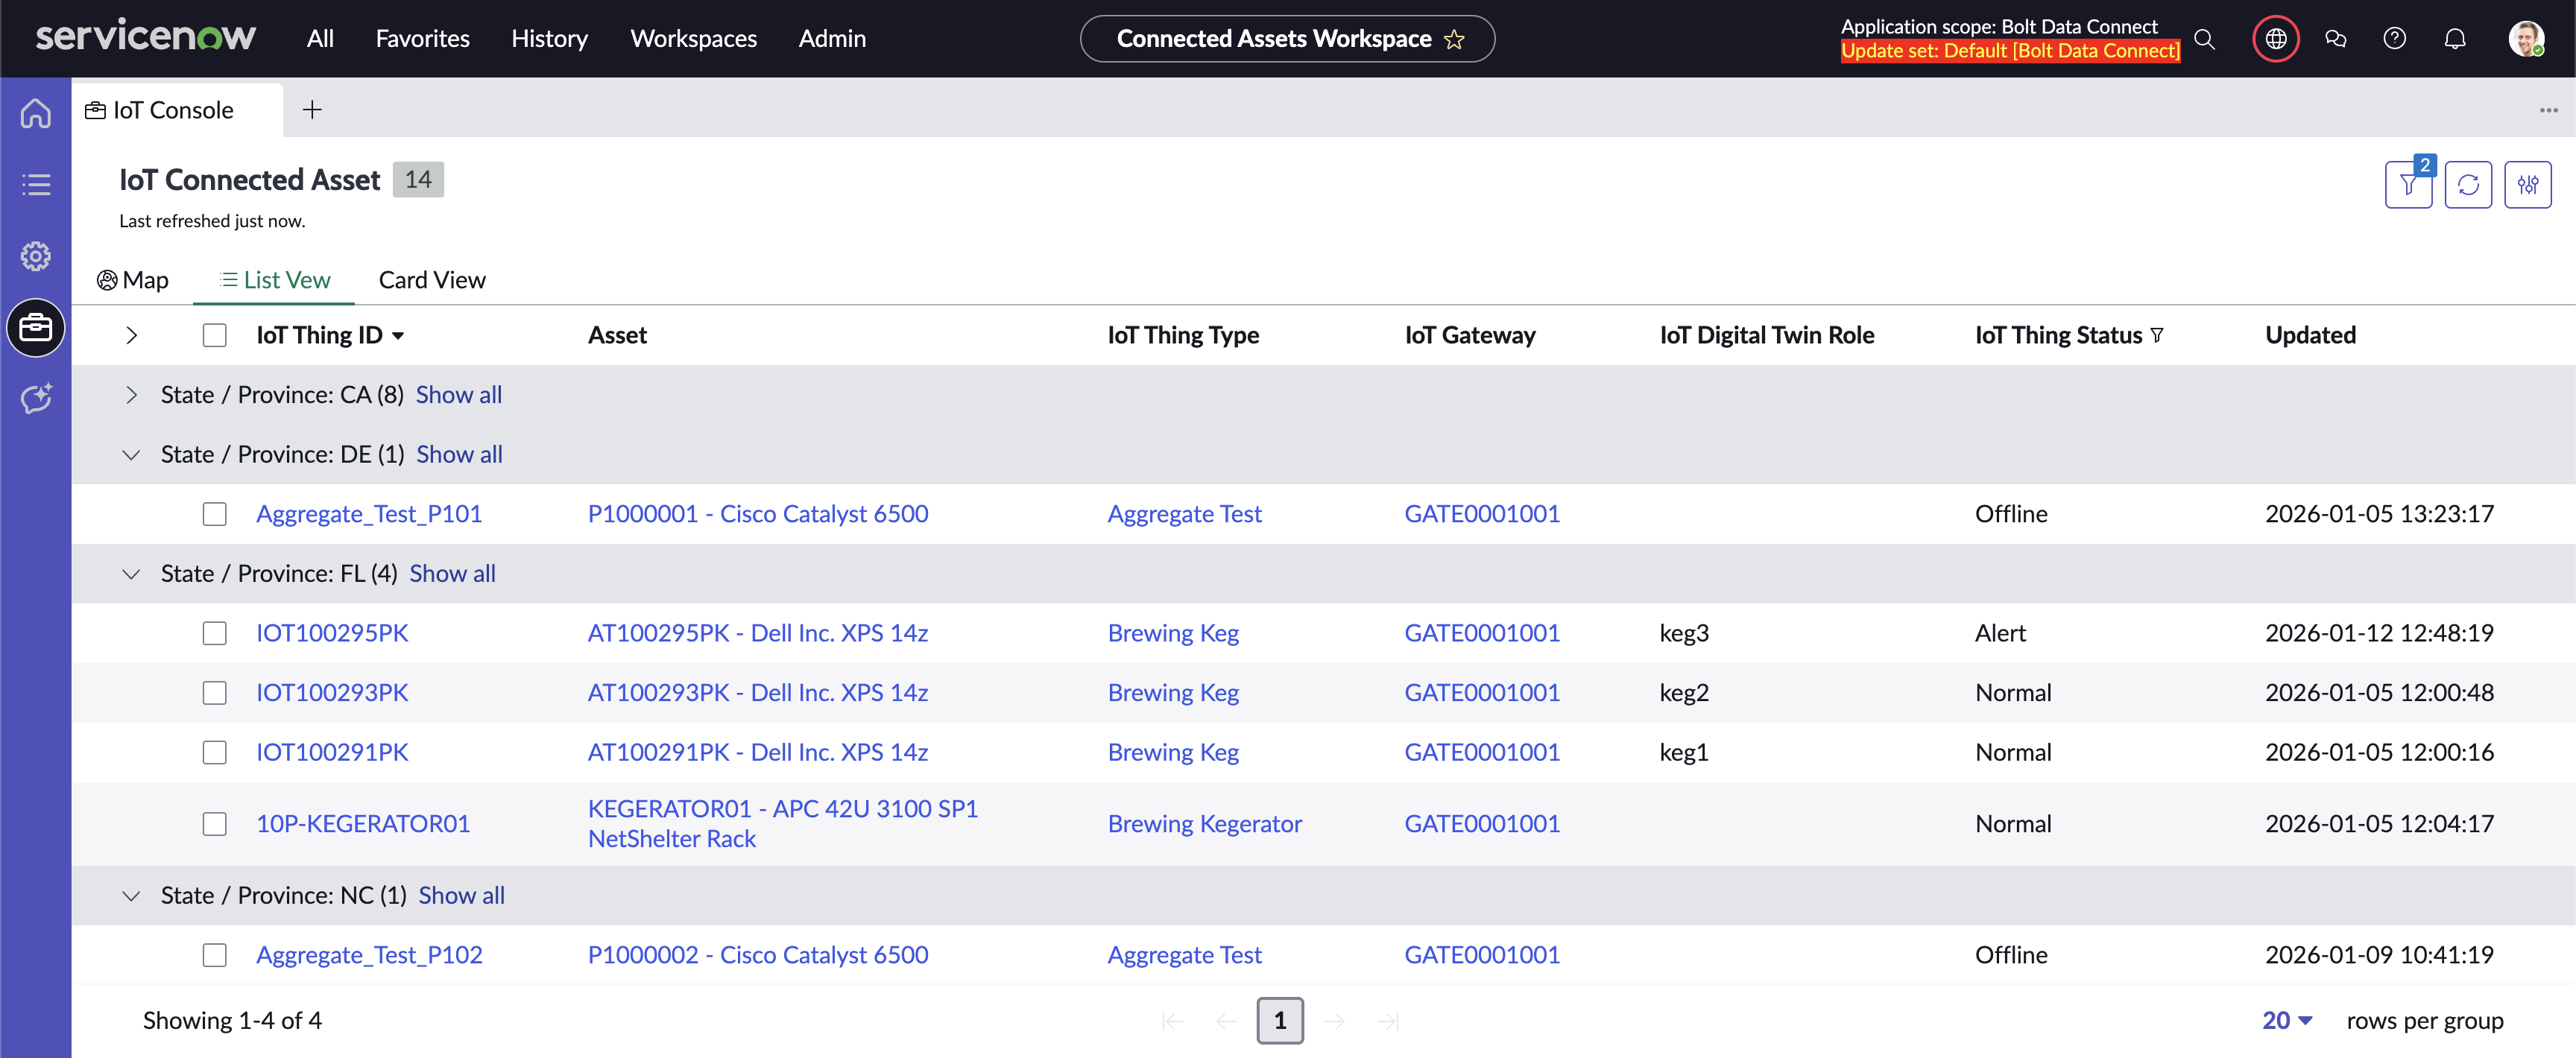
List View
Card View
The Card View displays the Connected Assets which match the filters and have an Asset with the Location field filled in with clickable Cards. Each link on the Cards can be clicked to open the record within the workspace. The Connected Assets are grouped by the current region level to match the Map tab.
Card View
Classic Map View Module
The Connected Asset Map Module displays all of the Connected Assets in an Instance whose Asset’s Location Field is filled in. The map is set within the standard ServiceNow Google Maps system property. Each pin contains all of the Connected Assets in a given loction. When clicked, a list of these Connected Assets pops up. A Connected Asset within this list can be selected to navigate to the Classic Connected Asset record page to view the Connected Asset.
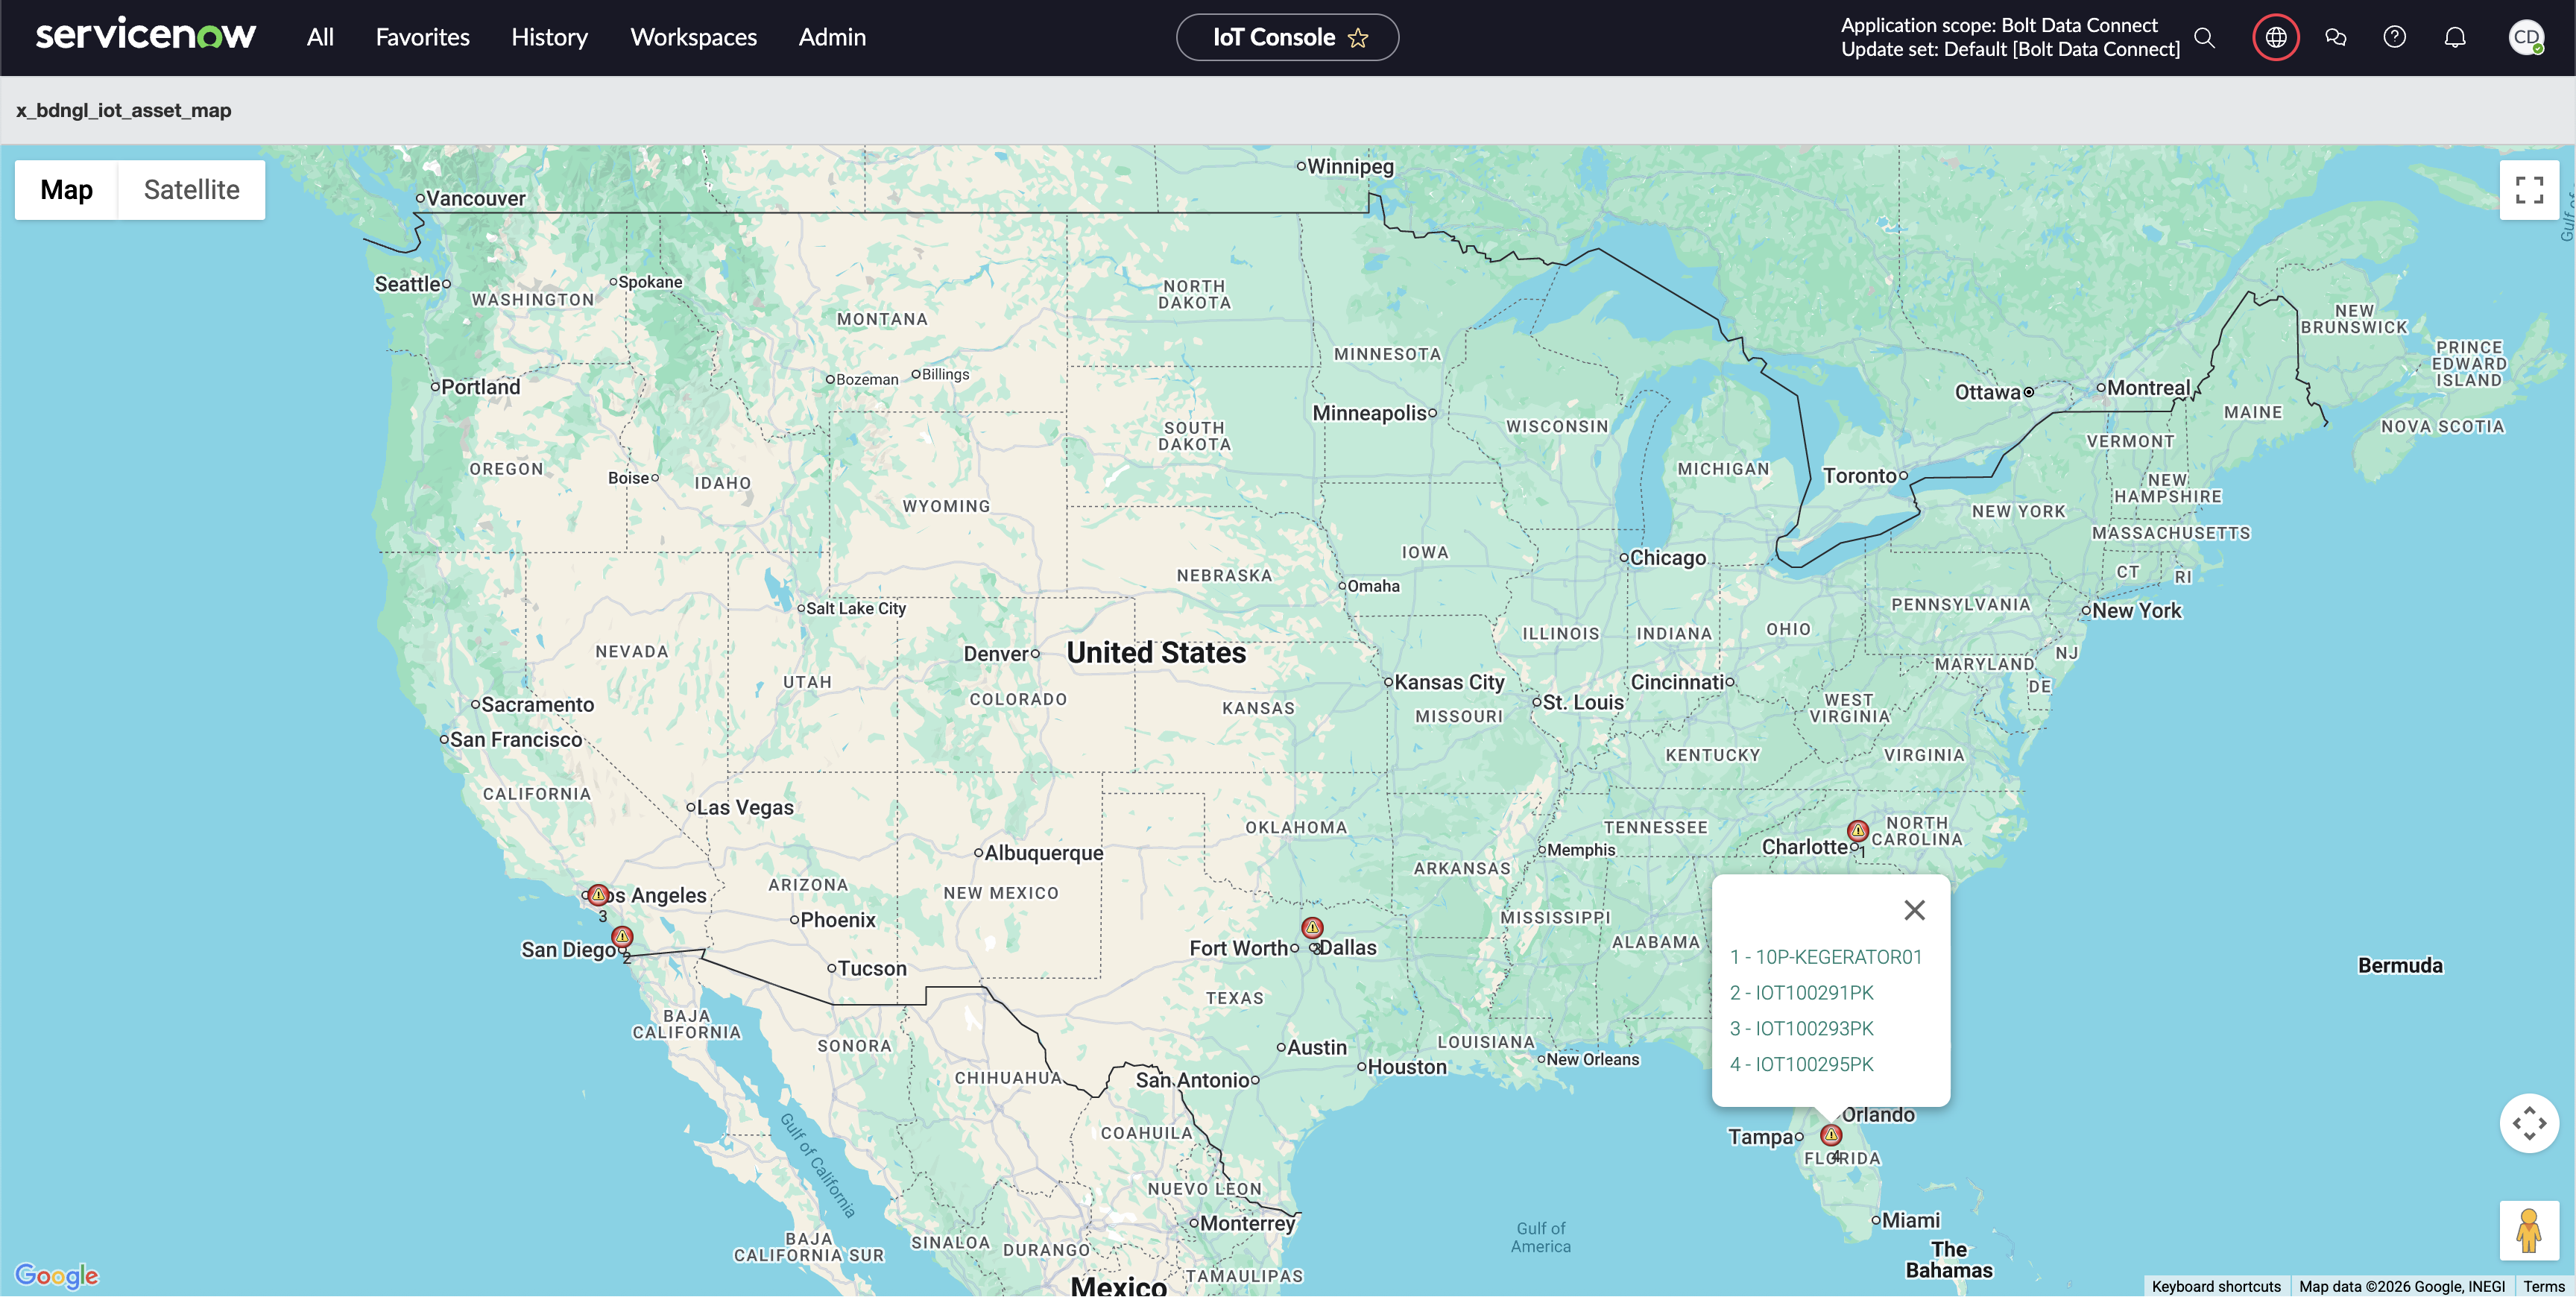
Connected Asset Map
Things
All of the below components are implemented as both ServiceNow UI Actions and ServiceNow UX Actions. The UI Actions are included in the Thing Type (x_bdngl_iot_thing_type) table, and can be shown / hidden from users using standard ServiceNow Roles, Views, UI Action Visibility Related List, and UI Policies. The UX Actions are included in the Connected Assets Workspace via the Thing Type Action Config record in the UX Form Actions Layout table, and can be shown / hidden from users using View Rules and the Thing Type Action Config record.
Thing Registration (Connected Asset Module)
The ‘Register’ UI Action allows you to Register a new Connected Asset using the fields visible in the form:
- IoT Thing ID
- The unique Id assigned to this thing / device.
- IoT Gateway
- The Gateway this Thing will be connected to.
- IoT Thing Type
- The
ThingType(from the IoT Setup Module) that this thing will use.
Sync Context (Connected Asset Module UI Action)
The Connected Asset Module allows you to manually push the Context Data for this specific IoT Connected Asset to the IoT Cloud.
This could be useful if the Context Values have changed for this IoT Connected Asset, and you don’t want to wait for the next scheduled Context Sync job to run.
After clicking the button, wait up to 60 seconds or until you see a blue message at the top of your screen to verify the updated Context Sync status.
Sync Attributes (Connected Asset Module UI Action)
The Connected Asset Module allows you to manually pull the latest Sensor Data for this specific IoT Connected Asset from the IoT Cloud.
This could be useful if Sensor Data has changed for this IoT Connected Asset and you don’t want to wait for the next scheduled Sensor Sync job to run.
After clicking the button, wait about 30-60 seconds and refresh the page to verify the updated Asset Attribute records.
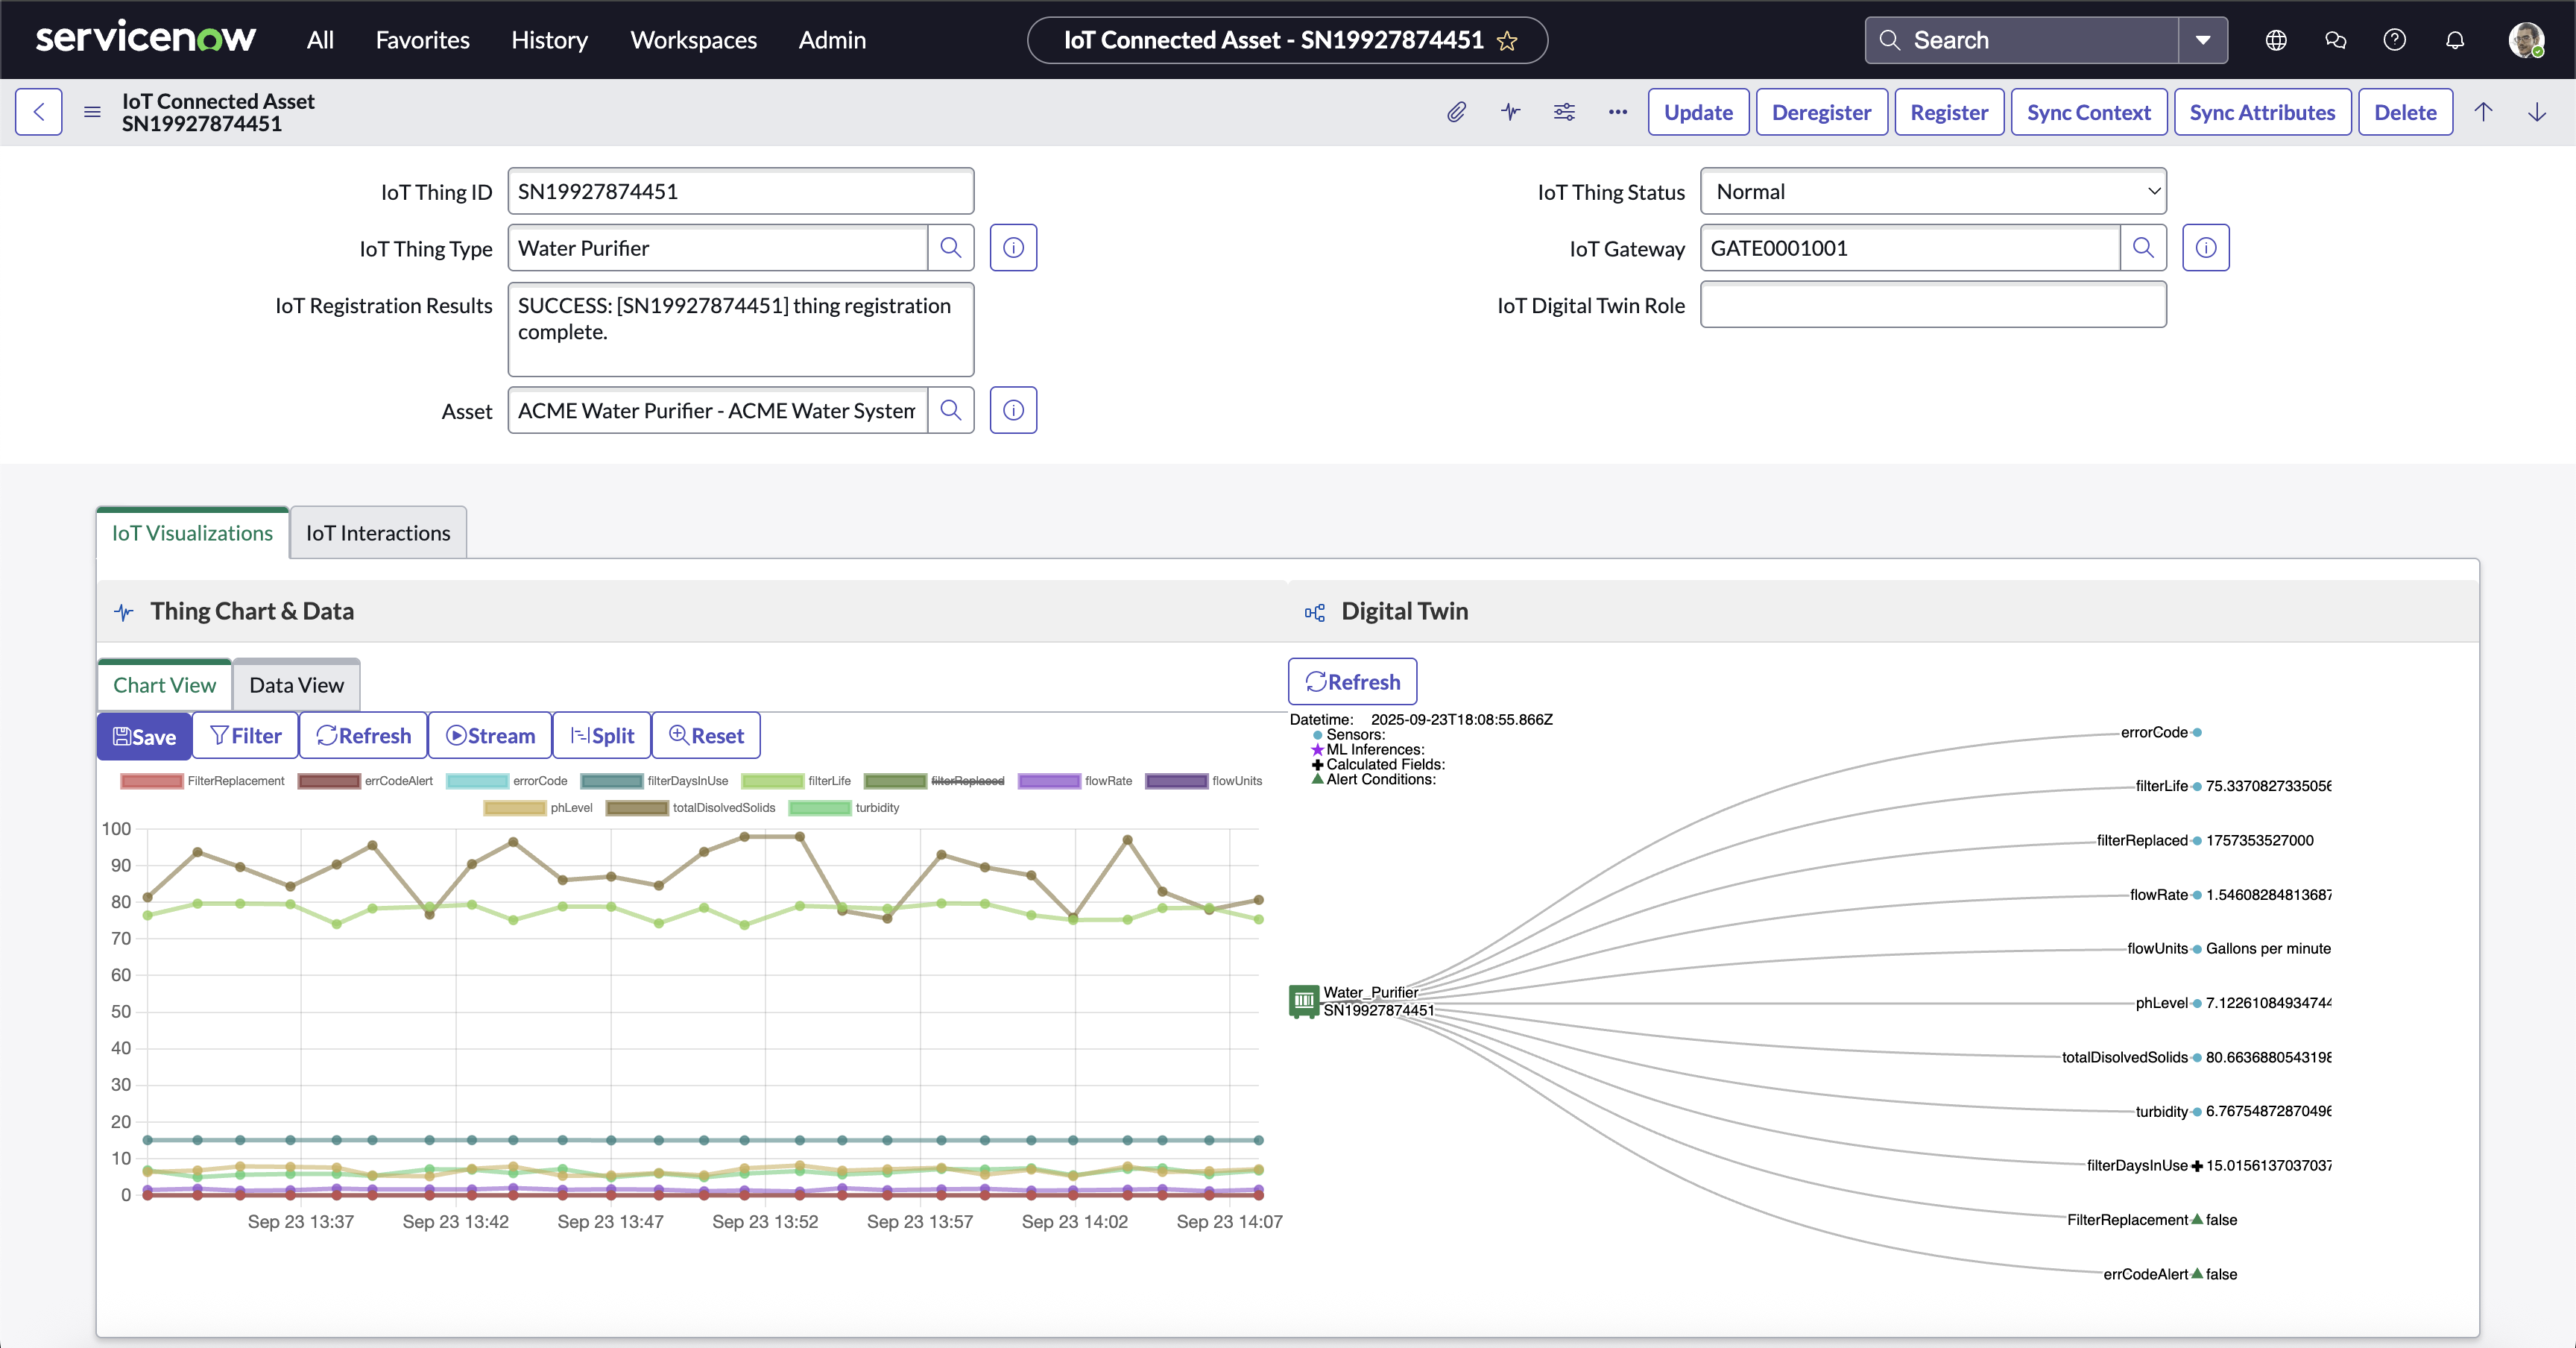
Thing Record Page
Manual Sensor Entry (Connected Asset Module UI Action)
The Connected Asset Page allows you to manually submit Sensor Values for this specific Thing to the IoT Cloud.
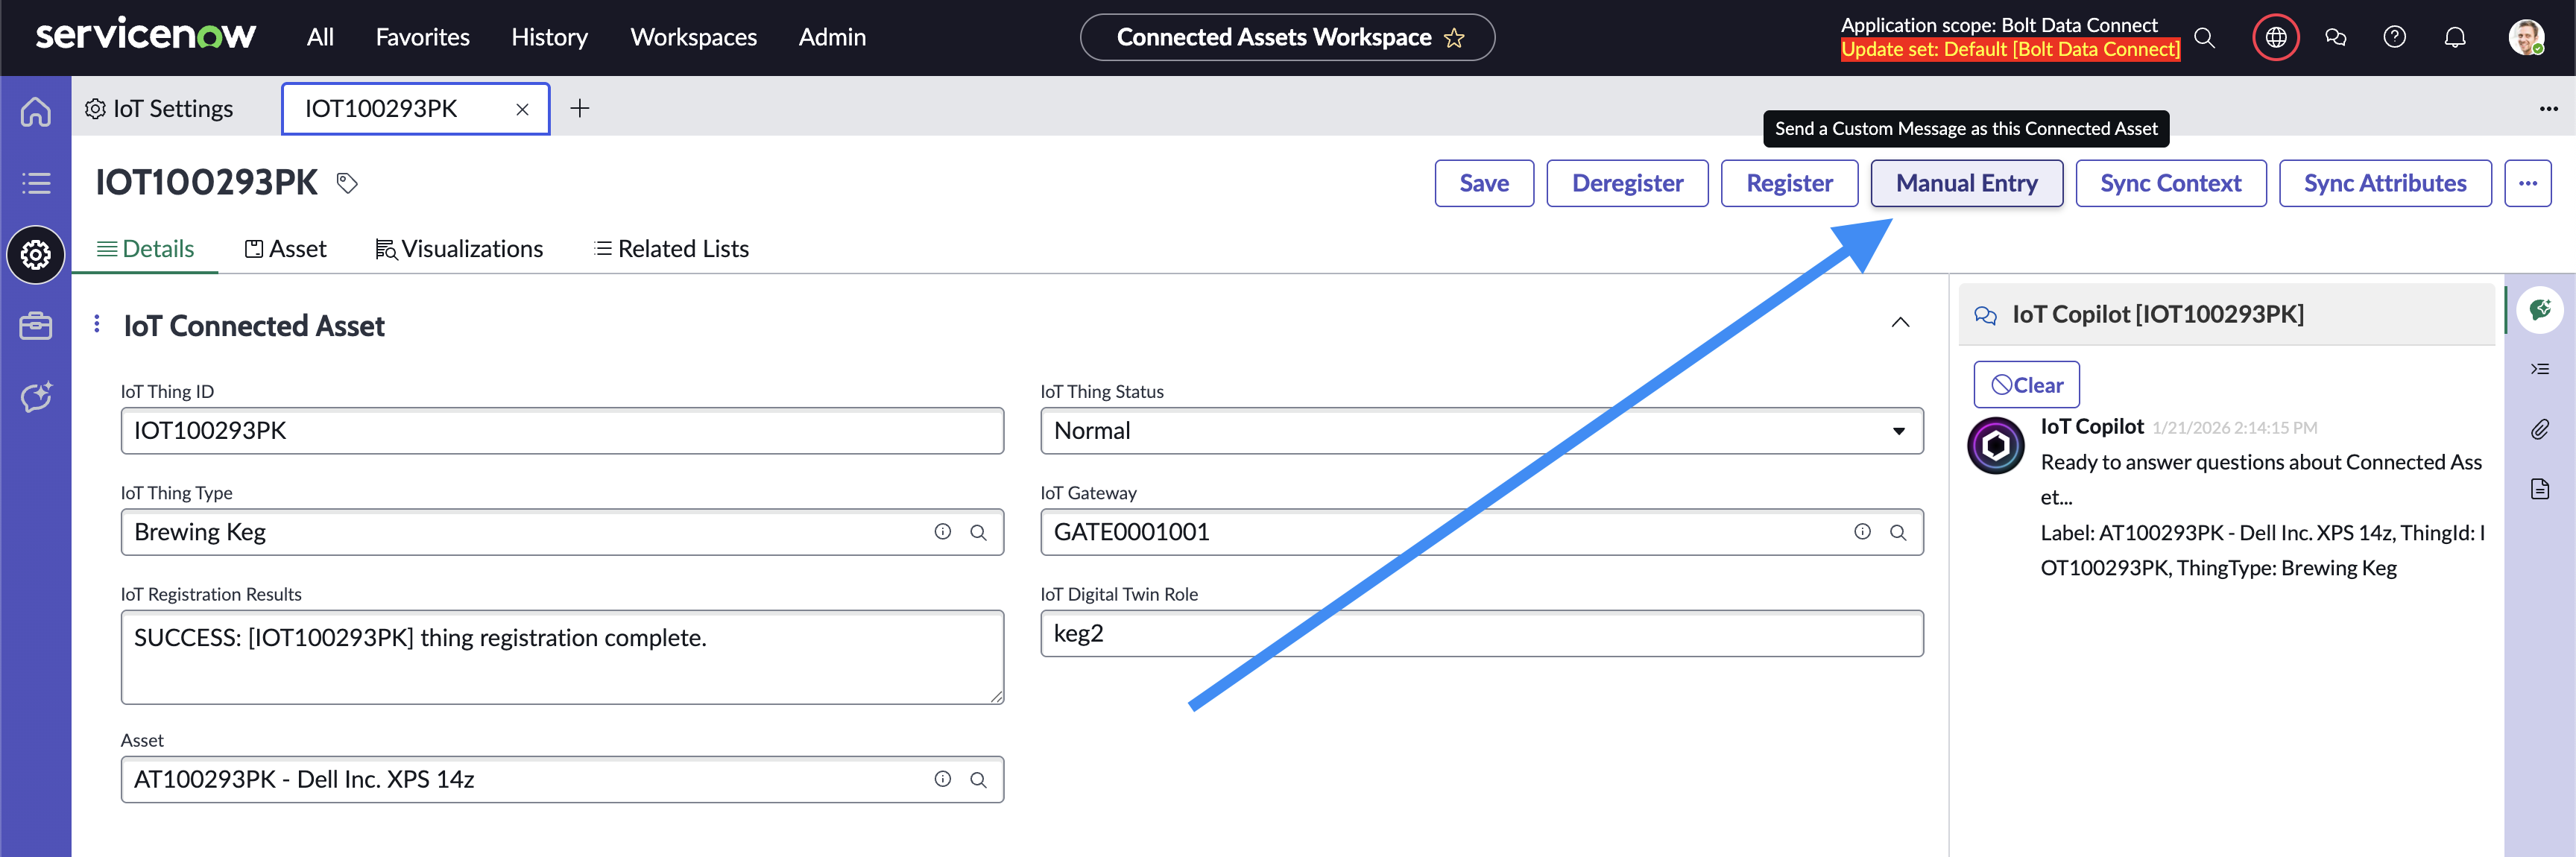
Manual Sensor Entry Button
This could be useful if this Connected Asset is not able to communicate due to security/firewalls or is temporarily disabled. The manually entered sensor values are uploaded and processed by the Rules Engine and stored in the IoT Cloud Data-Lake just like they would if they were received as a real IoT message.
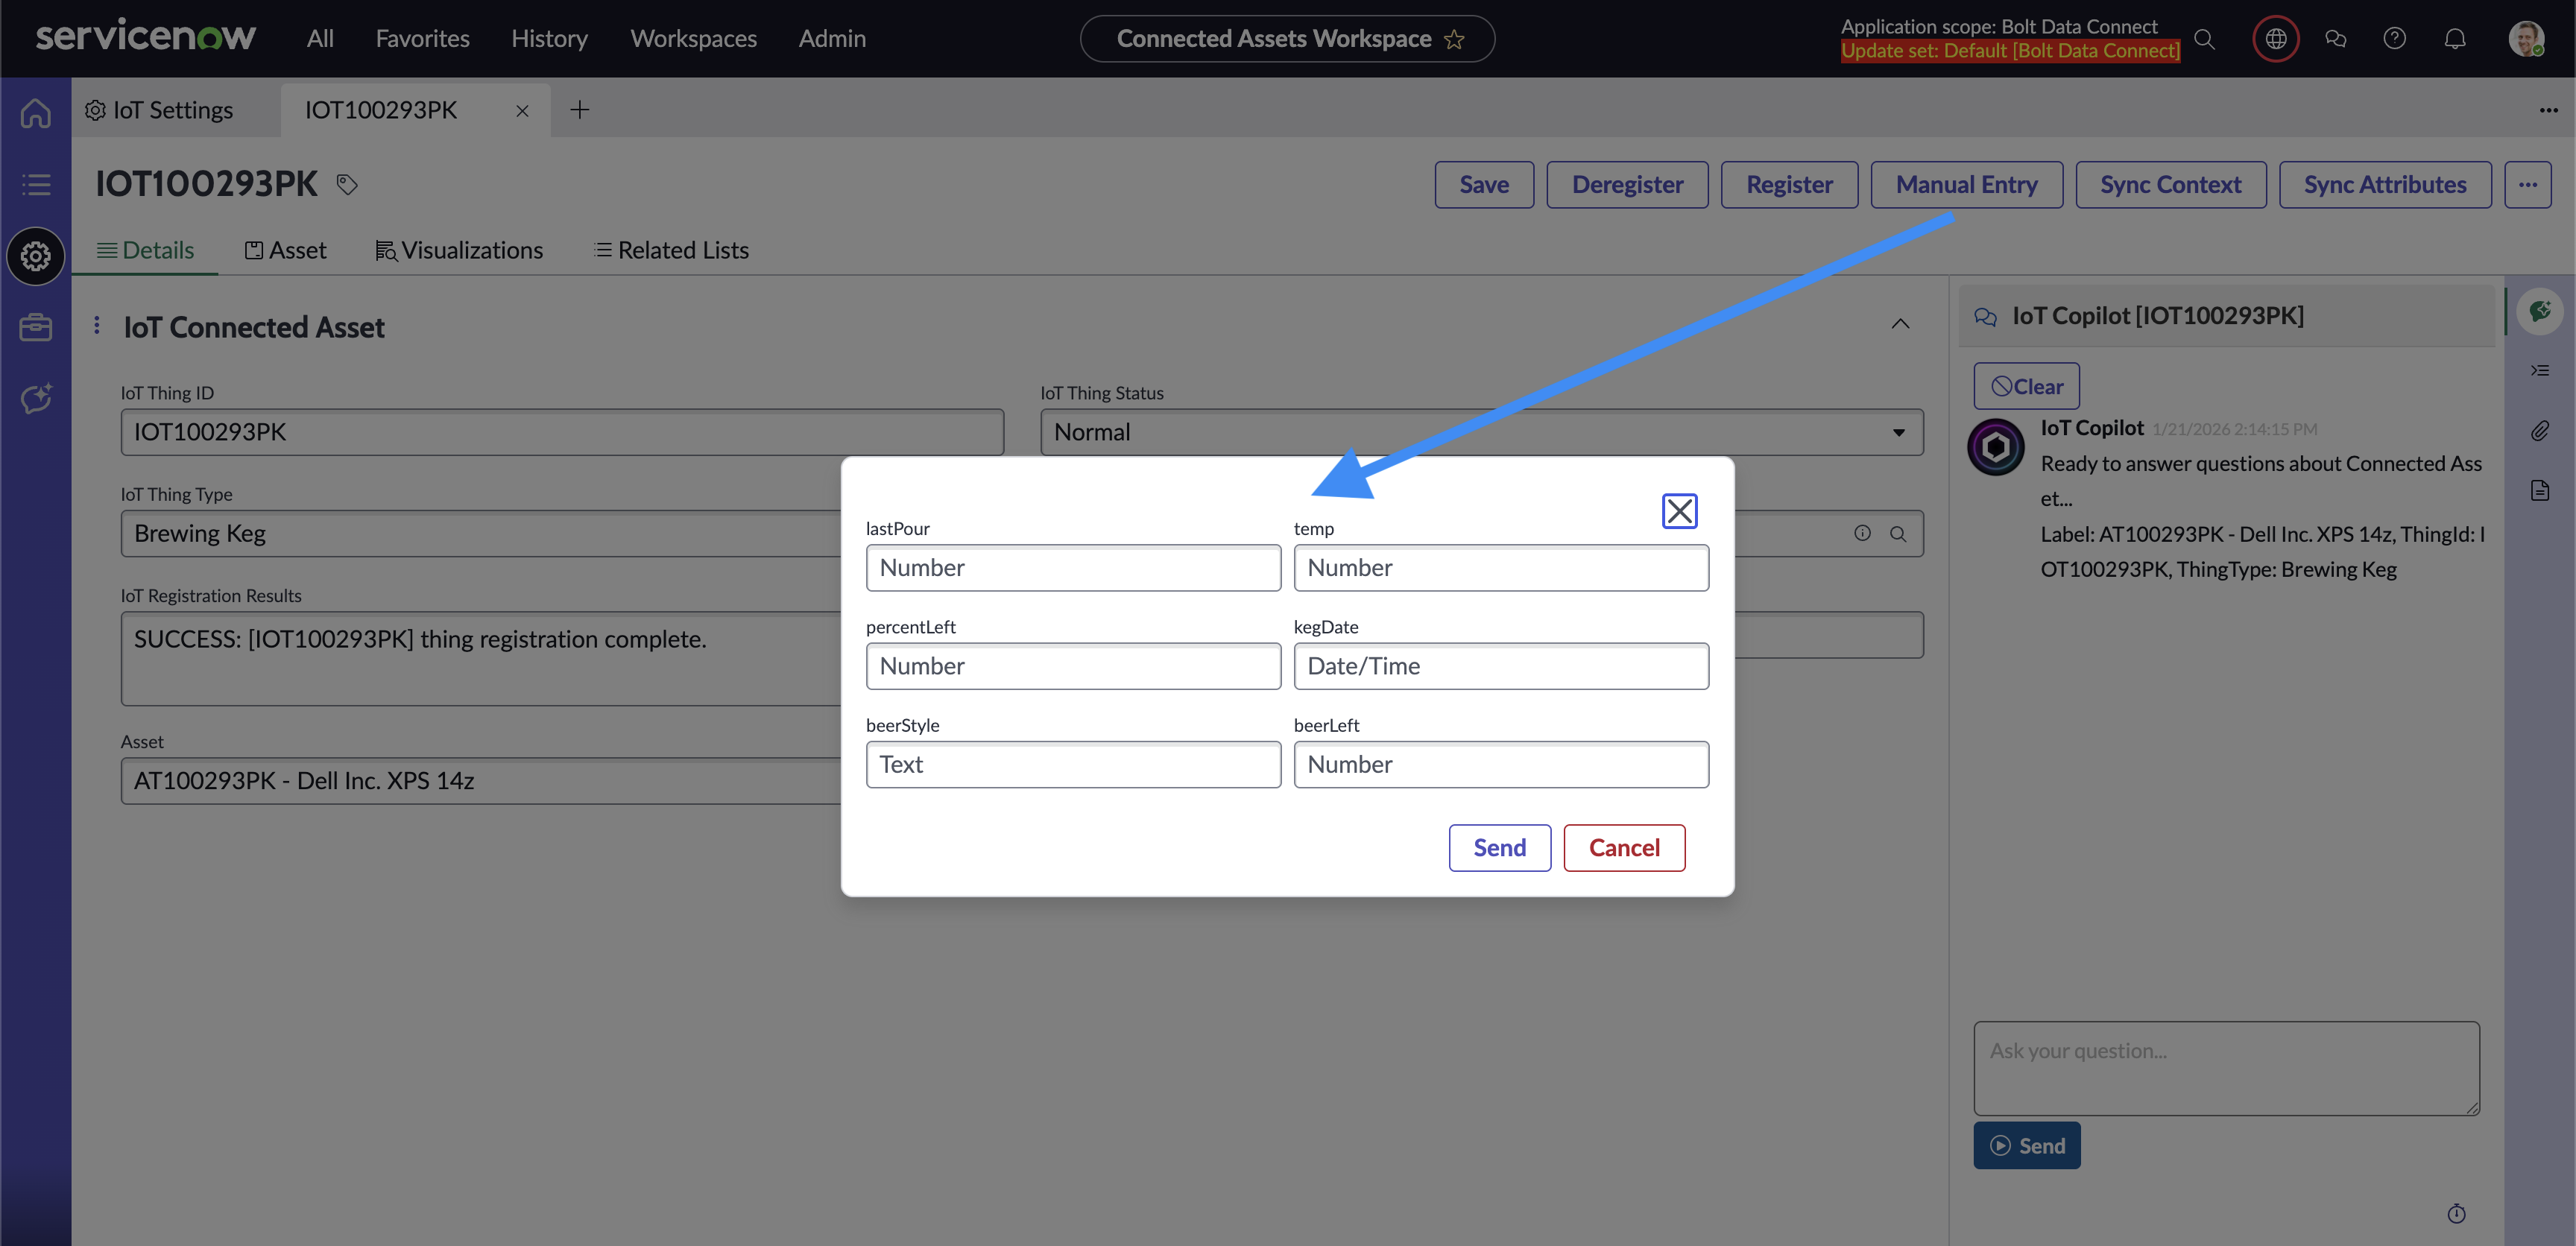
Manual Sensor Entry
Note
It’s important to add to this Manual Sensor Entry form is dynamic, based on the Sensors defined in the Thing Type. The Data Type and Storage Data Type influence the type / validation of each field on the form.Deregister (Connected Asset Module)
The Connected Asset Module allows you to De-Register a Connected Asset. This will remove the Connected Asset from the thing registry, stop the flow of data, and reduce device licensing.
Thing Chart & Data
By default, the 25 most recent messages will be displayed in the chart tab. This chart is fully interactive: zoom in/out, select/deselect sensors to hide/show them, scroll left/right, etc.
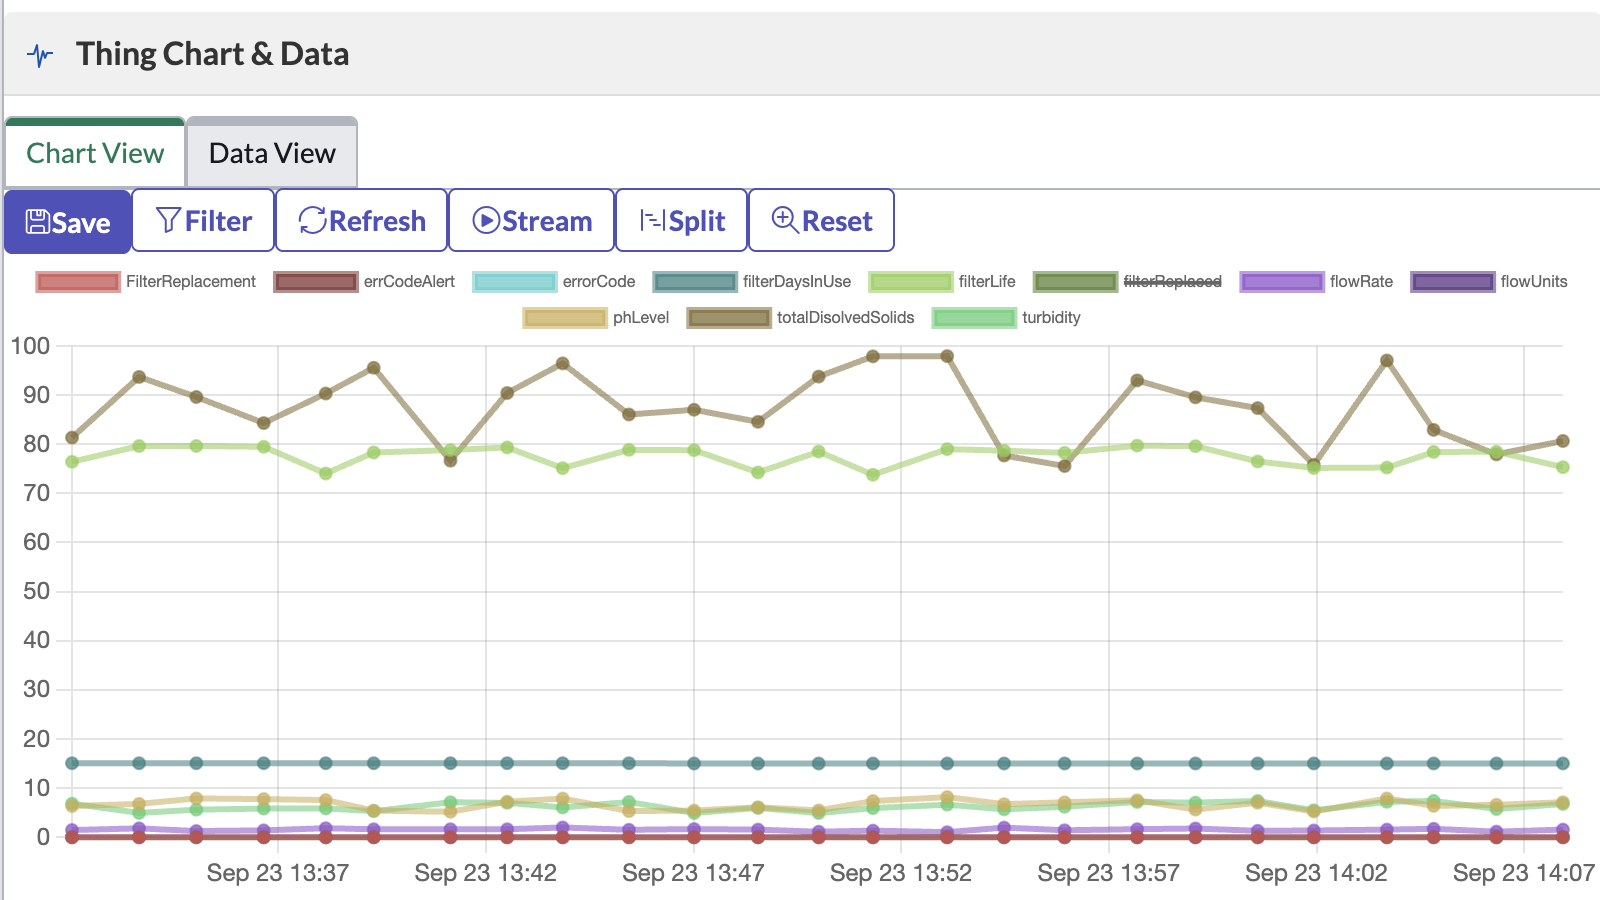
Thing Data Chart
The data tab allows you to see the same messages displayed in the chart tab, but in tabular/spreadsheet format, and download as a CSV file.
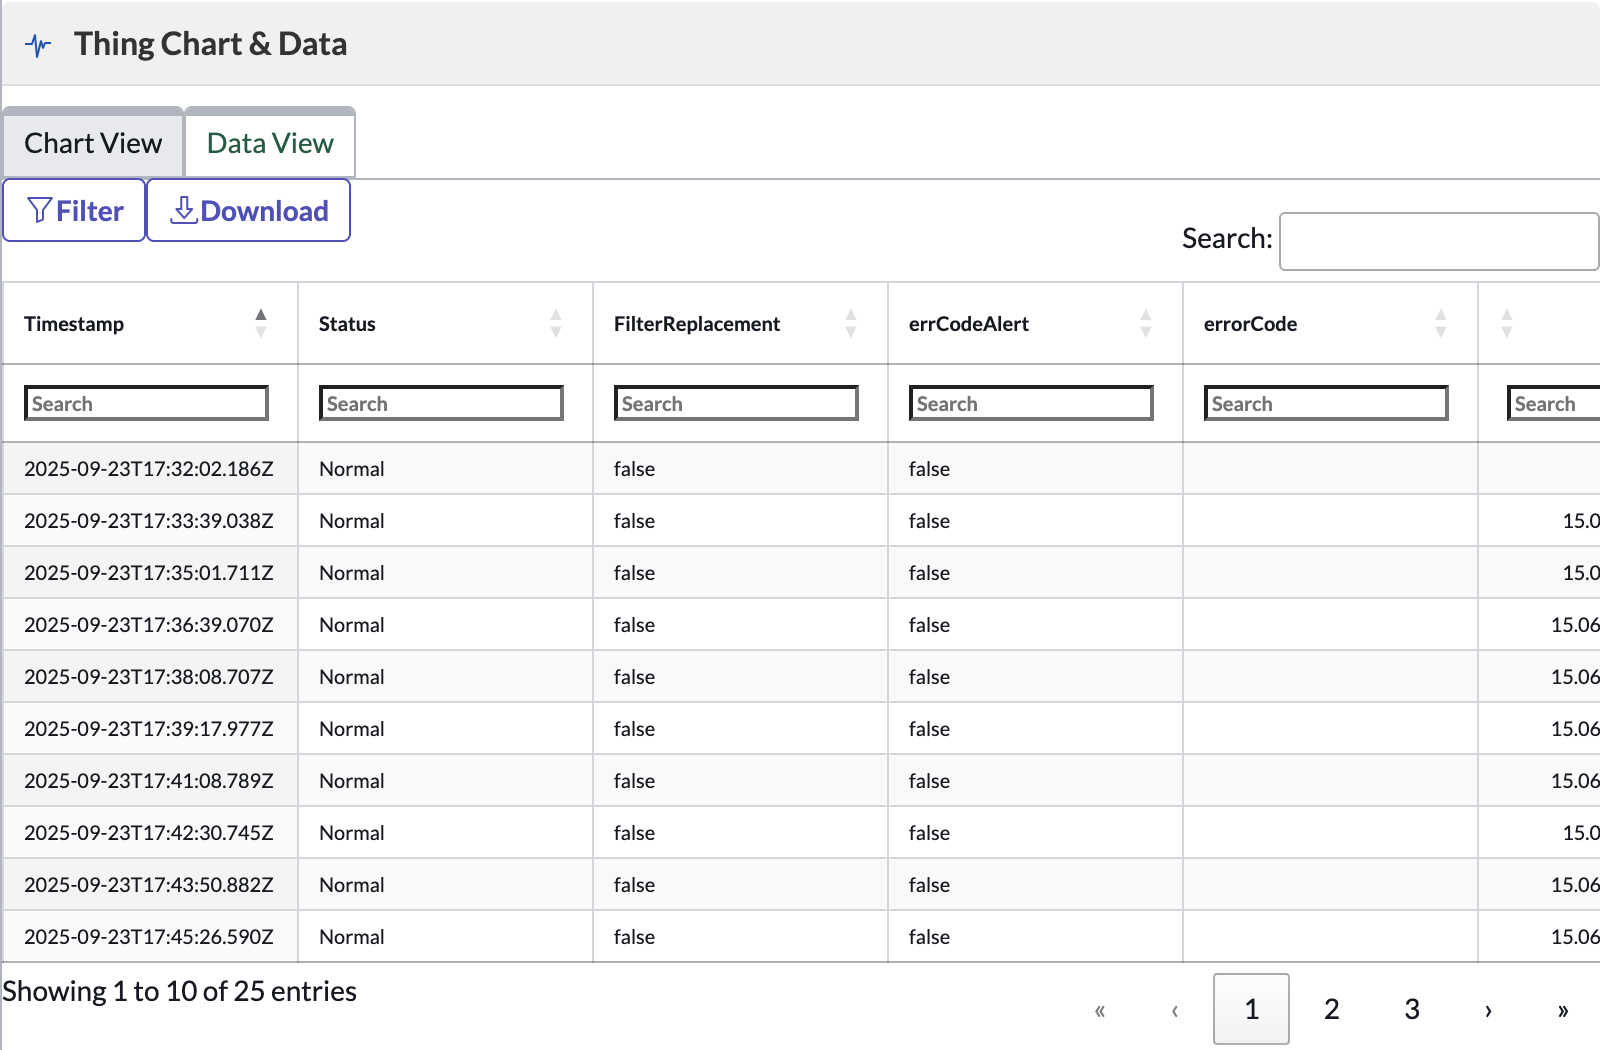
Thing Data Table
Stream
The Thing Chart now has the ability to Live Stream IoT data. After clicking on the “Play” Stream button, you’ll see the chart re-draw with each new message as it is received from the IoT Gateway.
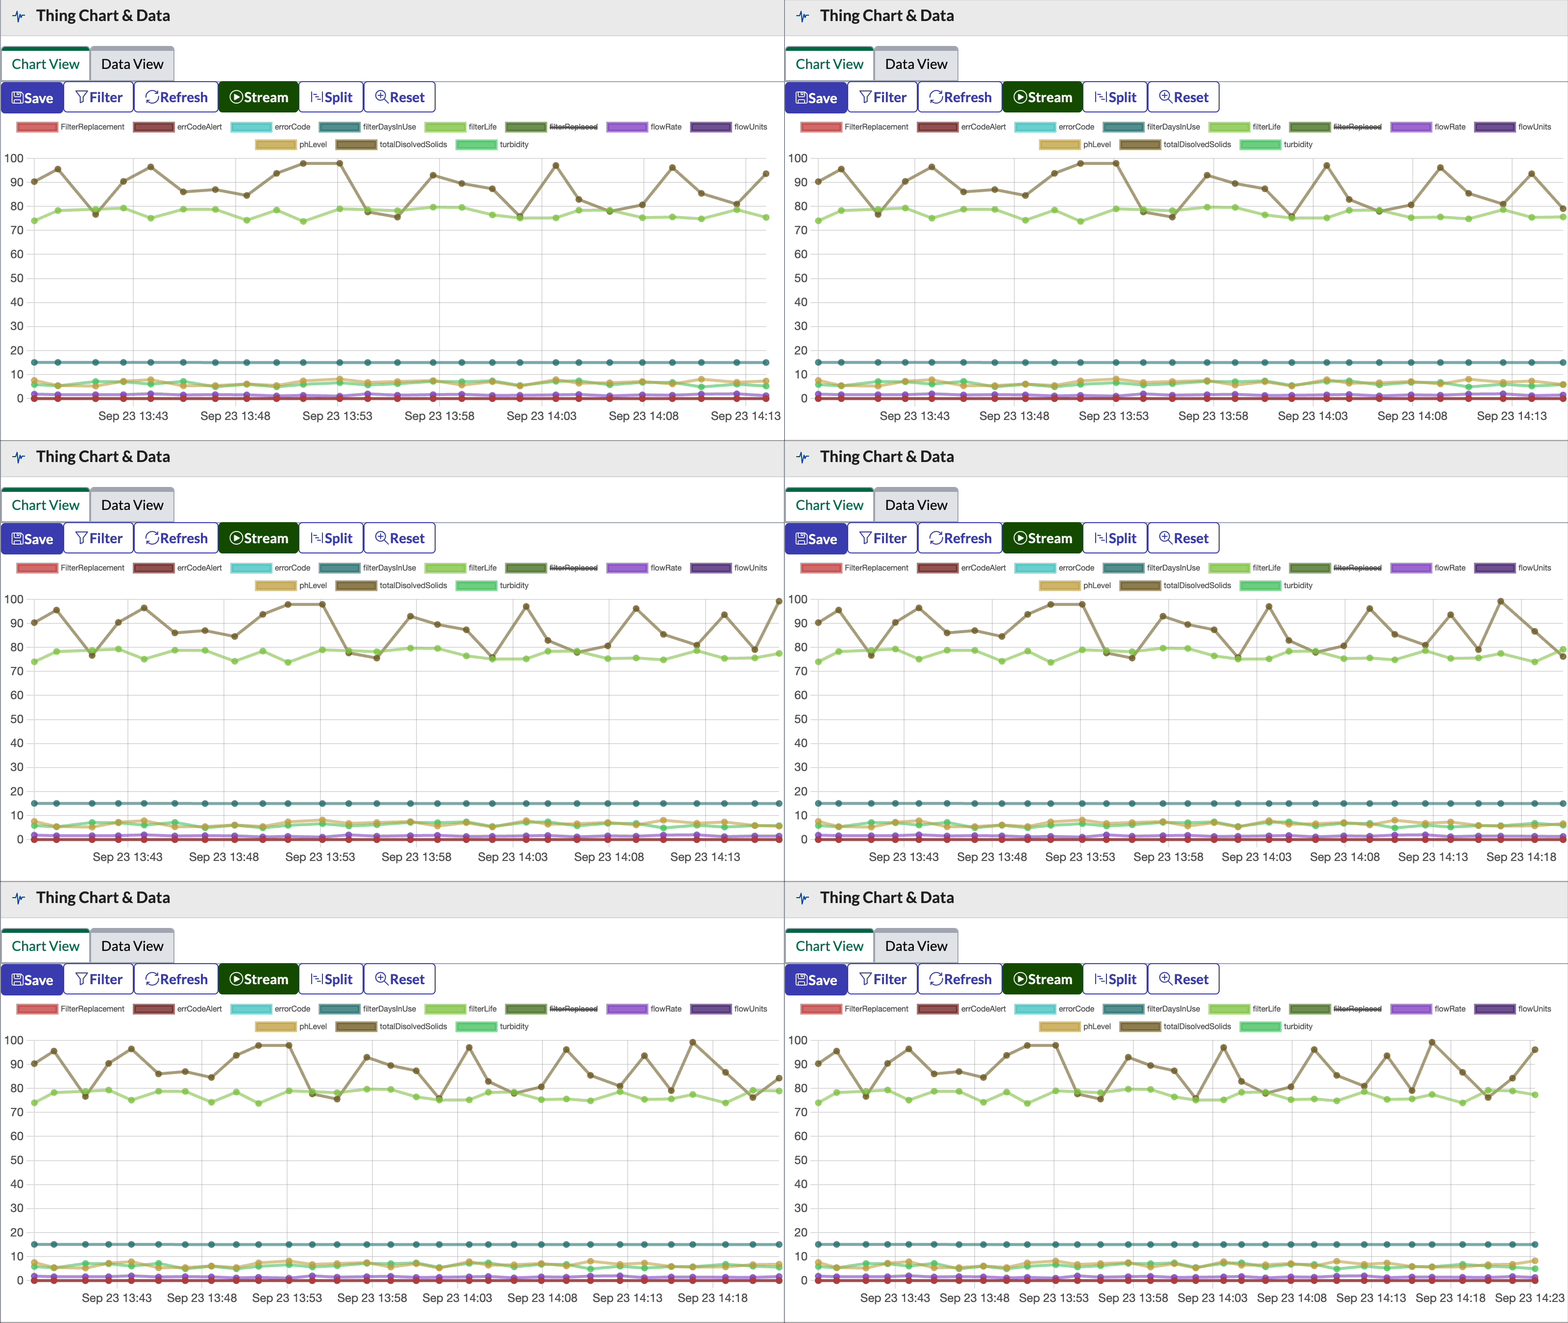
Thing Chart Live Stream
Split Axes
The Thing Chart can now split the plotted values across 3 Axes by separating them by their maximum absolute values.
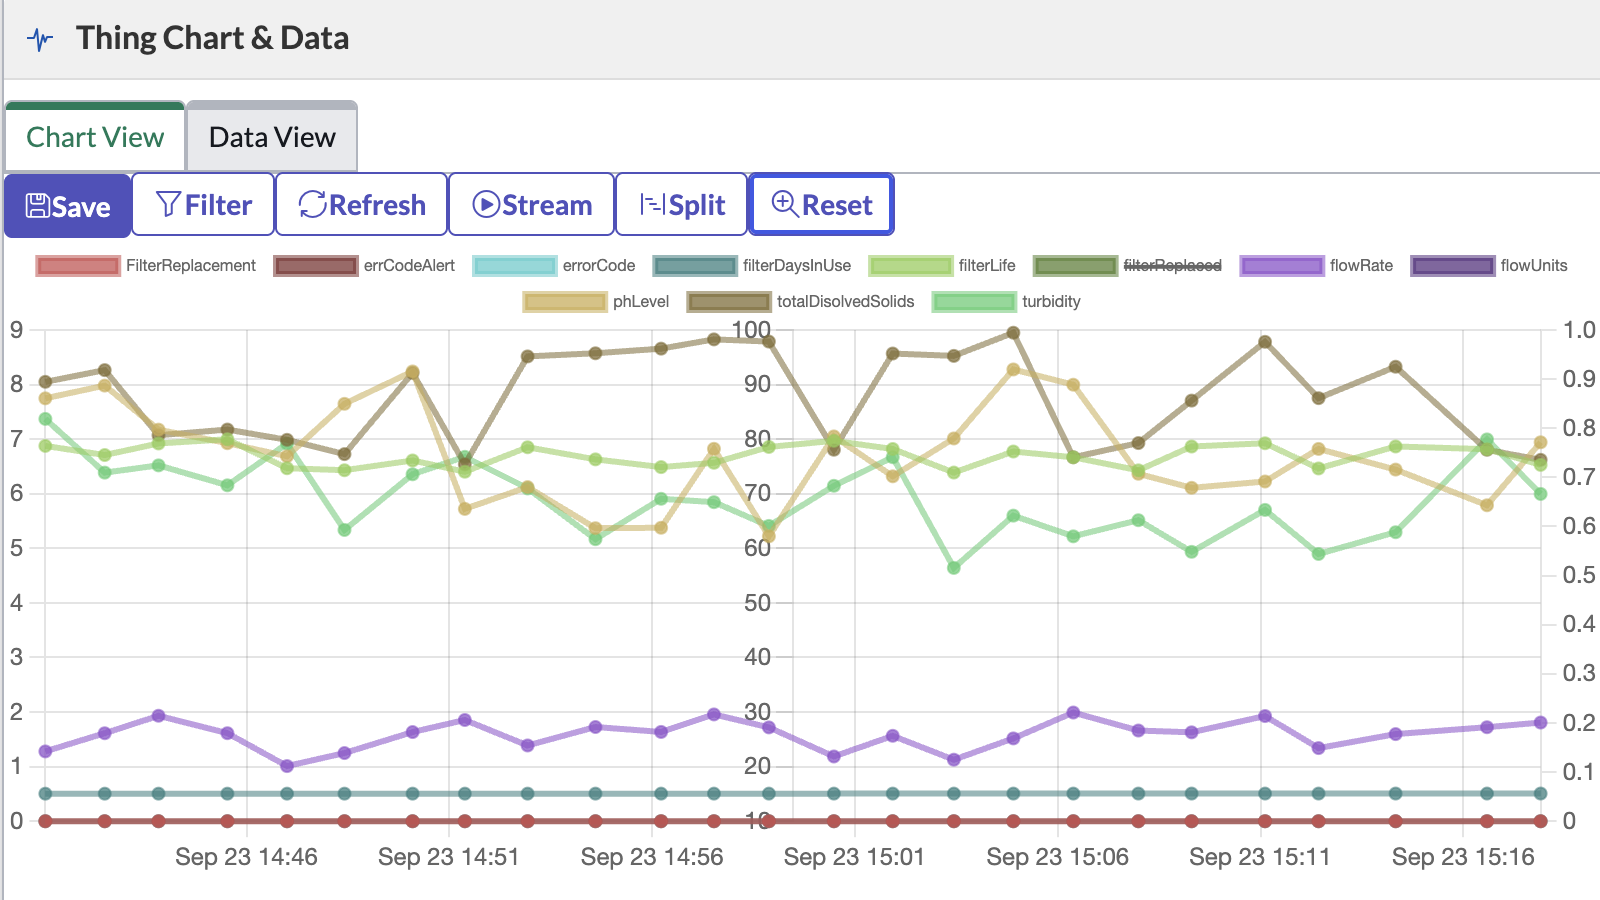
Thing Data Chart: Split
Thing Commands
This component allows the user to send a Command to a Connected Asset. Bolt Data Connect will route your command to the IoT Cloud, then the Edge Gateway, and ultimately to the device itself. Keep in mind that the device must know how to interpret this command for it to respond accordingly.
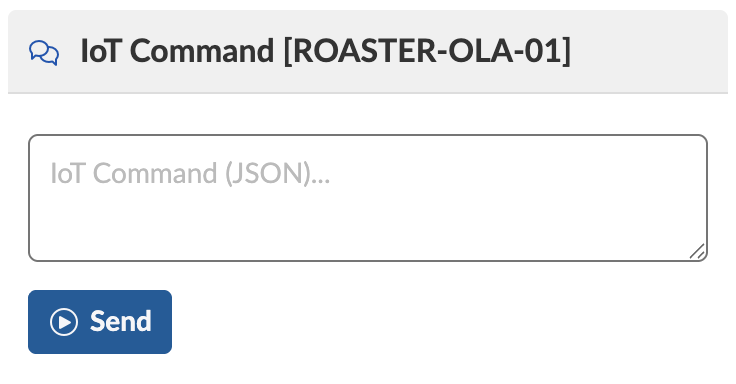
Thing Command
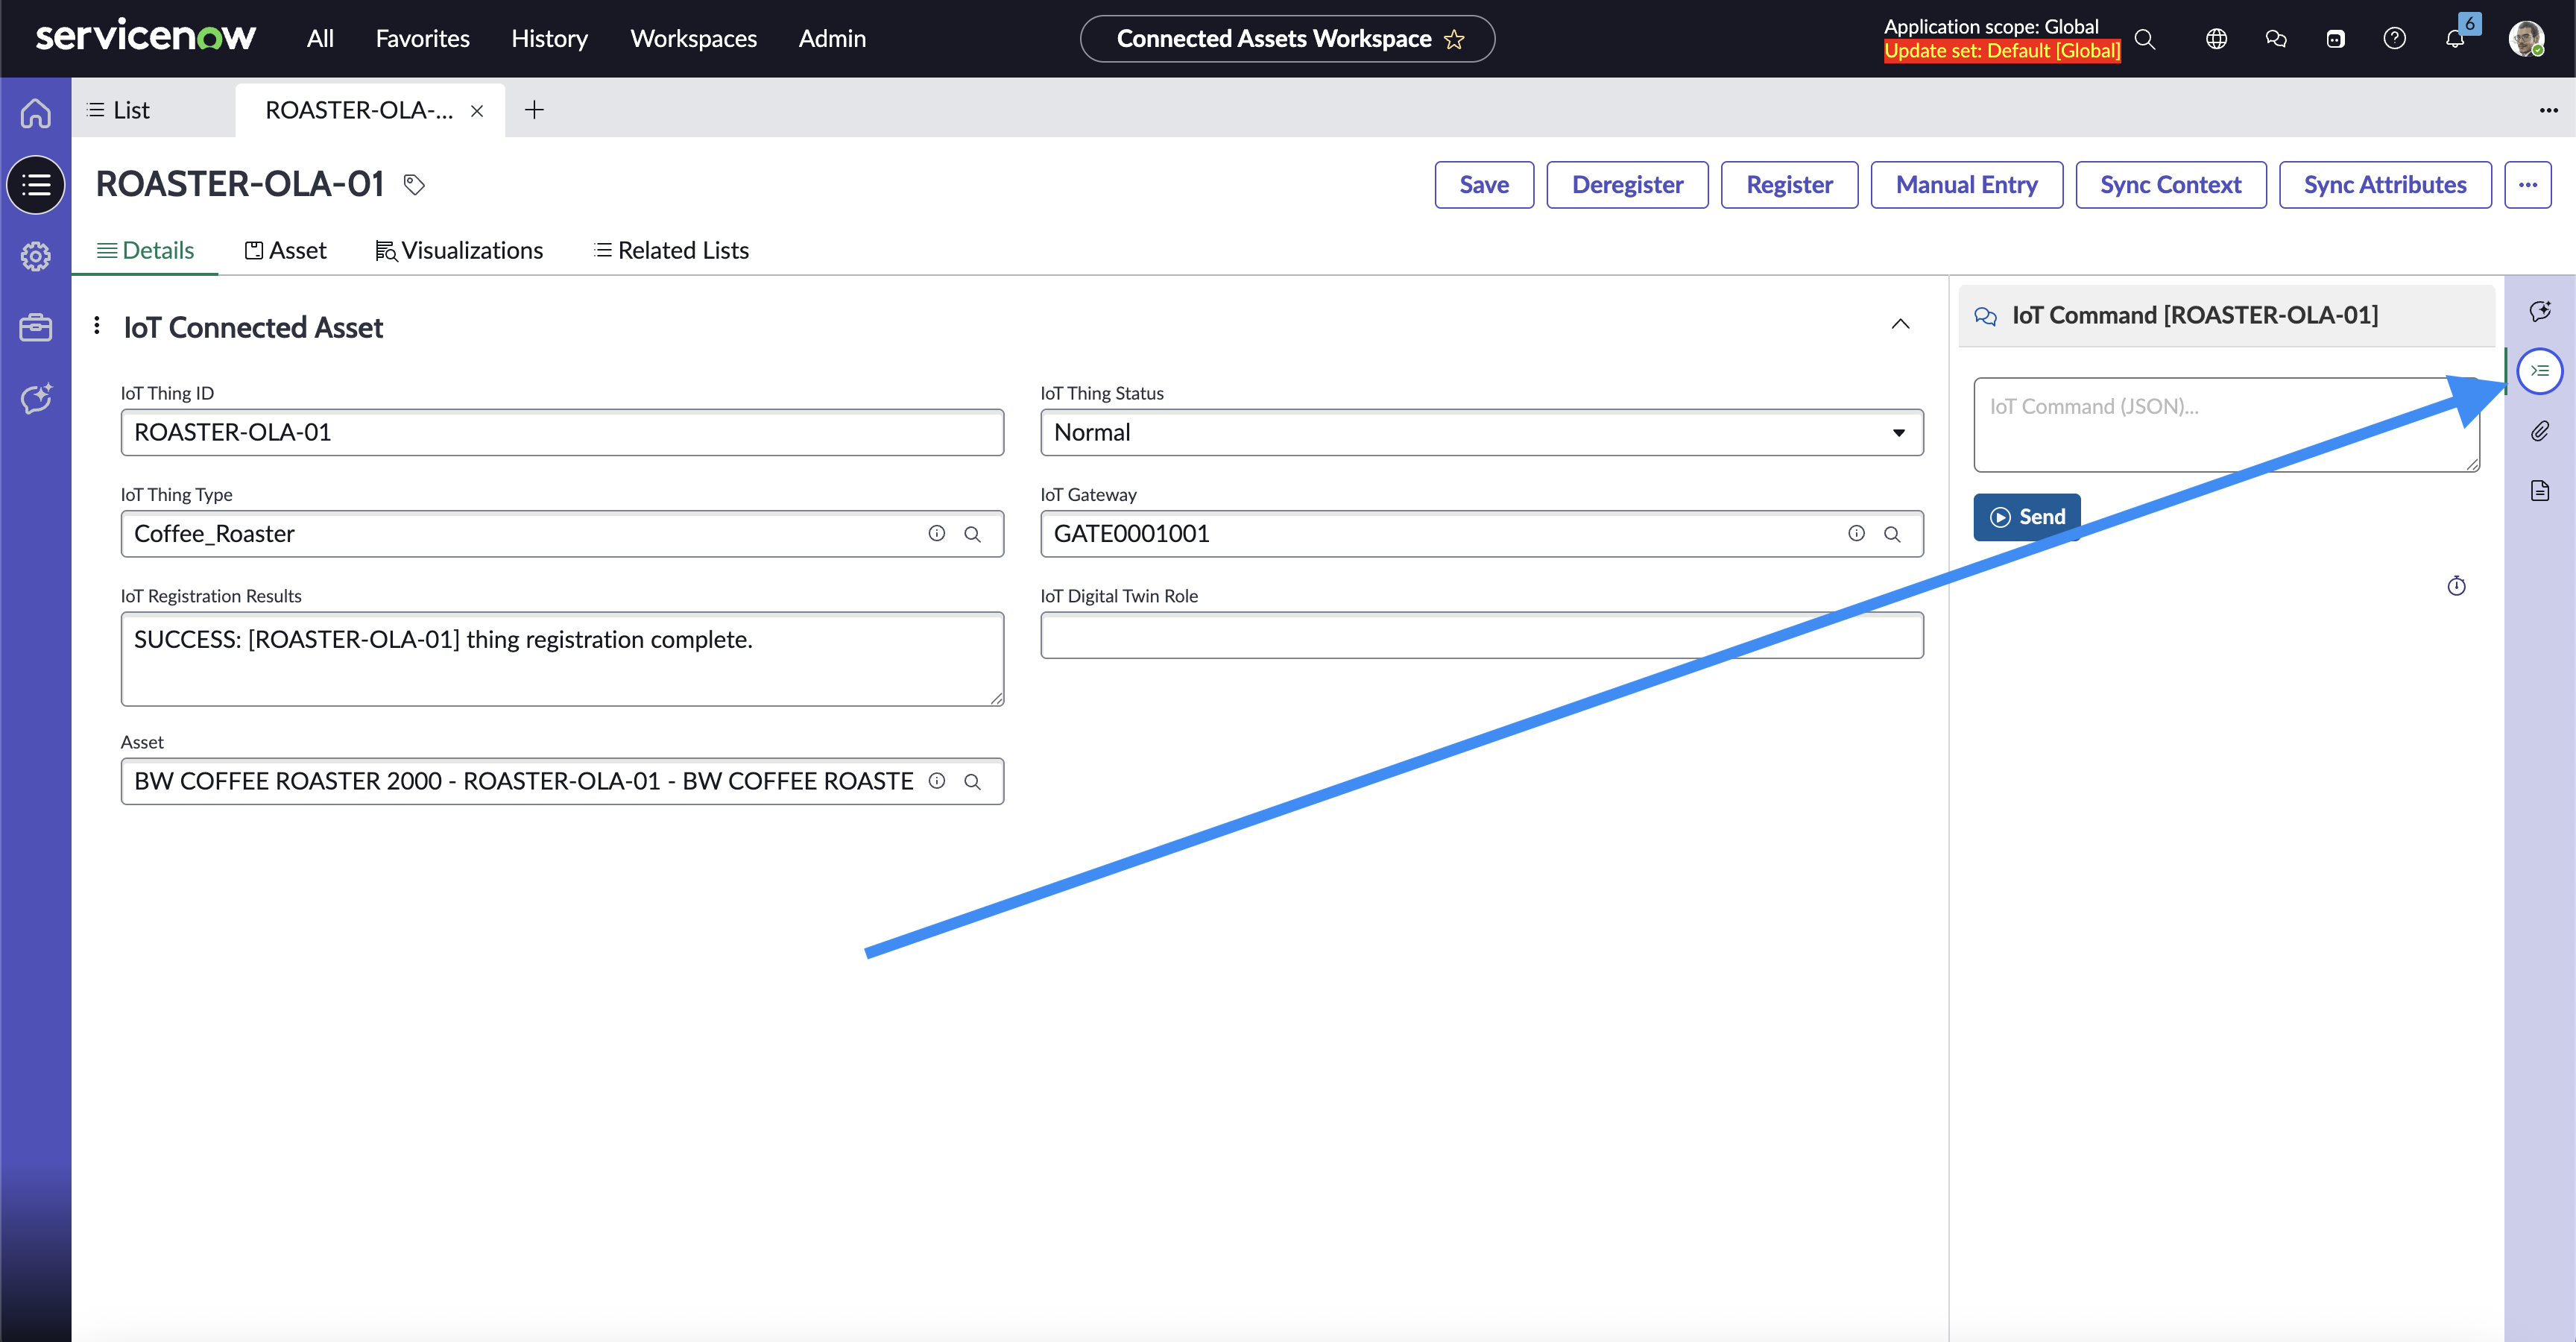
Thing Command on Thing Type Page
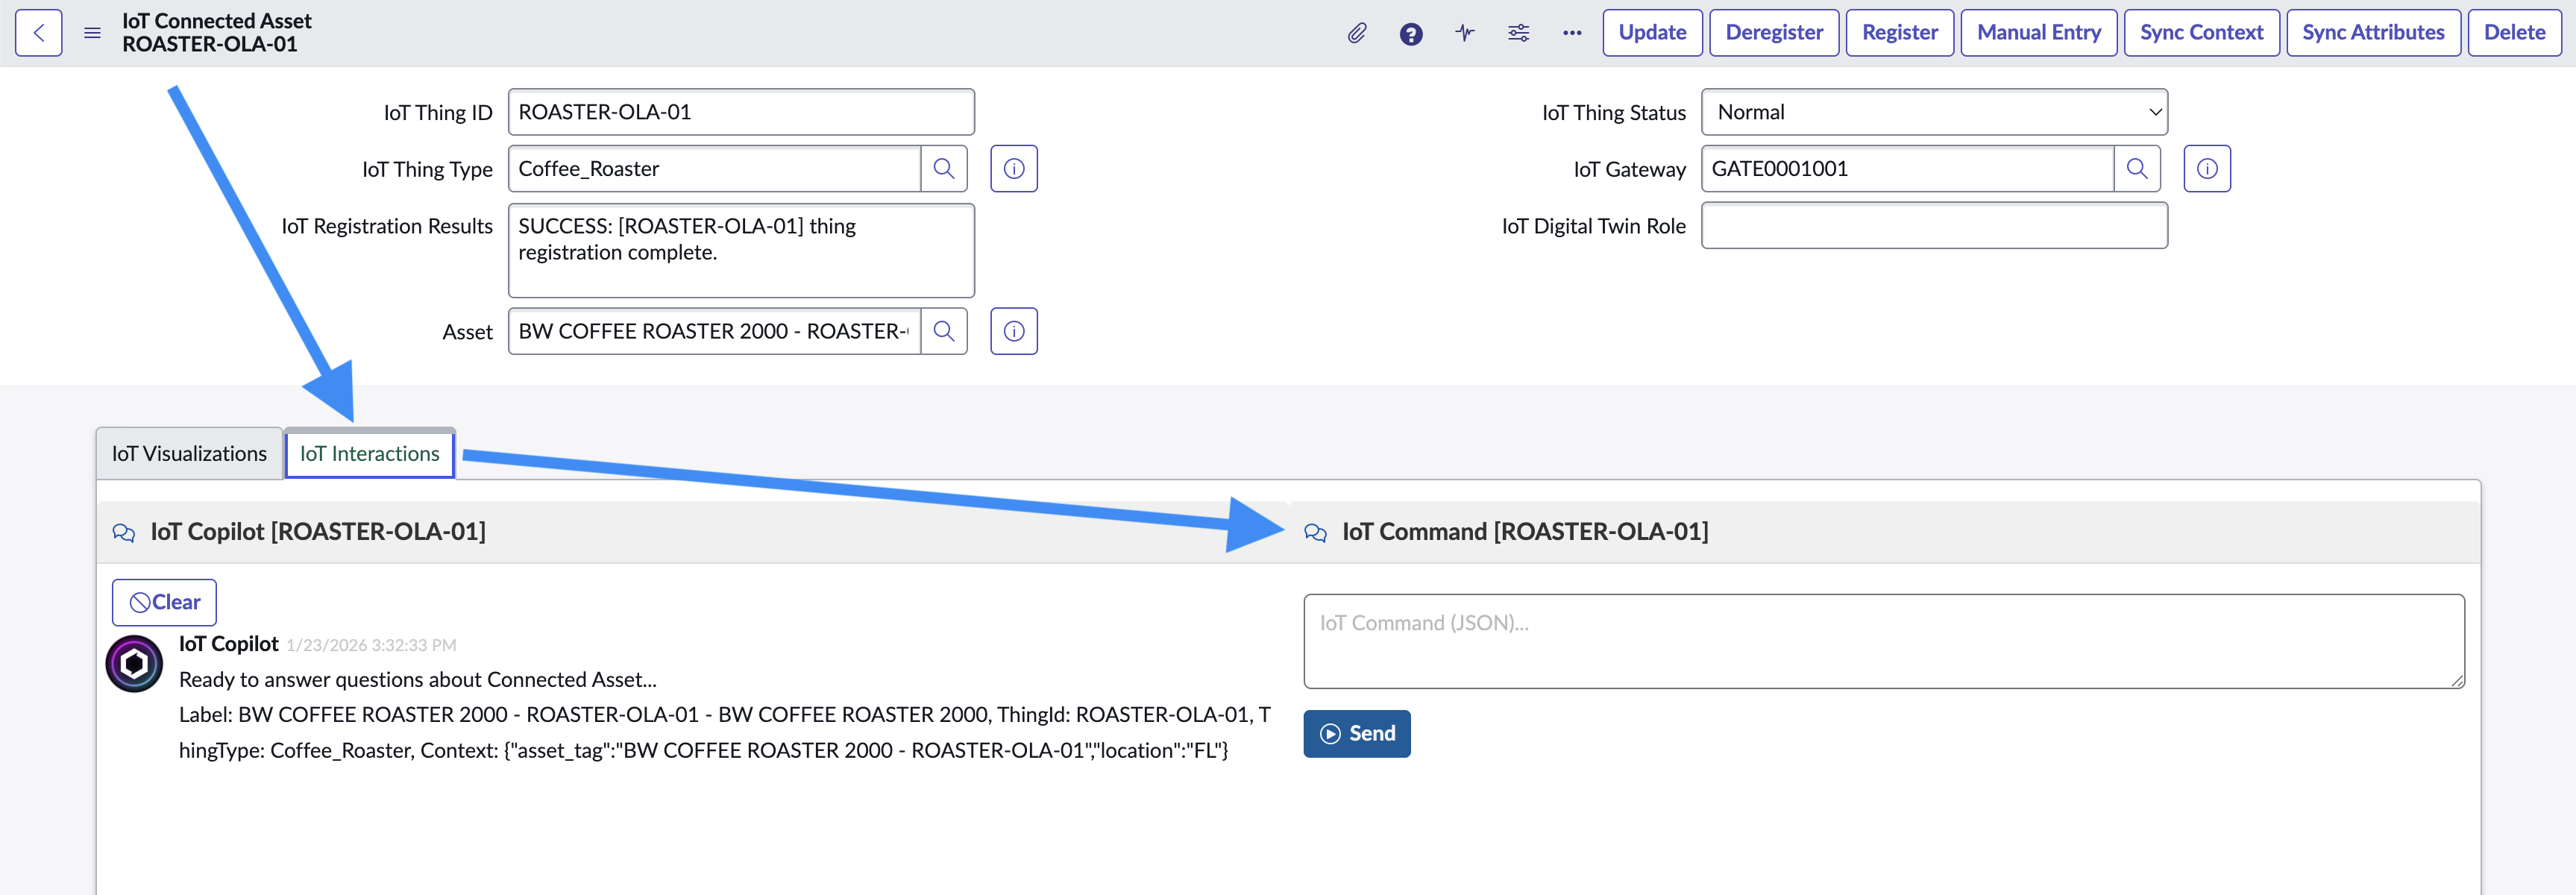
Thing Command in the Classic UI
Digital Twins
See the Digital Twin Diagram / Editor
On the IoT Connected Asset Record Page, add the IoT Digital Twin and easily view/edit the Digital Twin from any Thing in the configured Hierarchy.
The Diagram shows all of the most recent sensors and calculated fields from all Things in the same Digital Twin.
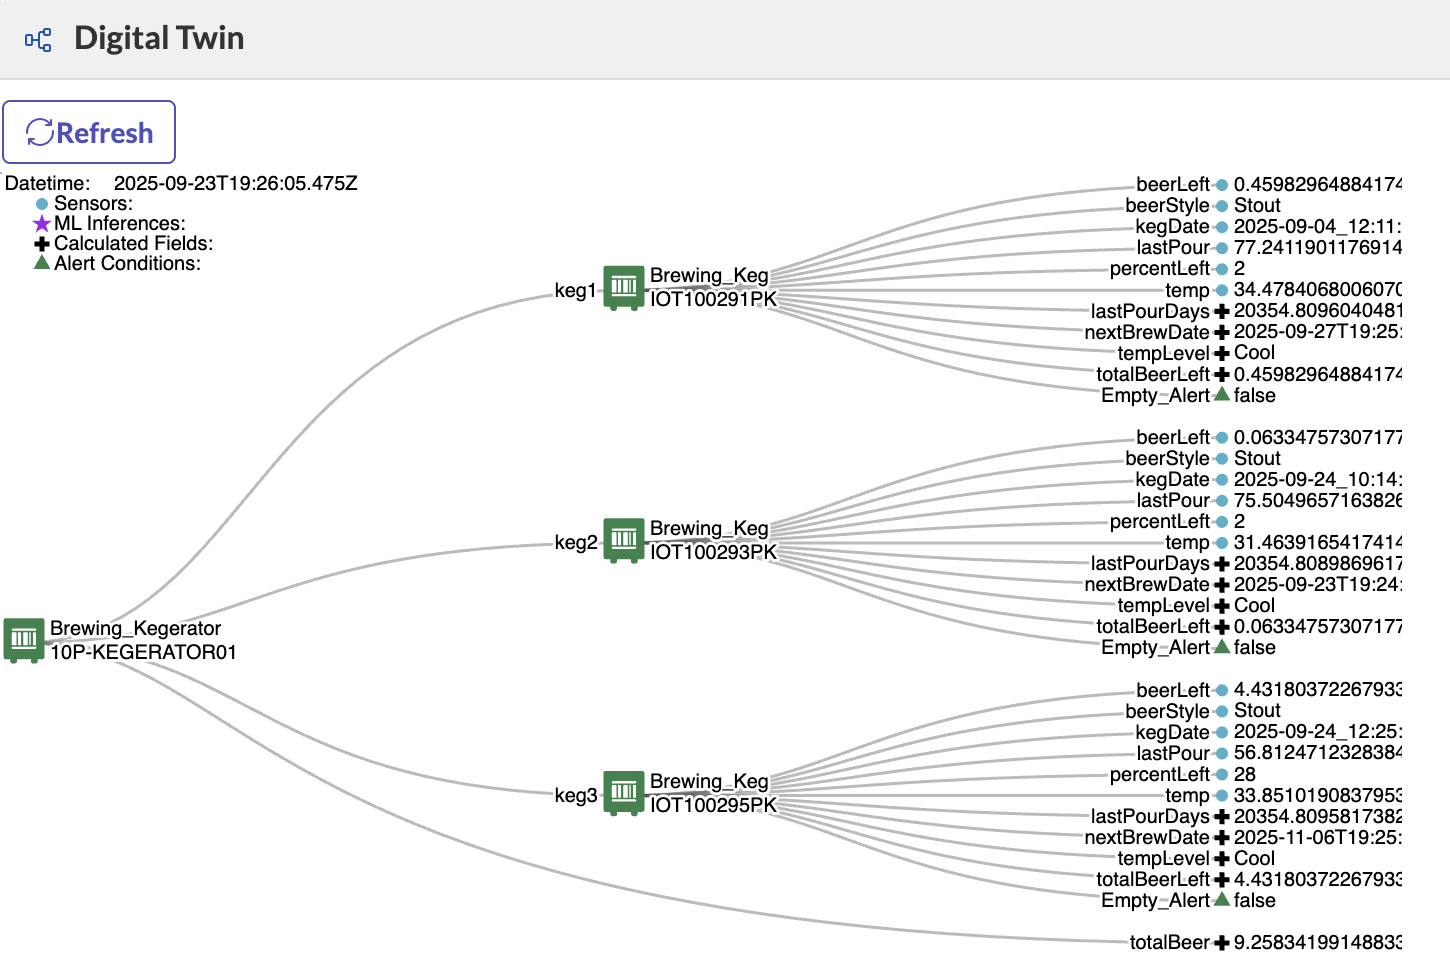
Digital Twin Viewer
-
The Legend shows the notation of the diagram including Sensors, Calculated Fields and Alert Conditions
-
Use the Digital Twin Toolbar to:
- Refresh the latest values
- Attach the data to the IoT Copilot Chat
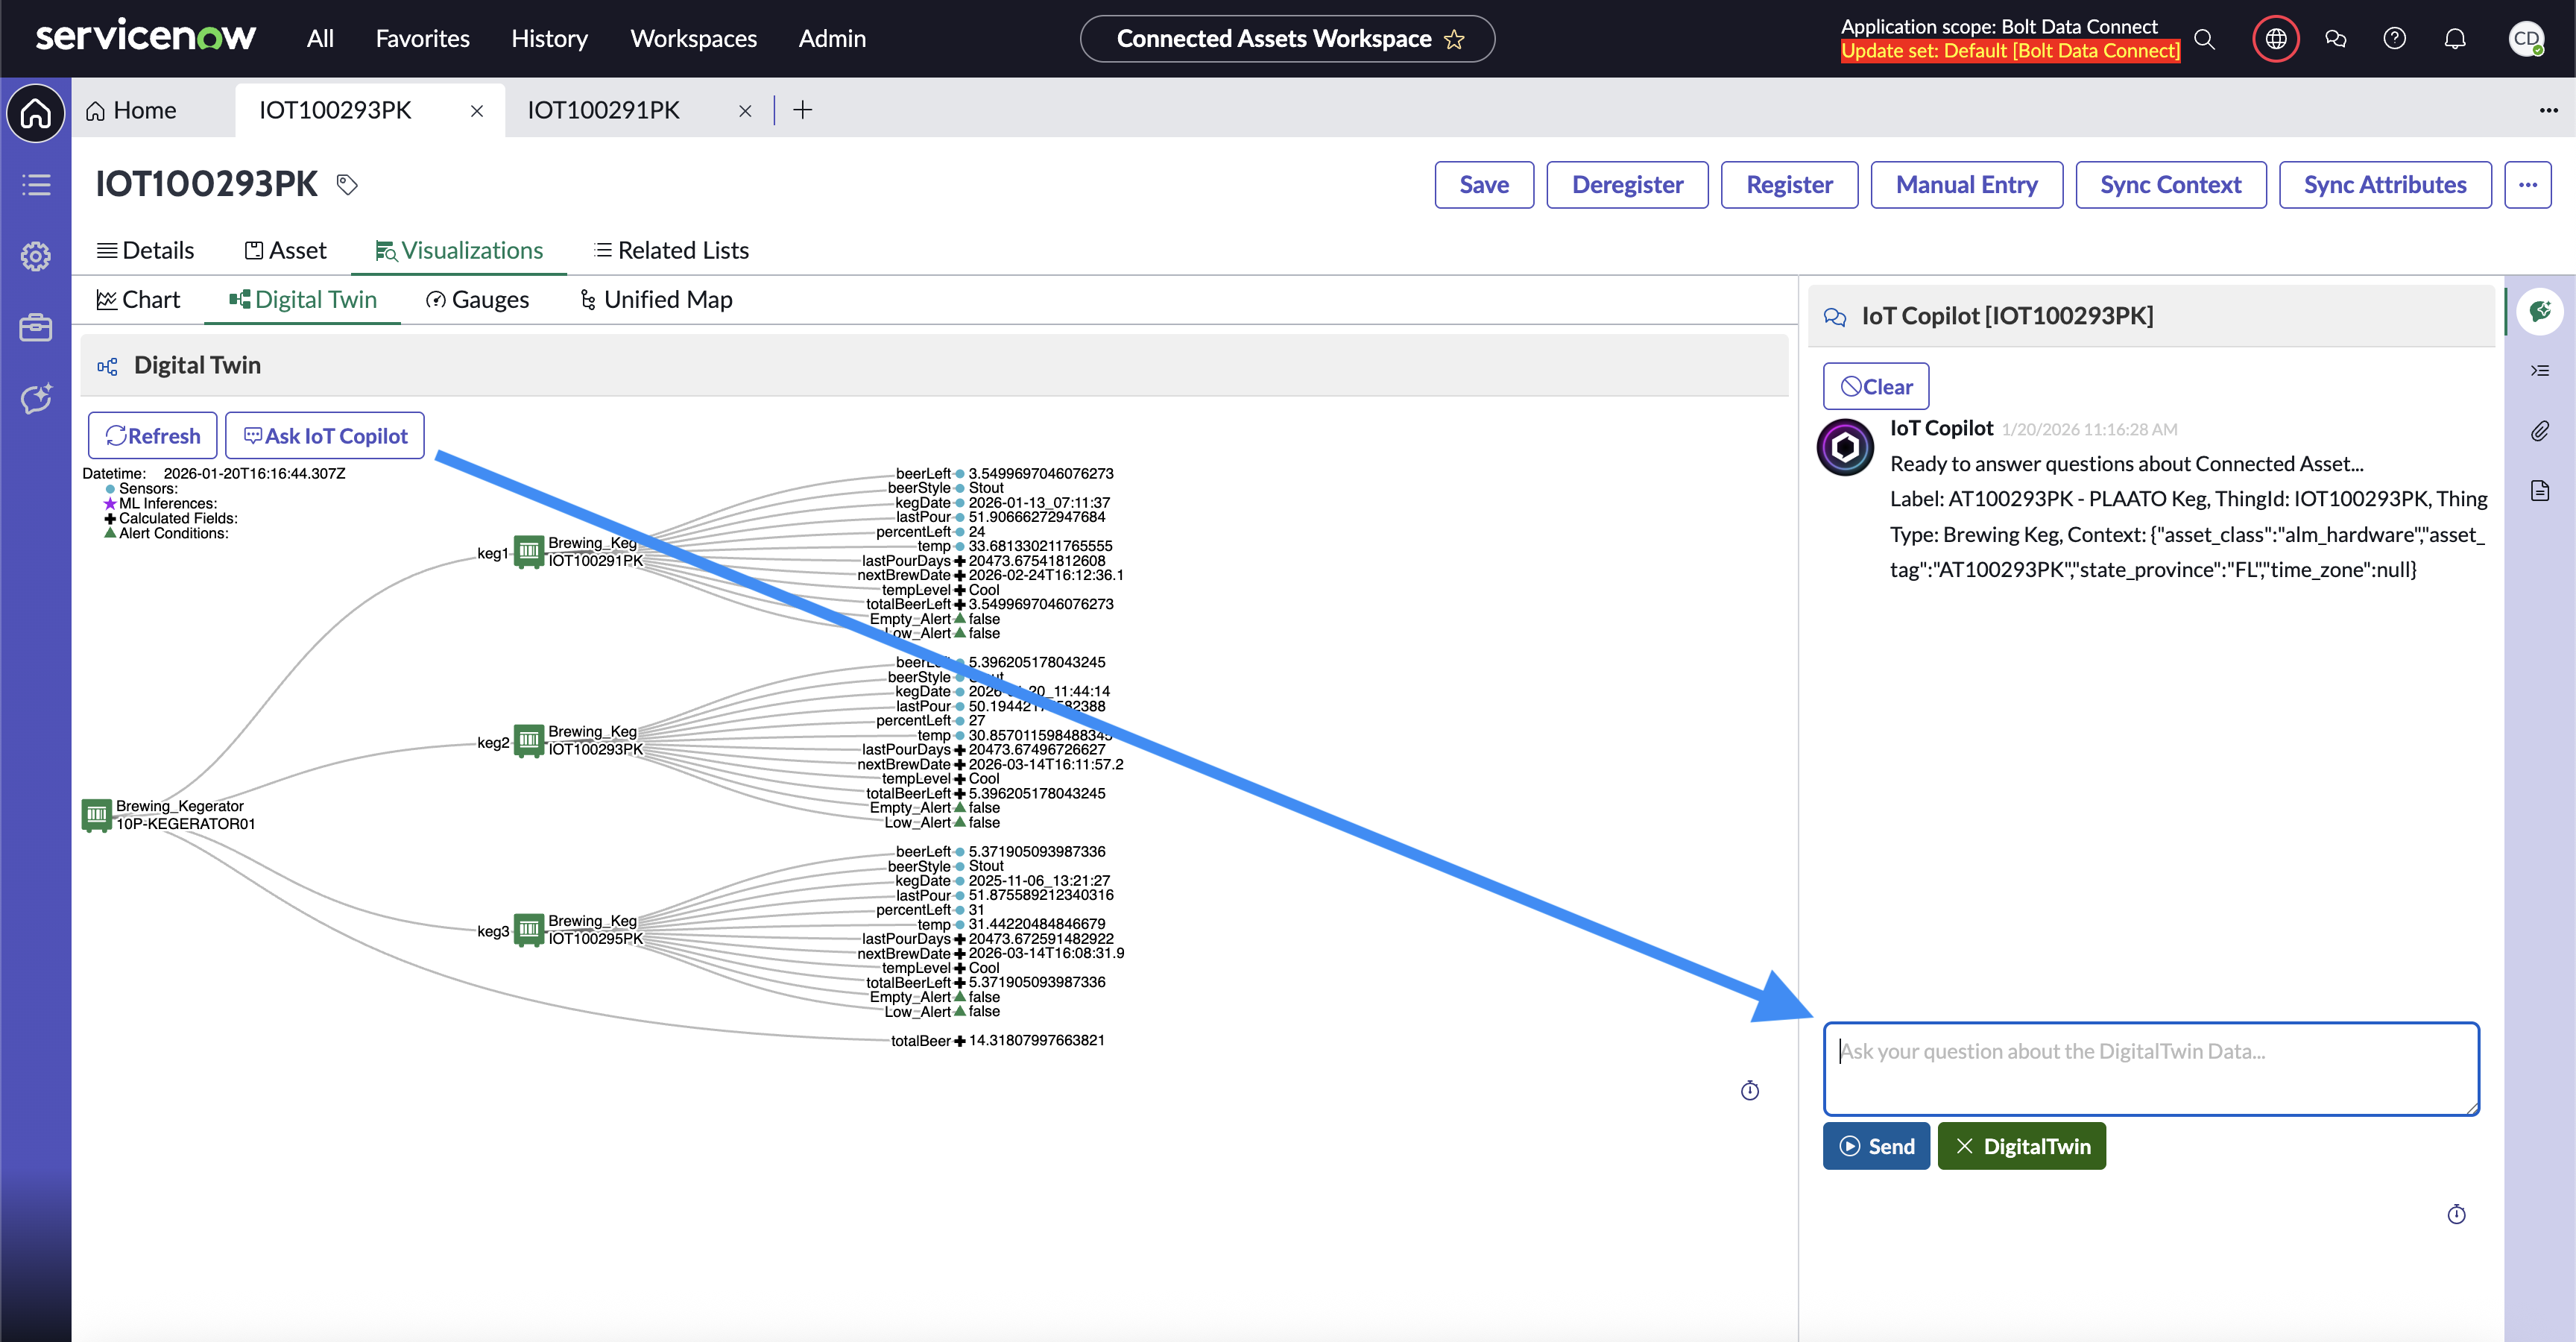
Attach Digital Twin Data to IoT Copilot
Unified Map
The Unified Map shows the same data that the Digital Twin Diagram shows, but it does so in an interactive environment. Each node in the Unified Map can be both moved and searched to help find specific fields. There are multiple layouts available in the Unified Map. The default layout is a horizontal heirarchy from left to right. If the ServiceNow version is Zurich or later, there will be additional buttons on the right side to switch the layout to a vertical heirarchy and a unified force view. In all views, assets and data can be dragged around and moved.
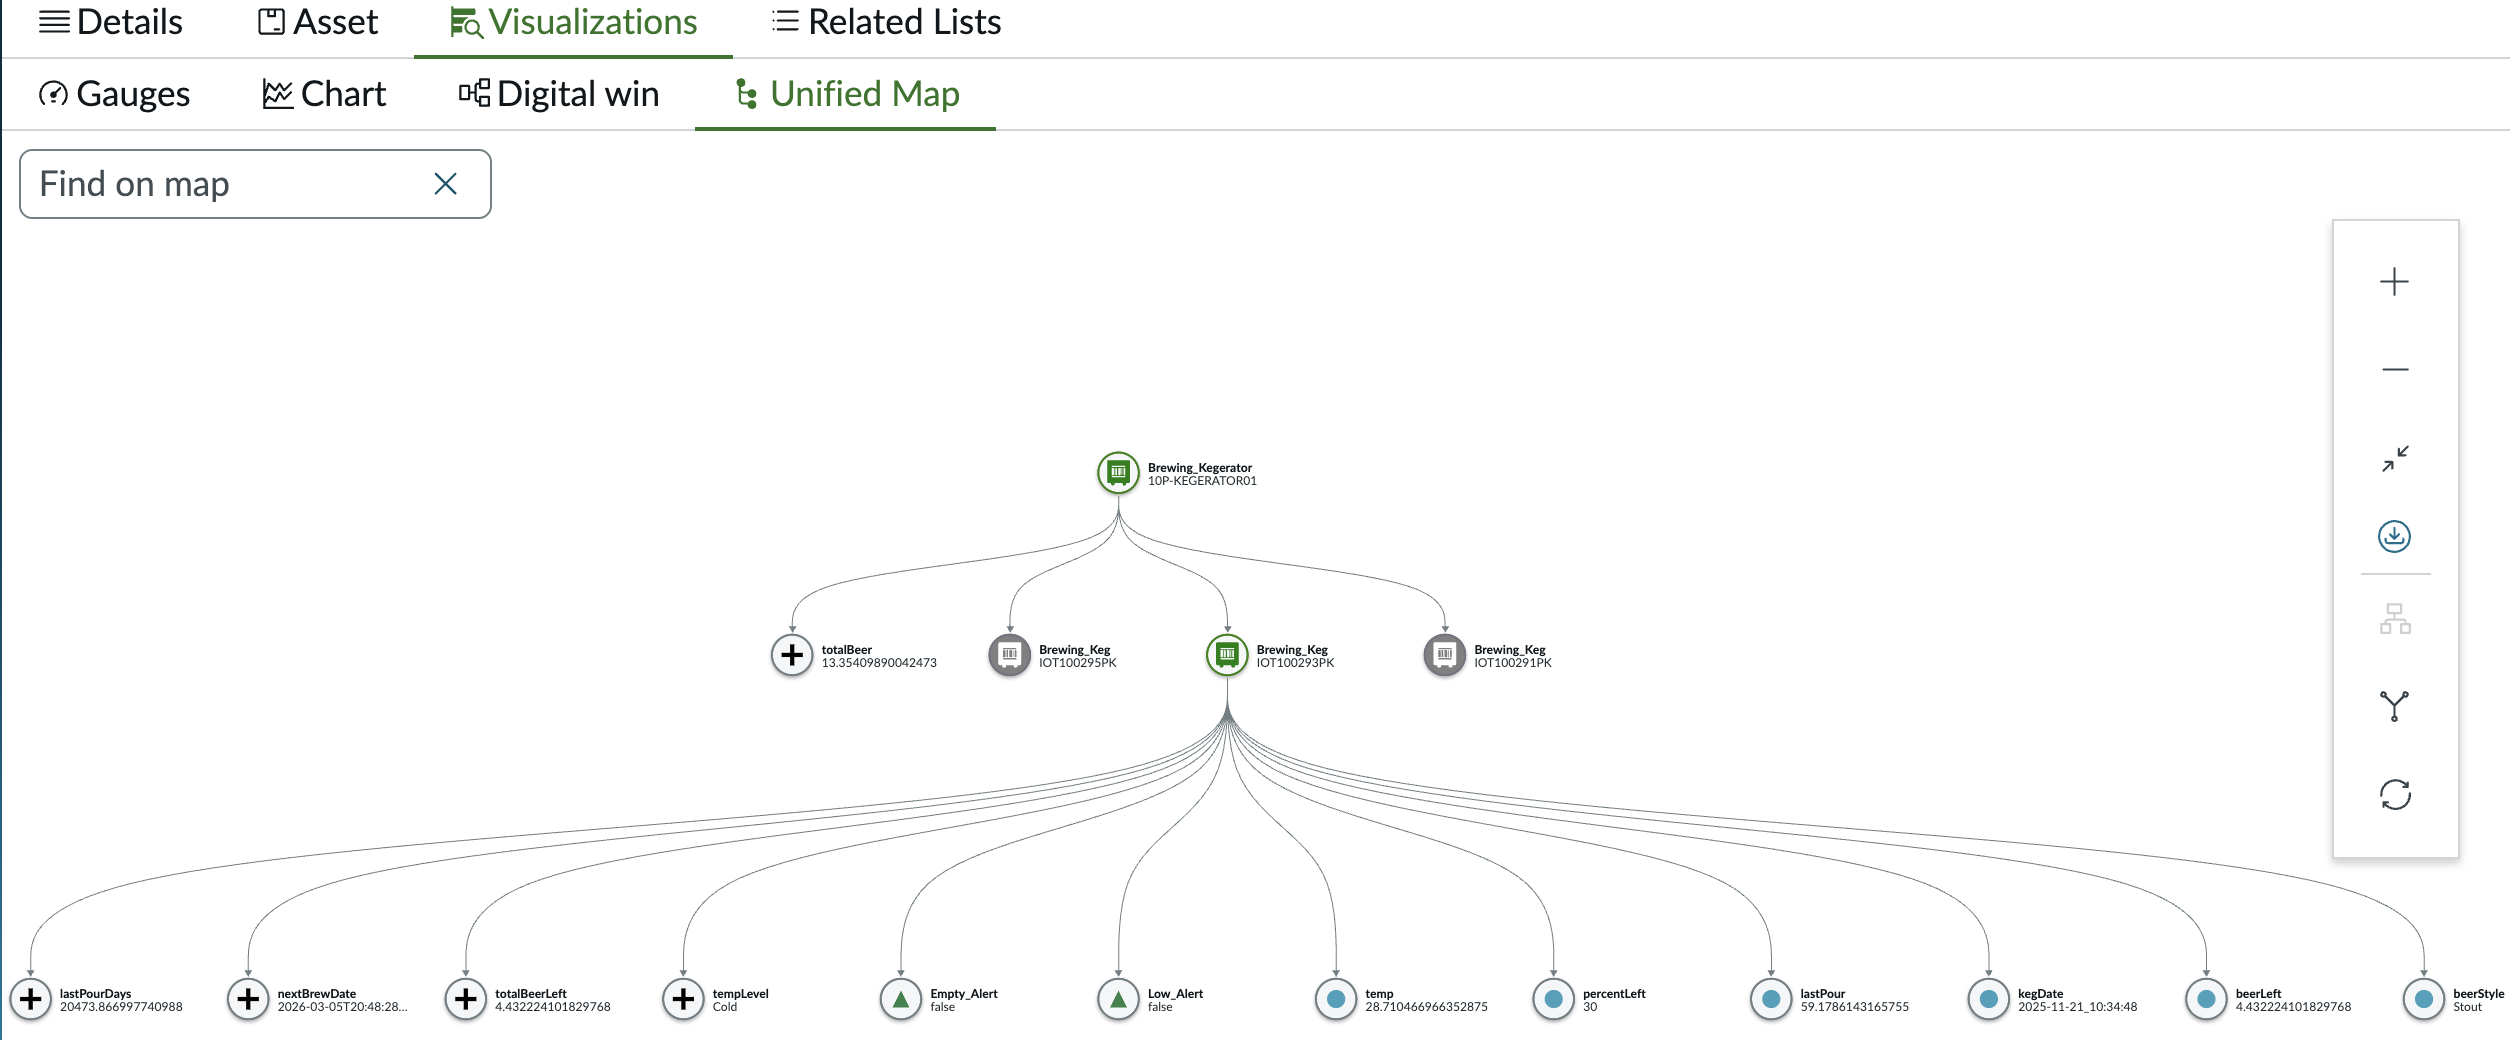
Unified Vertical Layout
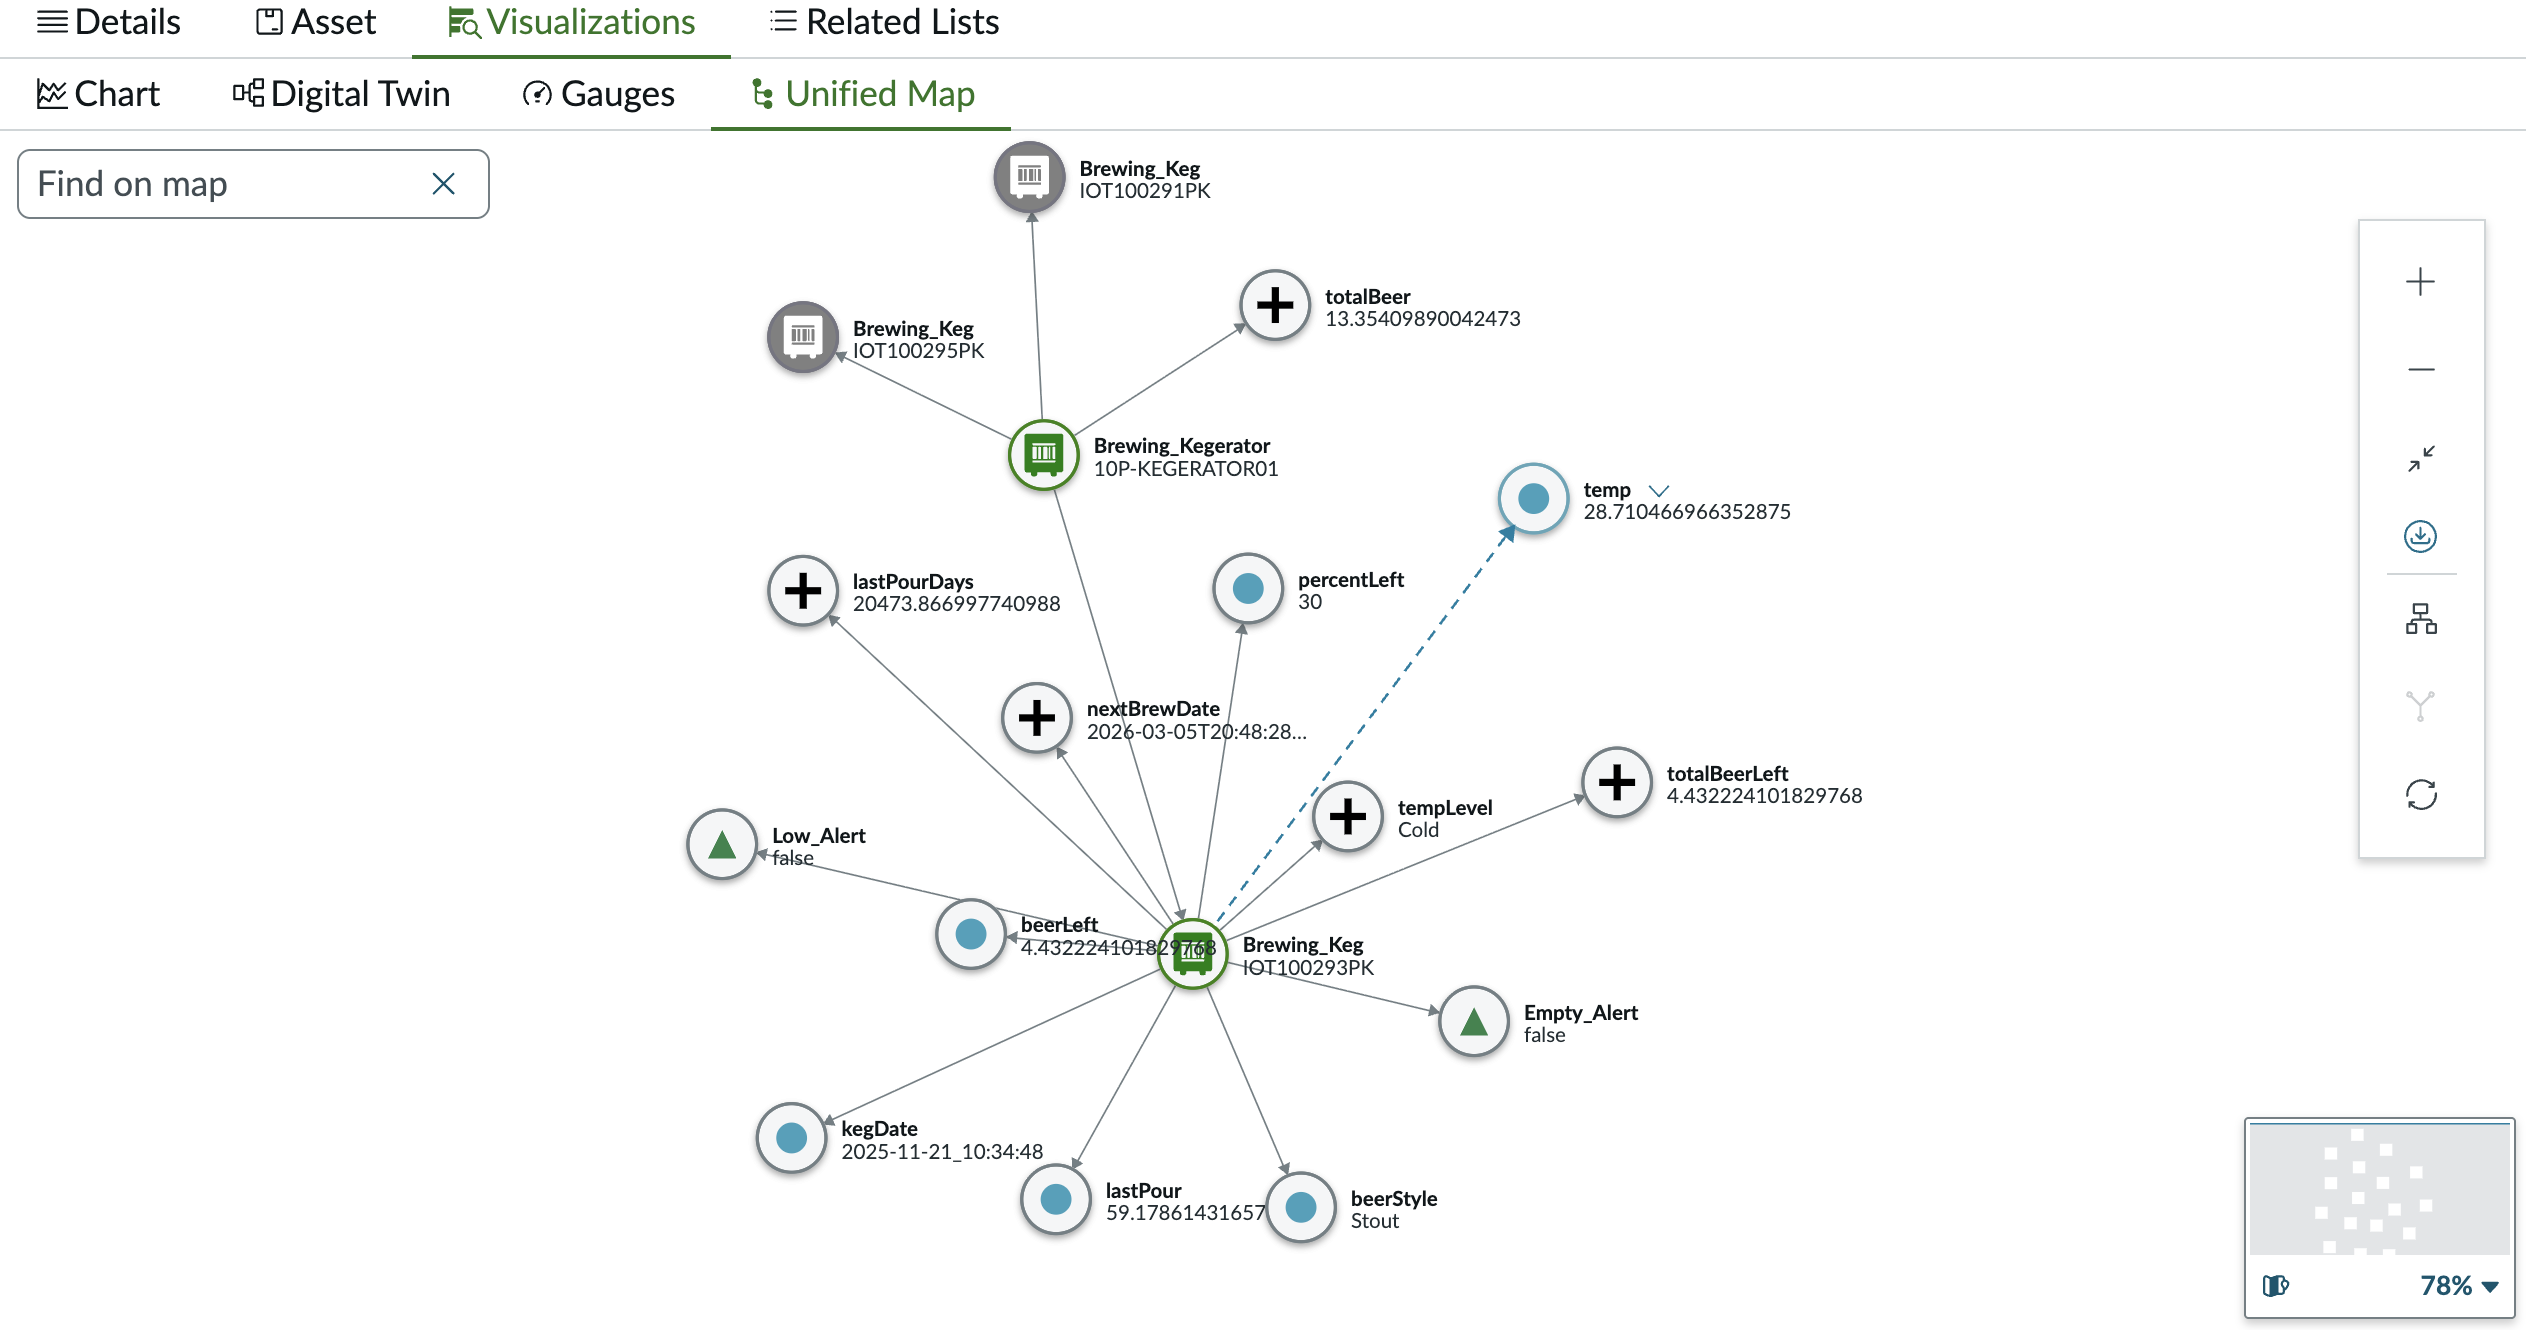
Unified Force Layout
IoT Copilot
Use IoT Copilot to give users the ability to ask natural language questions in an IoT Copilot Chat. Users can ask questions about a connected asset’s performance based on IoT telemetry data and alert history, unlocking instant insights.
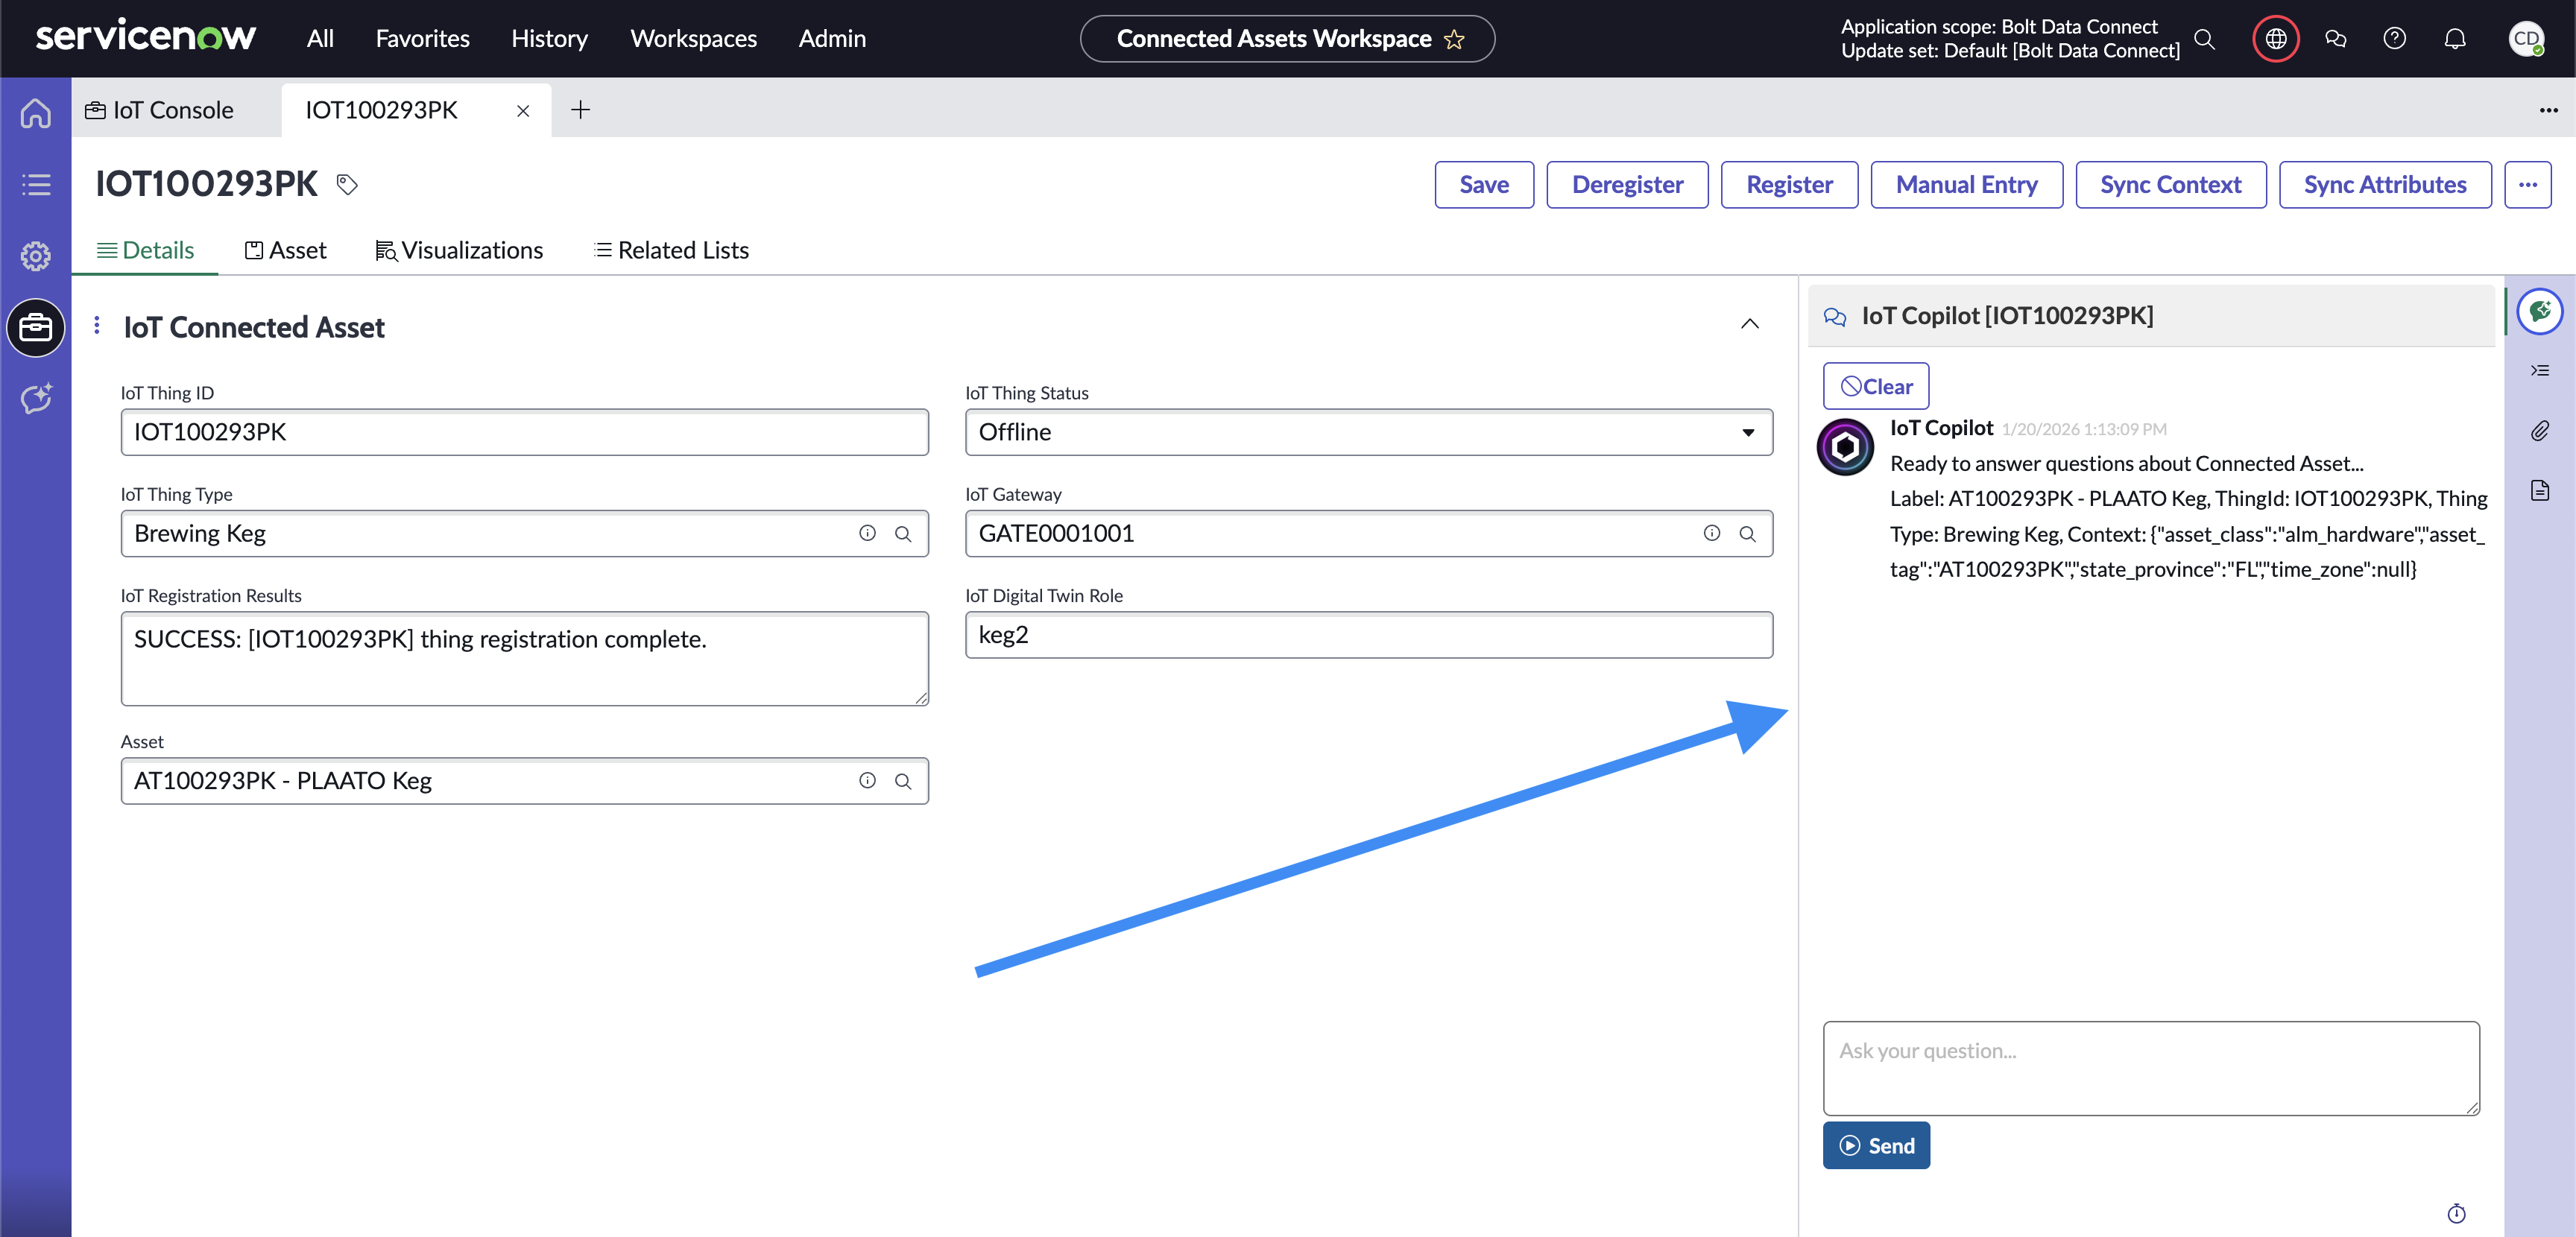
IoT Copilot Connected Asset Chat
The Global IoT Copilot found in the Connected Asset Workspace can be used to ask questions spanning all connected assets within the instance.
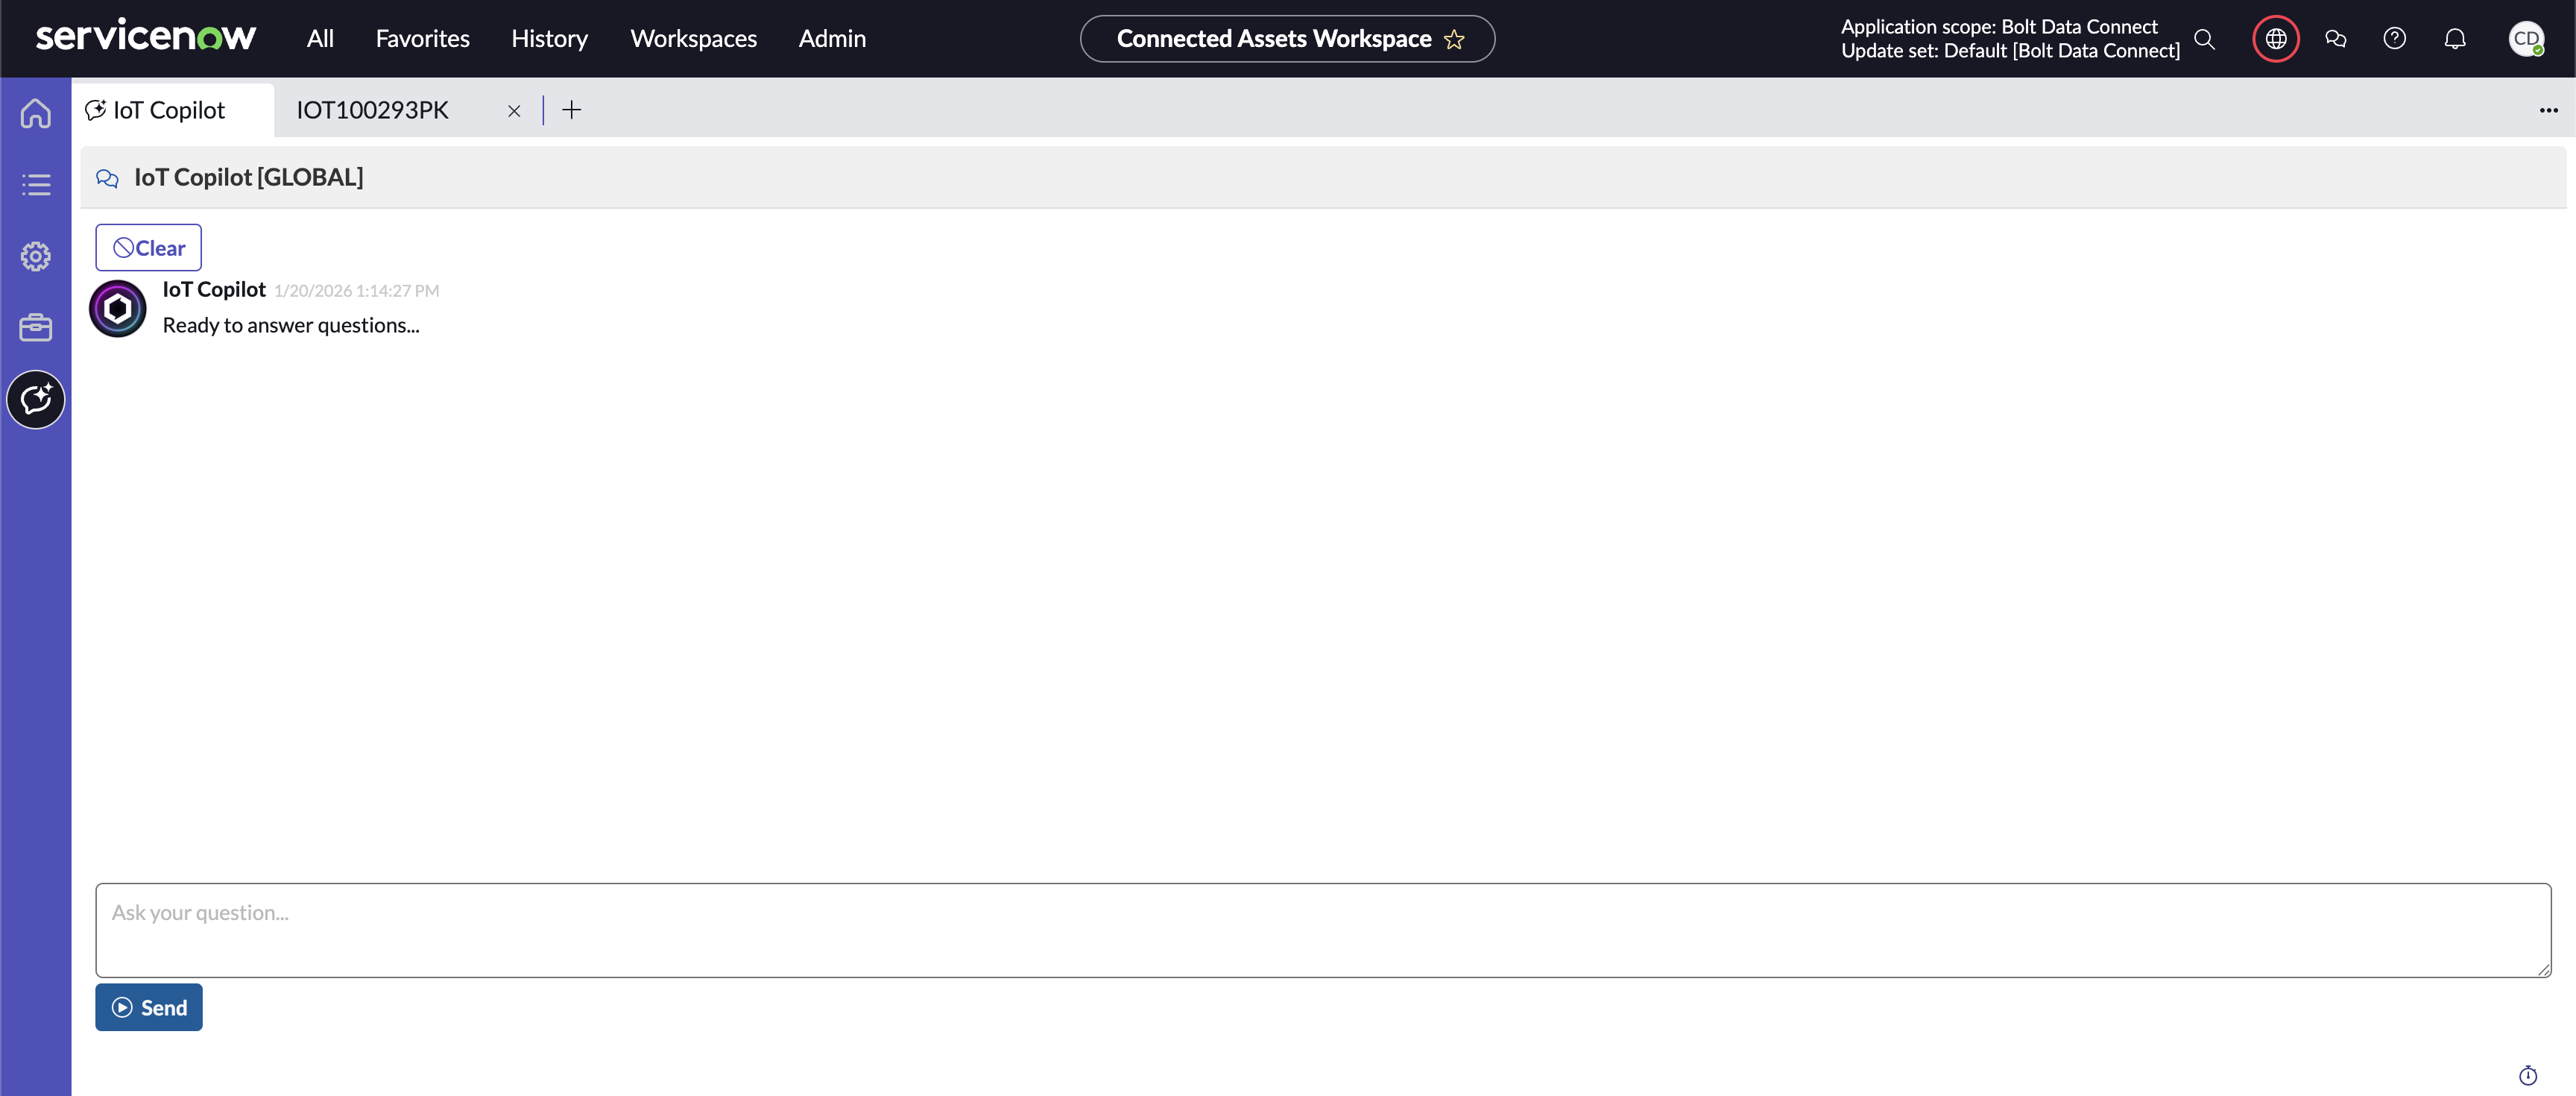
IoT Copilot Global Chat
Note
ServiceNow Now Assist licensing is not needed to take advantage of IoT Copilot. We are using Generative AI models behind our IoT Cloud API layer, utilizing a world-class Trust Layer to protect the data and privacy.Configurable Options
Thing Type
Each Thing Type can be given unique instructions using the Copilot Instructions field. These instructions give IoT Copilot the context it needs to understand how to interpret each Thing Type to answer questions more accurately.
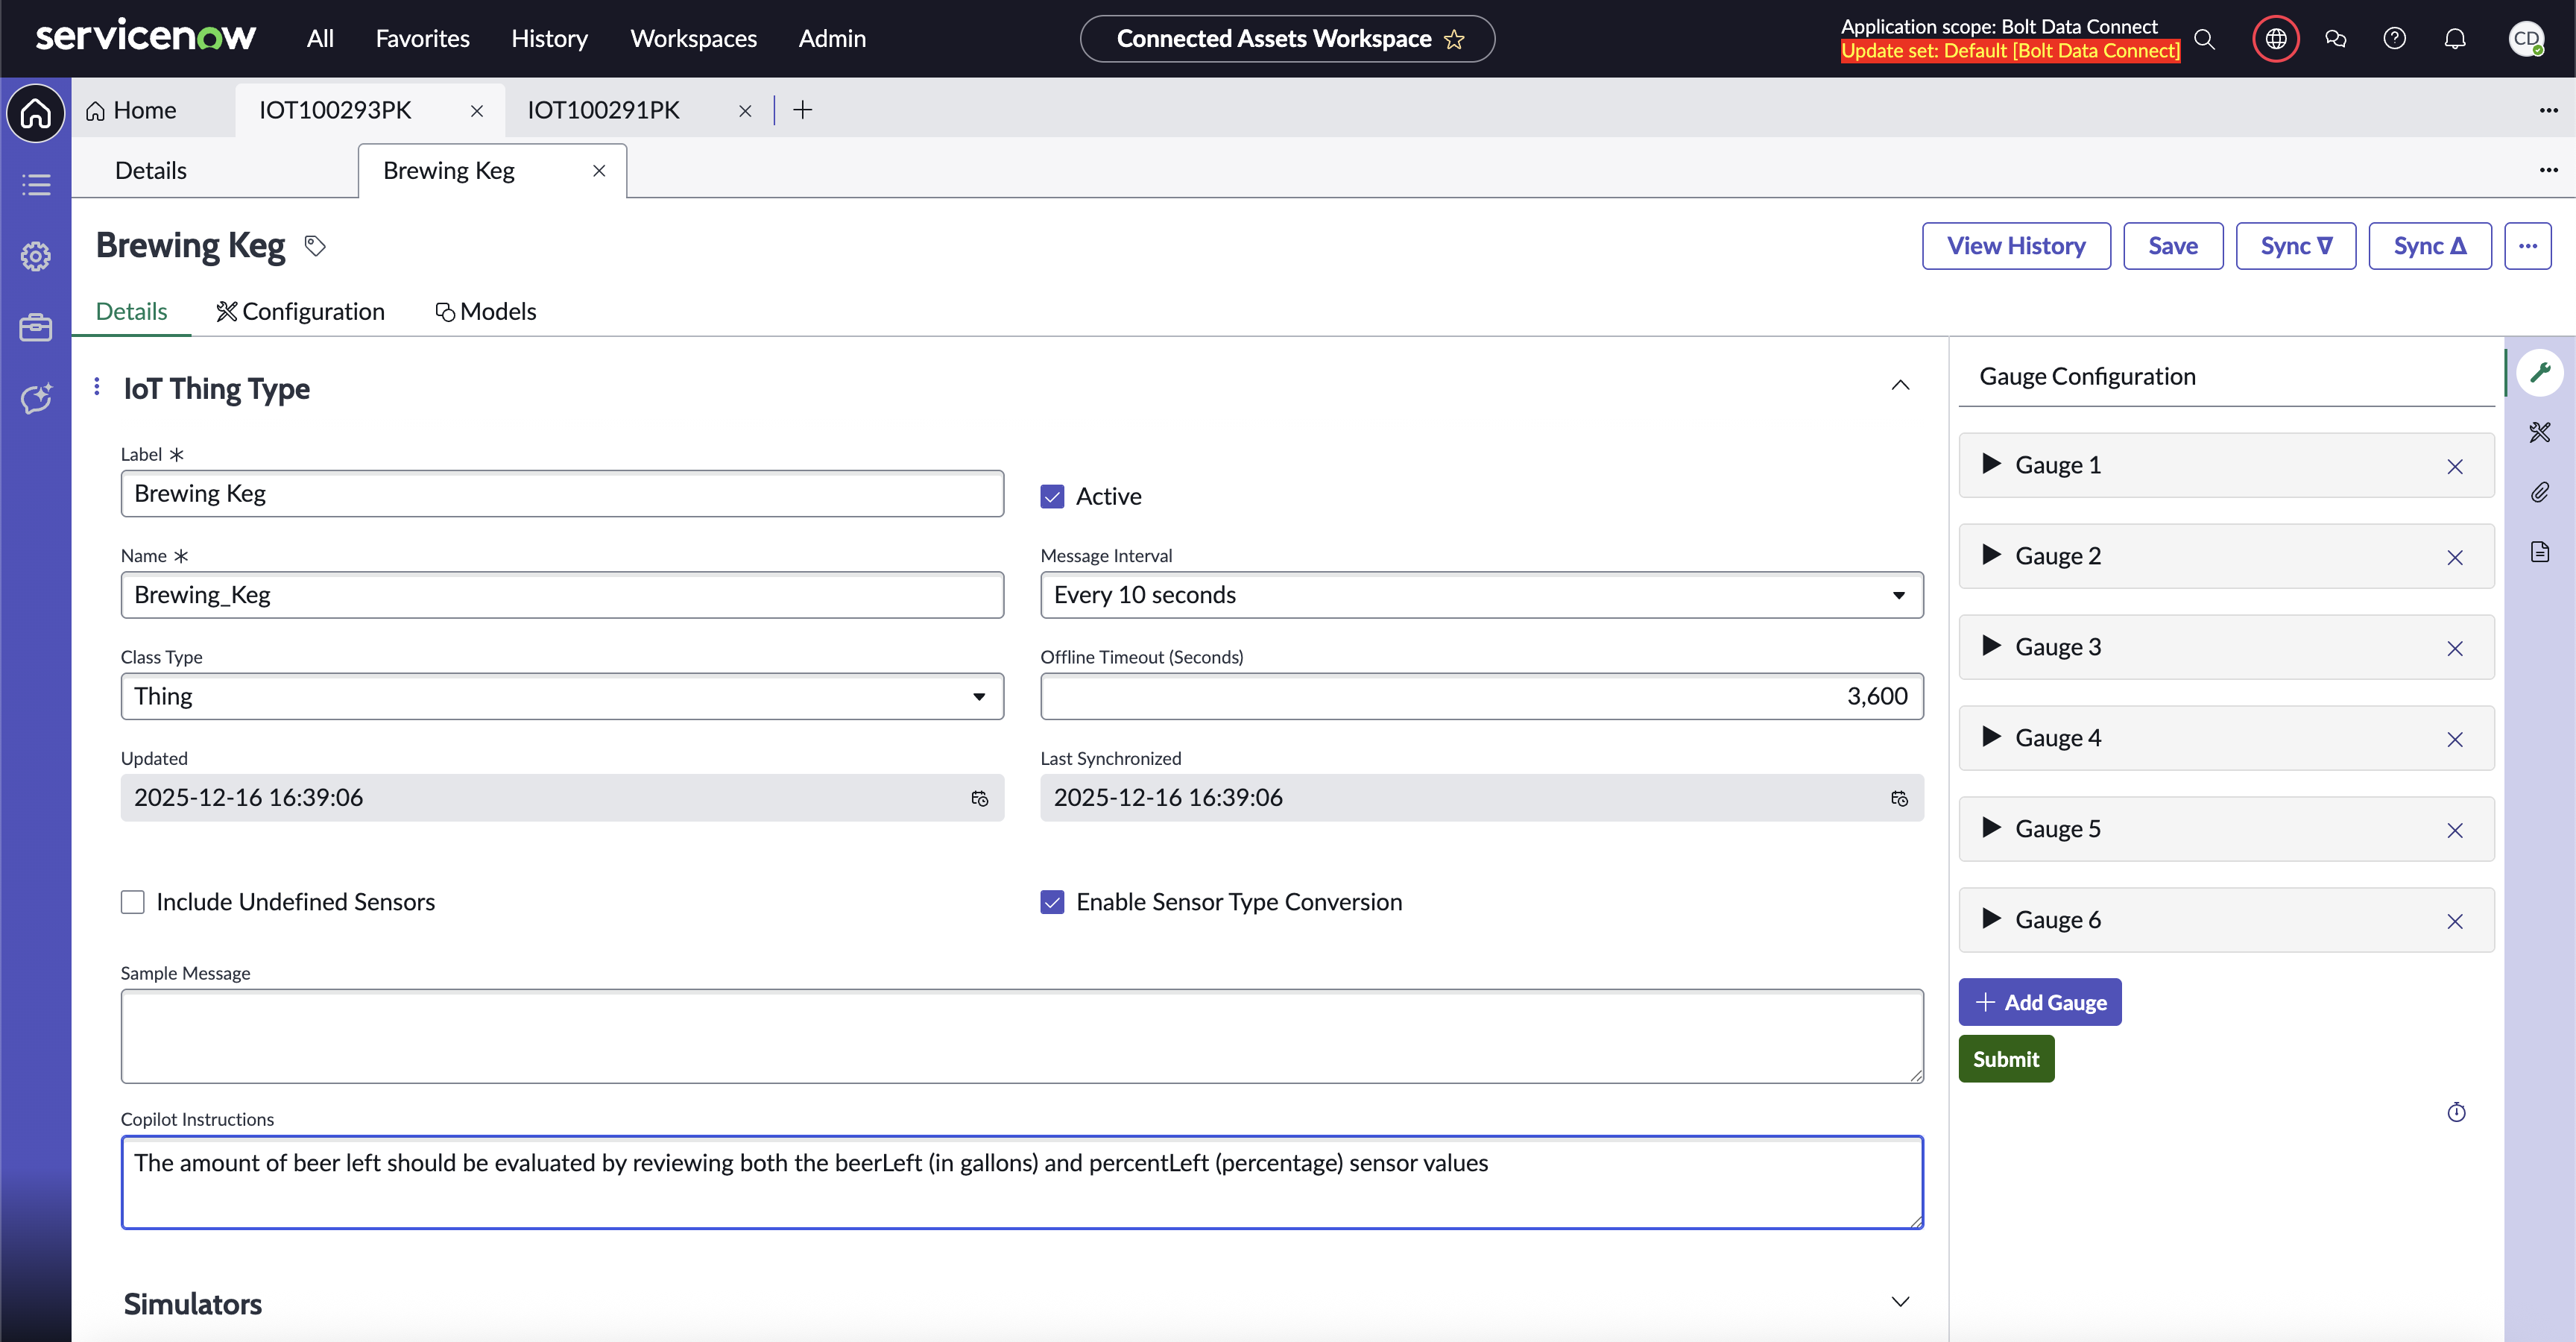
Thing Type instructions for IoT Copilot
Settings
You can configure the following options in IoT Setup -> Settings:
- Introduction section of Connected Asset Agent Prompts
- The Question section of Connected Asset Agent Prompts
- The Answer section of Connected Asset Agent Prompts
- Error response of Connected Asset Agent Prompts
- Agent Model (LLM):
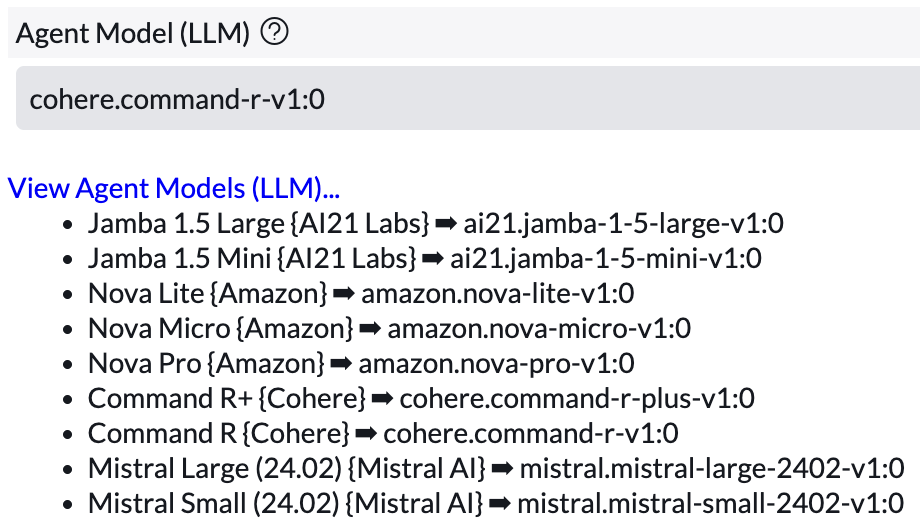
Connected Asset Agent Models
Sensor Gauges
The “Gauges” tab in the Connected Asset Record Page in the Connected Asset Workspace is used to render sensor values as a Single Score, a Progress Bar, or a Dial. There is a Gauge Configurator tab on the Thing Type Record page to set them up.
-
Open the desired Thing Type in the Connected Asset Workspace.
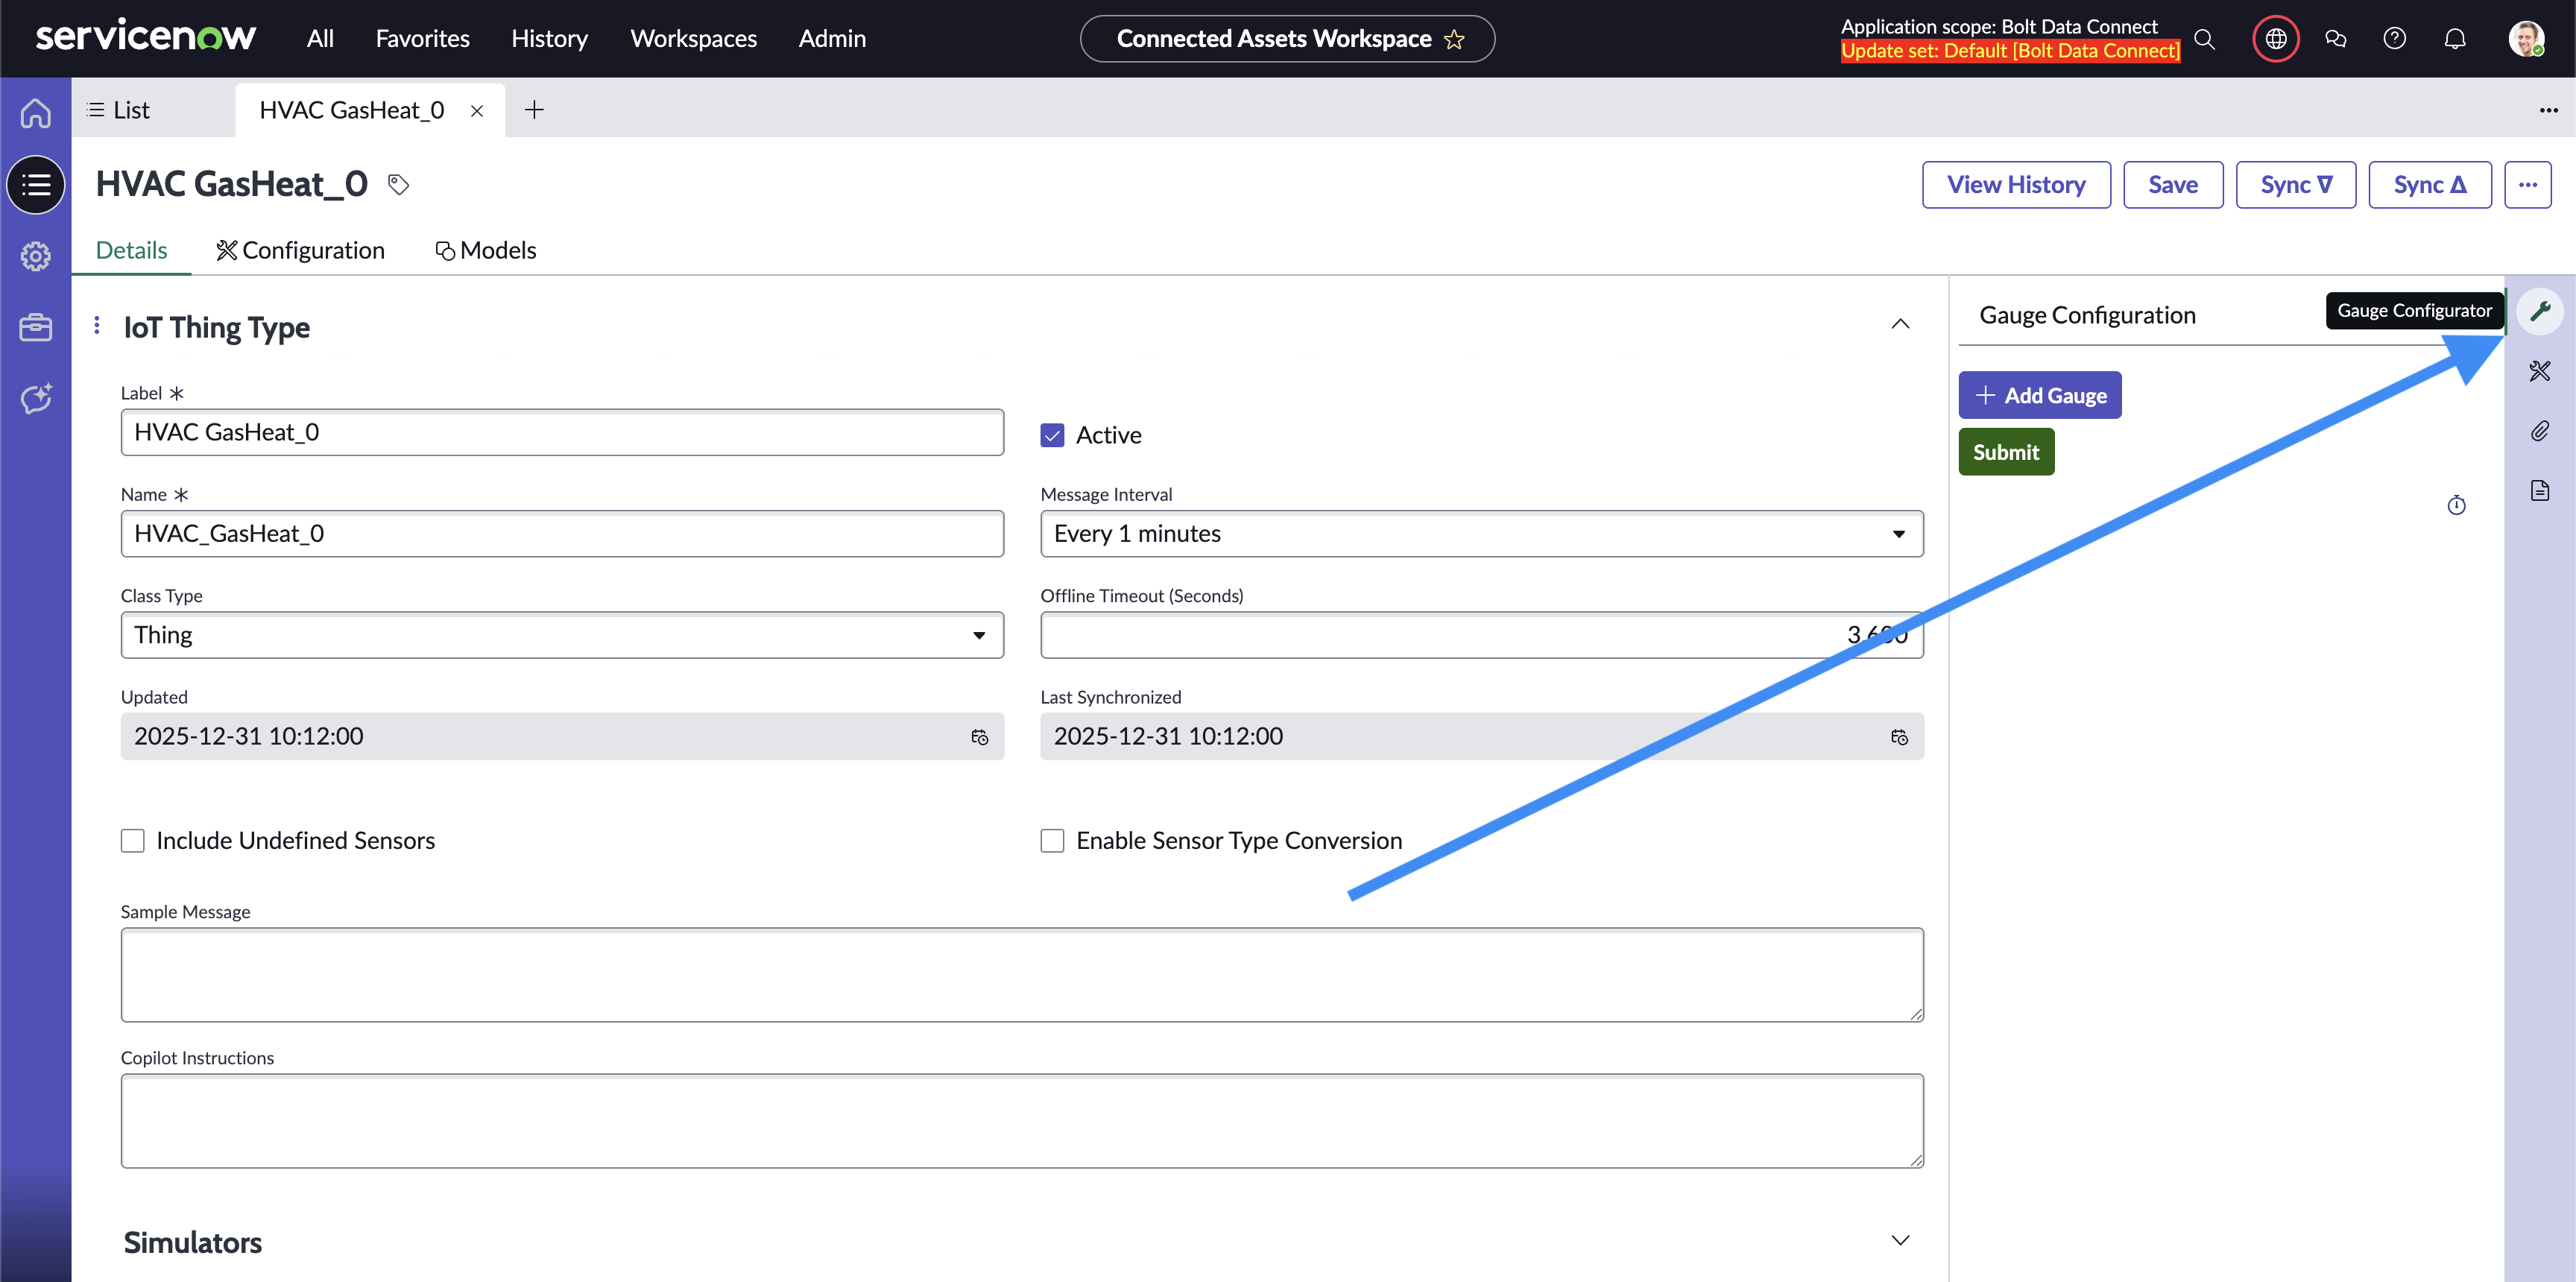
Gauge Configurator Location
-
Click the “Add Gauge” button to add Gauges to the thing type. You can set:
- Title
- Title is Sensor Name sets the title to the result of a sensor described by the Title field
- Sensor sets the sensor to display a Gauge for
- Gauge Type sets the Gauge to render as a Single Score, Progress Bar, or a Dial
- Row sets the vertical order that the Gauge will render on
- Column sets the horizontal order within a Row that the Gauge will render on
- Order sets the vertical order within a column that the Gauge will render on
- Min sets the minimum value for Progress Bars and Dials
- Max sets the maximum value for Progress Bars and Dials
- Precision controls how many decimal places to display on the gauge
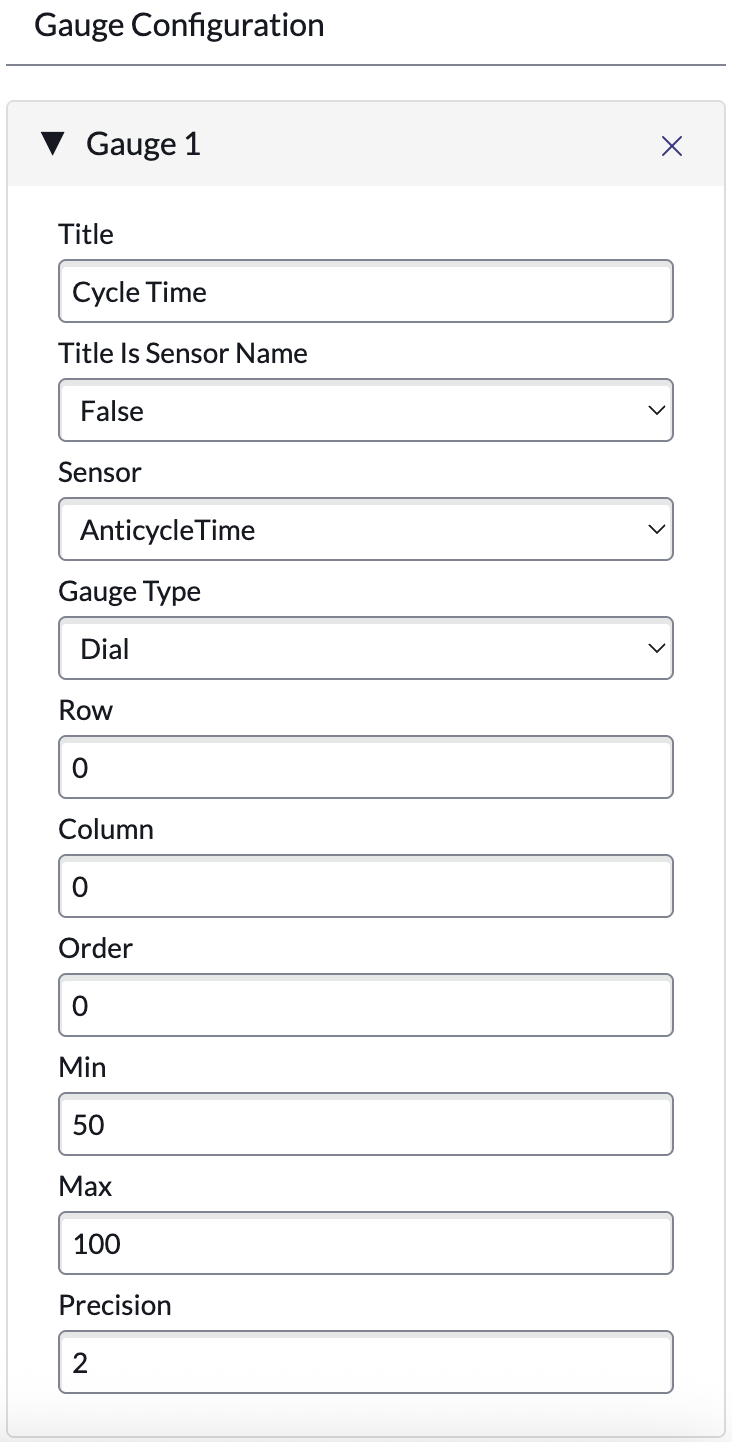
Sensor Gauges Editor
-
Click Submit
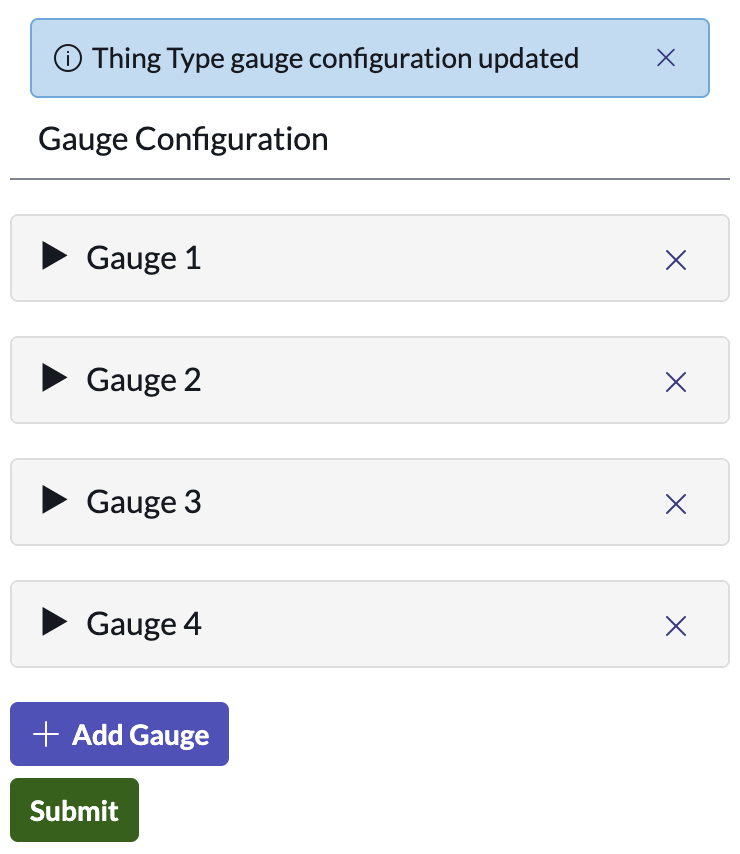
Sensor Gauges Editor Submit Message
-
See the resulting Gauges in the Connected Asset Record Page in the Connected Asset Workspace
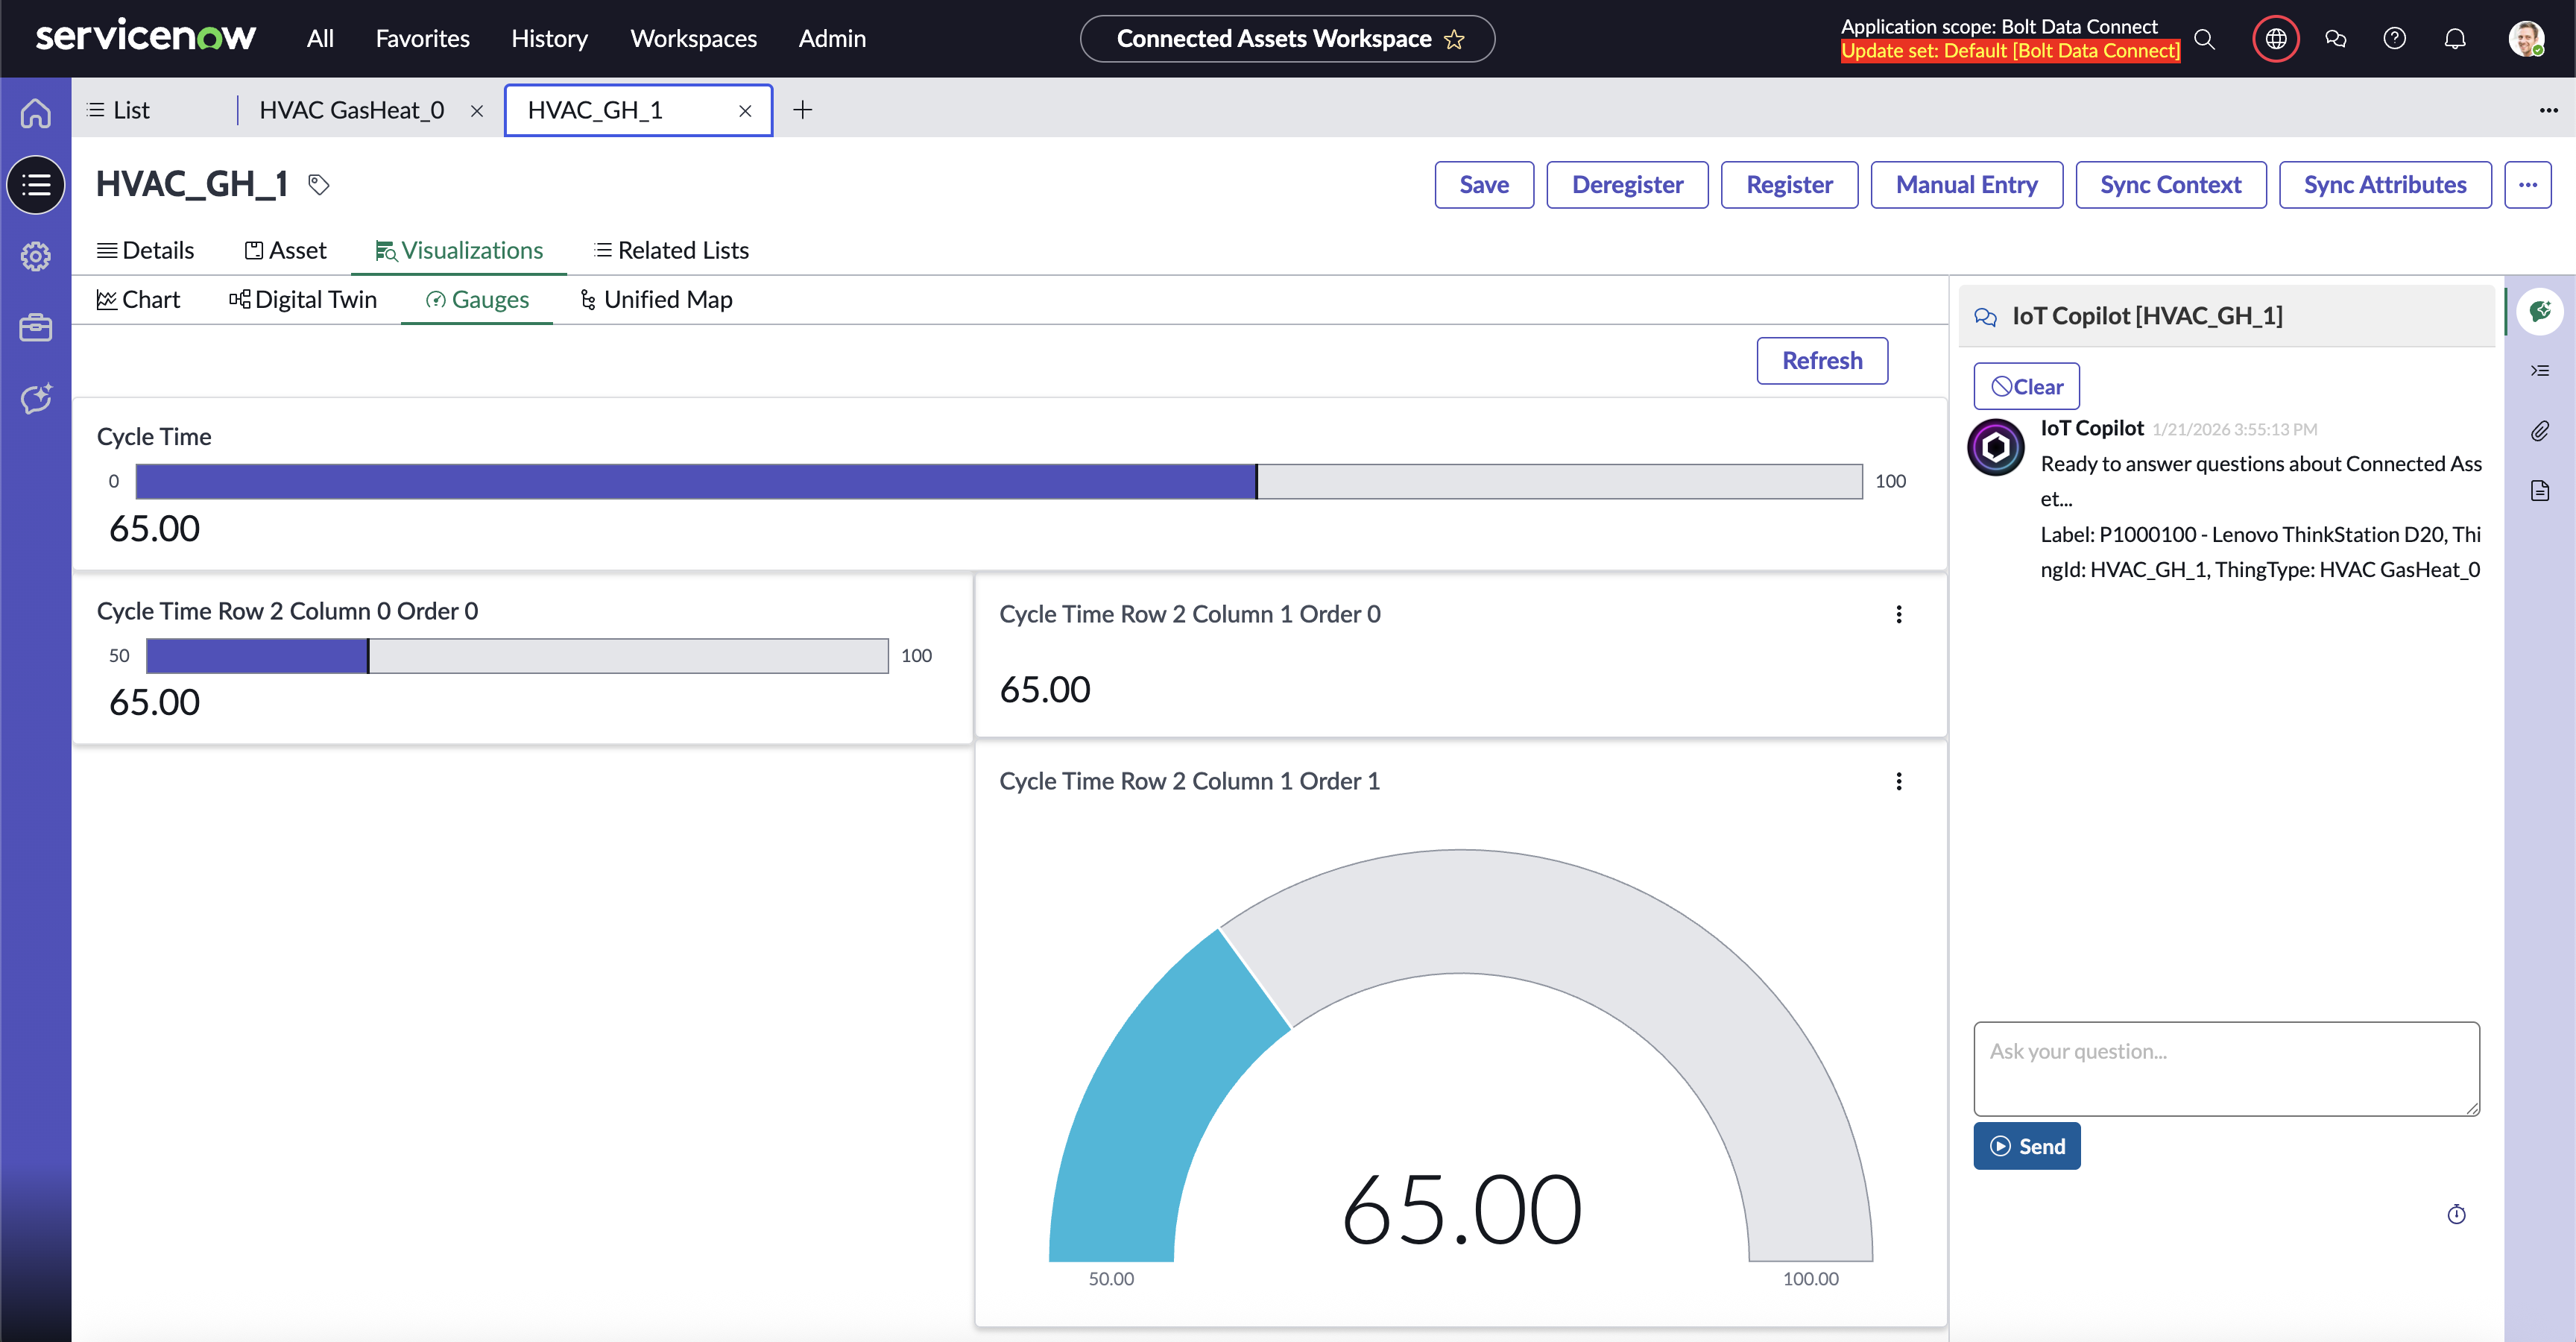
Sensor Gauges
Simulators
This section provides details on how to use and configure Connected Asset Simulators.
Simulators are runtime engines for testing IoT Gateways and Things. When you open the IoT Simulated Assets Module or the Simulated Assets table in the Connected Assets Workspace, it displays a list of all the Simulators within this ServiceNow org. These Simulators can “impersonate” devices by generating the messages typically sent from the actual devices.
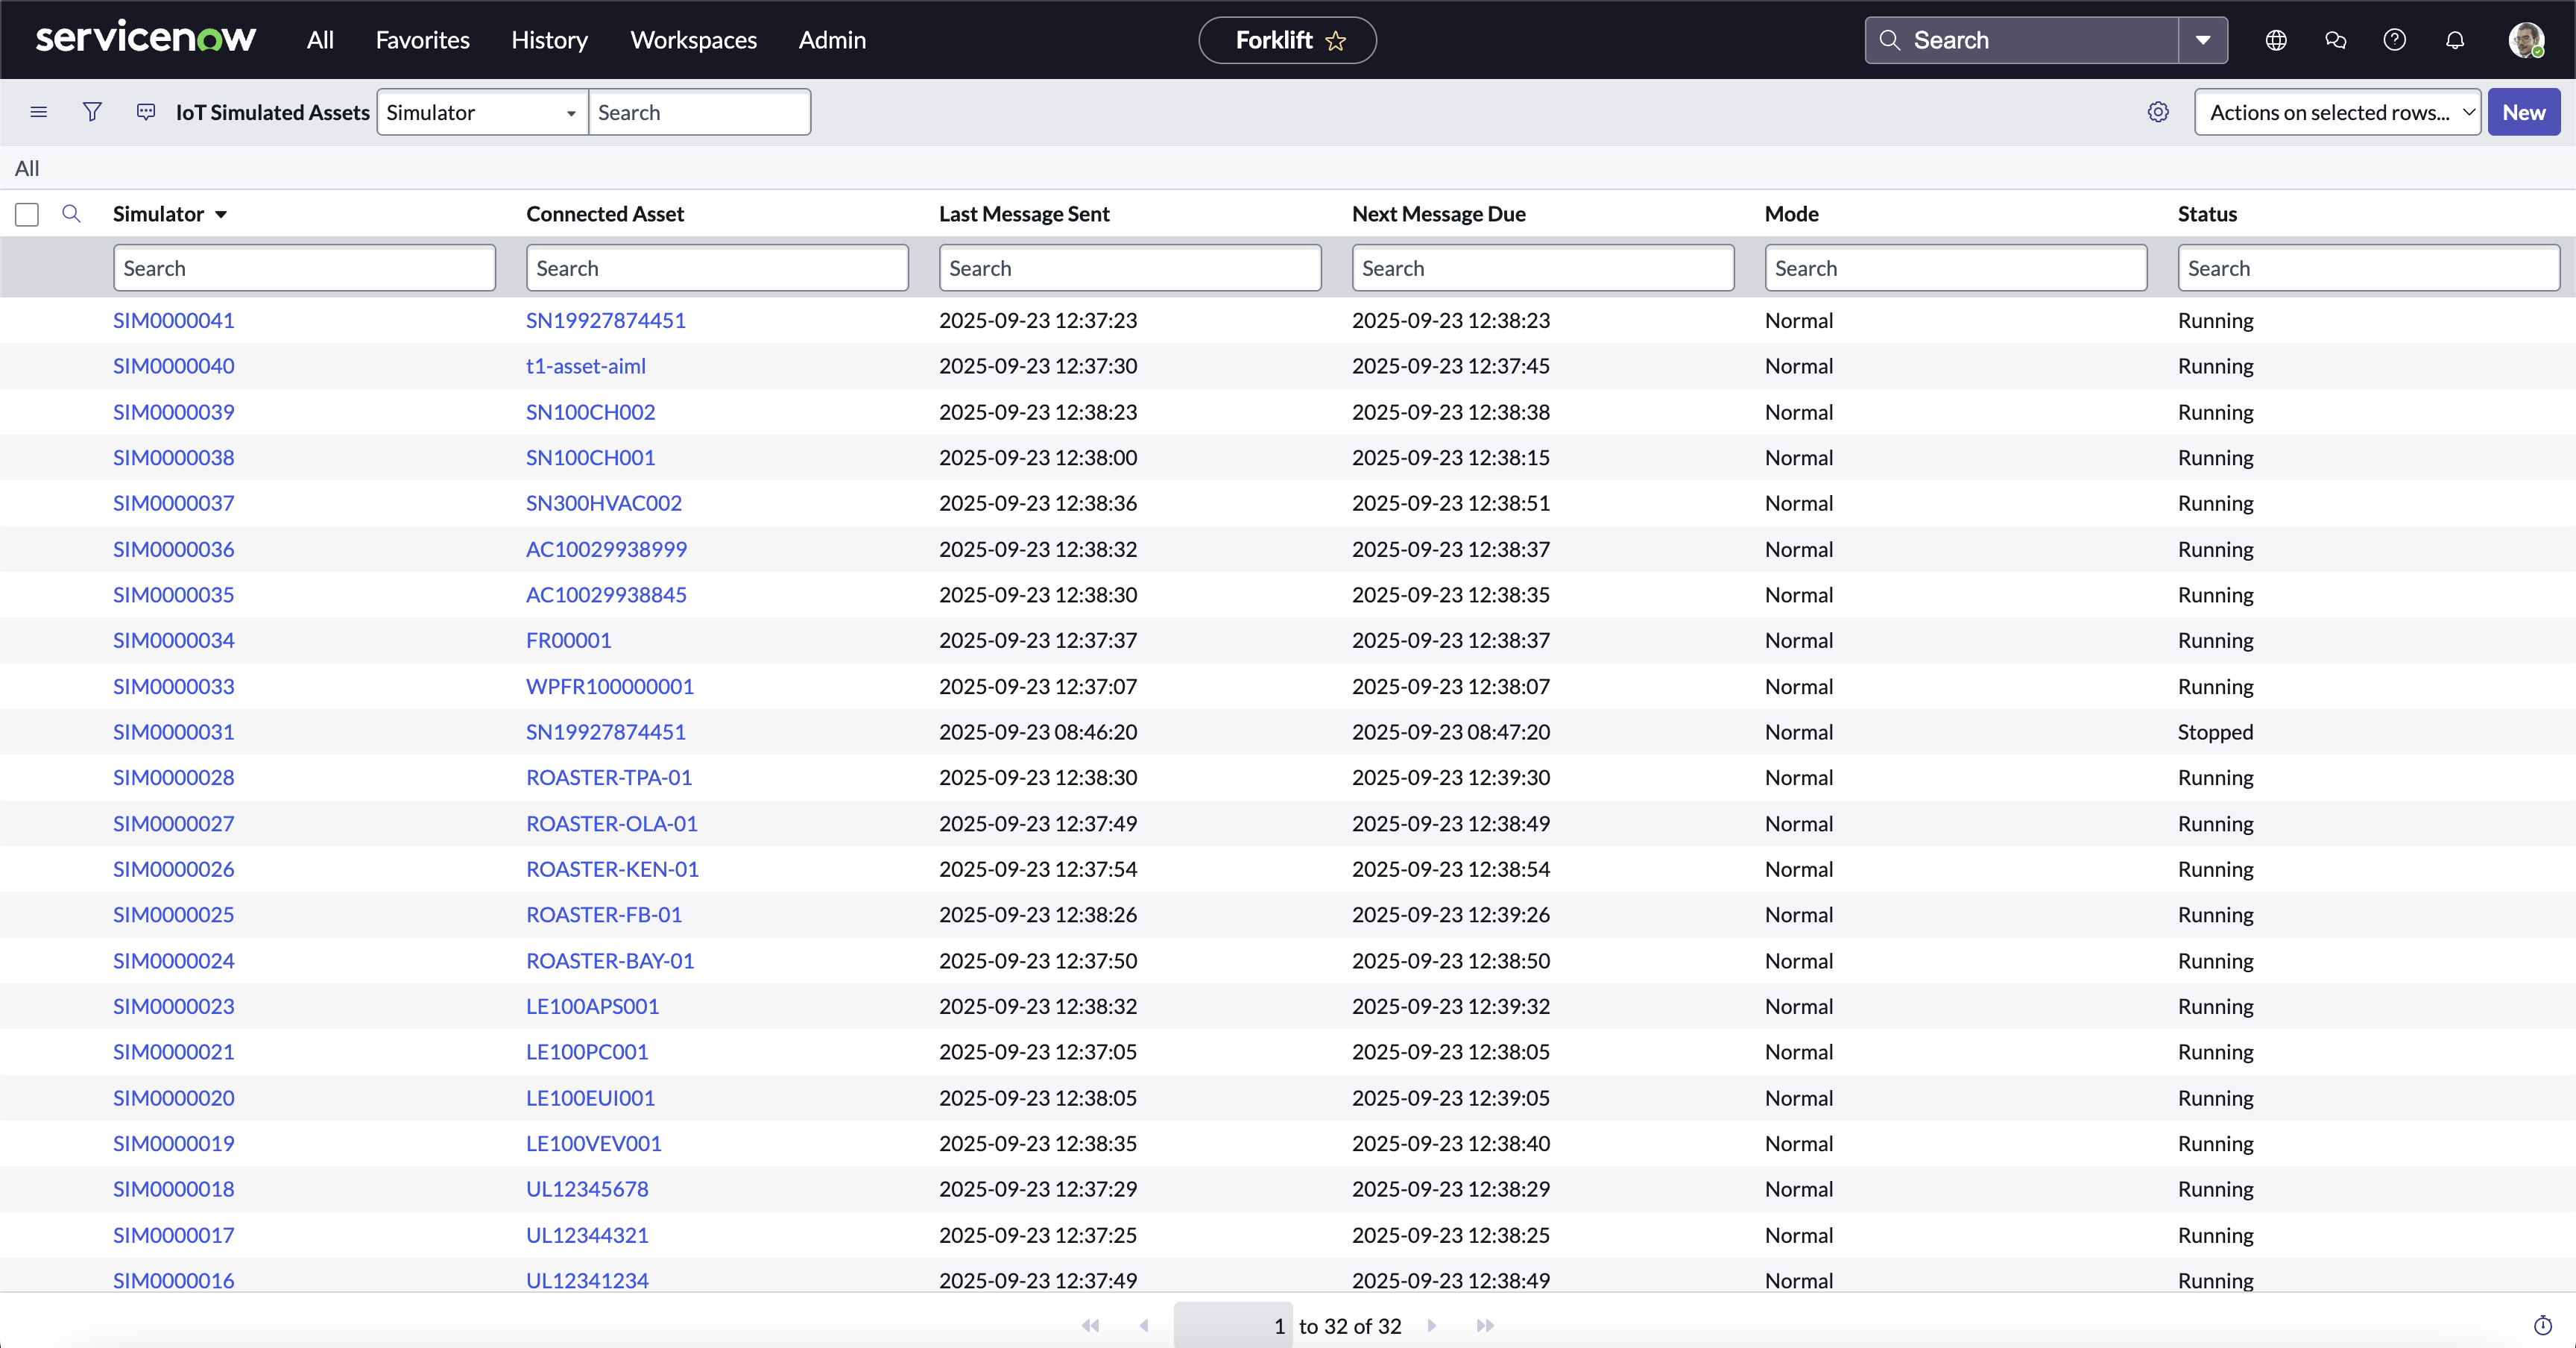
Simulators
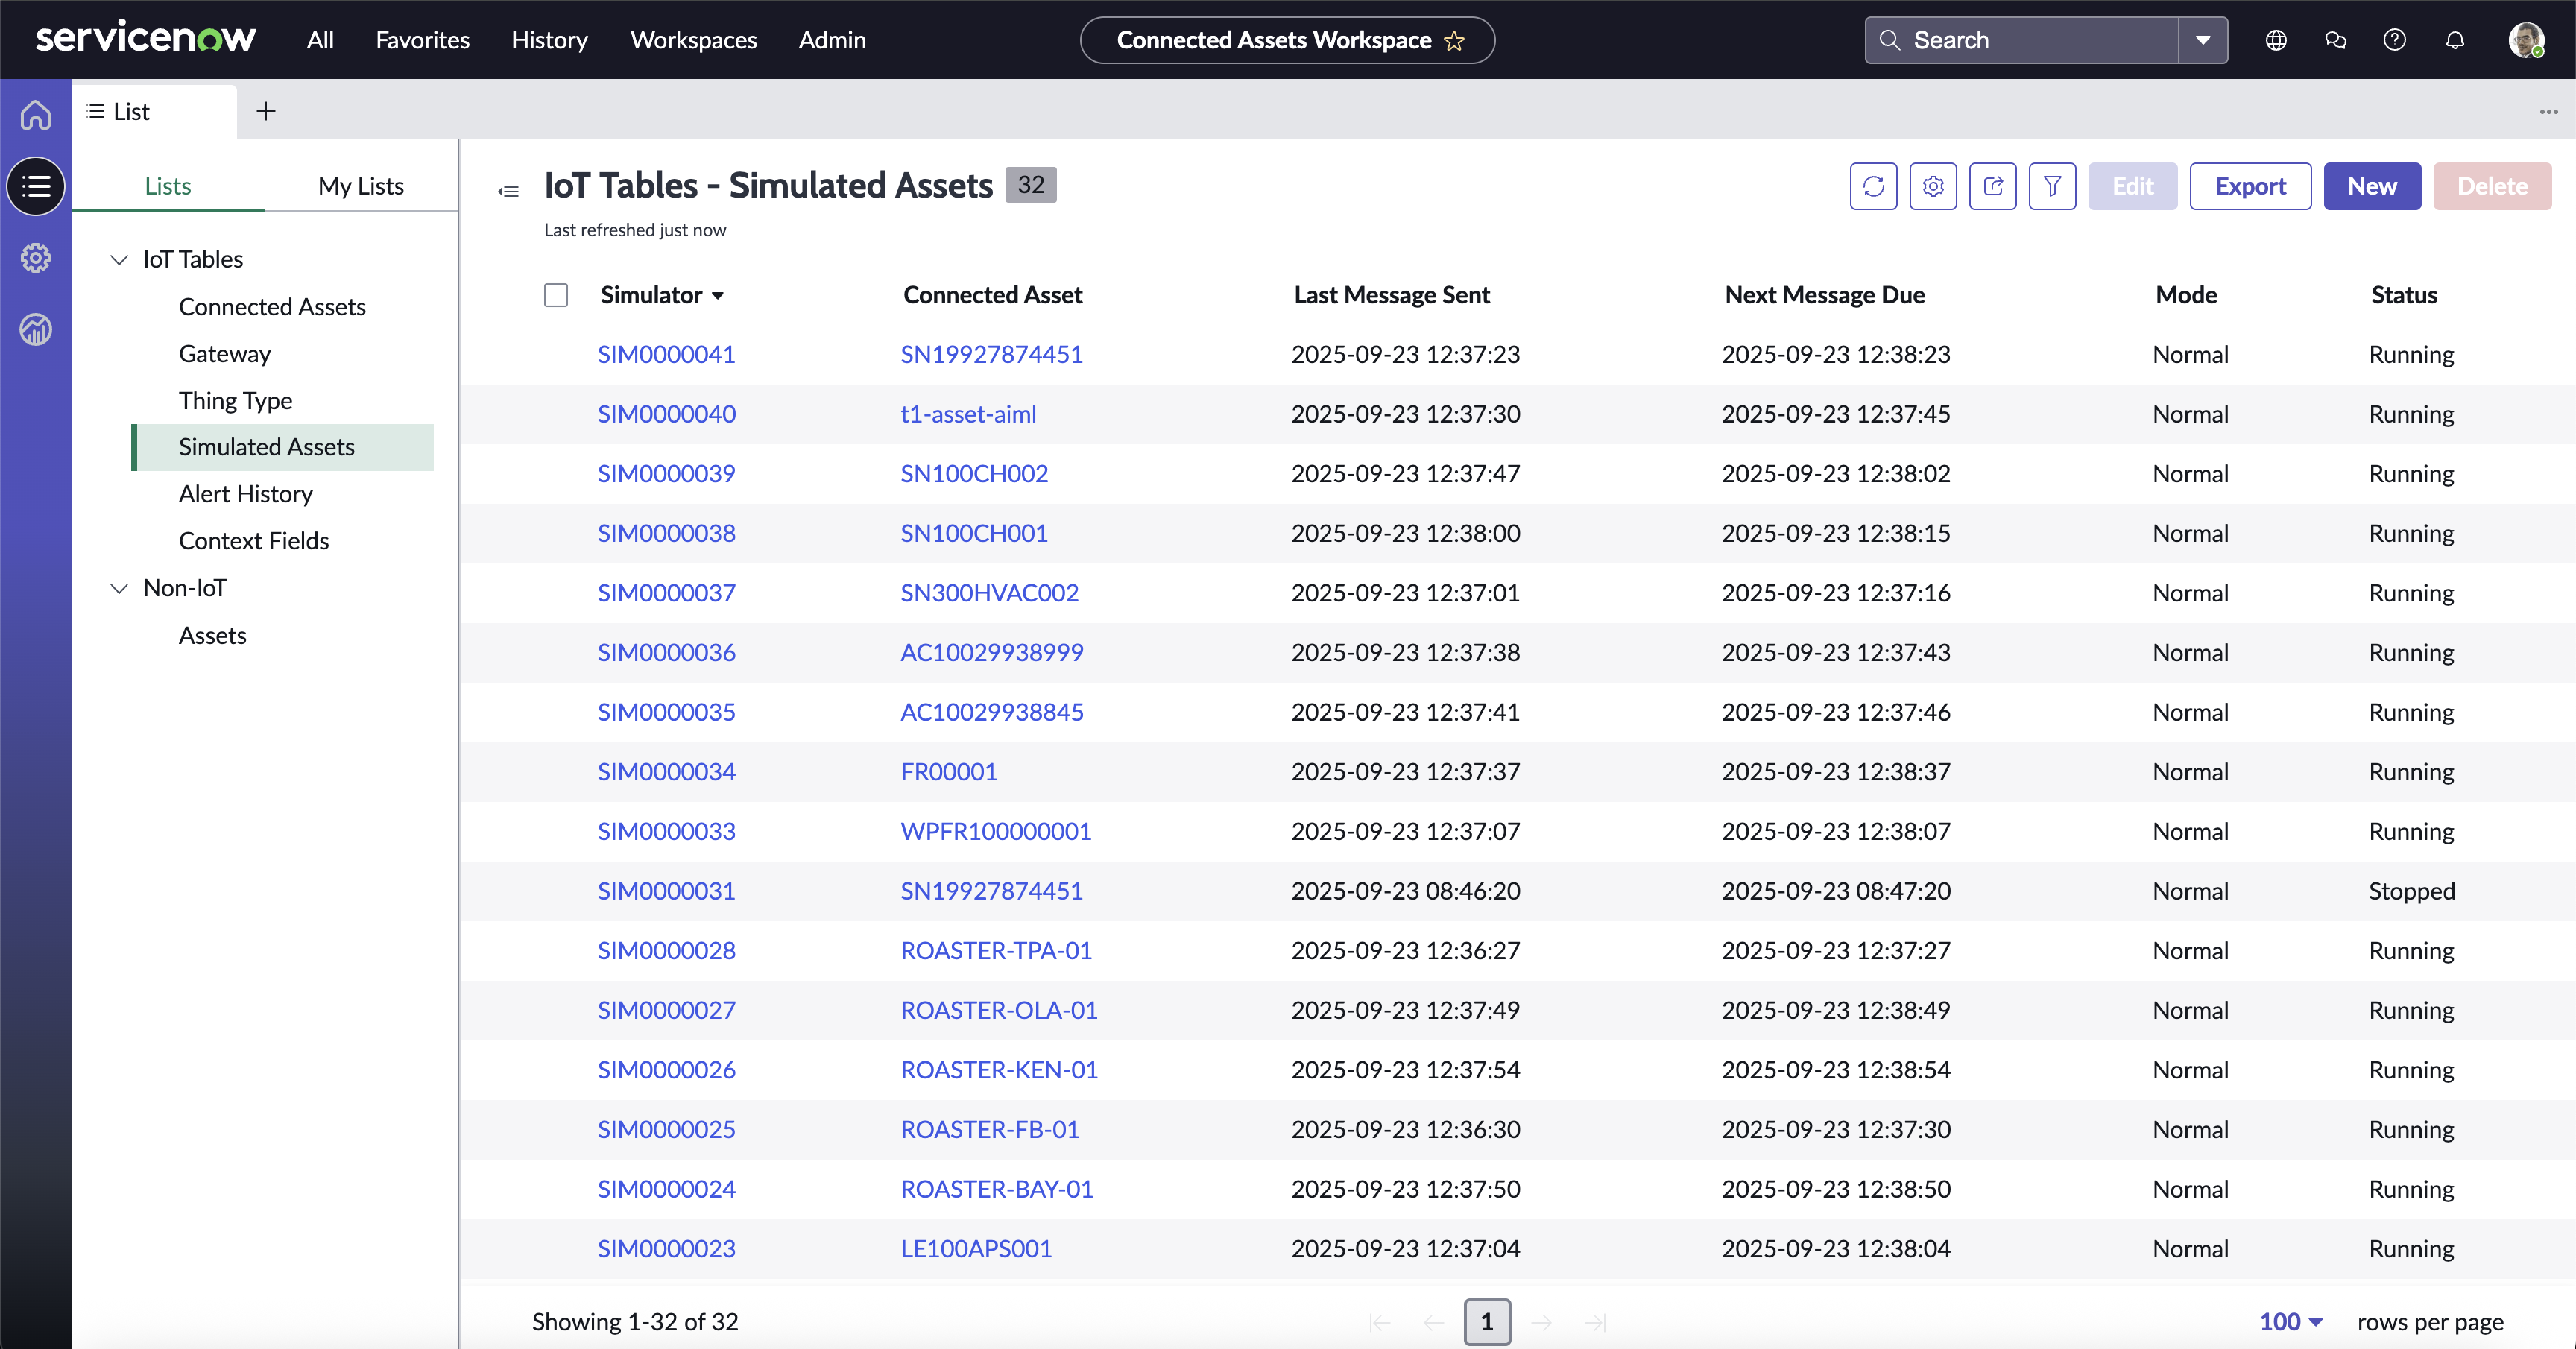
Simulators in the Workspace
Controlling Simulators
You can open a simulator by clicking on the name. With a simulator open, you can do the following:
- Change the Status (#1)
- Select the Connected Asset to simulate (#2)
- Select the Mode (#3)
You can change the Connected Asset and Status from the list view. To remove a simulator, you can delete the record.
Modes (#3) are configured below, and define the different combinations of values being sent from the simulated devices. You can see which Mode every device is in, as well as change the mode by switching it in the Simulator Record. This will cause the device to send different values, possibly resulting in an Alert Condition, to aid in testing and validation of the configured automation.
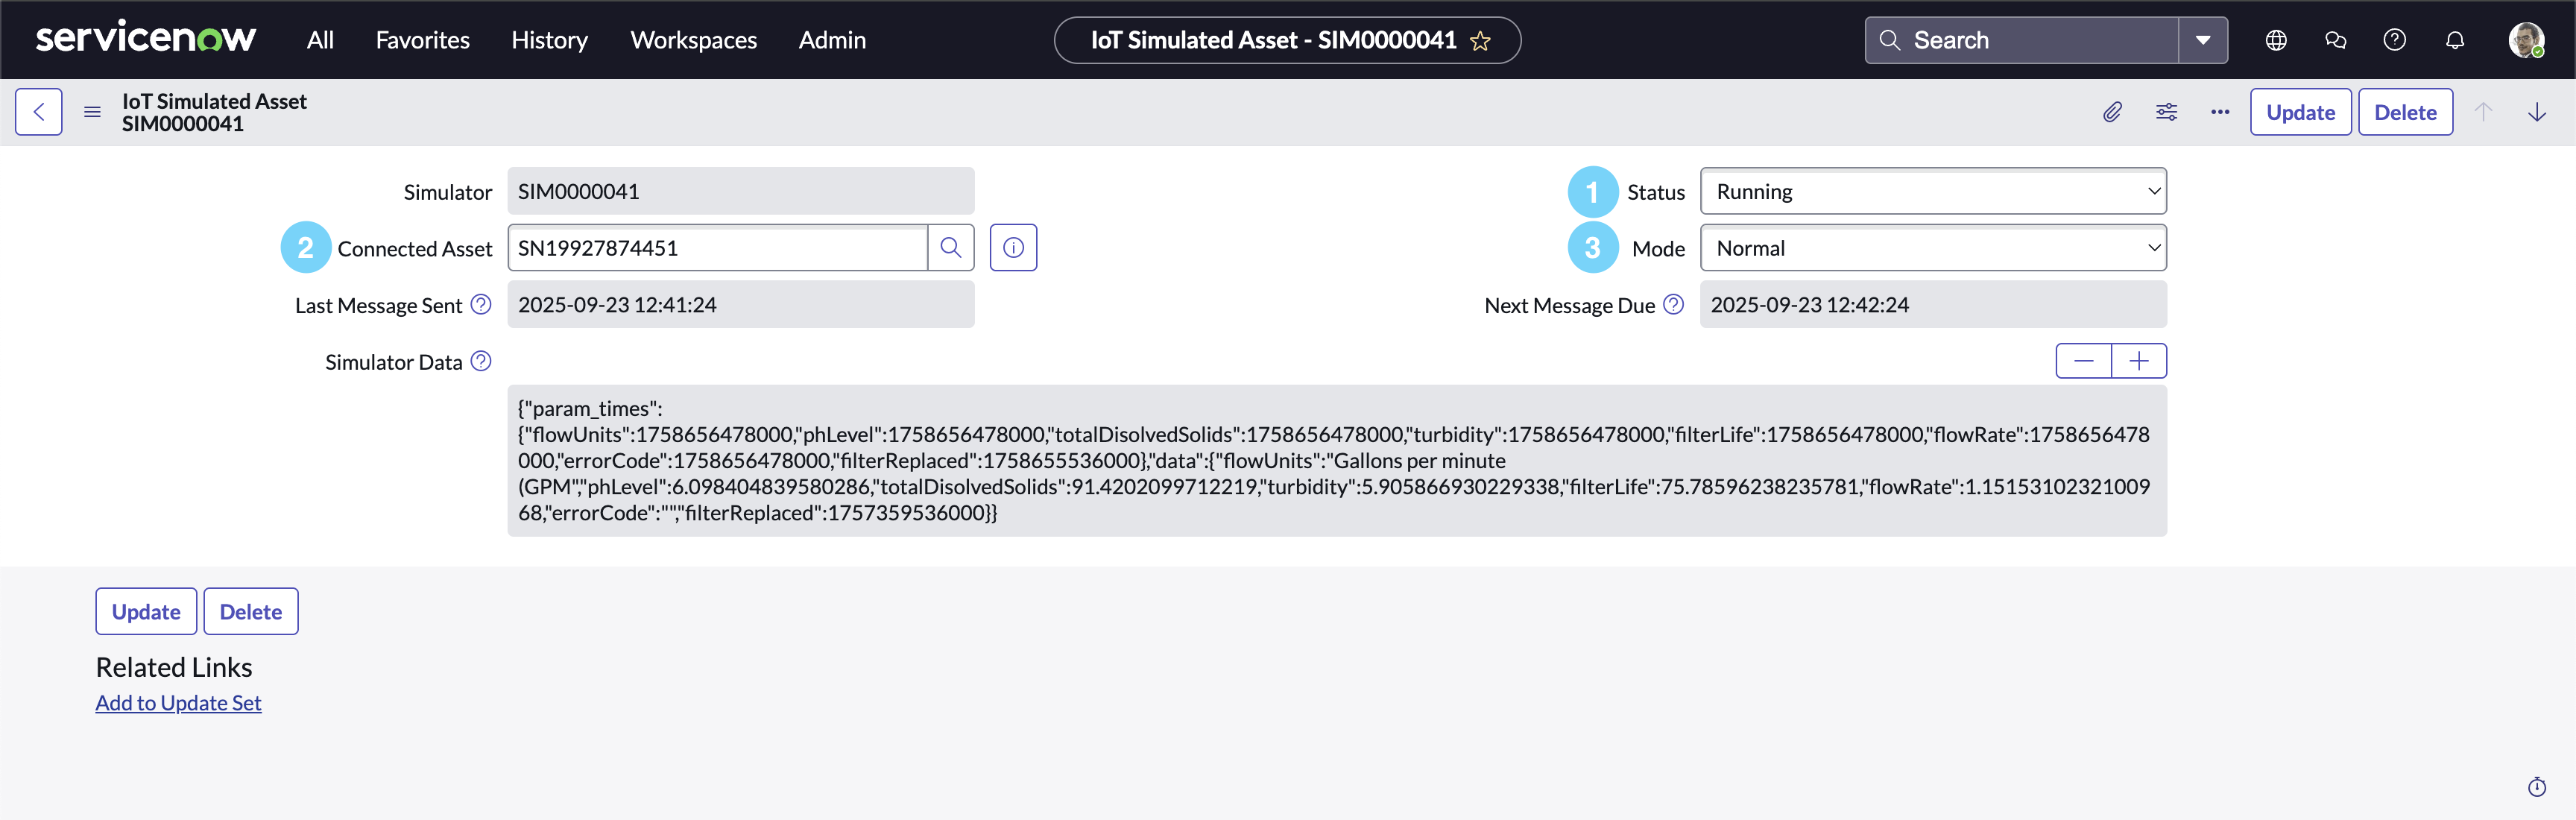
Simulator Console Controls
Note
If your simulated Thing shows “running”, but is not connected or sending data, it is possible that:
- There is a problem with the Simulator Config (next section). Double check all parameter values and types (Numbers, etc).
- The Gateway might need to be re-registered.
- The
IoT SimulatorScheduled Job is not enabled.
Configuring Simulators
Simulator Builder
The Simulator Builder is a UI Page found on the right side of the Thing Type page in the Workspace. This can be used to configure Simulators which run within the ServiceNow Instance.
Instructions
- Open the Thing Type in the Connected Asset Workspace.
- Click the Simulator Builder Side Button to open the Simulator Builder.
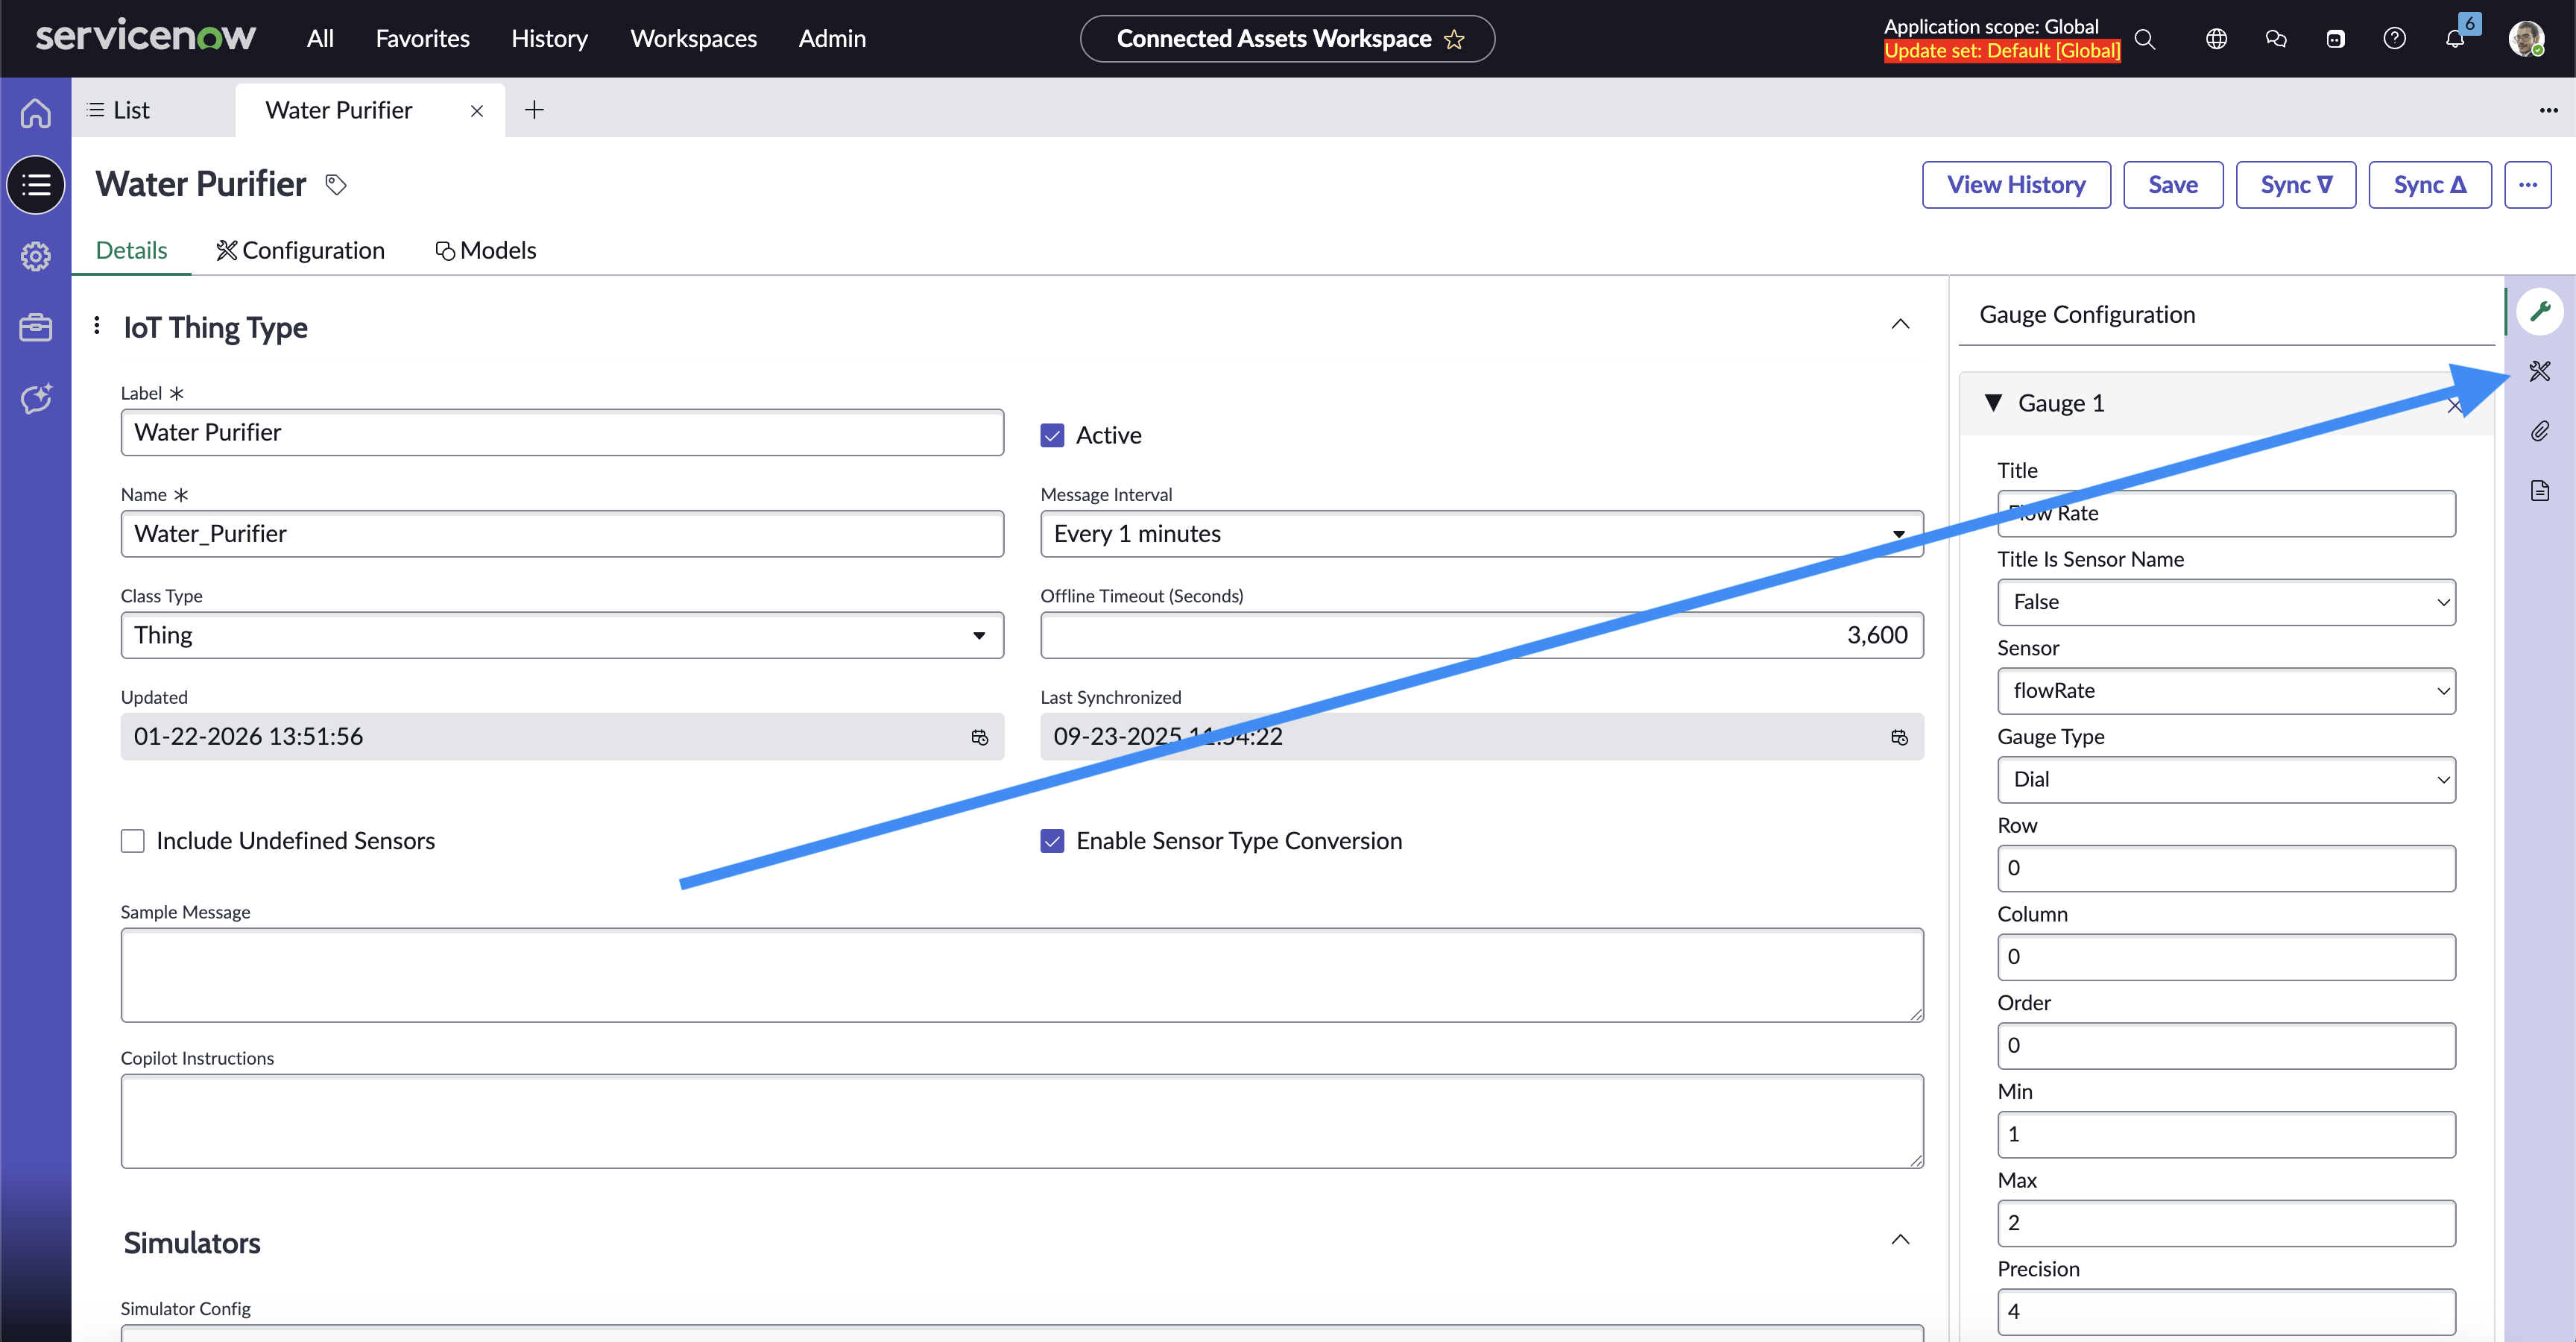
Simulator Builder Button on a Thing Page
- Add and fill out Parameters to Normal Mode.
- See Schema and Sensor Parameters to see details for each paramter type and value
- Add other Modes as needed.
- Click “Submit” at the bottom of the Simulator Builder to save Simulator Configuration to the page.
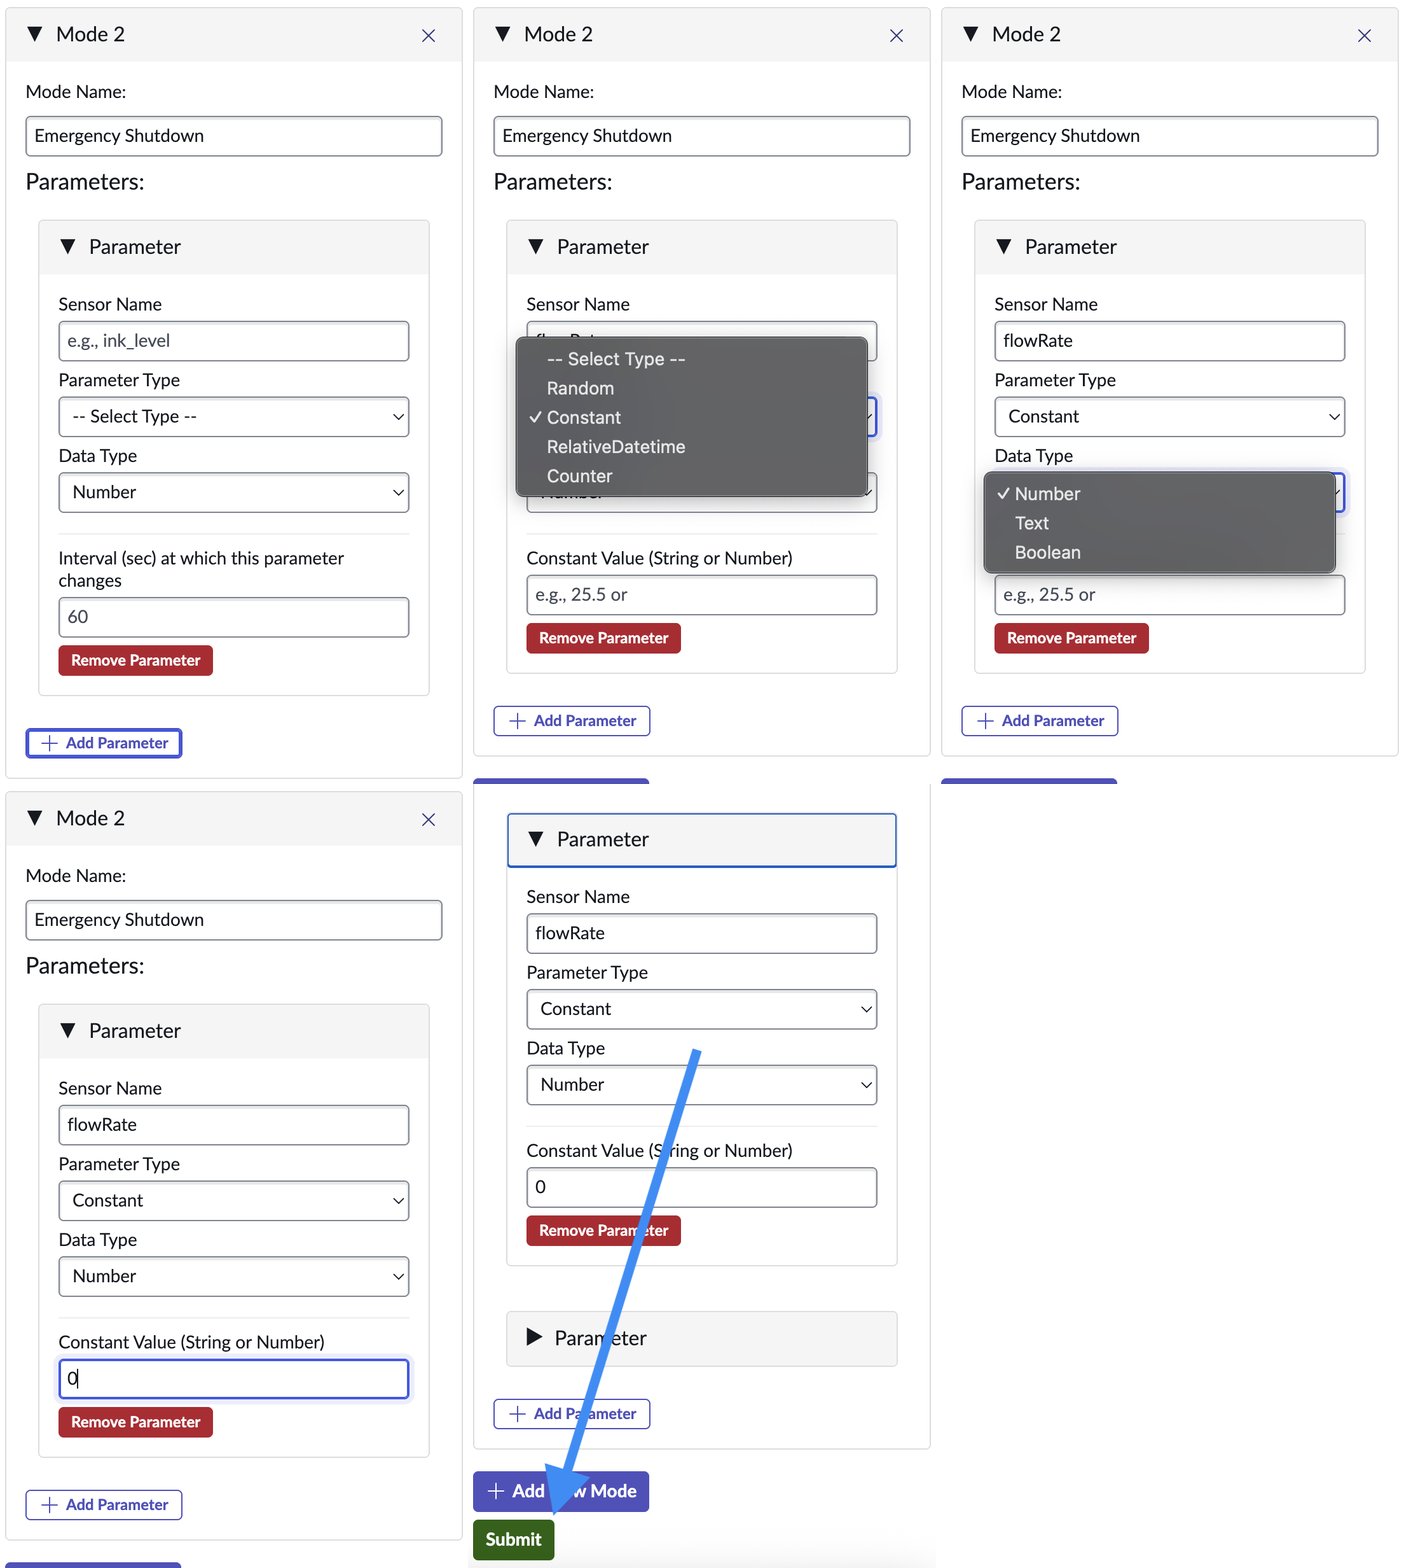
Filling our a Constant Mode Constant Parameter
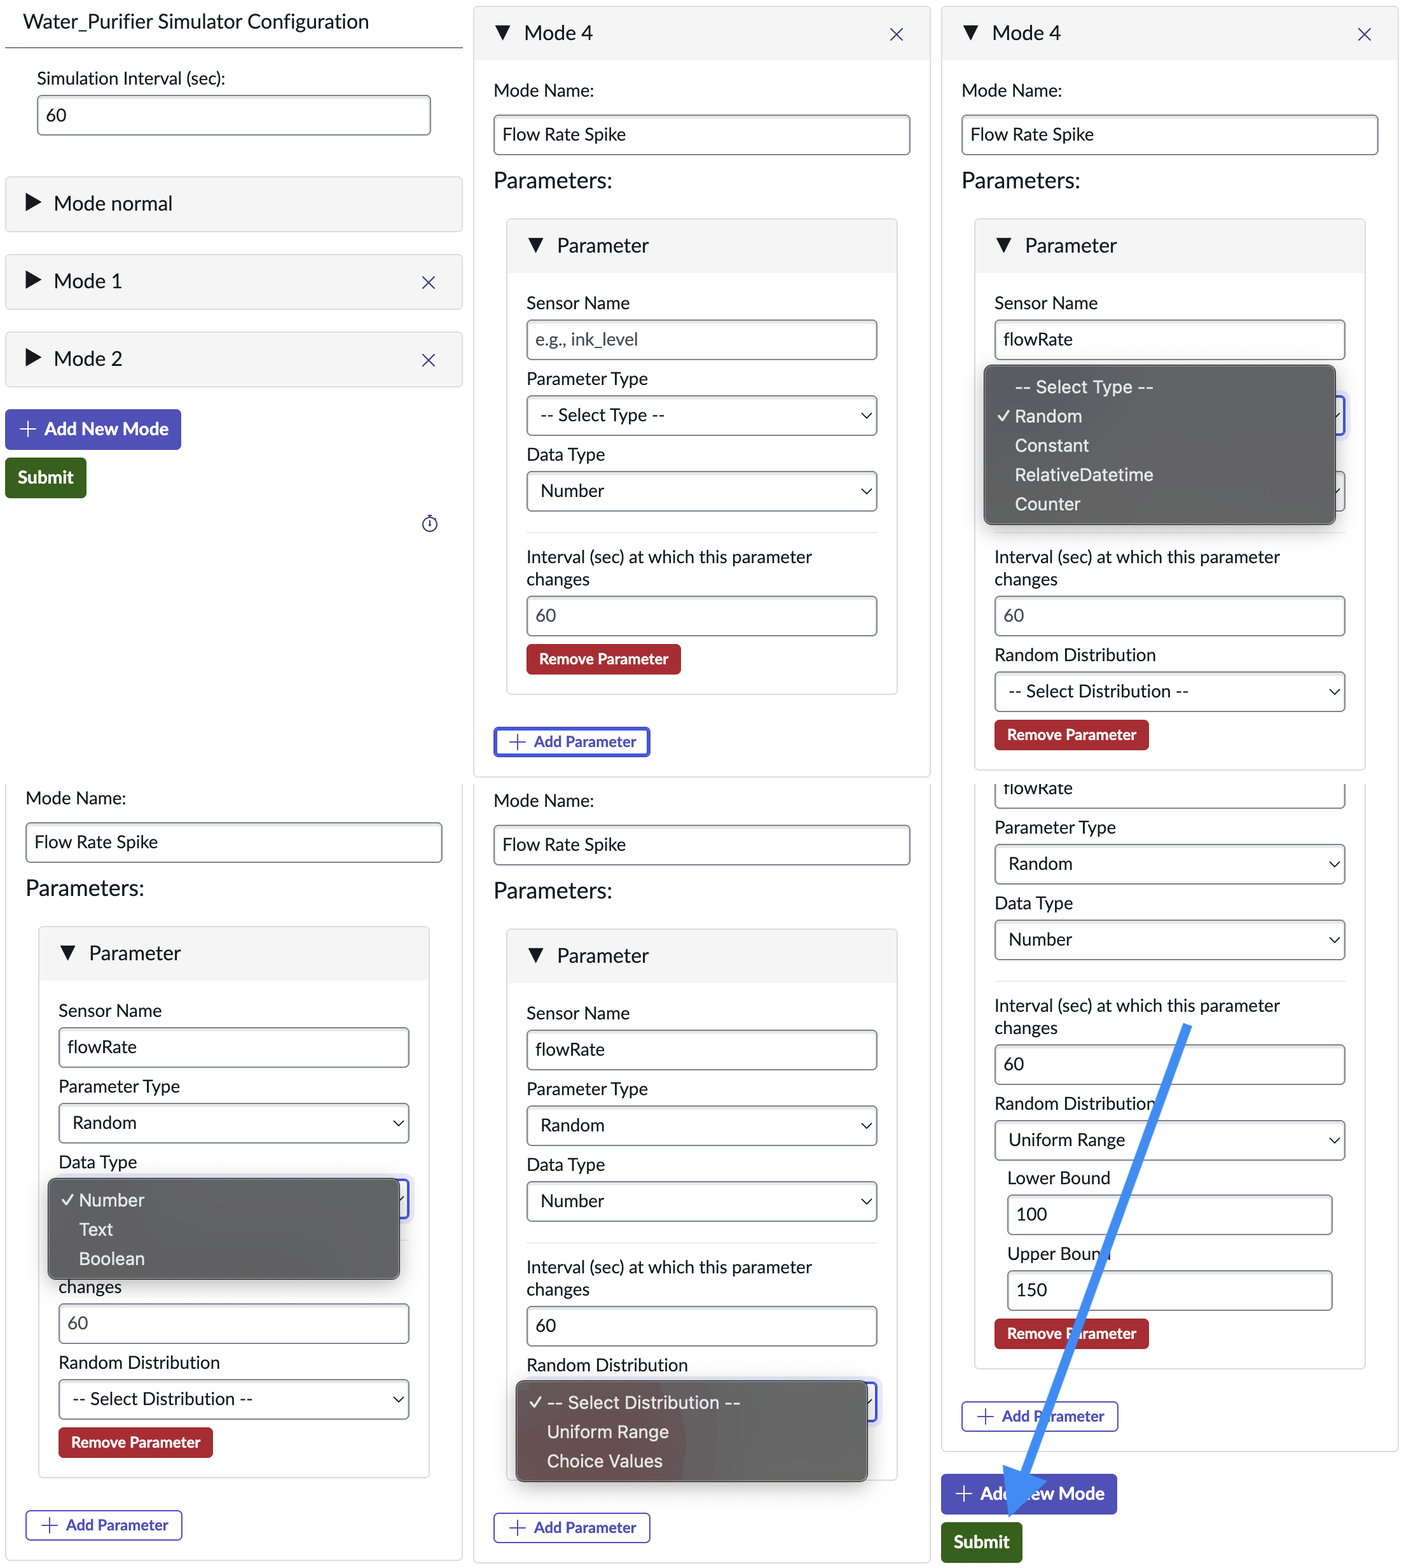
Filling our a Constant Mode Random Parameter
Modes
Each Thing Type can be setup with multiple “modes”. You should always start with the default “Normal” mode, then configure alternate modes.
BEST PRACTICE
It’s a best practice to configure a mode to correspond to each Alert Condition to enable easy testing.Each mode can define what simulated value will be returned for each Sensor. Click the Add Parameter button to add a new sensor value simulation.
Sensor Parameters
The following types of Sensor Parameters are currently supported:
-
Constant Constants will send the same “Constant Value” consistently.
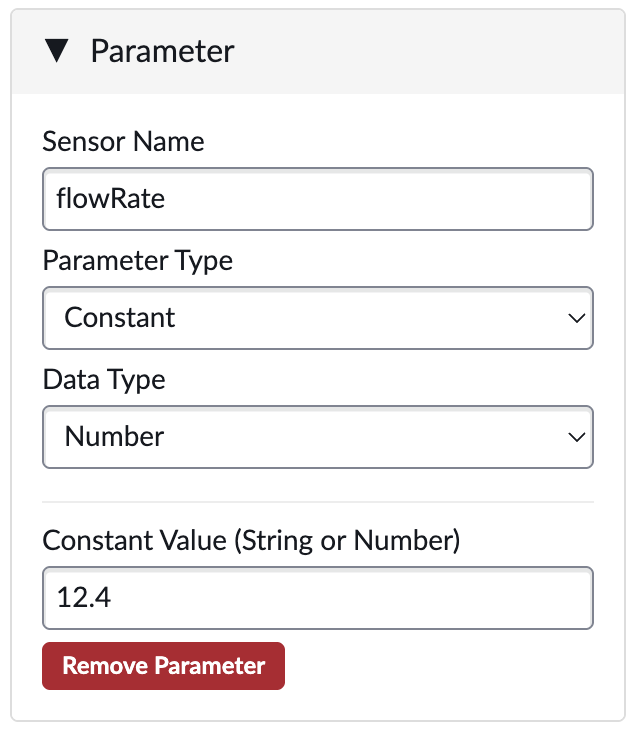
Simulator Parameter - Constant
-
Counter The Counter is a numeric value. It will default to the “Start” value, and will change by the “Step” amount at each “Interval”. When it reaches the “End”, it will start over again.
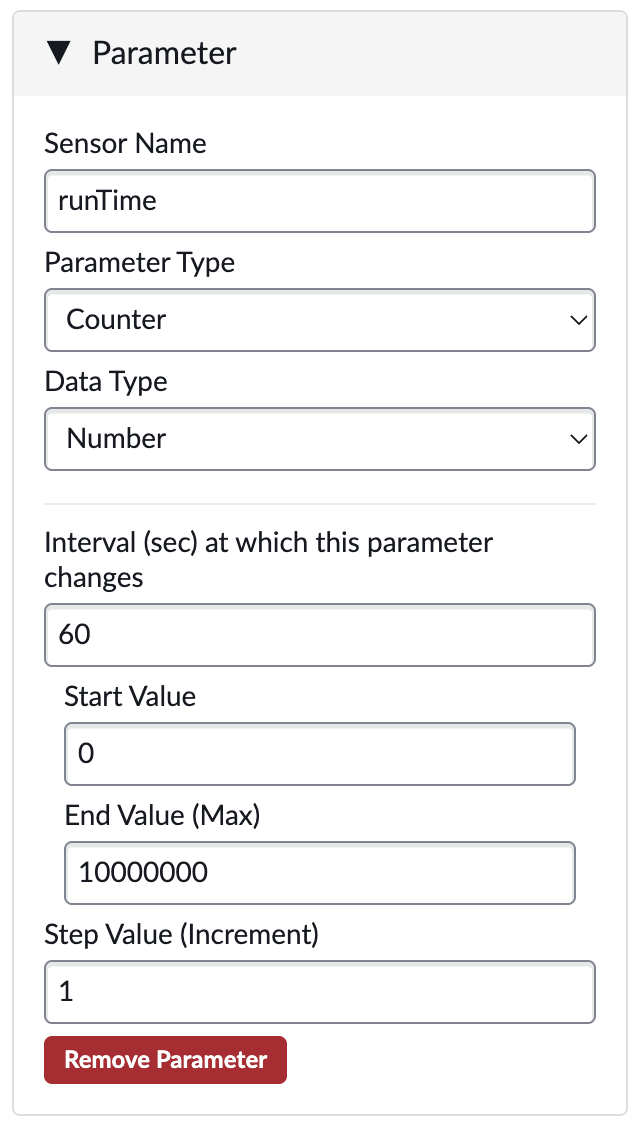
Simulator Parameter - Counter
-
Random-Uniform The Random / Uniform is a numeric value. It will be a random number between the “Lower” and “Upper” values, and will change at every “Interval”.
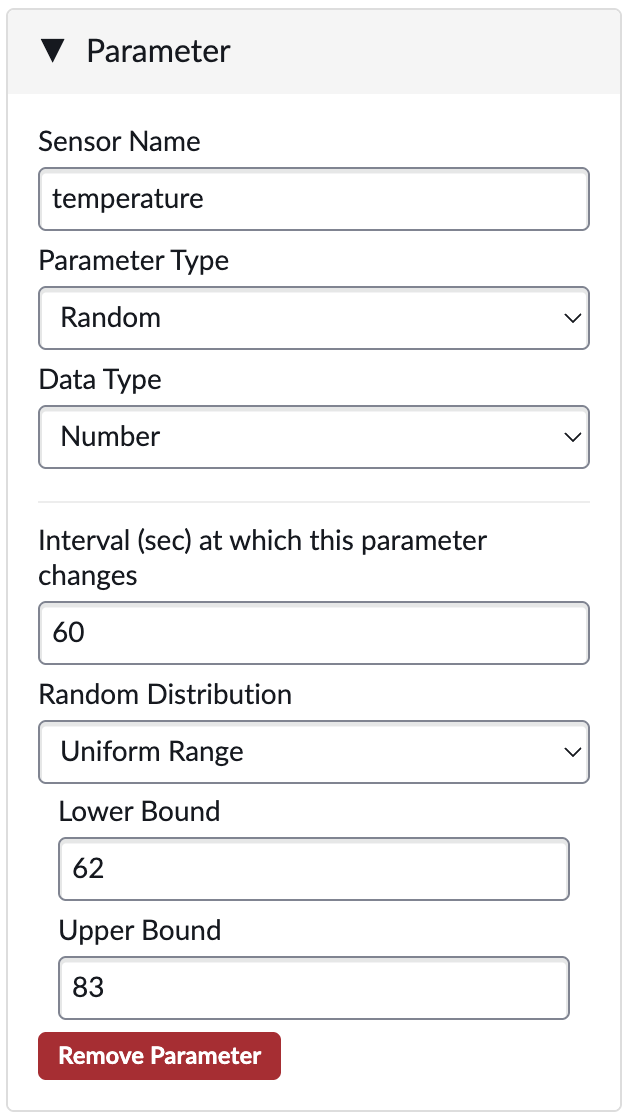
Simulator Parameter - Random
-
Random-Choice The Random / Choice can be numeric, boolean, text, etc. It will randomly choose between the provided “Choice Values”, and will change at every “Interval”.
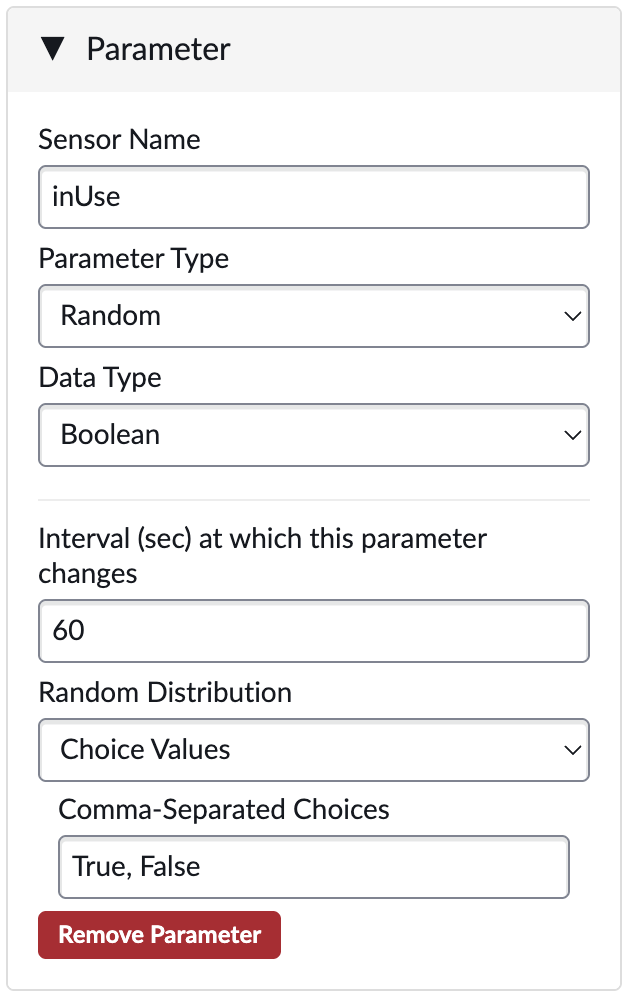
Simulator Parameter - Choice
-
Datetime The Datetime can be numeric or text. It will be recalculated on every message, relative to the current date/time. The Offset can be either positive (future) or negative (past), or 0 for current date/time. The format can either be epoch (to return the epoch in milliseconds) or a valid Python datetime format (e.g. %Y-%m-%d_%H:%M:%S) to return any textual date or time format.
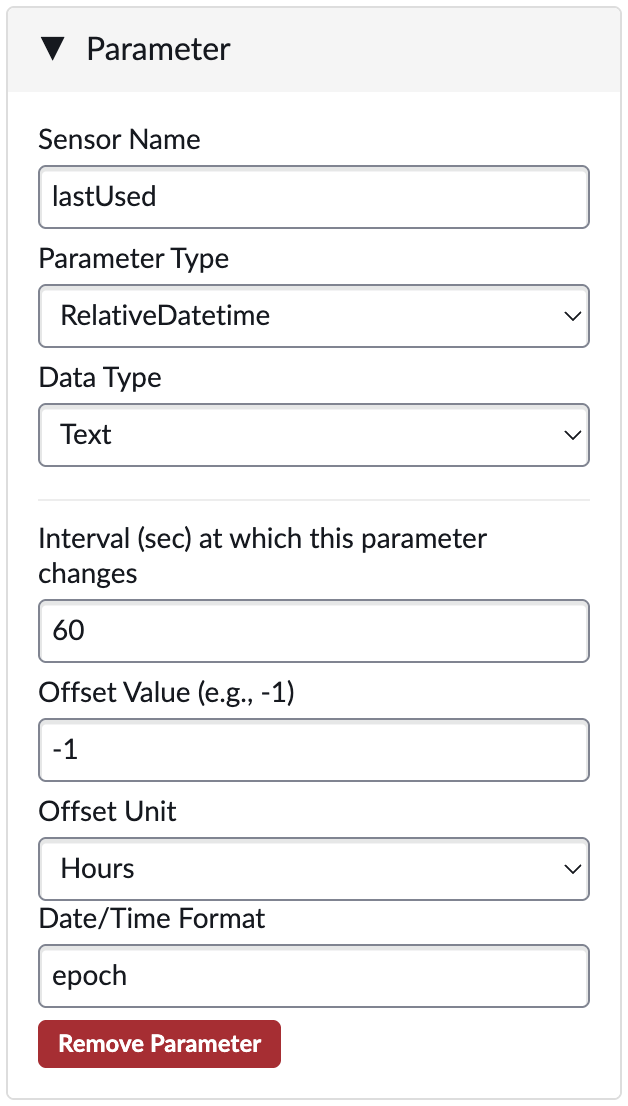
Simulator Parameter - Datetime
SAVE
After adding or editing the modes and parameters, don’t forget to Submit.Direct JSON Configuration
Simulators can also be configured in the Simulator Config field in the Thing Type record using the following JSON format. It is recommended that Simulaters are configured within the Simulator Builder.
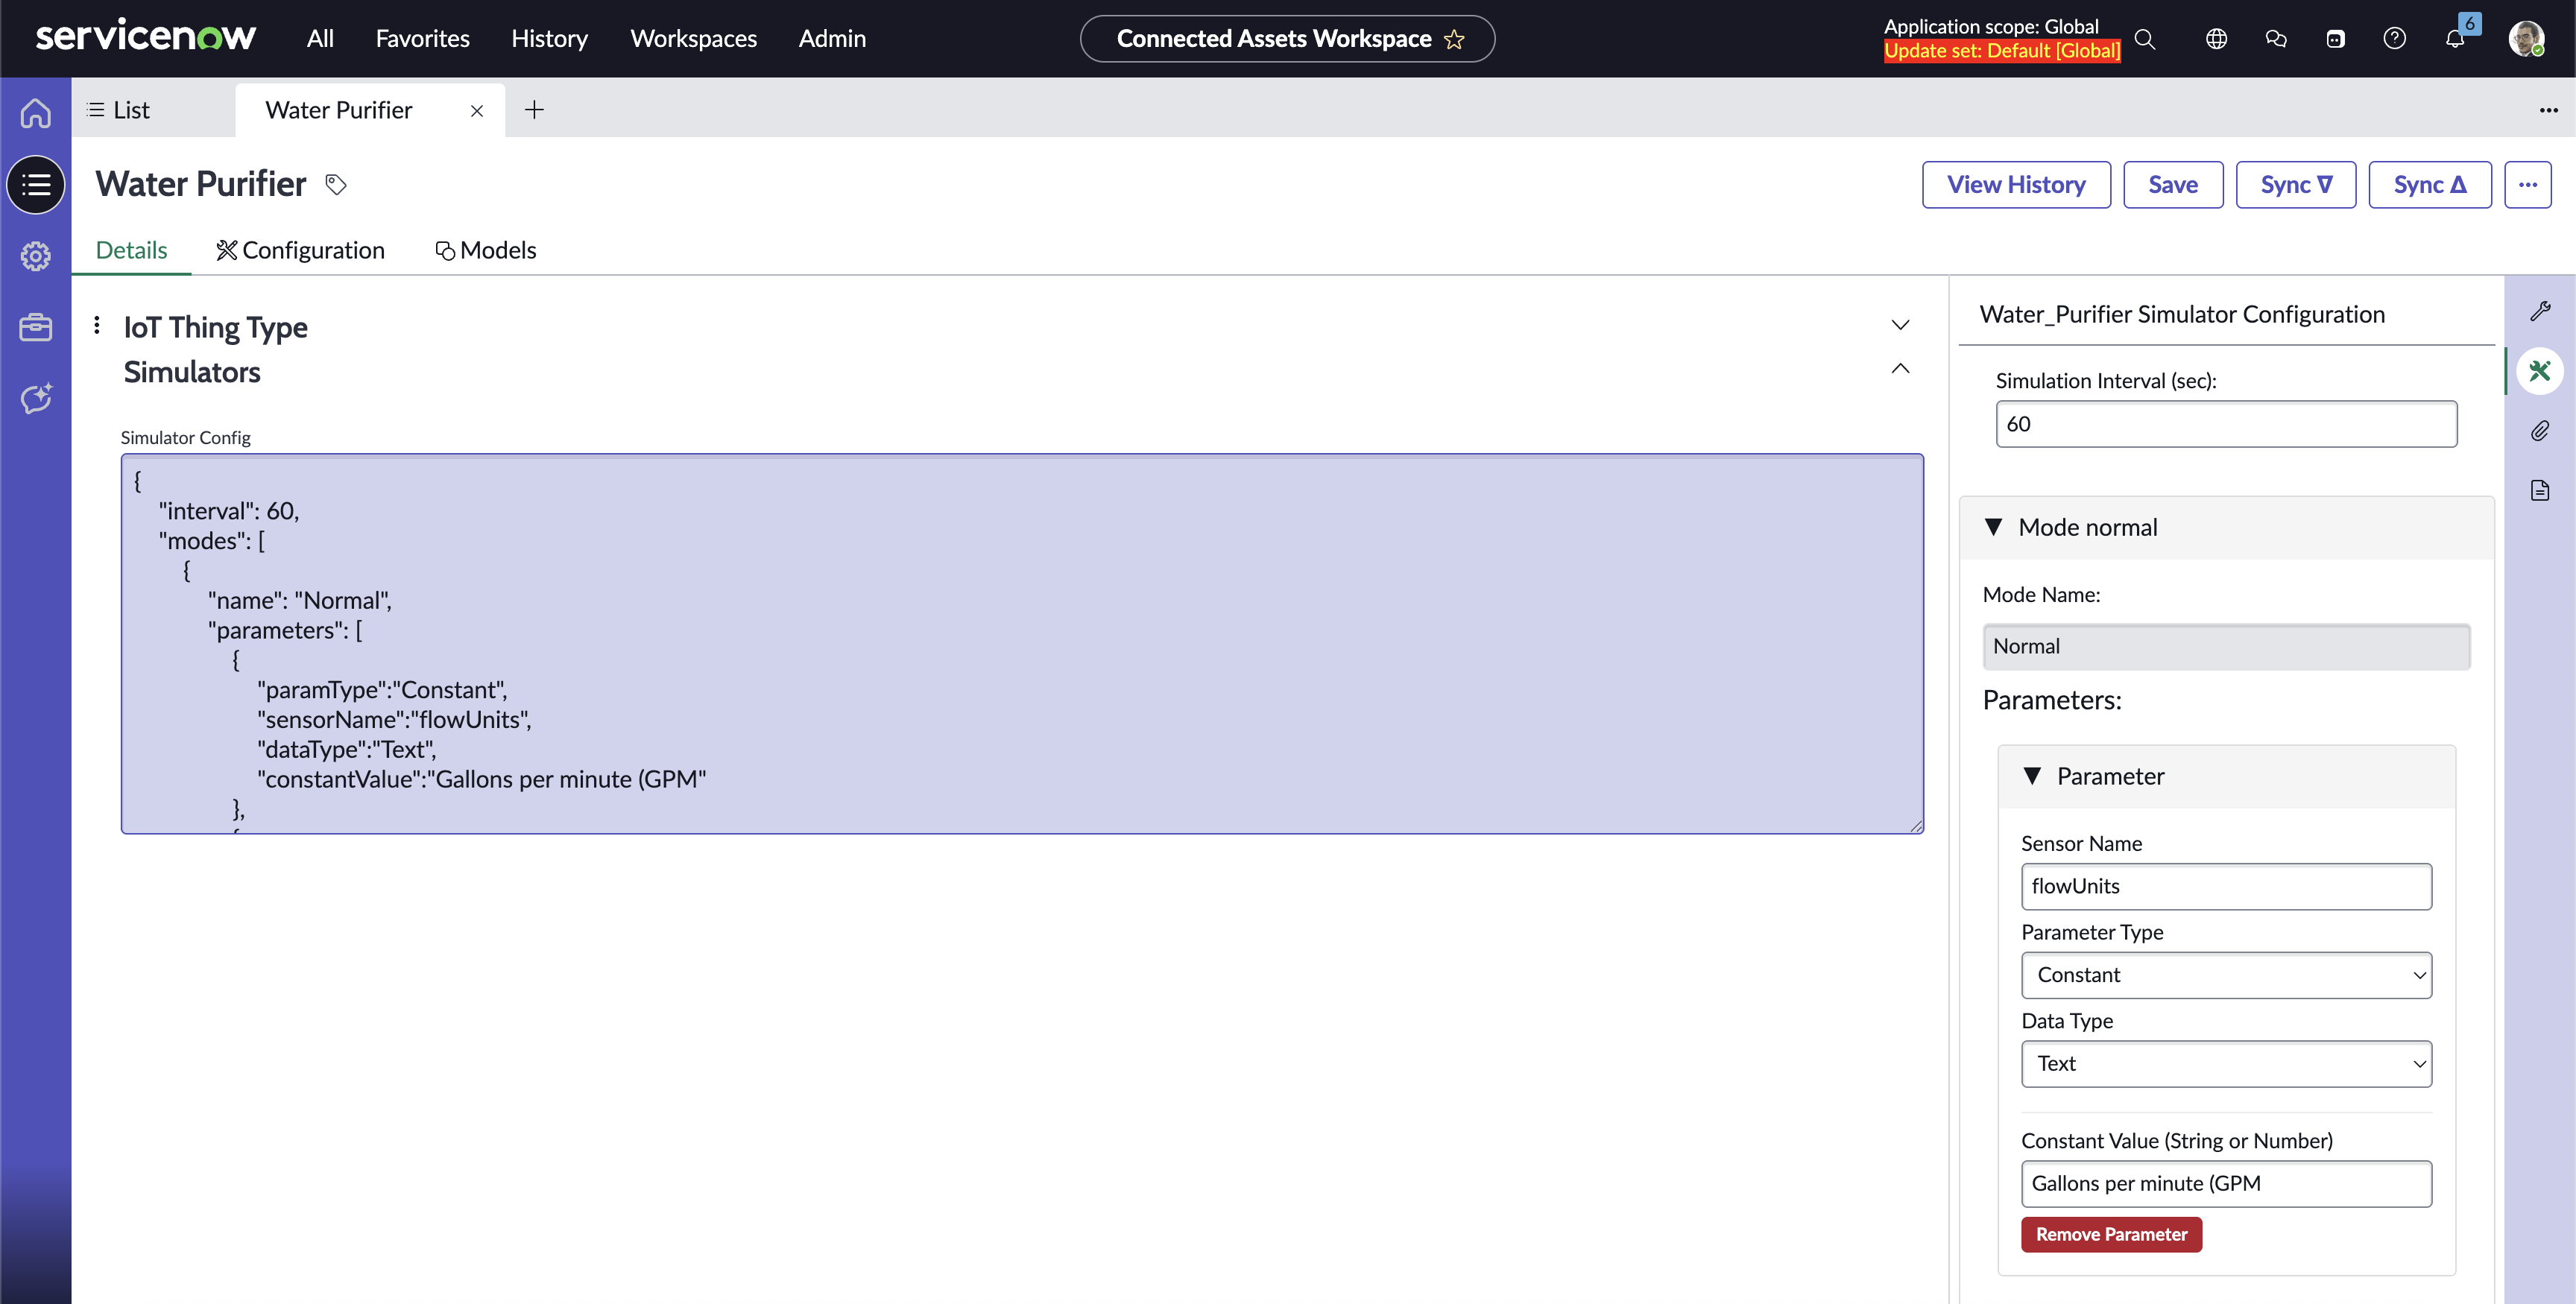
Simulator JSON Field
Schema
{
  "$schema": "http://json-schema.org/draft-07/schema#",
  "title": "IoT Simulator Config",
  "description": "Schema for configuring IoT Simulated Asset data generation with various modes and parameter types.",
  "type": "object",
  "properties": {
    "interval": {
      "type": "number",
      "description": "The overall interval (in seconds) at which the device data should be generated.",
      "minimum": 0
    },
    "modes": {
      "type": "array",
      "description": "An array of different data generation modes, each with its own set of parameters.",
      "items": {
        "type": "object",
        "properties": {
          "name": {
            "type": "string",
            "description": "The name of the data generation mode (e.g., Normal, Alert1)."
          },
          "parameters": {
            "type": "array",
            "description": "An array of specific parameters to be generated for the current mode.",
            "items": {
              "type": "object",
              "properties": {
                "paramType": {
                  "type": "string",
                  "description": "The type of parameter generation method.",
                  "enum": ["Random", "Constant", "RelativeDatetime", "Counter"]
                },
                "sensorName": {
                  "type": "string",
                  "description": "The name of the sensor or data point this parameter represents (e.g., ink_level, modelType)."
                },
                "interval": {
                  "type": "number",
                  "description": "The interval (in seconds) at which the counter should increment.",
                  "minimum": 0
                },
                "dataType": {
                  "type": "string",
                  "description": "The expected data type of the sensor value.",
                  "enum": ["Number", "Text"]
                }
              },
              "required": ["paramType", "sensorName", "interval", "dataType"],
              "oneOf": [
                {
                  "if": { "properties": { "paramType": { "const": "Random" } } },
                  "then": {
                    "properties": {
                      "randomDistribution": {
                        "type": "string",
                        "description": "The type of random distribution to use.",
                        "enum": ["uniform", "choice"]
                      },
                      "randomLower": {
                        "type": "number",
                        "description": "The lower bound for 'uniform' random distribution."
                      },
                      "randomUpper": {
                        "type": "number",
                        "description": "The upper bound for 'uniform' random distribution."
                      },
                      "randomChoiceValues": {
                        "type": "string",
                        "description": "A comma-separated string of possible values for 'choice' distribution."
                      }
                    },
                    "required": ["randomDistribution"],
                    "if": { "properties": { "randomDistribution": { "const": "uniform" } } },
                    "then": { "required": ["randomLower", "randomUpper"] },
                    "else": { "required": ["randomChoiceValues"] }
                  }
                },
                {
                  "if": { "properties": { "paramType": { "const": "Constant" } } },
                  "then": {
                    "properties": {
                      "constantValue": {
                        "type": ["string", "number"],
                        "description": "The fixed, unchanging value for this parameter."
                      }
                    },
                    "required": ["constantValue"]
                  }
                },
                {
                  "if": { "properties": { "paramType": { "const": "RelativeDatetime" } } },
                  "then": {
                    "properties": {
                      "offsetValue": {
                        "type": "number",
                        "description": "The value of the offset (e.g., -1 for 1 day ago)."
                      },
                      "offsetType": {
                        "type": "string",
                        "description": "The unit of the offset value (e.g., Days, Hours).",
                        "enum": ["Days", "Hours", "Minutes", "Seconds"]
                      },
                      "format": {
                        "type": "string",
                        "description": "The desired date/time format string (e.g., yyyy-MM-dd_HH:mm:ss, epoch)."
                      }
                    },
                    "required": ["offsetValue", "offsetType", "format"]
                  }
                },
                {
                  "if": { "properties": { "paramType": { "const": "Counter" } } },
                  "then": {
                    "properties": {
                      "counterStart": {
                        "type": "number",
                        "description": "The initial value of the counter."
                      },
                      "counterEnd": {
                        "type": "number",
                        "description": "The maximum value the counter will reach before resetting or stopping."
                      },
                      "counterStep": {
                        "type": "number",
                        "description": "The amount by which the counter increments each interval."
                      }
                    },
                    "required": ["counterStart", "counterEnd", "counterStep"]
                  }
                }
              ]
            },
            "minItems": 1
          }
        },
        "required": ["name", "parameters"]
      },
      "minItems": 1
    }
  },
  "required": ["interval", "modes"]
}
IoT Setup
IoT Settings
Configure Settings for the Bolt Data Connect Application.
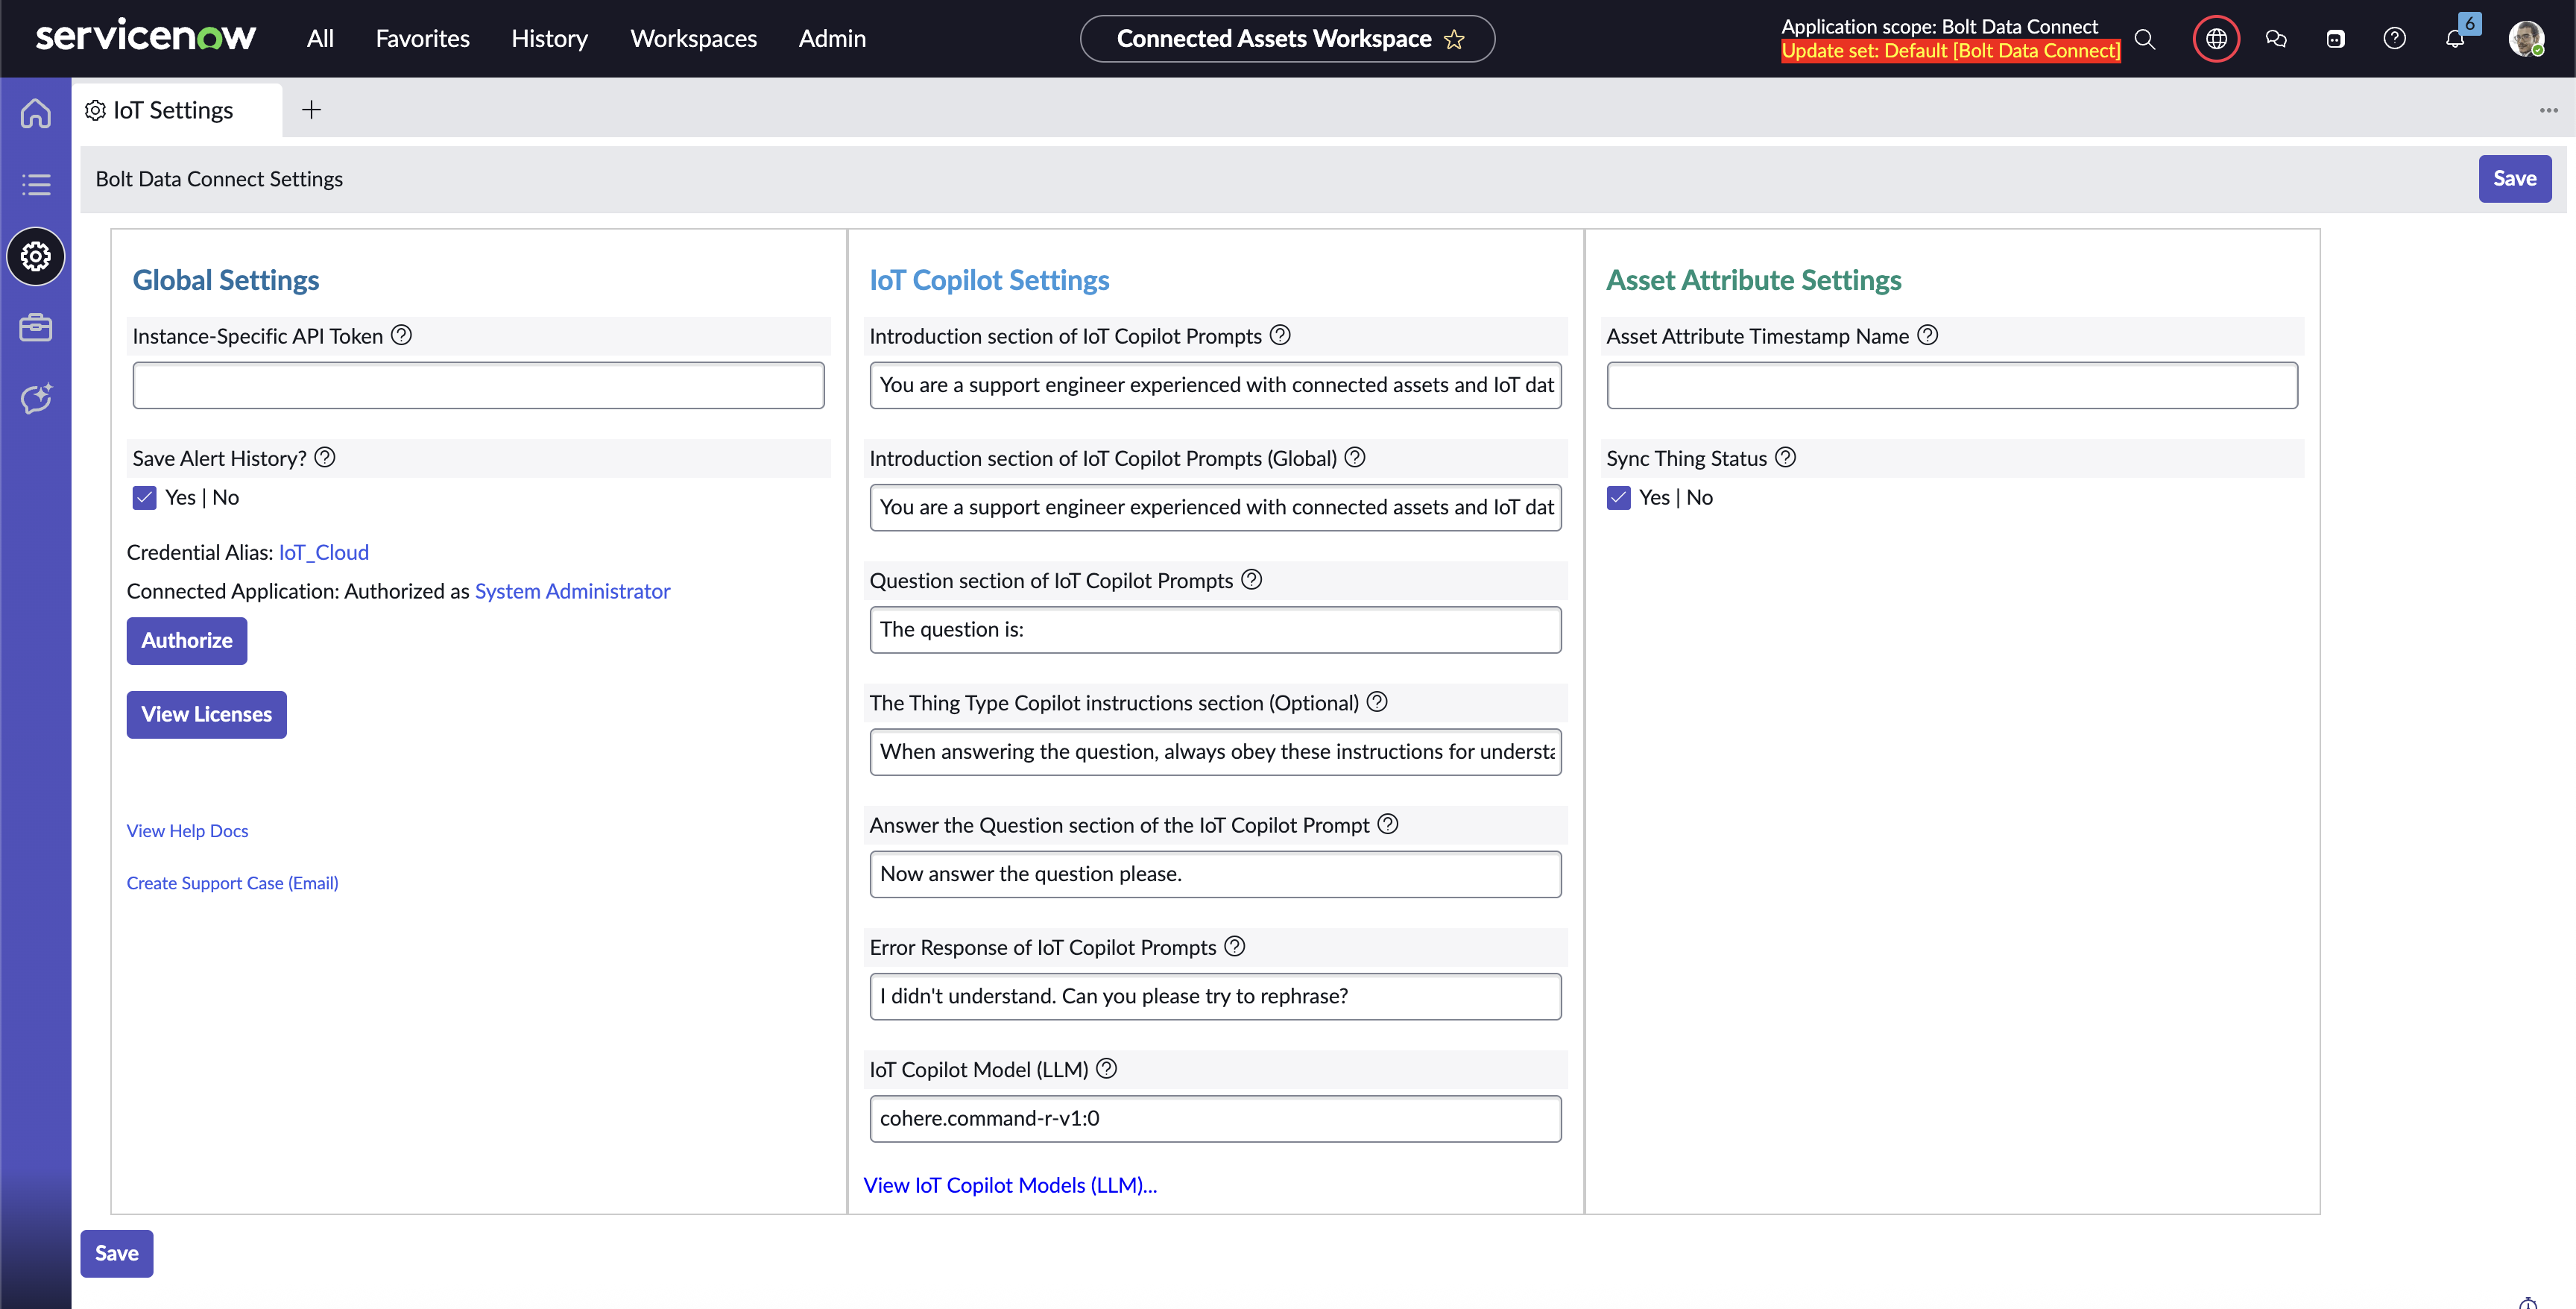
Bolt Data Connect Settings Page
App Connectivity
First, we’ll need to establish the connection between your ServiceNow Instance and the IoT Cloud infrastructure.
In order for the Bolt Data Connect ServiceNow App to communicate with the IoT infrastructure, we need to authorize the ServiceNow Instance to access the IoT Cloud, and we need authorize the IoT Cloud to access Salesforce.
Authorize the ServiceNow Instance to access the IoT Cloud
- First, your Bolt Data Connect support representative should provide you with an API Token, an Access Key, and a Secret Key. Keep this information safe. It’s essentially your username and password to your IoT Cloud.
Let us know
Should you ever learn or suspect these Keys have been compromised, please notify your Bolt Data Connect representative.- From the ServiceNow All Menu -> Bolt Data Connect -> IoT Setup module, select Settings.
- In the Instance-Specific API Token field enter the API Token you received in Step 1.
- Select the IoT Cloud link next to Credential Alias.
- Select the credential that shows up in the related list towards the bottom of the page.
- In the AWS Access Key ID field, enter the Access Key received in Step 1.
- In the AWS Secret Access Key field, enter the Secret Key received in Step 1.
- You shouldn’t need to modify any other settings here. Click Update and close the tab (if it opened in a new tab).
Authorize the IoT Cloud to access your ServiceNow Instance
In order for the IoT Cloud to send Alerts to your ServiceNow Instance, you must Authorize the app to access the ServiceNow APIs associated with your instance.
- From the ServiceNow All Menu -> Bolt Data Connect -> IoT Setup module, select Settings.
- Below the Connected Application label, select Authorize.
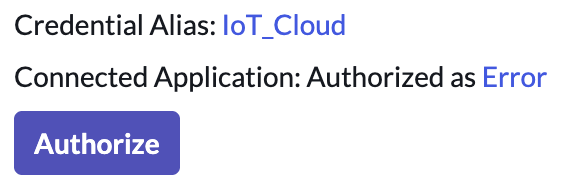
Authorize the Connected Application
- You’ll be redirected to a ServiceNow Authorization_ screen. Select Allow.
Heads Up
Verify the URL in this window is accurate. You must be logged in as a User of the Instance in which you wish to authorize the IoT Cloud integrations (this is the User the IoT Cloud will use to send Alerts and trigger platform events). If you need to switch to another User, you can select the “Not you?” link to be redirected to your Instance’s login page to log-in and authorize as a different User within your Instance.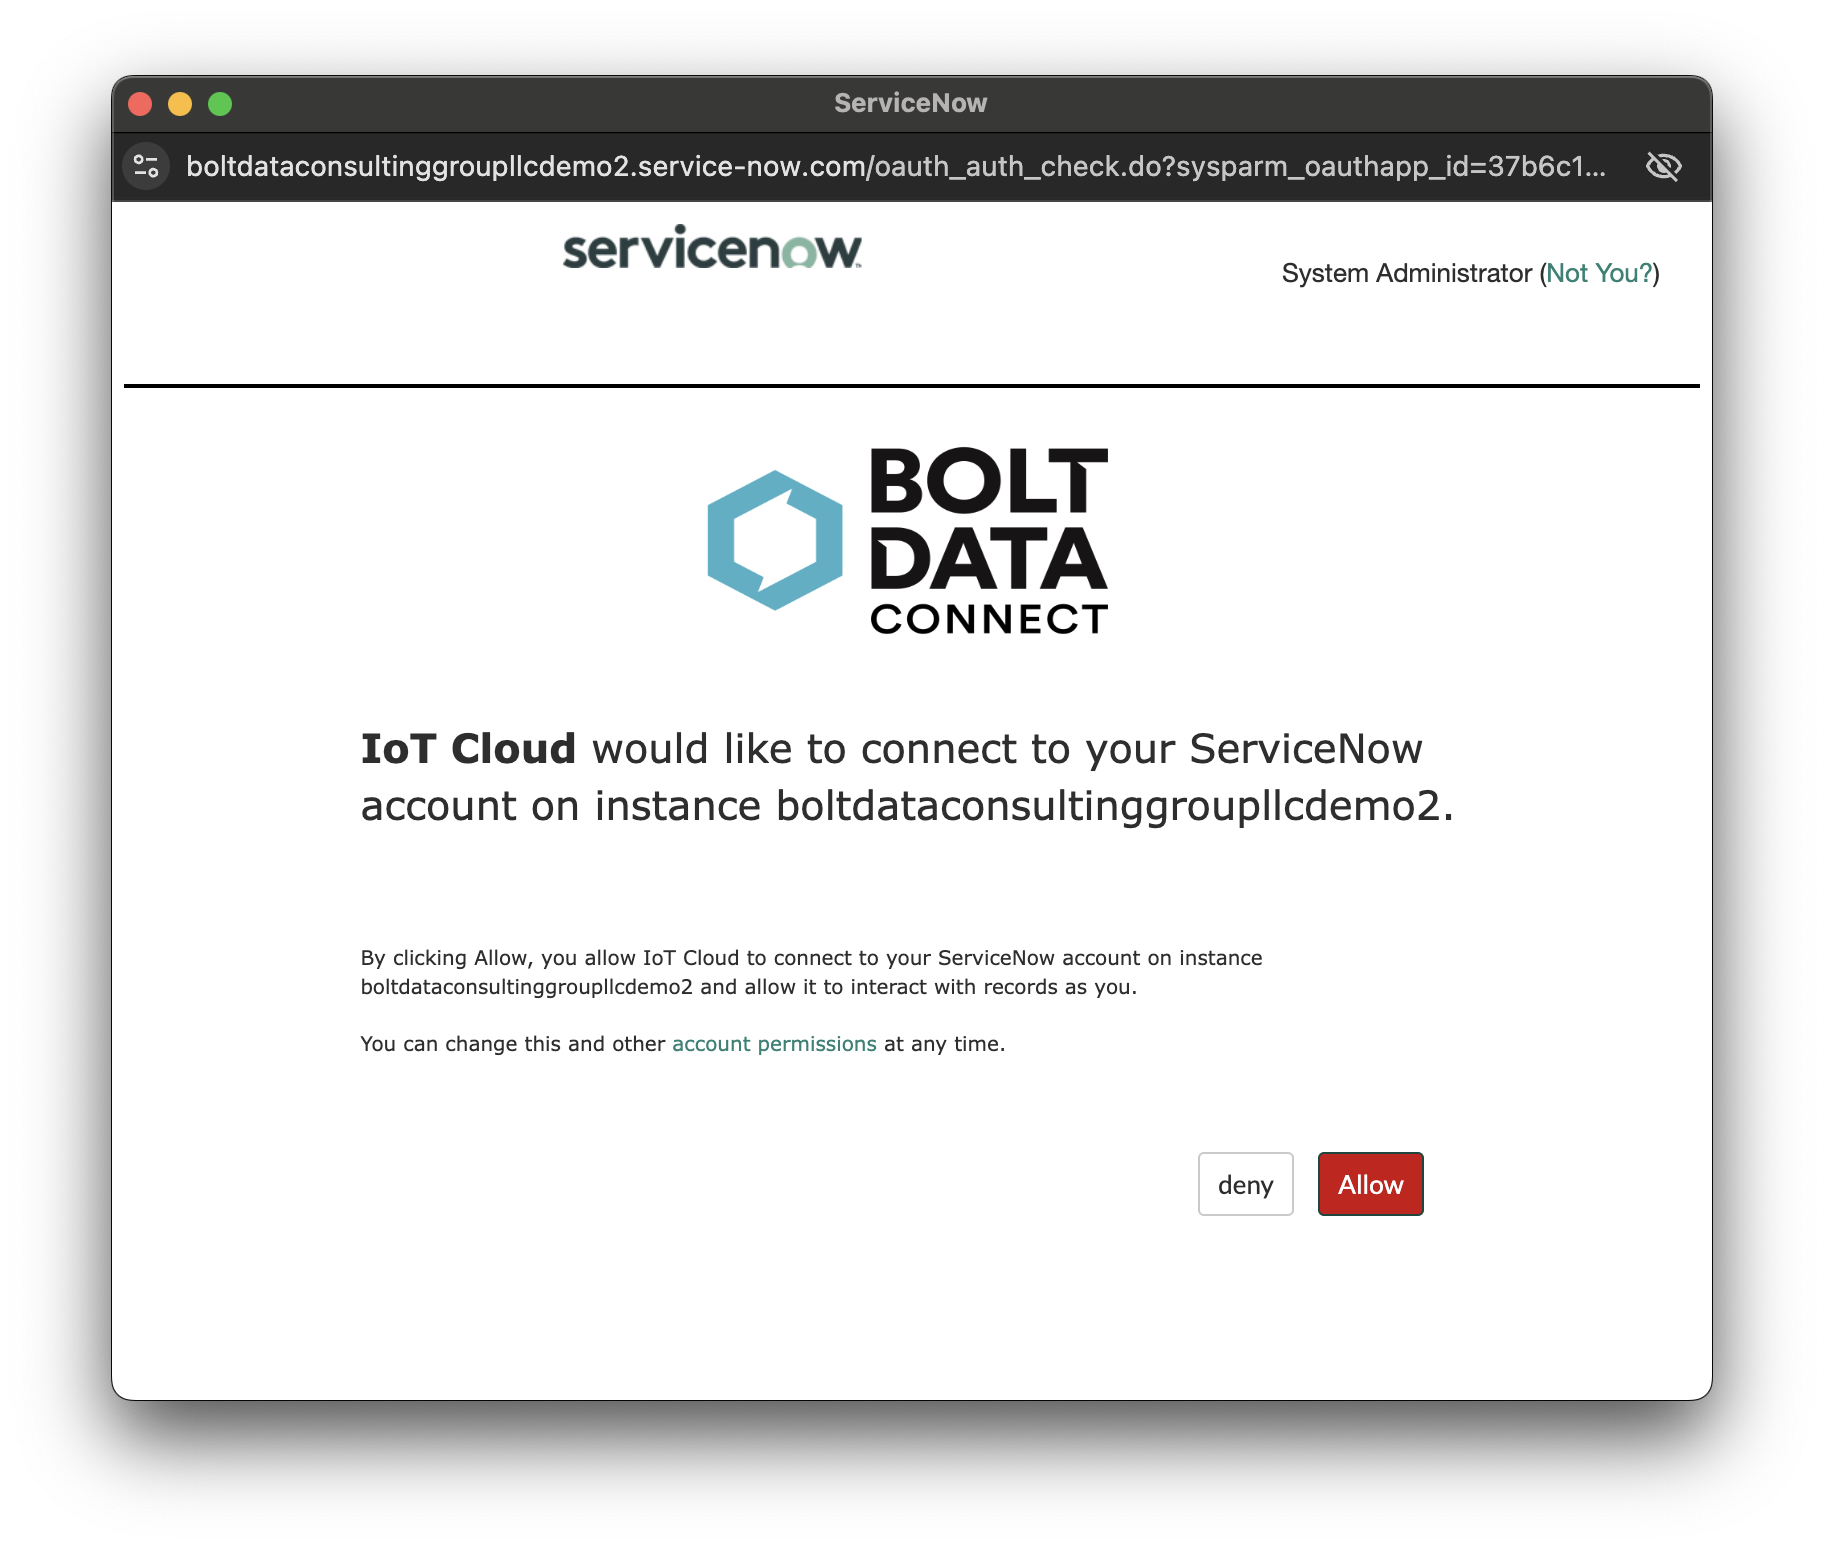
Allow the IoT Cloud to access your Org
- After selecting Allow, refresh the page. The status of the authorization will be displayed.
- When successful, the authorization status message window will close automatically (or you can close it manually if you chose). In the unlikely event you encounter an error during authorization, please let us know as soon as practical!
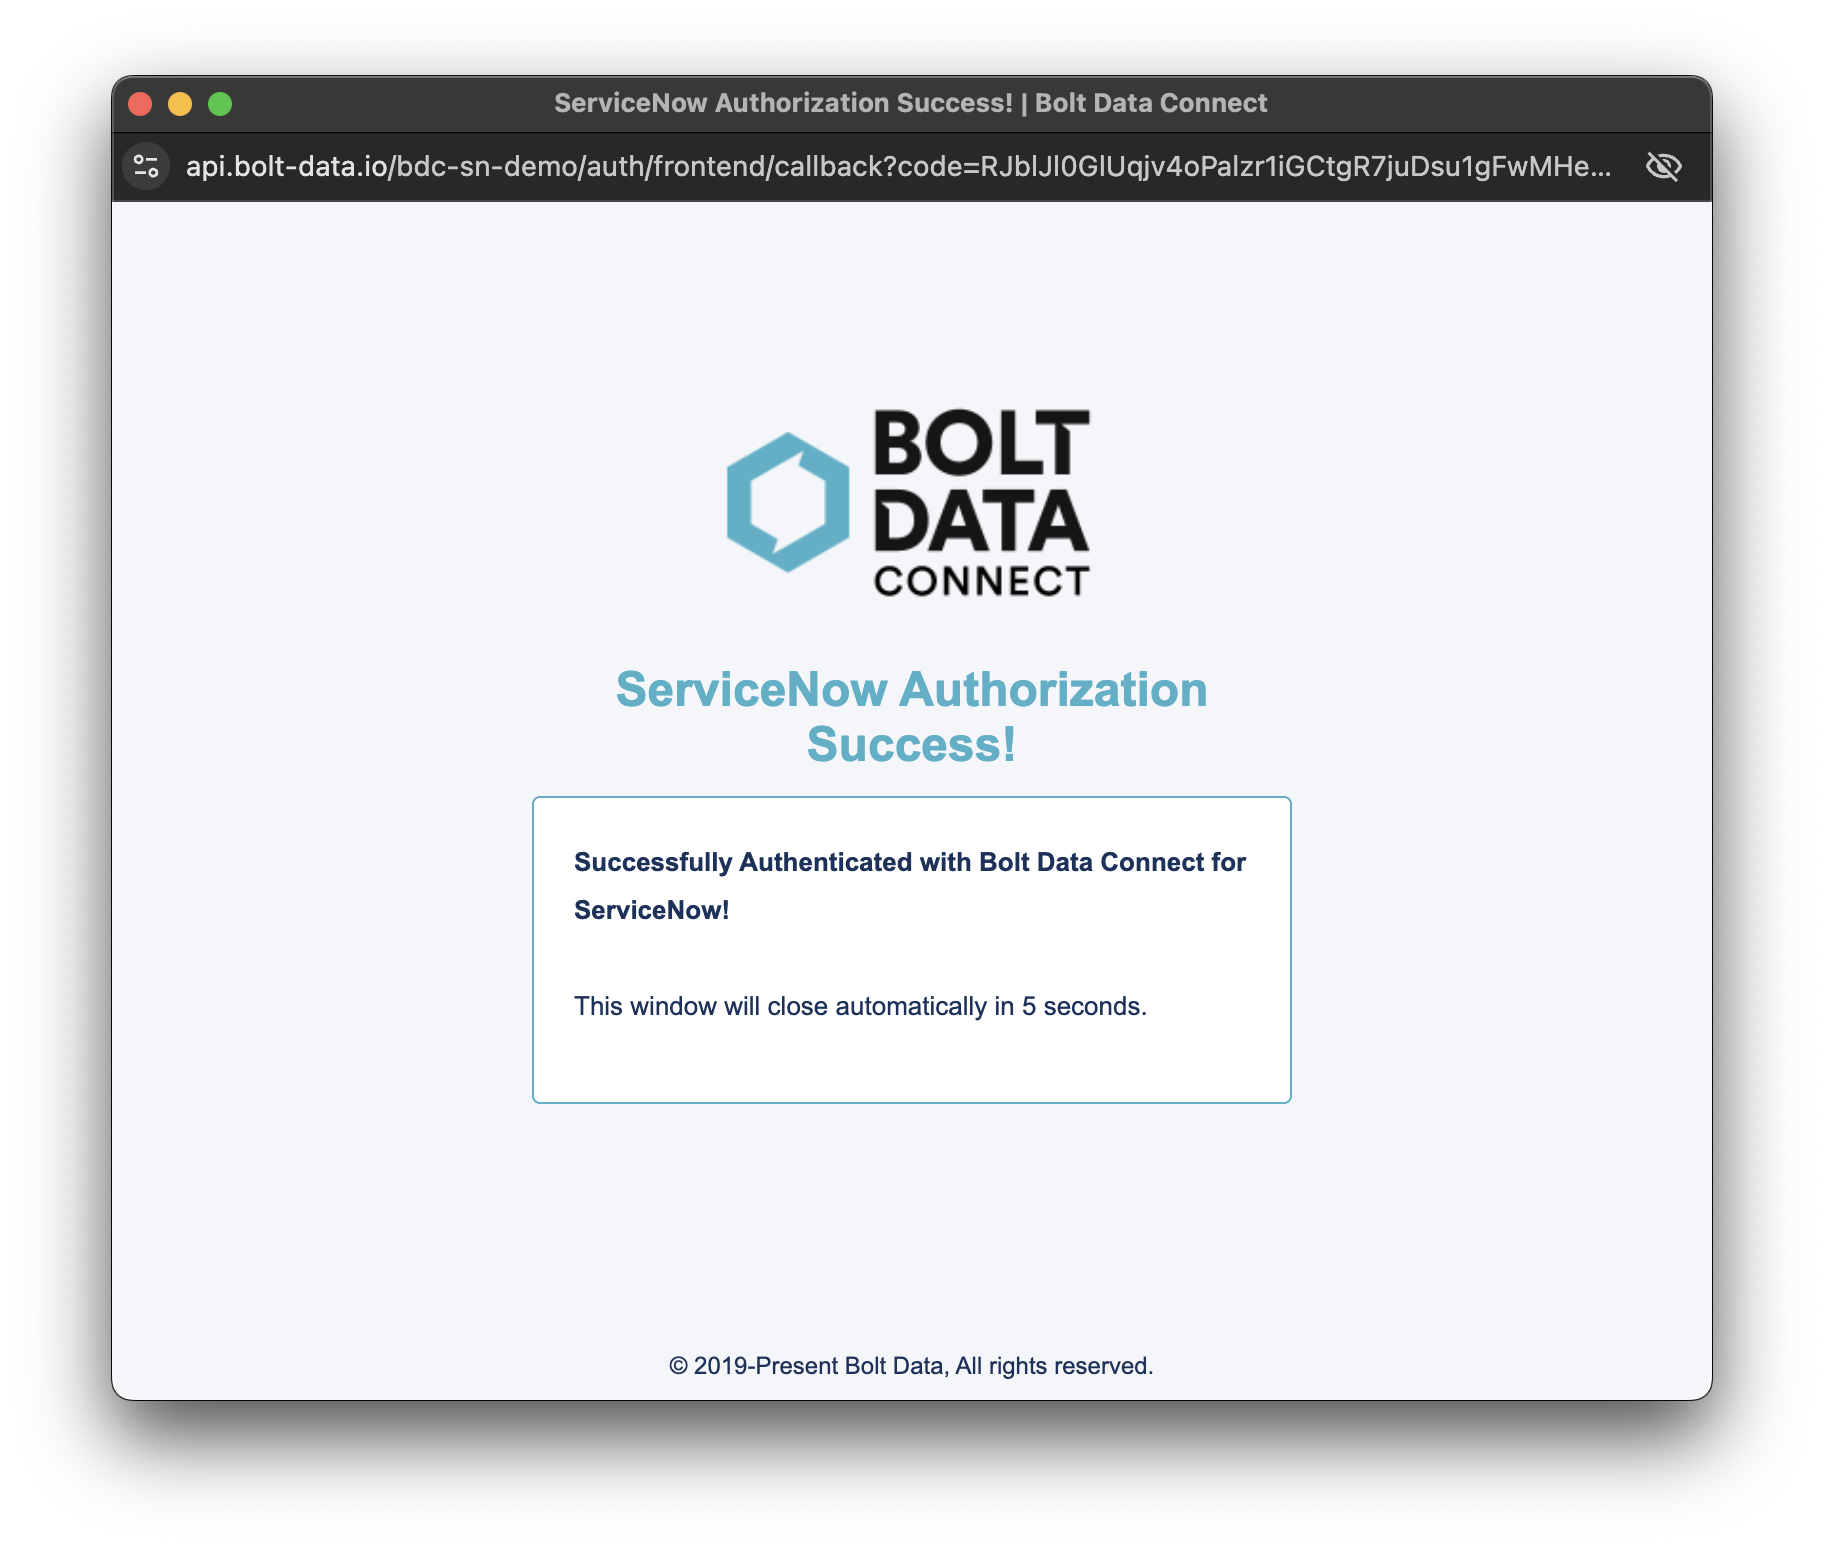
Authorization success message
Note
Bolt Data Connect does not collect any data from you or your Instance; this authorization only provides the IoT Cloud with the ability to send alerts to your Instance. The IoT Cloud is never given your login credentials.-
That’s it! This should only be required once, but should you ever need to re-establish this authorization, you can repeat these steps at any time.
-
To revoke authorization at any time, you can follow these steps:
- Select All (ServiceNow All Modules)
- Search for
System OAuthand selectManage Tokens. - You should find up to three tokens with the name
IoT Cloud. You can either delete these records or select them and clickRevoke Access. - You can re-authorize the IoT Cloud at any time by following the steps above.
-
You can check which ServiceNow User is currently authorized by the IoT Cloud at any time.
- Navigate to the Settings module found under All -> Bolt Data Connect -> IoT Setup -> Settings.
- The User should be displayed next to the Connected Application label:
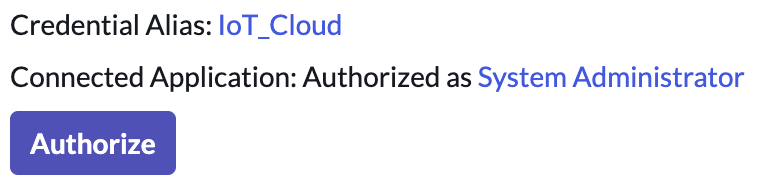
Authorization check
Licensing
View Licenses
From the Settings module, you can easiliy view the Bolt Data Connect licensing across all of your Instances (Dev, Test, Production, etc.) and all of the Application Layers (ServiceNow, IoT Cloud and Edge Gateway).
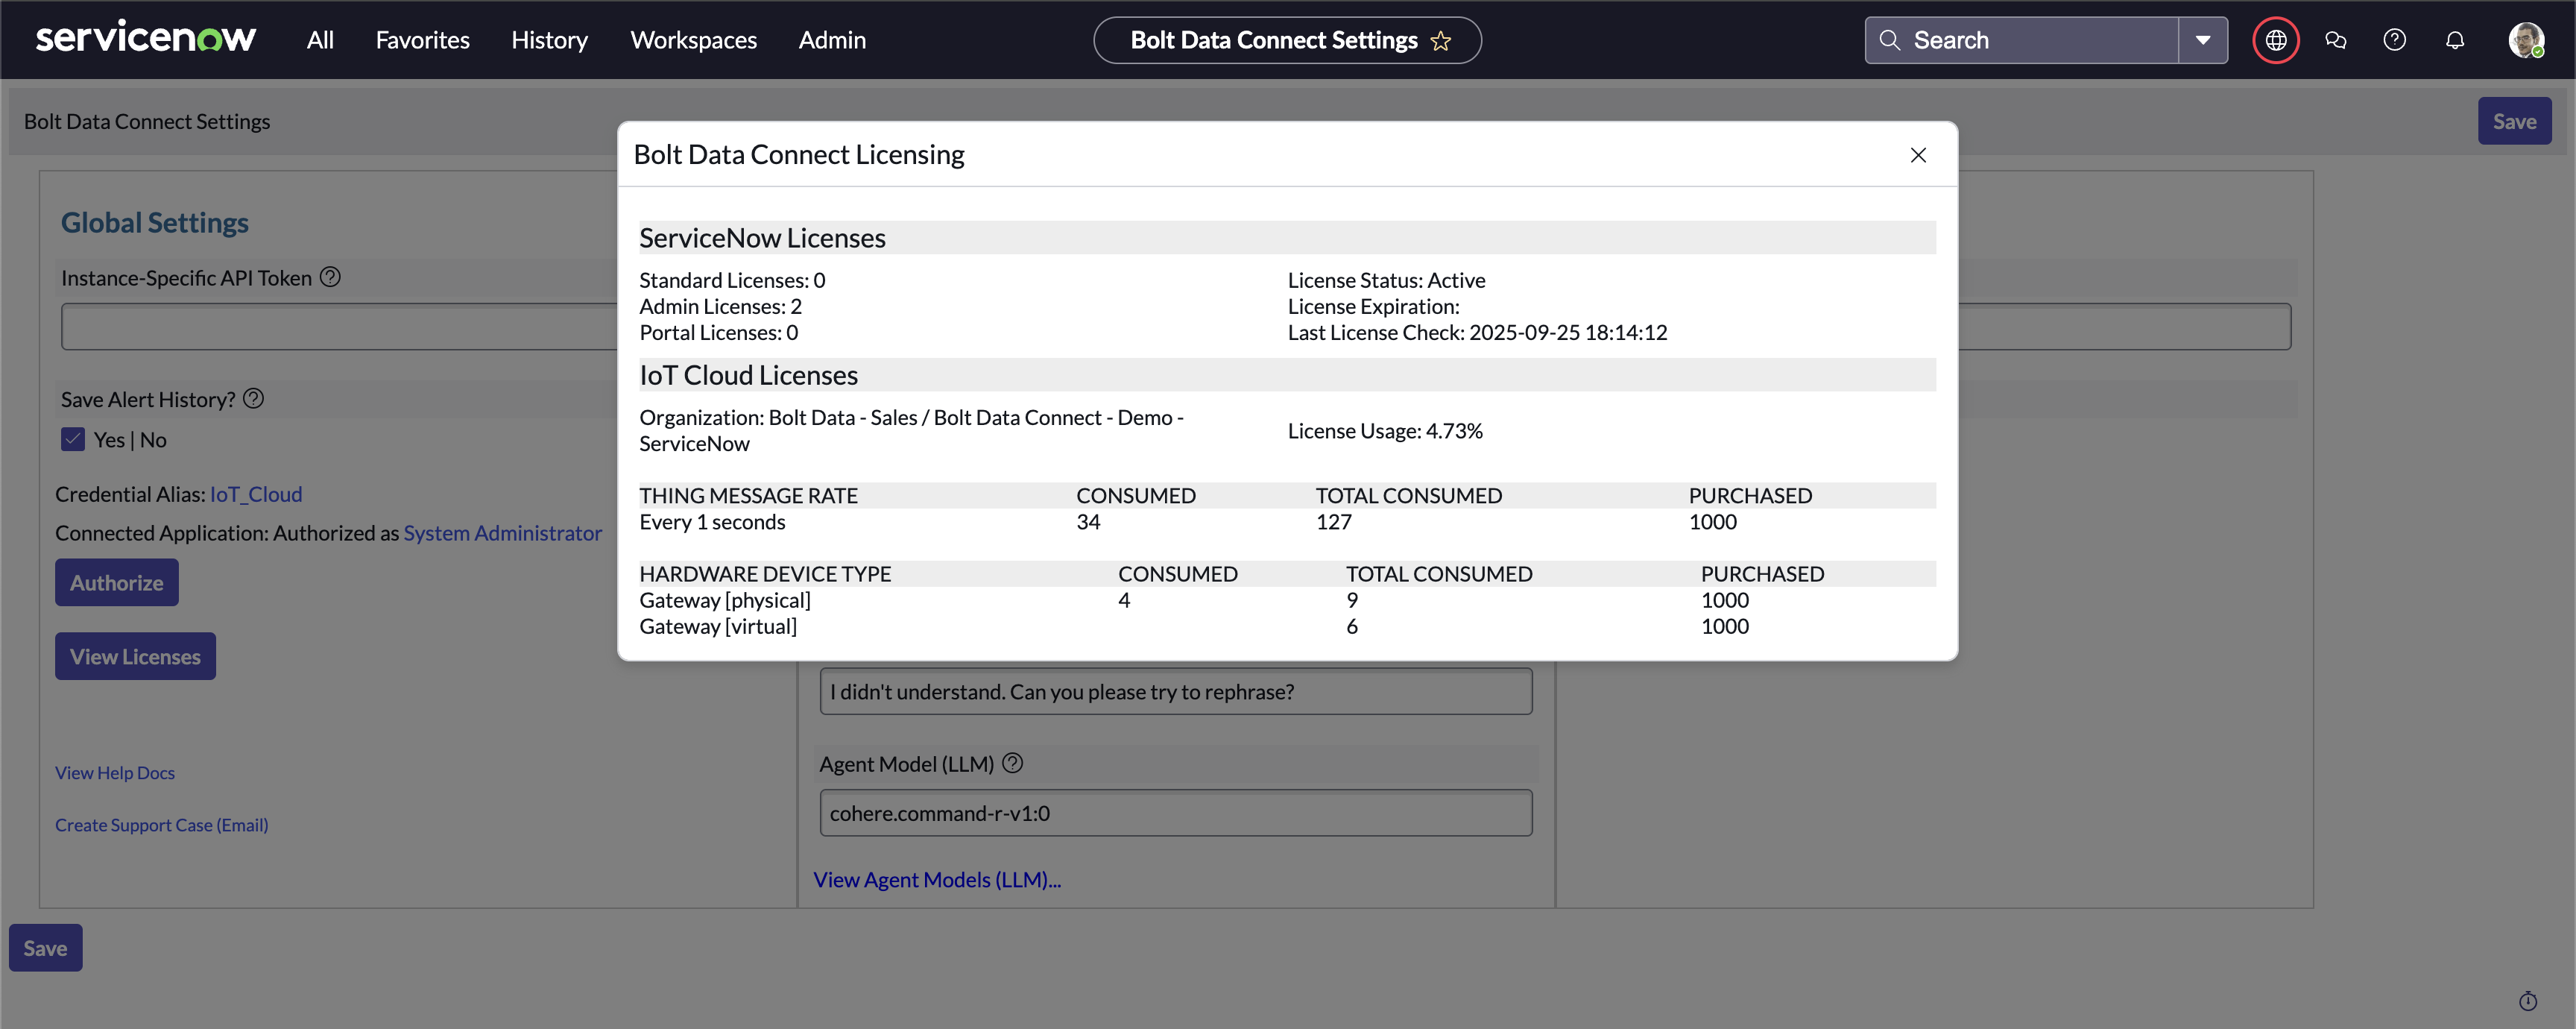
View Licenses
ServiceNow Licenses
- Standard Licenses
- The number of Standard Bolt Data Connect IoT User licenses used.
- Admin Licenses
- The number of Admin Bolt Data Connect IoT User licenses used.
- Portal Licenses
- The number of Portal Bolt Data Connect ServiceNow User licenses used.
- Last License Check
- The most recent date of synchronizing the Licenses with ServiceNow.
- License Status
- The status of the License from ServiceNow.
- License Expiration
- The date of the License Expiration from ServiceNow.
IoT Cloud Licenses
- Organization
- The parent / local IoT Cloud accounts connected to this Instance
- License Usage
- A calculation of the total percentage of device licenses used across all Instances
- Thing Message Rates
- A list of licensed message rates along with the purchased and used count of each
- Hardware Device Types
- A list of licensed devices types along with the purchased and used count of each
License Flexibility
As Thing Type “Message Rate” definitions are changed, licensing is evaluated and updated. We’ve implemented a flexible license usage policy, allowing you to use any Message Rate below or equal to the purchased rate.Thing Types
Thing Types allow you to configure “no-code” metadata to control the data model, frequency, and business logic of the IoT Cloud and Edge Gateway processing, all from within ServiceNow.
Thing-Type Configuration
Organizing your Thing-Types is crucial for unlocking the full potential of the Bolt Data Connect App. Each IoT Connected Asset is assigned a Thing-Type and it’s this Thing-Type that determines what calculations are performed on your IoT Connected Asset’s data and what Alerts get propagated to ServiceNow.
Each Thing-Type defines all interesting Sensors, Calculations, and Alert Conditions for an IoT Connected Asset of that type. It also defines how data is aggregated in the IoT Cloud. The IoT Rules Engine performs all Aggregations, Calculations, and Alert Conditions at the Edge, reducing the load on the IoT Cloud infrastructure, and saving you money.
-
Digital Twin Roles allow you to define relationships between Thing Types. This gives you the ability to create calculations and alerts based off of related IoT Connected Asset values as well.
-
Sensors allow you to define how each field in your IoT Connected Asset’s data is aggregated, what data type to assume for it and whether or not to send or save that data to the cloud.
-
ML Inferences allow you to add the result of executing an ML Model with a set of input values from IoT Sensors.
-
Calculated Fields allow you to enrich an IoT Connected Asset’s data prior to entering the Cloud. Calculations can use any Sensors or other Calculations within the scope of an IoT Connected Asset. For example, Calculations can allow you to derive a state based on Sensor data, then use that state to drive an Alert.
-
Alert Conditions allow IoT Connected Assets to communicate with ServiceNow. They are the catalysts that drive your Processes and State changes in ServiceNow. You have full control over what constitutes an Alert and how often to rebroadcast that Alert when the state hasn’t changed after a specified time. Alerts can use any Sensors or Calculations within the scope of a IoT Connected Asset.
-
Copilot Instructions allow thing type speciffic instructions to be sent as context to messages sent to IoT Copilot. These instructions give IoT Copilot the context it needs to understand how to interpret each Thing Type to answer questions more accurately.
-
Gauges specify how the Sensor Gauges will show on the Gauges page in the Visualizations tab in the Workspace for all Connected Assets of this Thing Type. These should be set with the Gauge Configuration UI in the Workspace Thing Type Page.
Thing Type Editing
Thing-Types define the configuration for Edge Processing.
Top Level Configuration
- Label
- The label to use for the Thing-Type specification.
- Is Active
- If a Thing’s Thing-Type is not active (i.e. this option is deselected), the Thing’s data will not be aggregated and every message will be forwarded from the Gateway to the Cloud. It is not recommended to deactivate a Thing-Type that is assigned to Things, except for brief troubleshooting; otherwise, it could potentially result in higher costs and missed Alerts.
- Sample Message
- Used to auto-populate the Sensors section of the Thing-Type Specification.
- Aggregate Type
- Determines when to send the aggregated messages. It can be configured to “None”, “Seconds”, or “Count”.
- None: Forward every message received from the device to the cloud.
- Seconds: Aggregate the last N seconds of Thing data, where N is defined by the Aggregate Interval field.
- Count: Aggregate the last N messages from a Thing, where N is defined by the Aggregate Interval field.
- Aggregate Interval
- Used in conjunction with the Aggregate Type field to determine the frequency of aggregation performed on the Gateway.
- Offline Timeout (Seconds)
- Used to determine if a Thing is offline. If a device has not communicated in the time specified in this field, then an Offline Alert is sent to ServiceNow.
Sensor Settings
- Include Undefined Sensors
- When not selected any unrecognized sensor value(s) will be trimmed from the messages before processing
- Enable Sensor Type Conversion
- When selected the raw sensor values will be convereted into the Data Types specified below
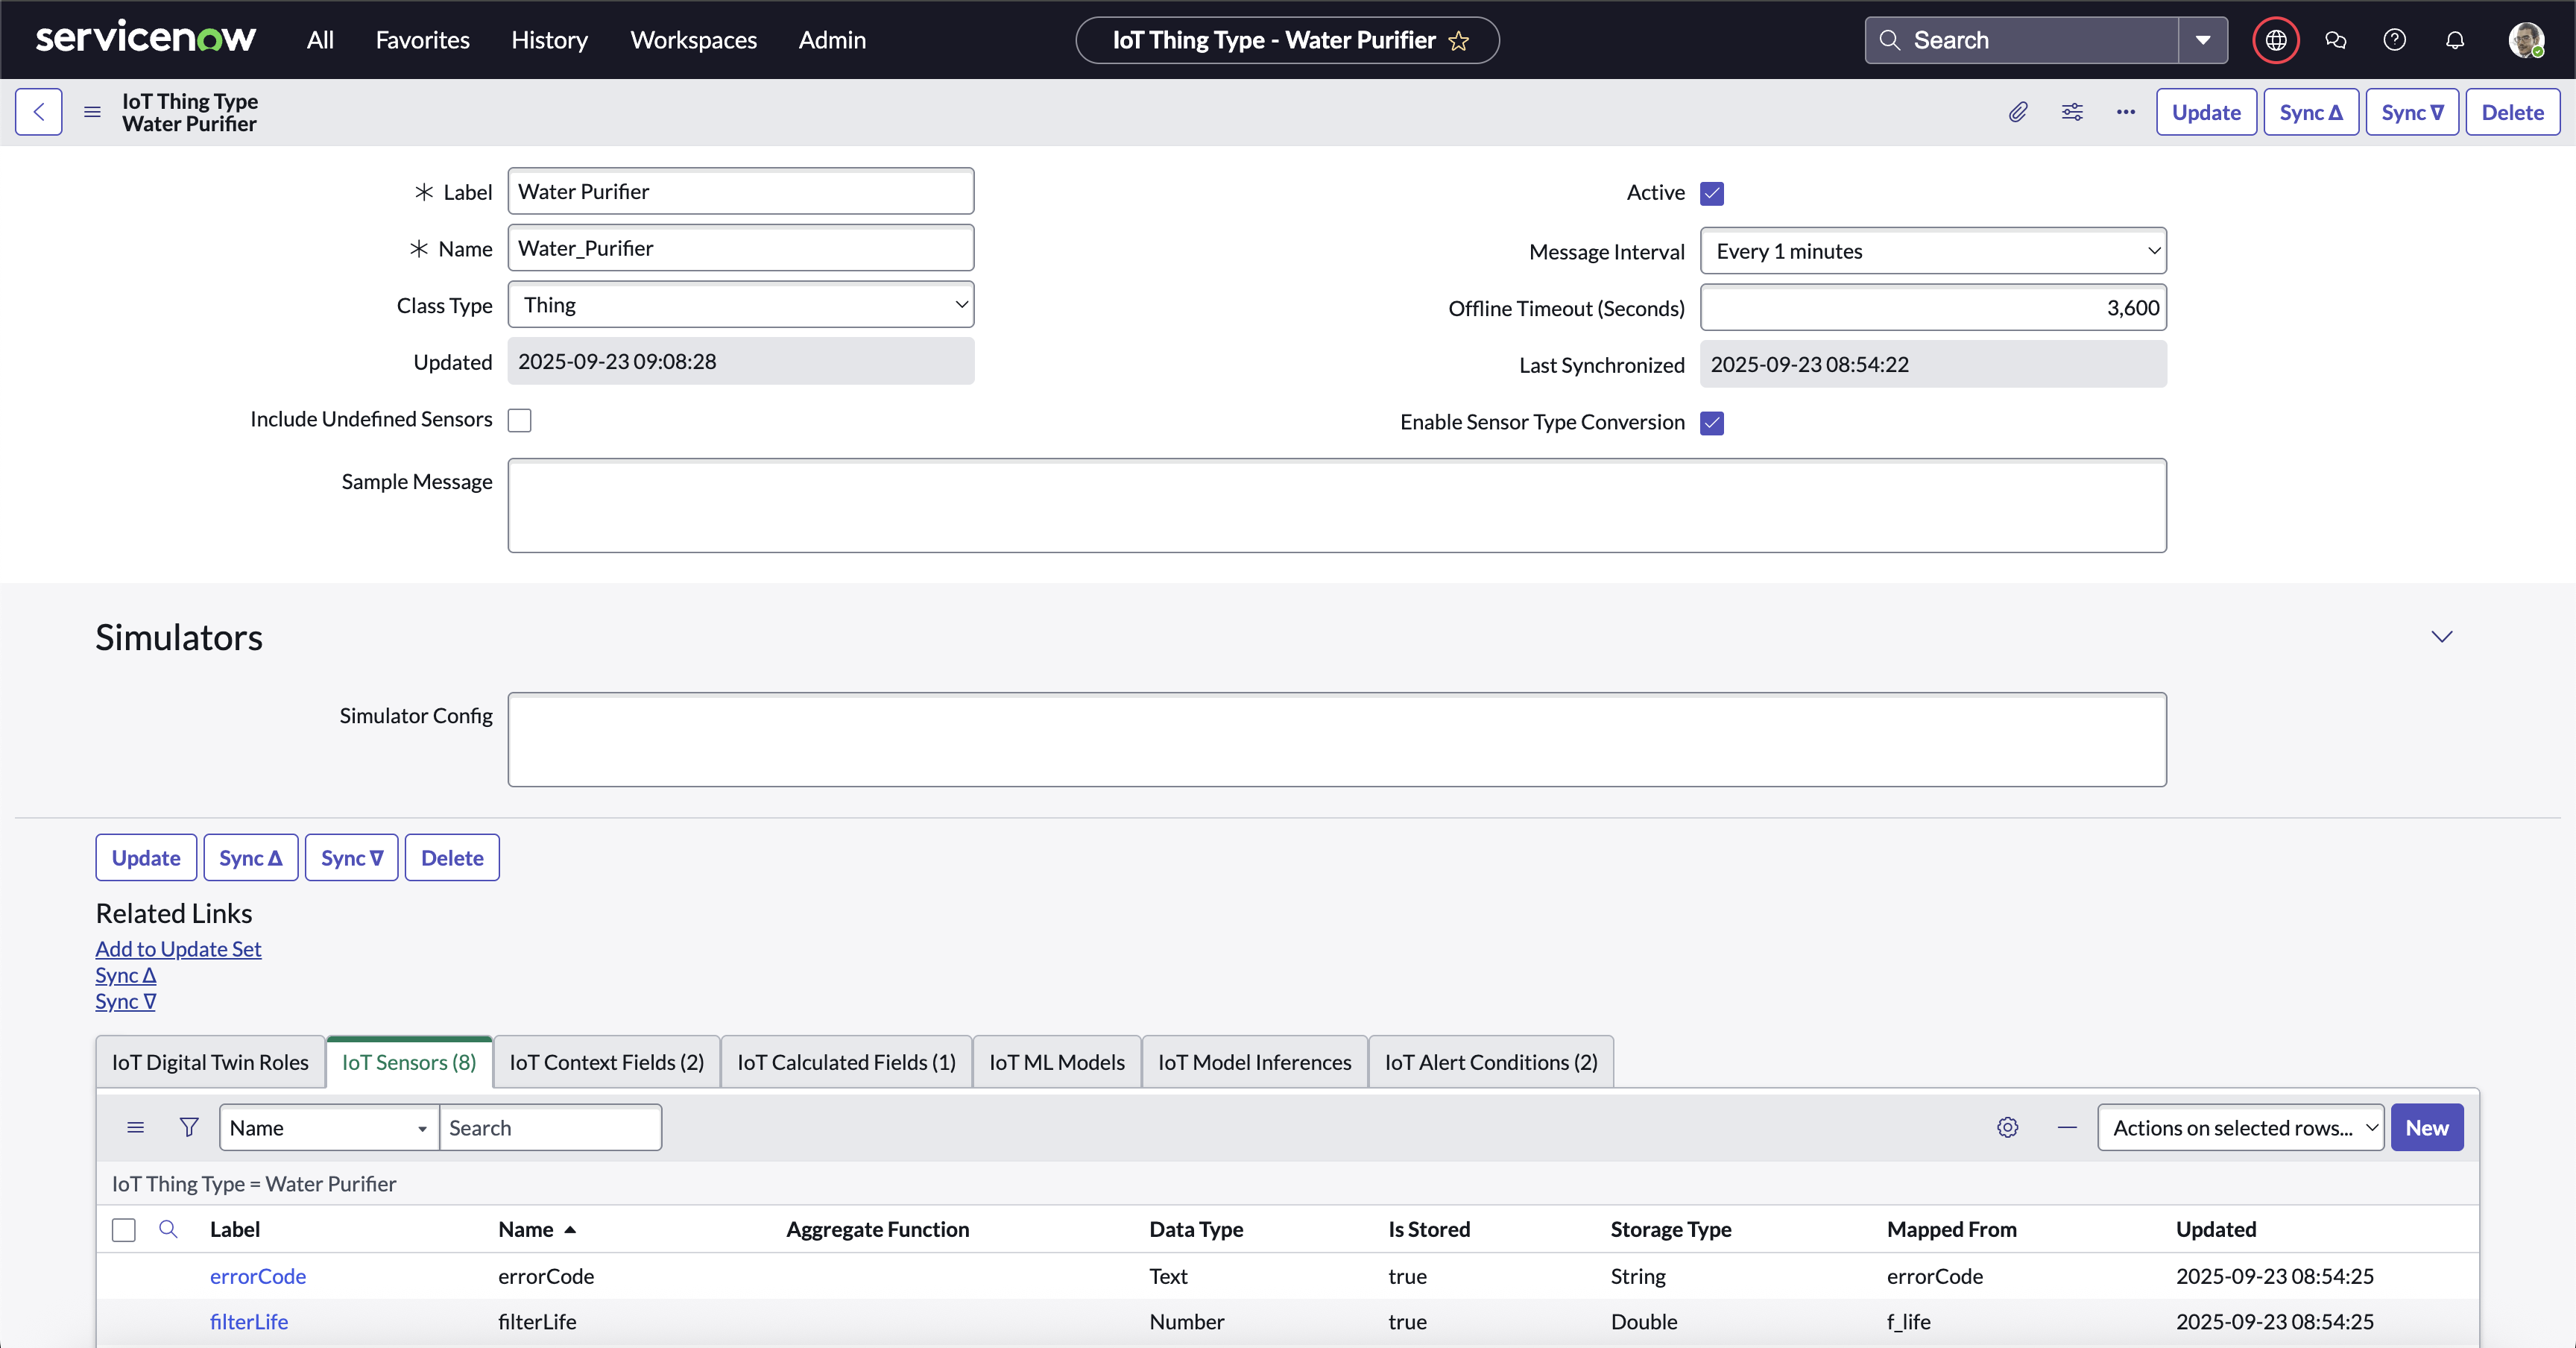
Thing Type Record Page
Digital Twin Children
See the Digital Twins page for details on configuring this section.
Sensors
This section defines all the Sensors for the Thing-Type. Note if you have a sample message in JSON format, you can paste the message in the Sample Message field and select Parse to auto-fill the Sensors section.
- Label
- The display name of the sensor data on plots.
- Sensor Name
- The name of the field in the actual Thing’s data message.
Example
Sensor Name =sensorABC, expects a field like {... "sensorABC": 123, ...} to be in the data message from the Thing.
- Data Type
- Specifies the type of data expected from each Sensor.
- Aggregate Function
- Determines how the data is aggregated in the Gateway.
- NONE: Use the last received value as the value for the Sensor for Calculations, Alerts, and Cloud updates.
- SUM: Sum all values received during the Aggregate Interval as the value for the Sensor for Calculations, Alerts, and Cloud updates.
- AVG: Average all values received during the Aggregate Interval as the value for the Sensor for Calculations, Alerts, and Cloud updates.
- MIN: Use the minimum of all values received during the Aggregate Interval as the value for the Sensor for Calculations, Alerts, and Cloud updates.
- MAX: Use the maximum of all values received during the Aggregate Interval as the value for the Sensor for Calculations, Alerts, and Cloud updates.
Context Fields
Context Fields are configured in the Context Data Setup Page.
ML Models
This section defines all the ML Models available on a Gateway. These Models have been developed by a Data Scientist and uploaded to the BDC IoT Cloud. NOTE: This section is only available on Gateway Thing Types.
See Machine Learning for more information.
- Label
- The label to use for the Calculated Field.
- Model Name
- The unique name of the model.
- Input Features
- The features required by this model. These will be mapped in the ML Inferences.
- Model Parameters
- Configuration values for the model itself.
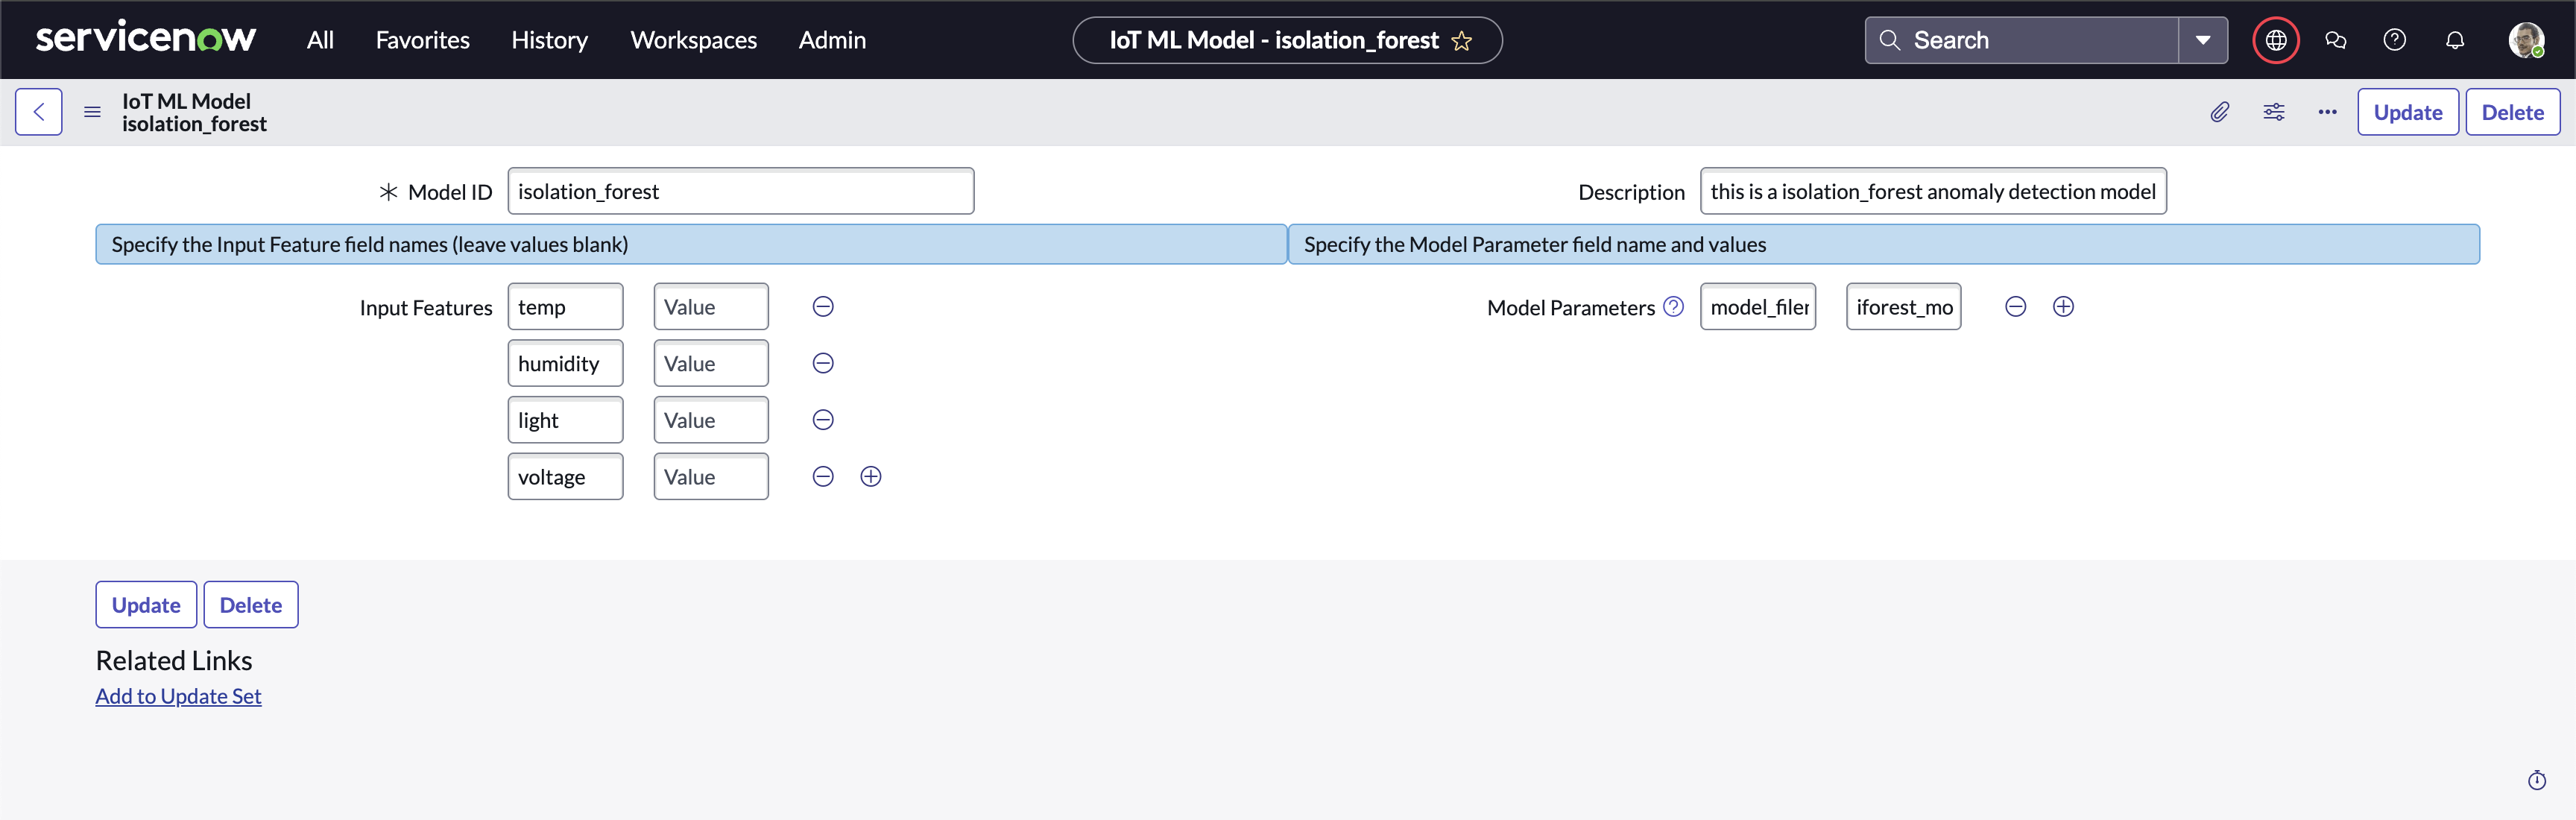
ML Models
ML Inferences
This section defines all the ML Inference Fields for a Thing-Type. Each of these represent a result of executing an ML Model with a set of input values from IoT Sensors.
- Label
- The label to use for the ML Inference field.
- Name
- The name of the ML Inference field. It’s also the name referenced by other Calculations and Alerts.
- Model
- The ML Model (defined on the corresponding Gateway Thing Type) that will be executed.
- Data Type
- Determines the assumed data type for the result of the Calculation.
- Formula
- The mapping of Model Input Features to IoT Sensor values.
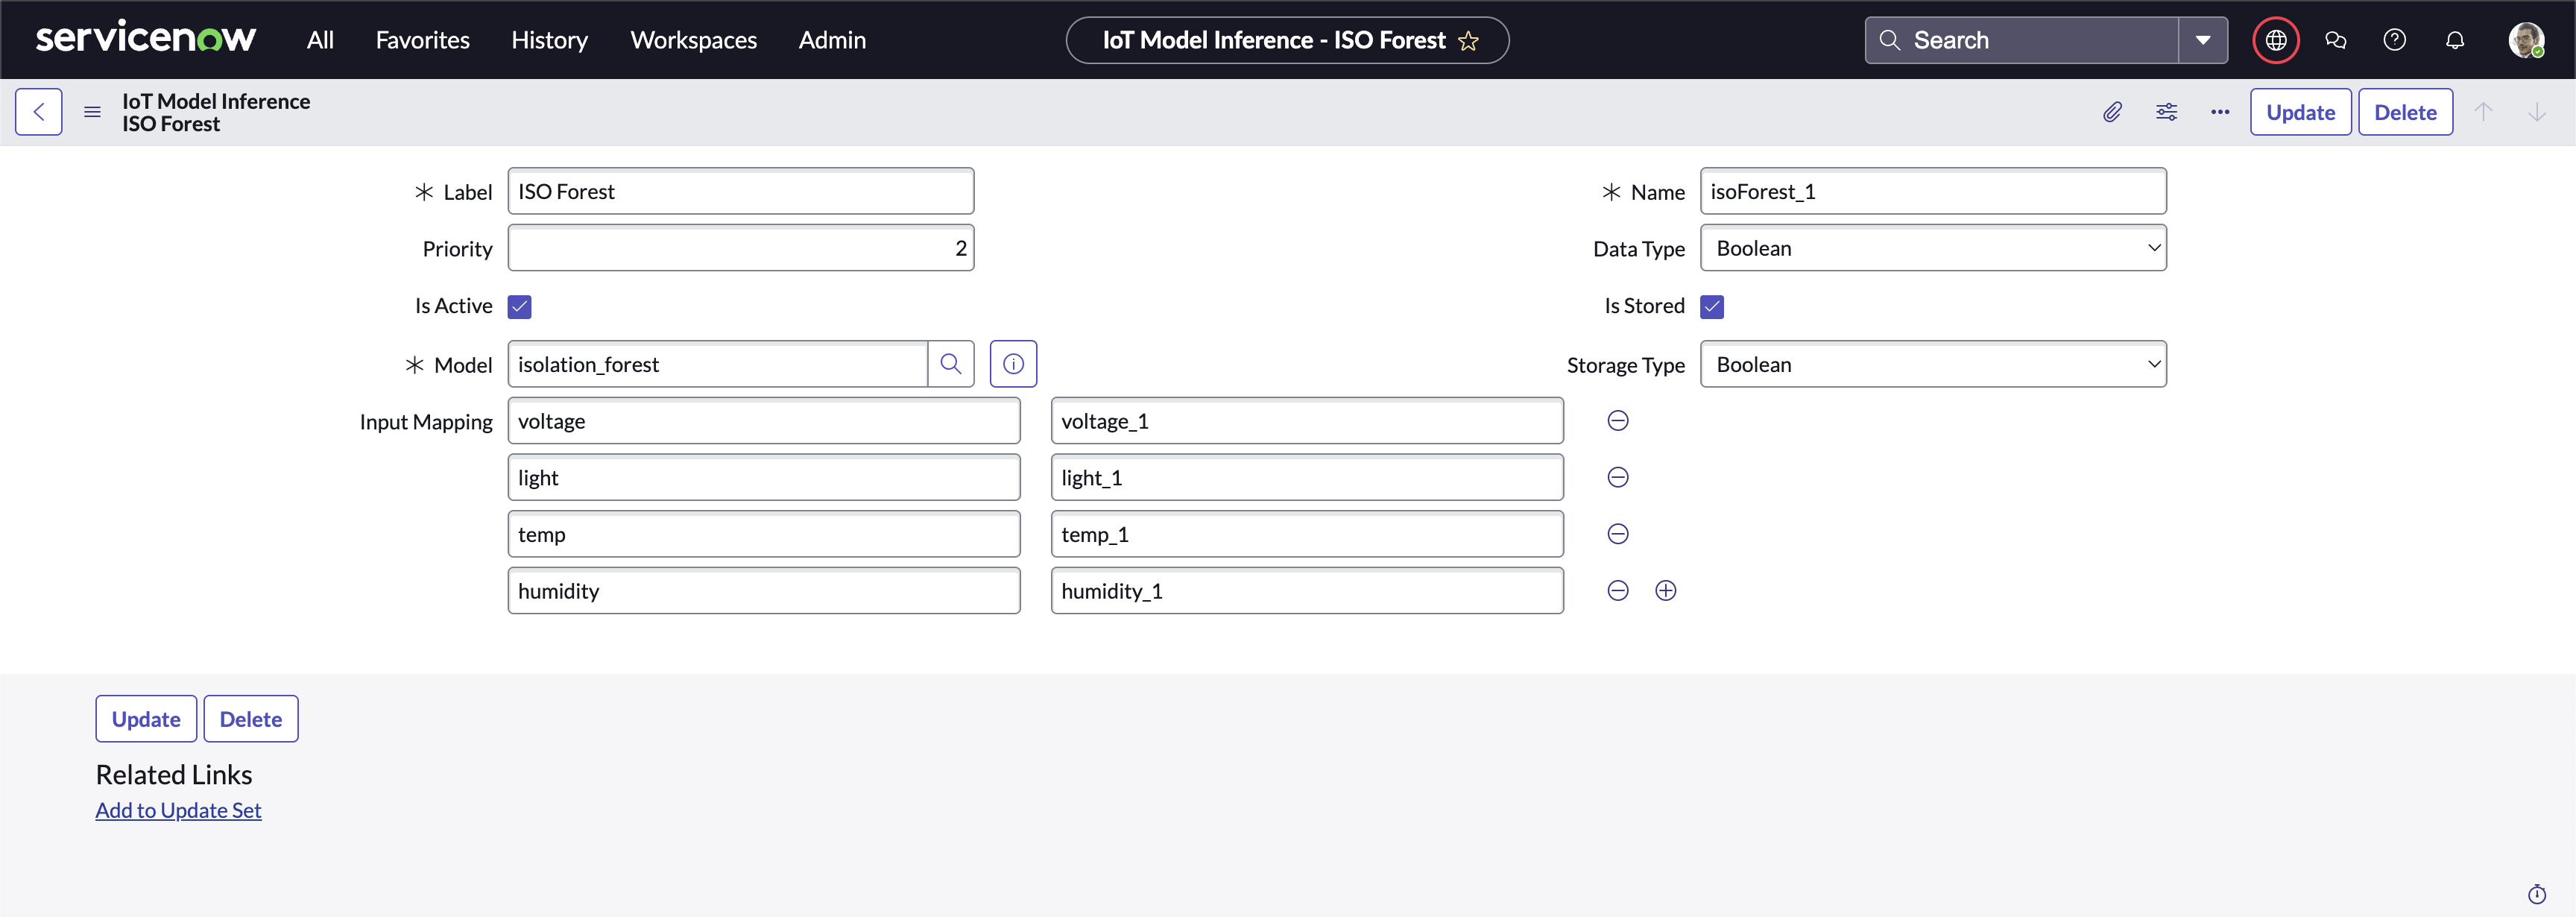
ML Inferences
Calculated Fields
This section defines all the Calculated Fields for a Thing-Type. All Sensor data is aggregated prior to computing the Calculated Fields. It can be assumed that all Sensor data is up-to-date in conformance with the aggregation settings defined by each Sensor.
- Label
- The label to use for the Calculated Field.
- Field Name
- The name of the field when this calculation is sent to the Cloud. It’s also the name referenced by other Calculations and Alerts.
Example
Field Name =calcABC results in {... "calcABC": 123, ...}, when data is sent to the Cloud and referenced as calculation.calcABC in other Calculations and Alerts.
- Data Type
- Determines the assumed data type for the result of the Calculation.
- Formula
- The actual formula to evaluate. The formula should be any Javascript statement that returns an assignable value. The formula can use any Sensor, Calculated Field, or Context Field in the computation. Sensor values are available in the
sensornamespace (e.g.sensor.sensorABC), other Calculated Fields are available in thecalculationnamespace (e.g.calculation.calcABC), and Context Fields are available in thecontextnamespace (e.g.context.contextABC).
Alert Conditions
This section defines all the Alert Conditions for a Thing-Type. Alerts are a special subset of Calculated Fields. Alerts are computed after all Calculated Fields have been computed, so it can be assumed that all Calculated Fields are using the most recent data. The result of the Alert calculation should be a boolean value, True if an Alert should be sent to ServiceNow, False otherwise.
- Label
- The label to use for the Alert Condition.
- Condition Name
- The name of the field when this alert is sent to the Cloud.
Example
Condition Name =alertABC results in {... "alertABC": 123, ...}, when data is sent to the Cloud.
- Alert Type
- Determines the type of Alert sent to ServiceNow. Each Alert sent to ServiceNow will include this Alert Type, which can be used in your Processes to take actions (like update the IoT Thing Status for a given Thing).
- Alert Interval / Units
- Determines how often this Alert is re-broadcasted. If the Alert condition has persisted longer than the amount of time specified by this field, the Alert will be sent to ServiceNow again to retrigger any automated processes. It is recommended to keep the Alert Interval at rather large values to avoid retriggering your processes.
- Formula
- The actual formula to evaluate. The formula should be a Javascript statement, and can use any Sensor or Calculated Field in the calculation. The formula should result in a boolean value; It will be evaluated as if it’s boolean — i.e. if the value is “falsy” it will result in no Alert. Otherwise it will result in an Alert. Sensor values are available in the
sensornamespace (e.g.sensor.sensorABC), Calculated Fields are available in thecalculationnamespace (e.g.calculation.calcABC), Context Fields are available in thecontextnamespace (e.g.context.contextABC), and other Alert Conditions are available in thealertnamespace (e.g.alert.alertABC).
Examples
- The formula,
sensor.SensorA > 40executes the relational operation, comparing SensorA to the literal 40. If this Condition Name was,DeviceThawed, then the resulting message to the Cloud could be:
{
 "sensor": {
  "SensorA": 39
 },
 "alert": {
  "DeviceThawed": false
 }
}
- OR -
{
 sensor: {
  "SensorA": 41
 },
 alert: {
  "DeviceThawed": true
 }
}
… with the later triggering an Alert with the defined Alert Type to ServiceNow. Anytime an Alert is sent to ServiceNow, the accompanying data message is included and can be used in your Flows. See the Processes section for more details.
- The formula,
calculation.CalcA === "Cold"executes the strictly-equal equality operator, comparingCalcAto the literal"Cold". If this Condition Name was,DeviceCold, then the resulting message to the Cloud could be:
{
 "sensor": {
  "SensorA": 39
 },
 "calculation": {
  CalcA: "Cold"
 },
 "alert": {
  "DeviceCold": true
 }
}
- Sample Result
- This field is automatically calculated based on the formula entered using the data provided in the sample message to populate the sensor and calculation namespaces.
Formula Editor
The Formula Editor Page now helps in writing formulas (both Calculated Fields and Alert Conditions). It allows the user to select data pills for any sensor, calculated field, digital twin value, function, or operator and copy them to the clipboard. The user can then paste the value anywhere in their formula field.

Formula Editor with Data Pills
Examples
- The formula,
sensor.SensorA + sensor.SensorB, will add the aggregated value of SensorA to the aggregated value of SensorB. If this Calculated Field name wasCalcA, then the resulting message to the Cloud could be:
{
 sensor: {
  "SensorA": 40,
  "SensorB": 2
 },
 calculation: {
  "CalcA": 42
 }
}
- The formula,
(sensor.SensorA > 40) ? "Not Cold" : "Cold", will execute the Javascript ternary operator (basically an assignable if-else statement). If this Calculated Field name wasColdState, then the resulting message to the Cloud could be:
{
 sensor: {
  "SensorA": 39
 },
 calculation: {
  "ColdState": "Cold"
 }
}
- OR -
{
 "sensor": {
  "SensorA": 41
 },
 "calculation": {
  "ColdState": "Not Cold"
 }
}.
- Sample Result
- This field is automatically calculated based on the formula entered using the data provided in the sample message to populate the sensor and calculation namespace.
Thing Type Synchronizing
Thing Types definitions are stored in both ServiceNow and the IoT Cloud. You can update and Save them to ServiceNow, and choose when to “Push” them to the cloud. The “Last Modified” and “Last Synchronized” Dates help you to track their status.
Import New Thing Types…
From the main Thing Types screen, you can select the Import action to Import Thing Types from either the IoT Cloud or a local file into ServiceNow. There are two tabs, Remote Configurations and Upload File.
Remote Configurations
Note
This import brings the full details of the selected thing types and their dependencies stored on the IoT Cloud.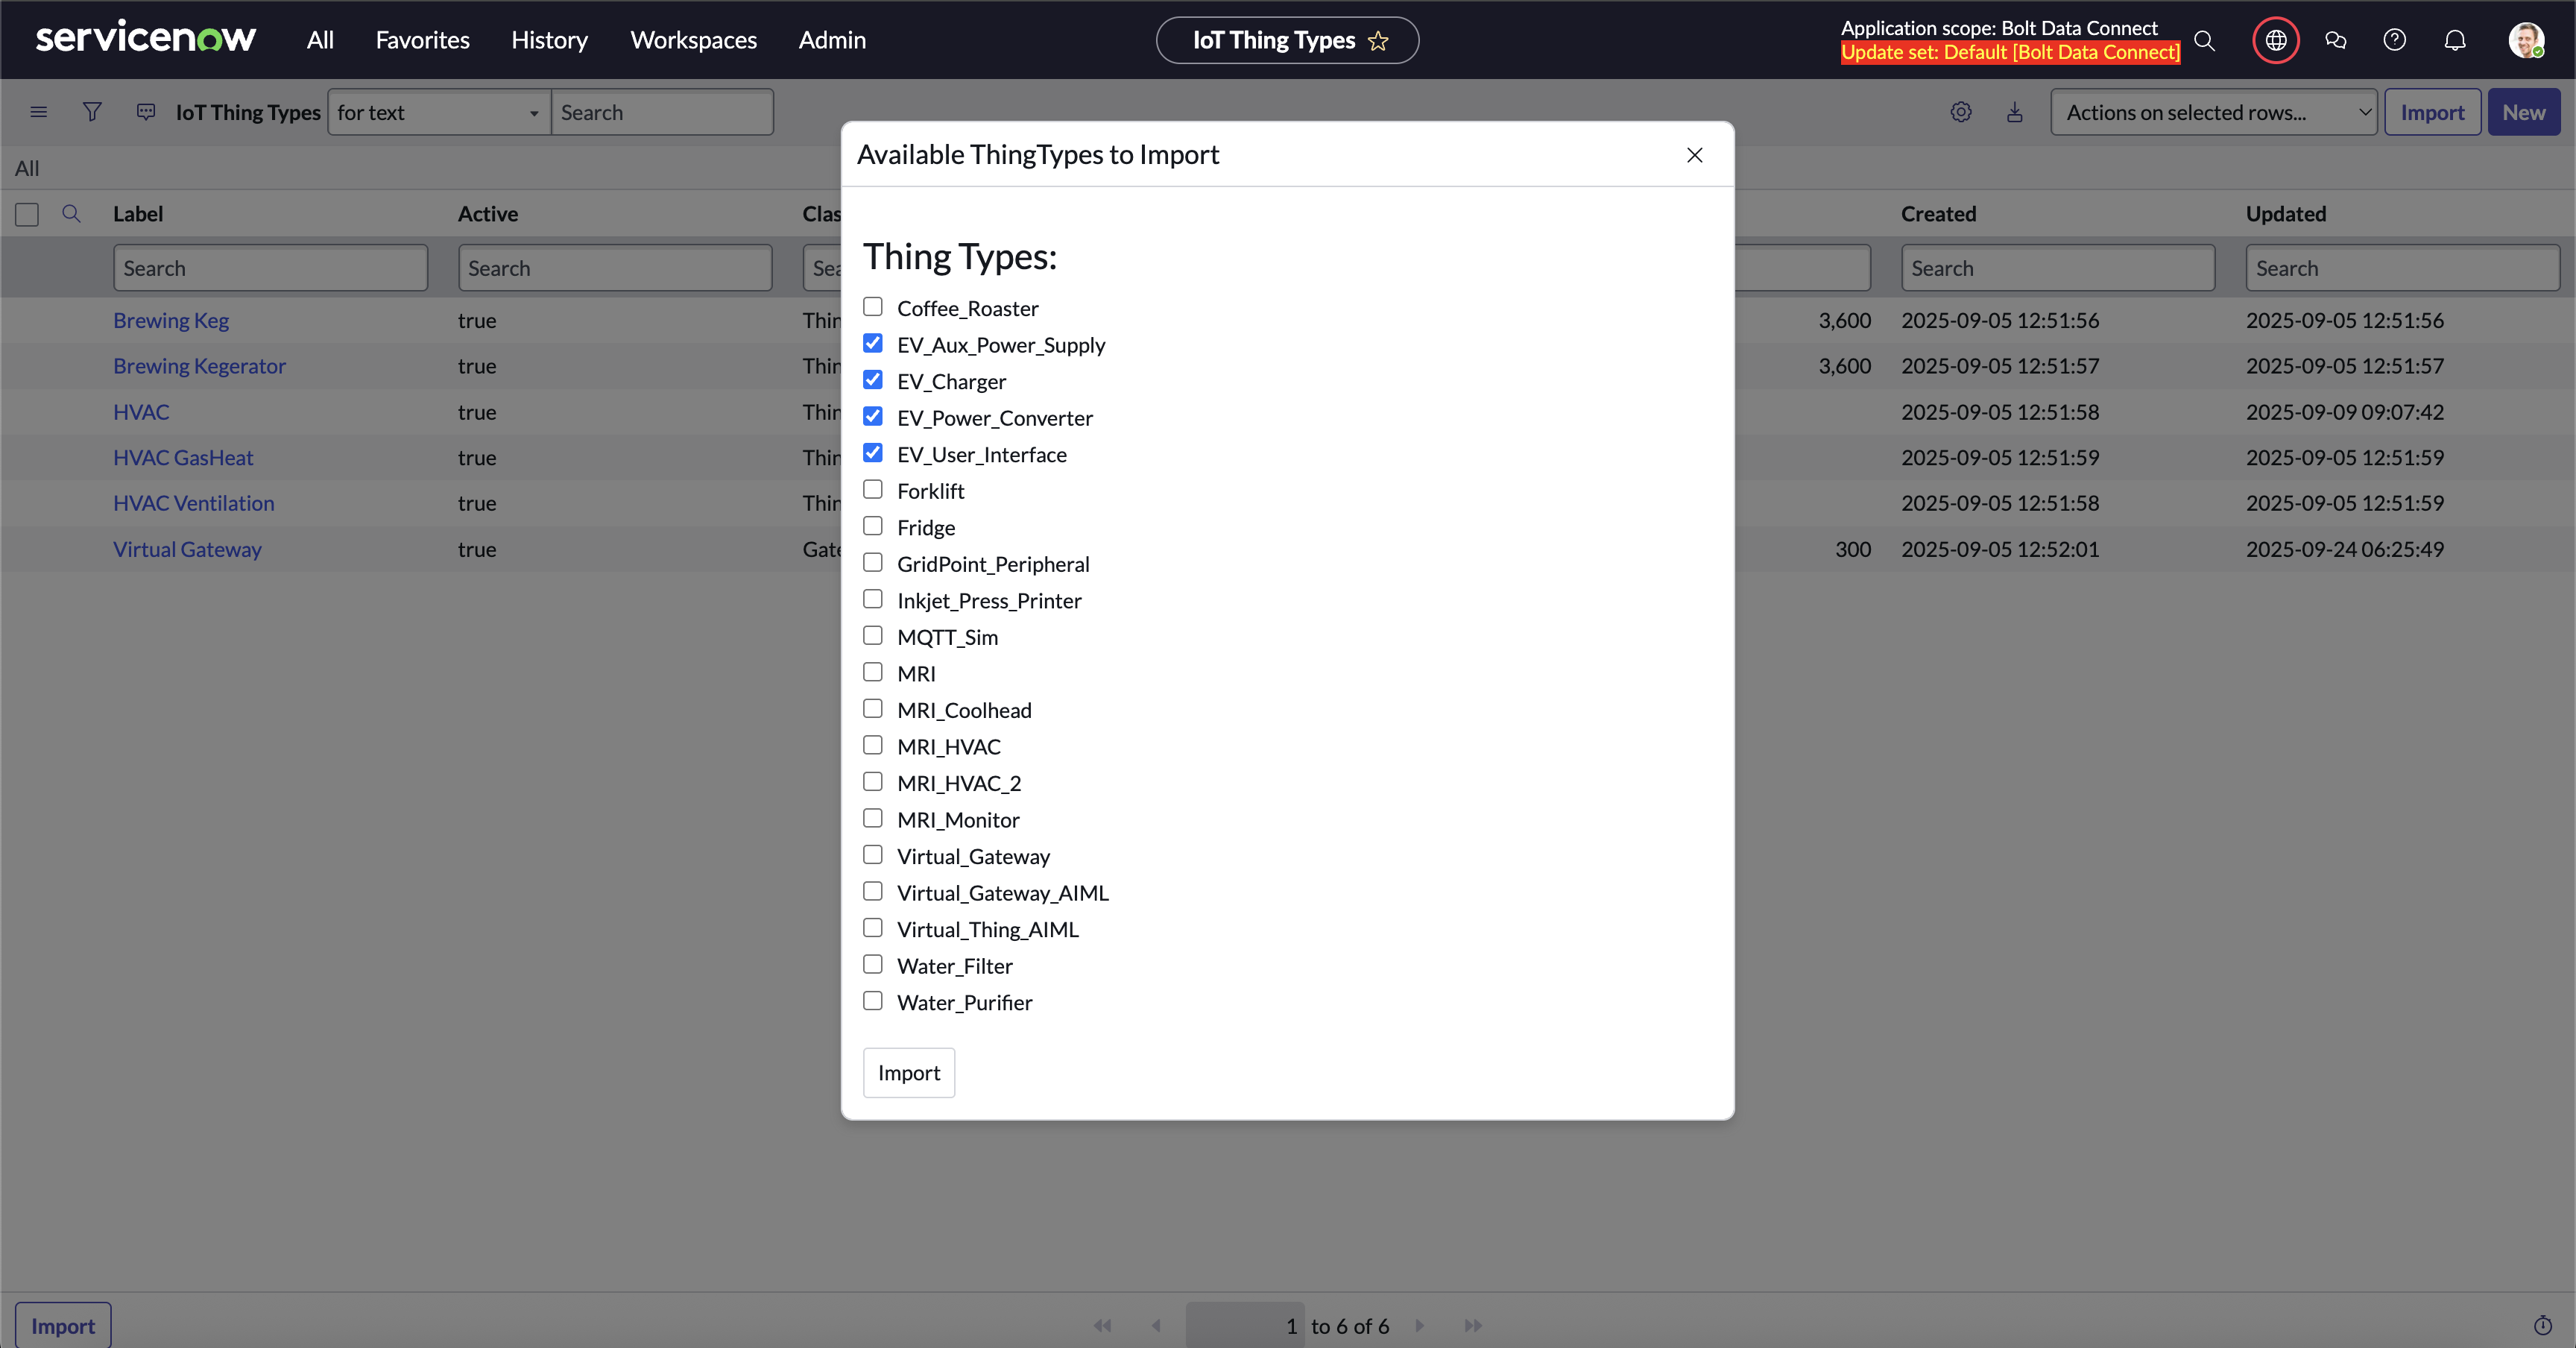
Thing Types Import
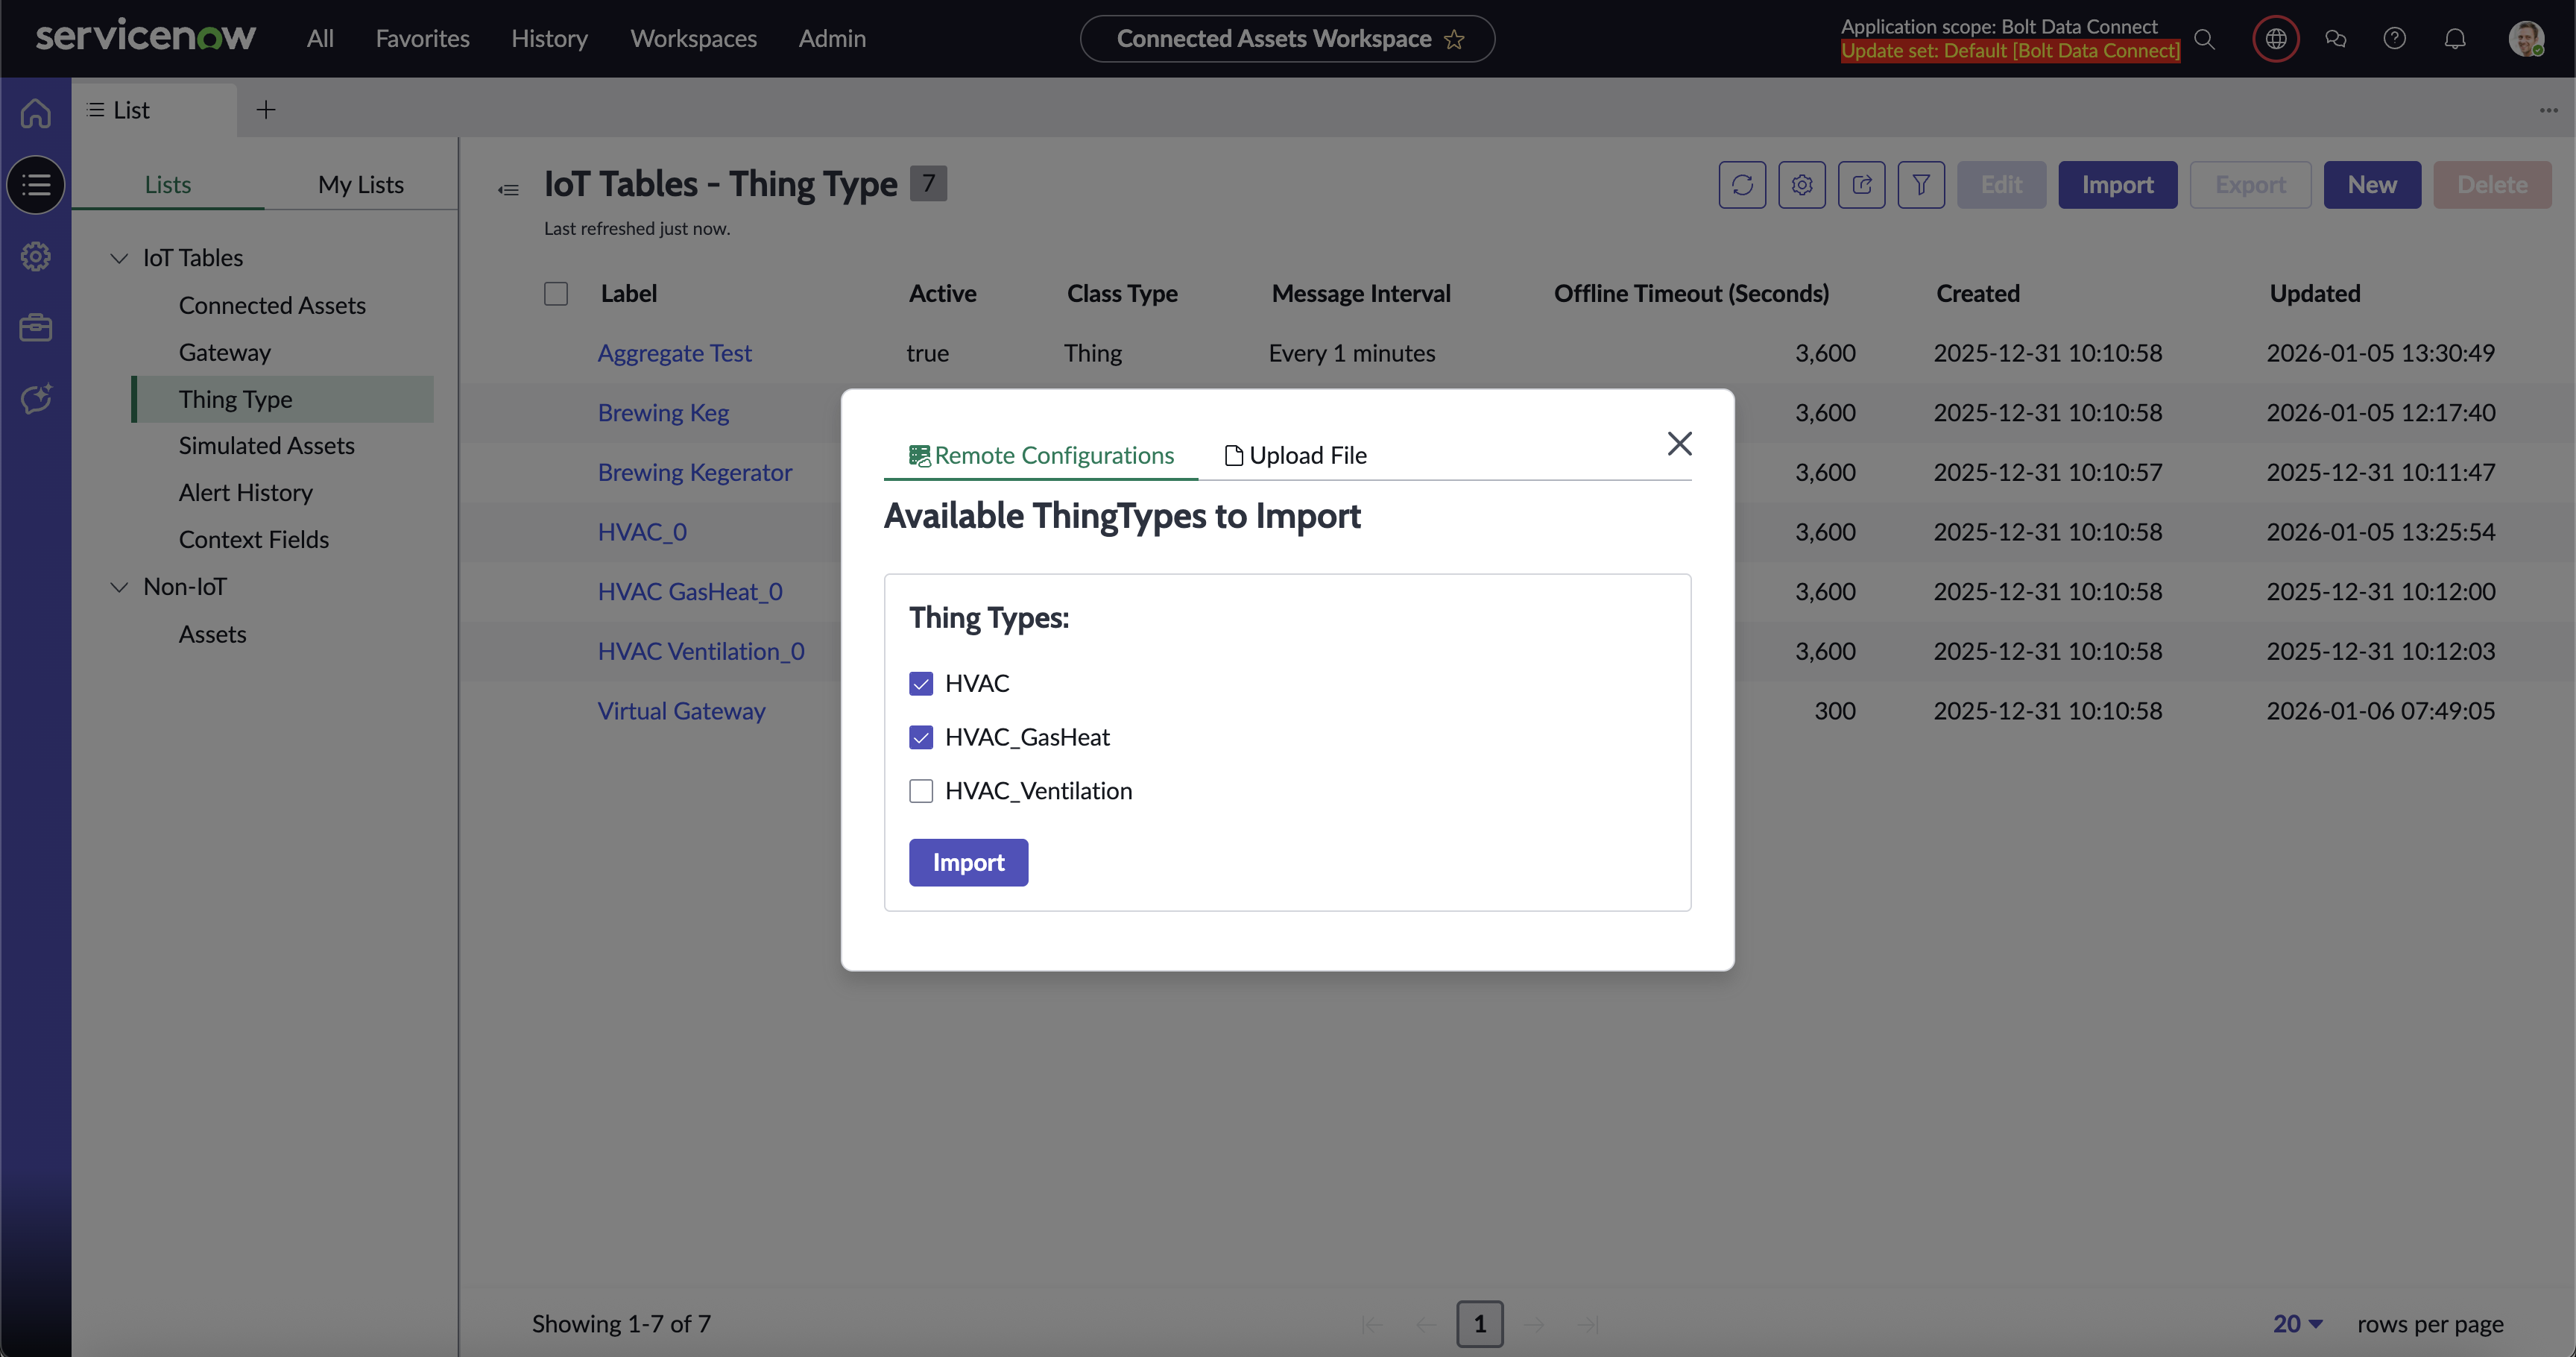
Thing Types Workspace Import
Upload File
Select a file saved using the Export action to import all of the thing types and their dependencies.
Note
This import brings the full details of the selected thing types and their dependencies stored on the local file.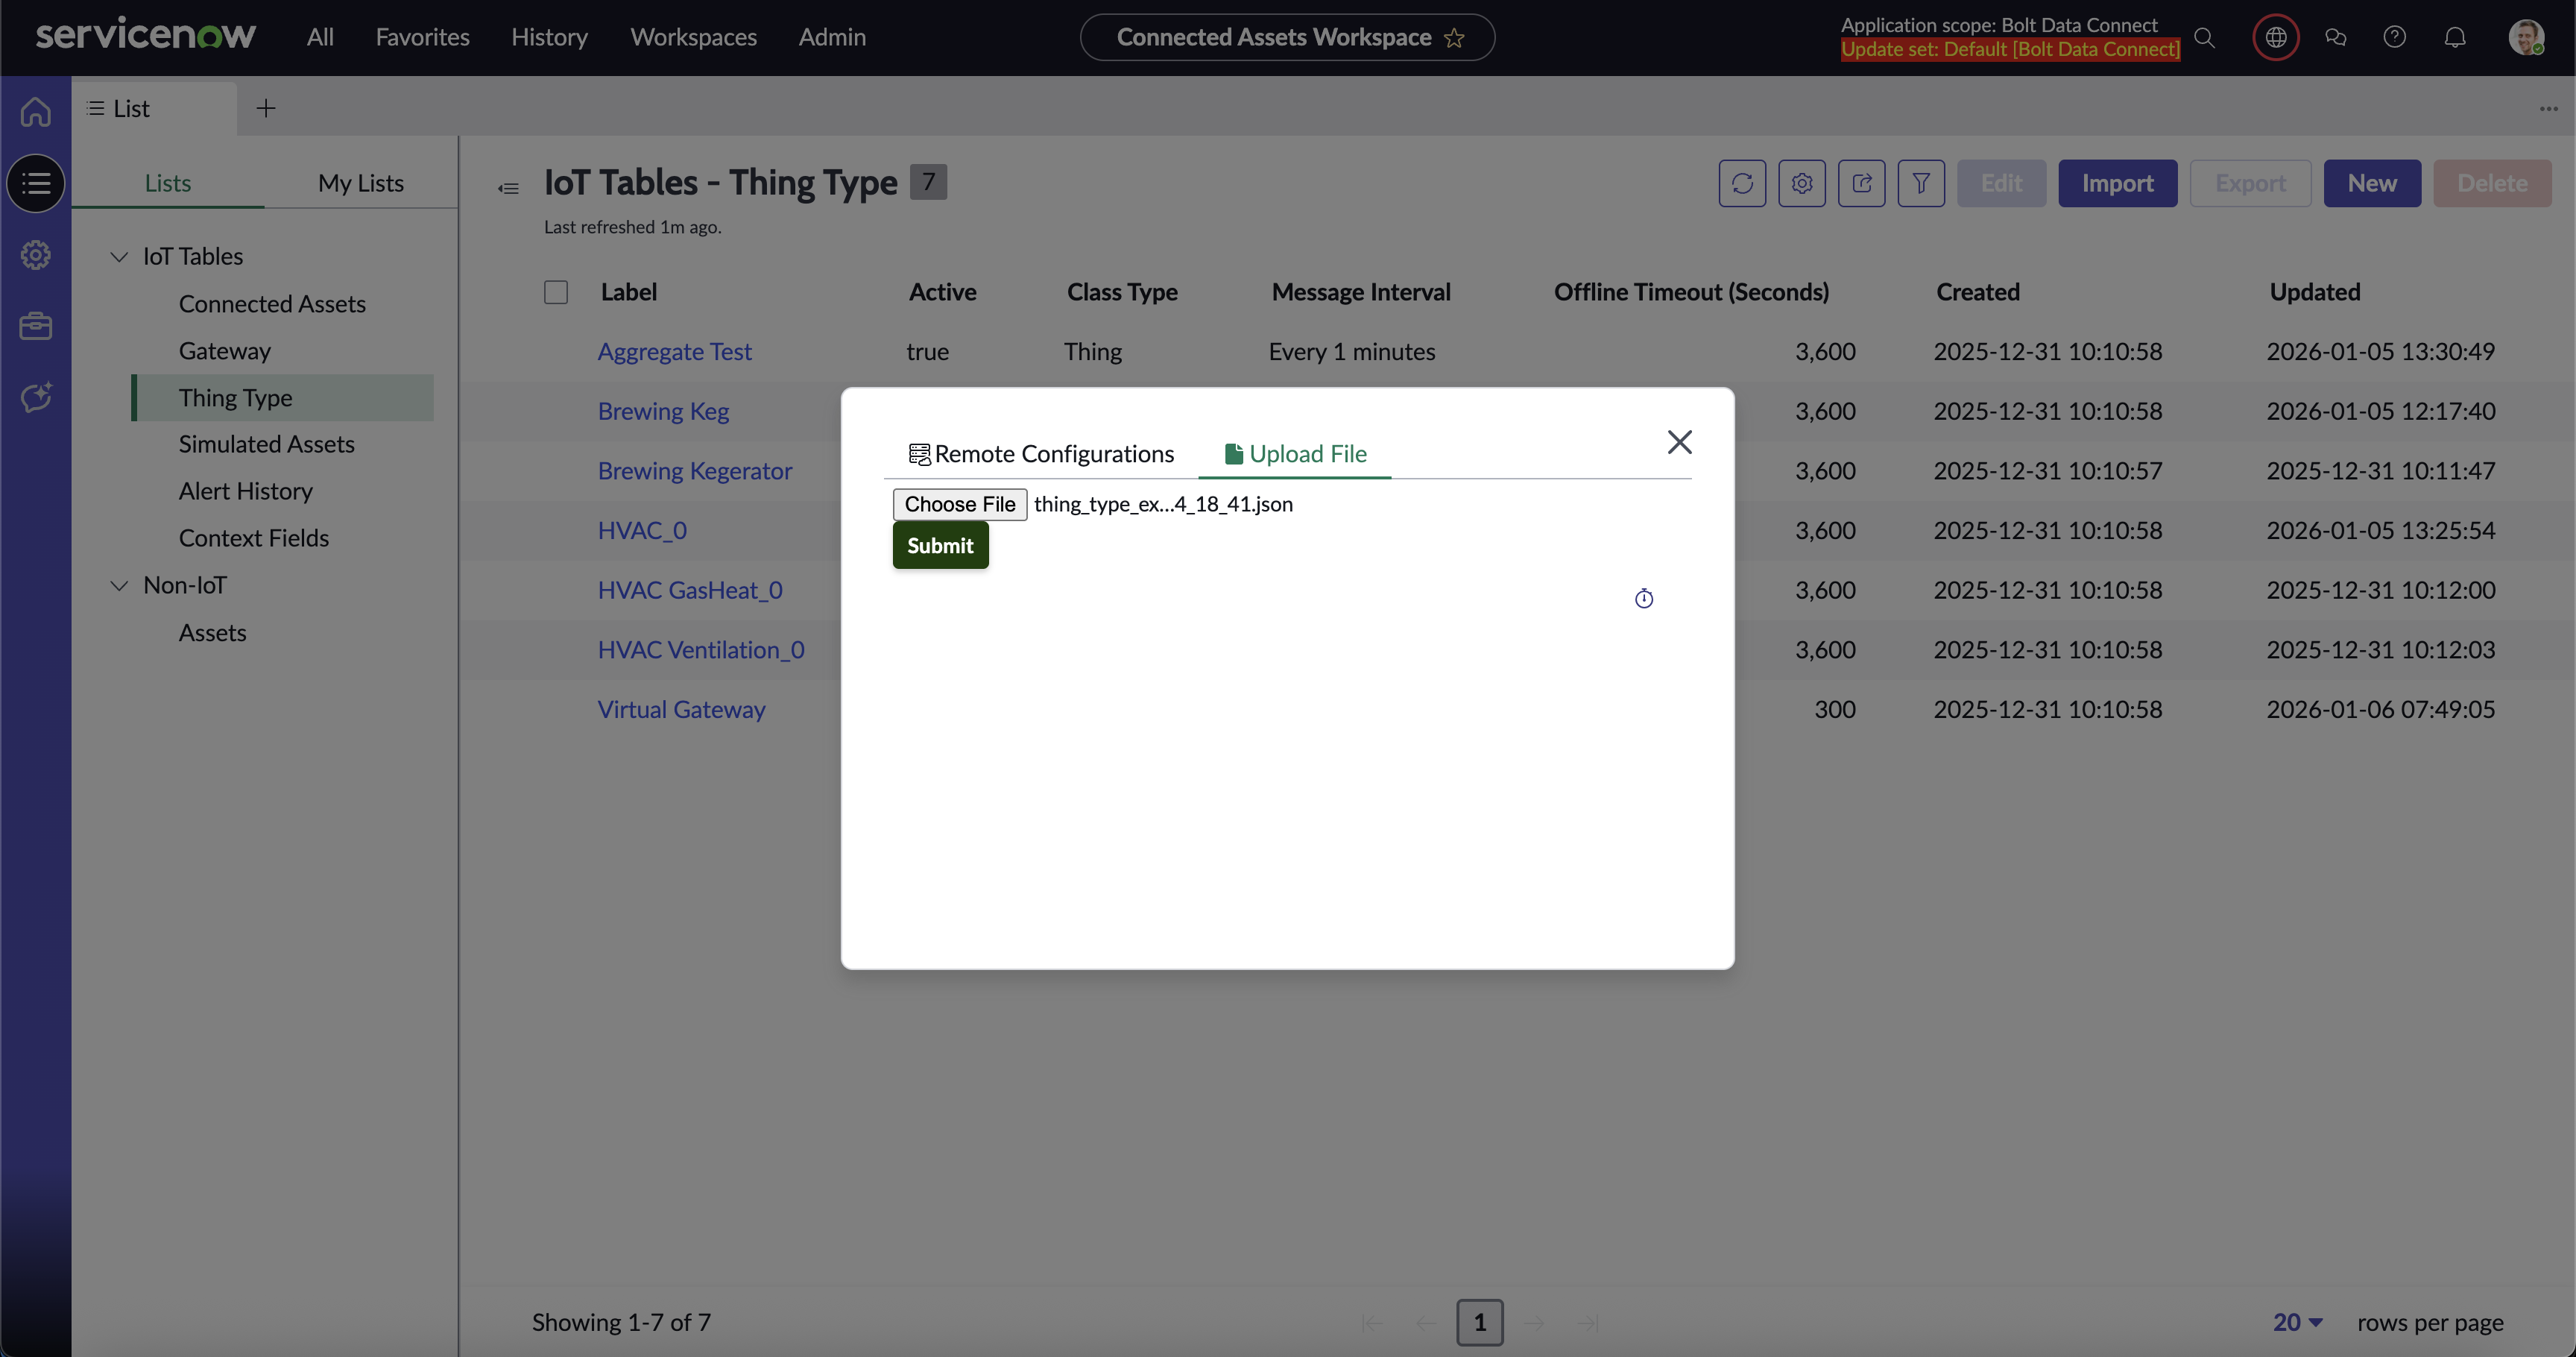
Upload Thing Types
Export Thing Types
From the main Thing Types list page in the workspace, you can select thing types and click the Export action to save your thing types configurations to a local file. This file can be used to backup and move changes between instances.
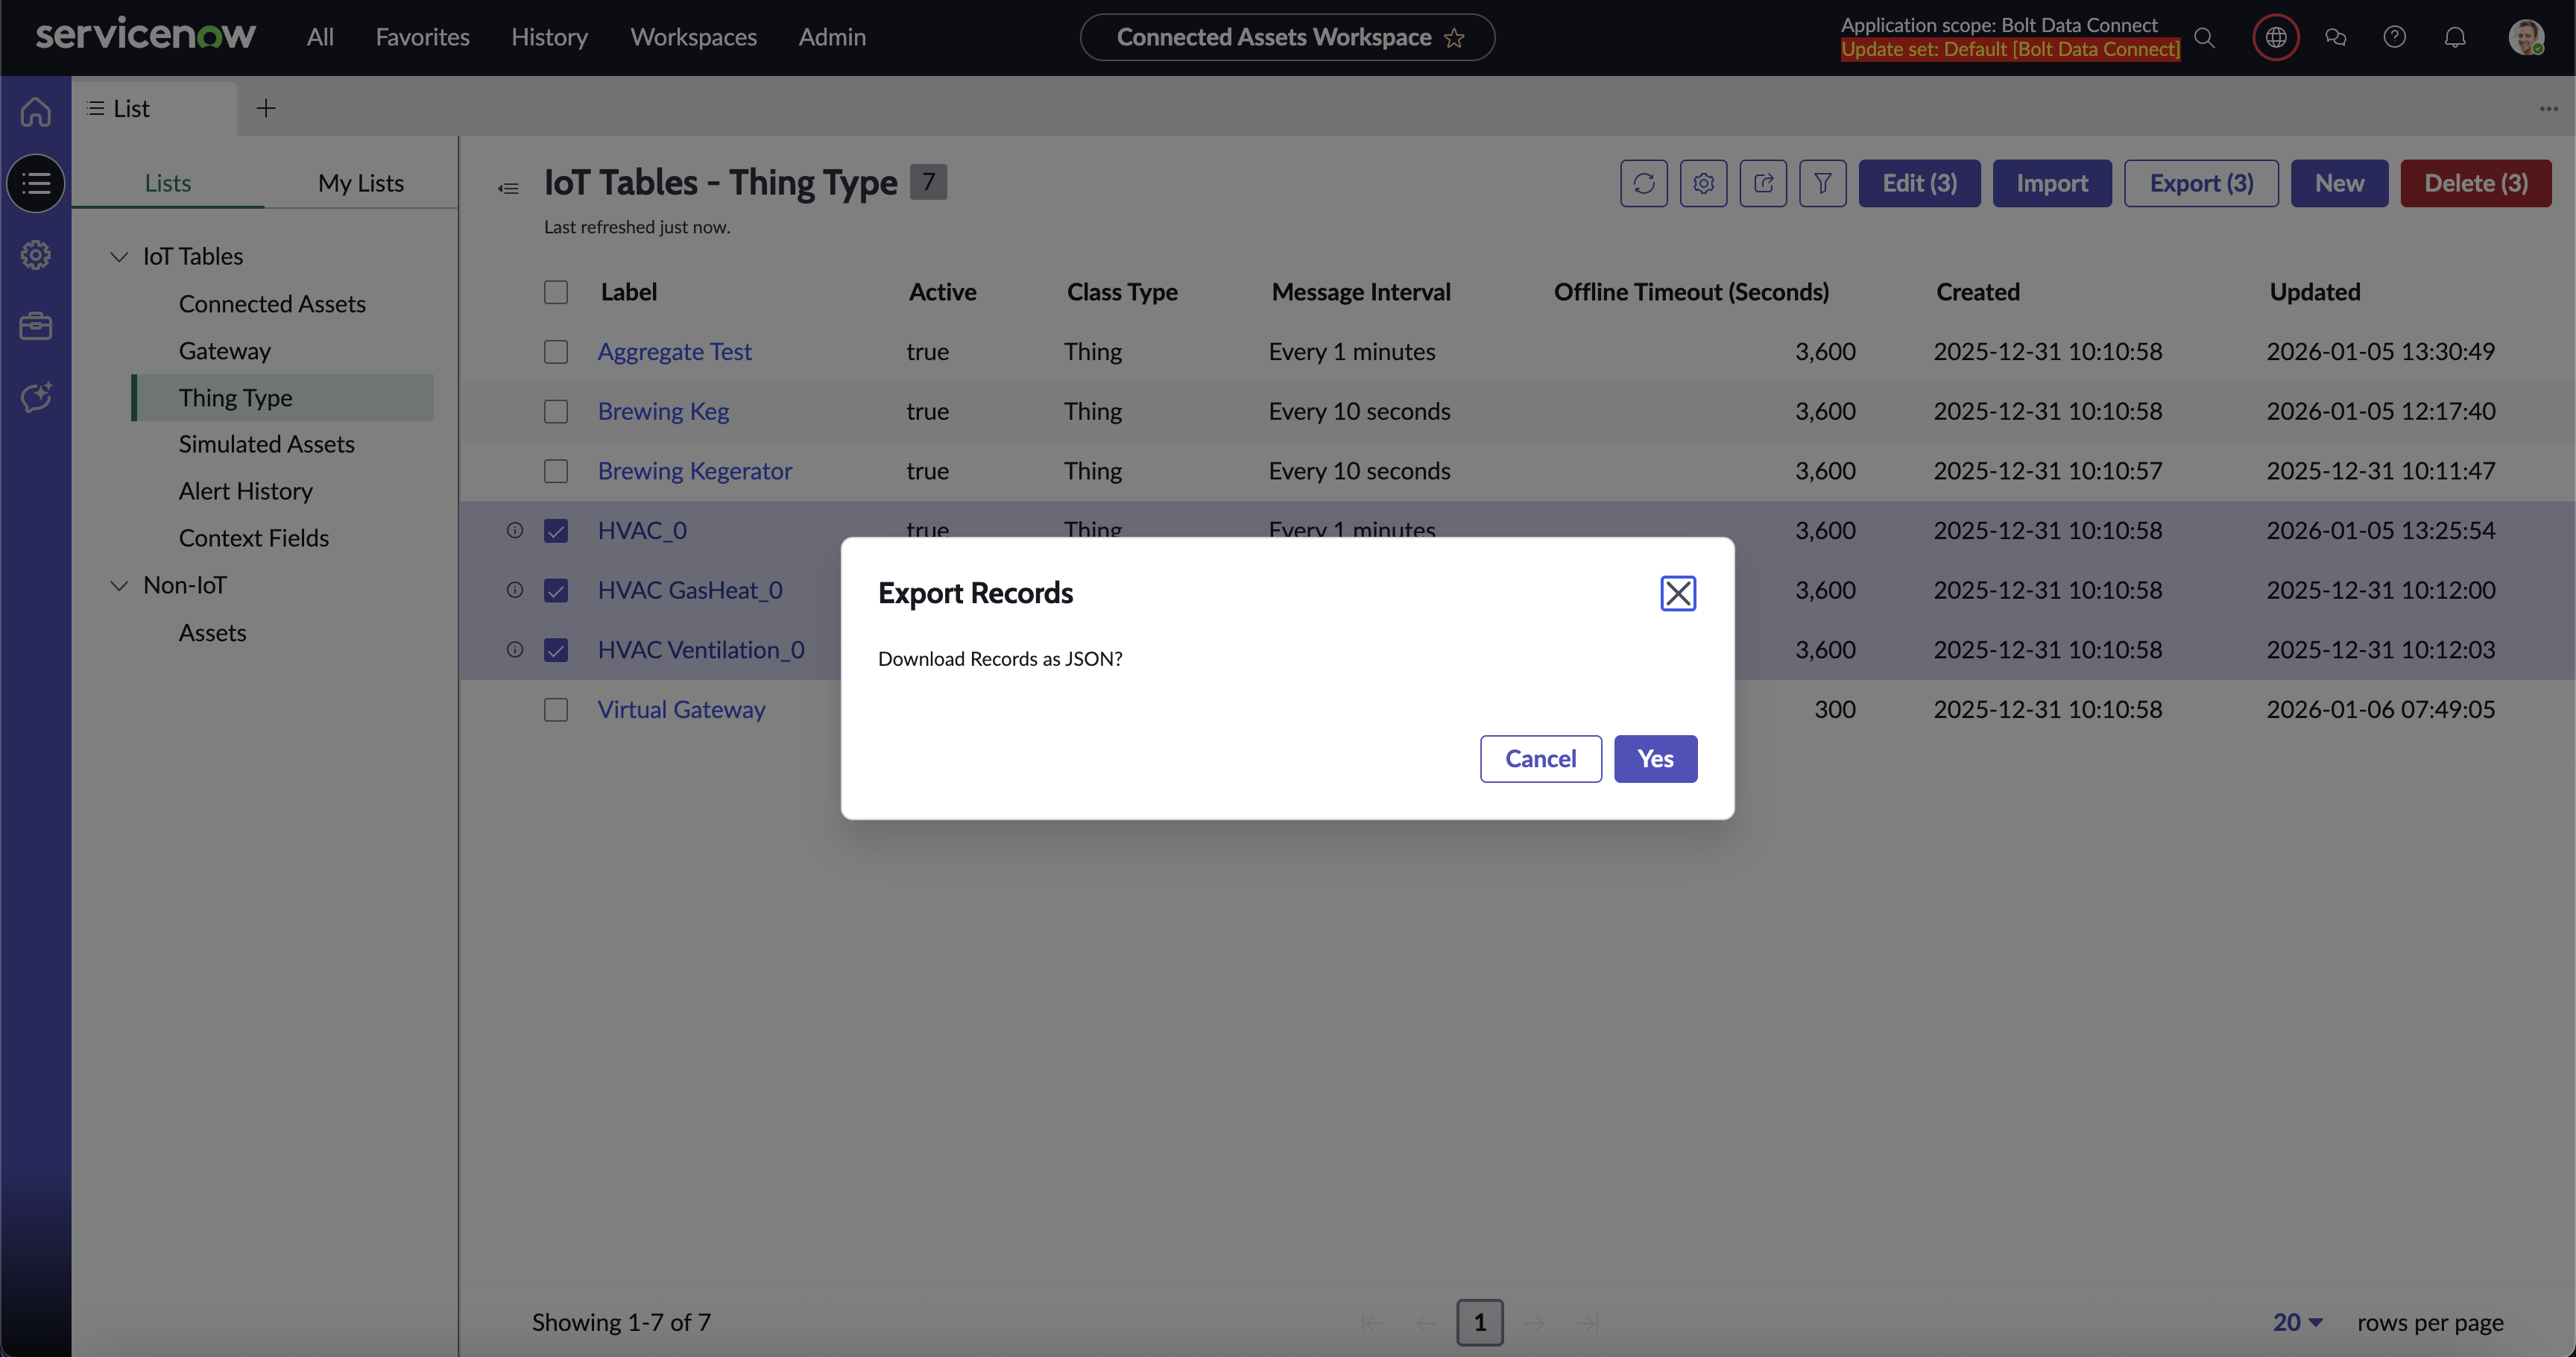
Export Thing Types
Sync
Sync ∇ (Pull from the IoT Cloud)
When Editing a Thing Type, you can choose to Sync the full definition from the IoT Cloud into ServiceNow. This would typically be used if the Thing Type has been edited and you wish to rollback, or if you are setting up a new ServiceNow Instance but reusing a IoT Cloud org.
Sync Δ (Push to the IoT Cloud)
To deploy the latest Thing Type definition to the IoT Cloud (and the Edge Gateways), simply Sync the Thing Type.
Audit Trail (From the IoT Cloud)
To view the history of a Thing Type definition in the IoT Cloud, use the View History UI Action to view the Audit Trail.
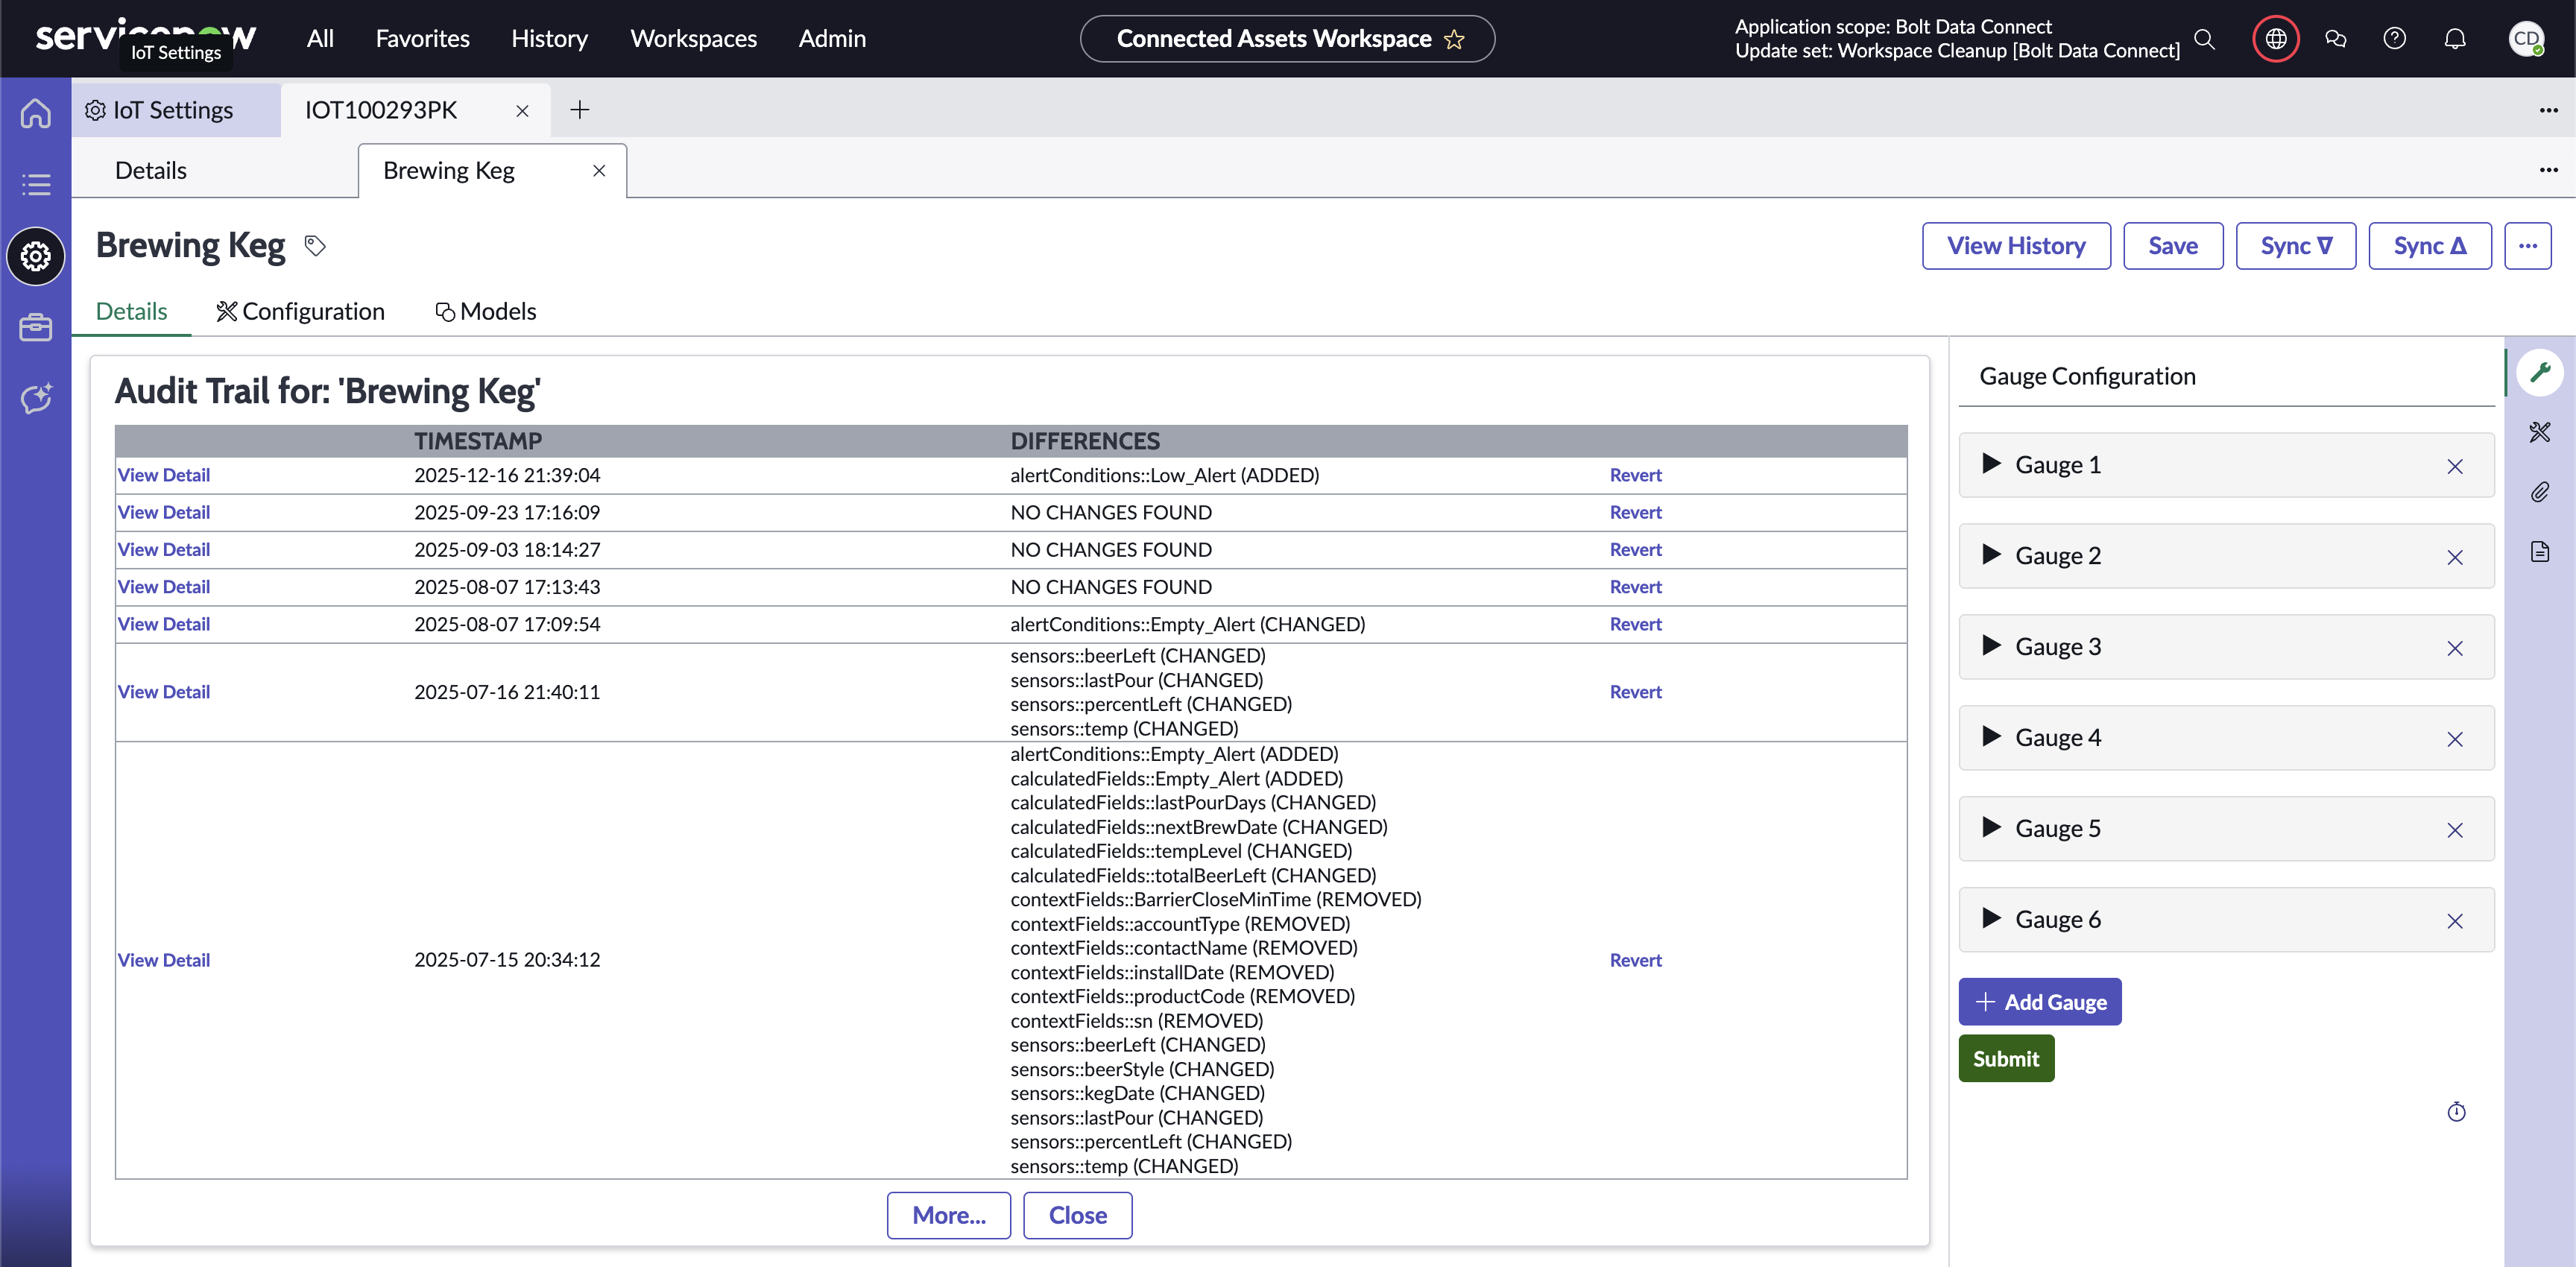
Thing Type Audit Trail
Note
- The View Detail button shows the detailed content behind each change
- The Revert button will replace the Thing Type editor with the previous values. After reviewing the changes the user can then Save and Sync as they wish. This will not delete any records, including sensors, digital twin roles, alert conditions, calculated fields, context fields, ml models, and model interfaces. These records need to be deleted manually through any supported method in ServiceNow.
Digital Twins
Digital Twins represent a group of IoT Connected Assets that together form a composite device. They are closely related, each playing a role in a reusable Digital Twin Type, and can use values from the other IoT Connected Assets in their own Calculated Fields and Alert Conditions.
Digital Twin
The first step is creating an IoT Digital Twin Role record in the Thing Type record that make up the IoT Digital Twin Role. Go to the Thing Types setup page, and click into the desired parent Thing Type.

Digital Twin Children
- Name
- The role that the child Thing Type plays in the related group of IoT Connected Assets.
- Label
- The label of the IoT Digital Twin Role.
- IoT Thing Type
- The
Thing Typeof the Parent. - Child Thing Type
- The
Thing Typeof the Child.
Digital Twin Diagram
On the IoT Connected Asset Record Page, you will see the IoT Digital Twin section where you can easily view the Digital Twin from any Connected Asset in the configured Hierarchy.
The Diagram shows all of the most recent sensors and calculated fields from all Connected Assets in the same Digital Twin.
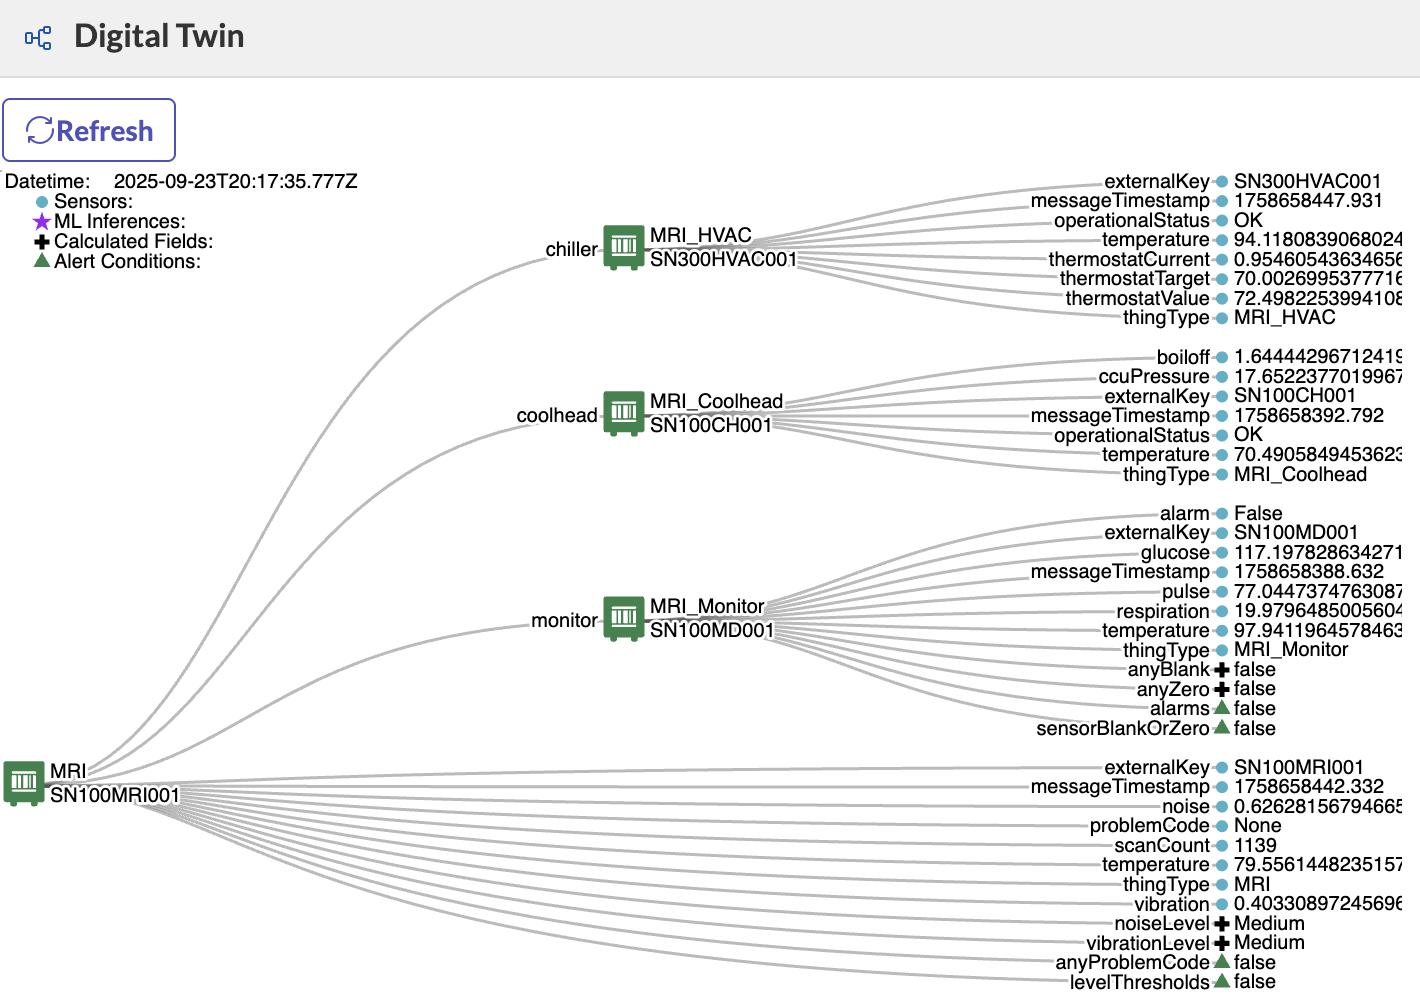
Digital Twin Diagram
Context Data
Easily Sync ServiceNow Data (related to the IoT Connected Assets) to the IoT Cloud and Edge Gateway. This Context data can be used in Calculations and Alert Conditions (by using the context group - e.g. context.someField == 'Gold'), to enhance and provide flexibility in your Thing-Type Specifications.
All IoT Context fields are synced with a scheduled job, or can be manually synced for special cases and troubleshooting.
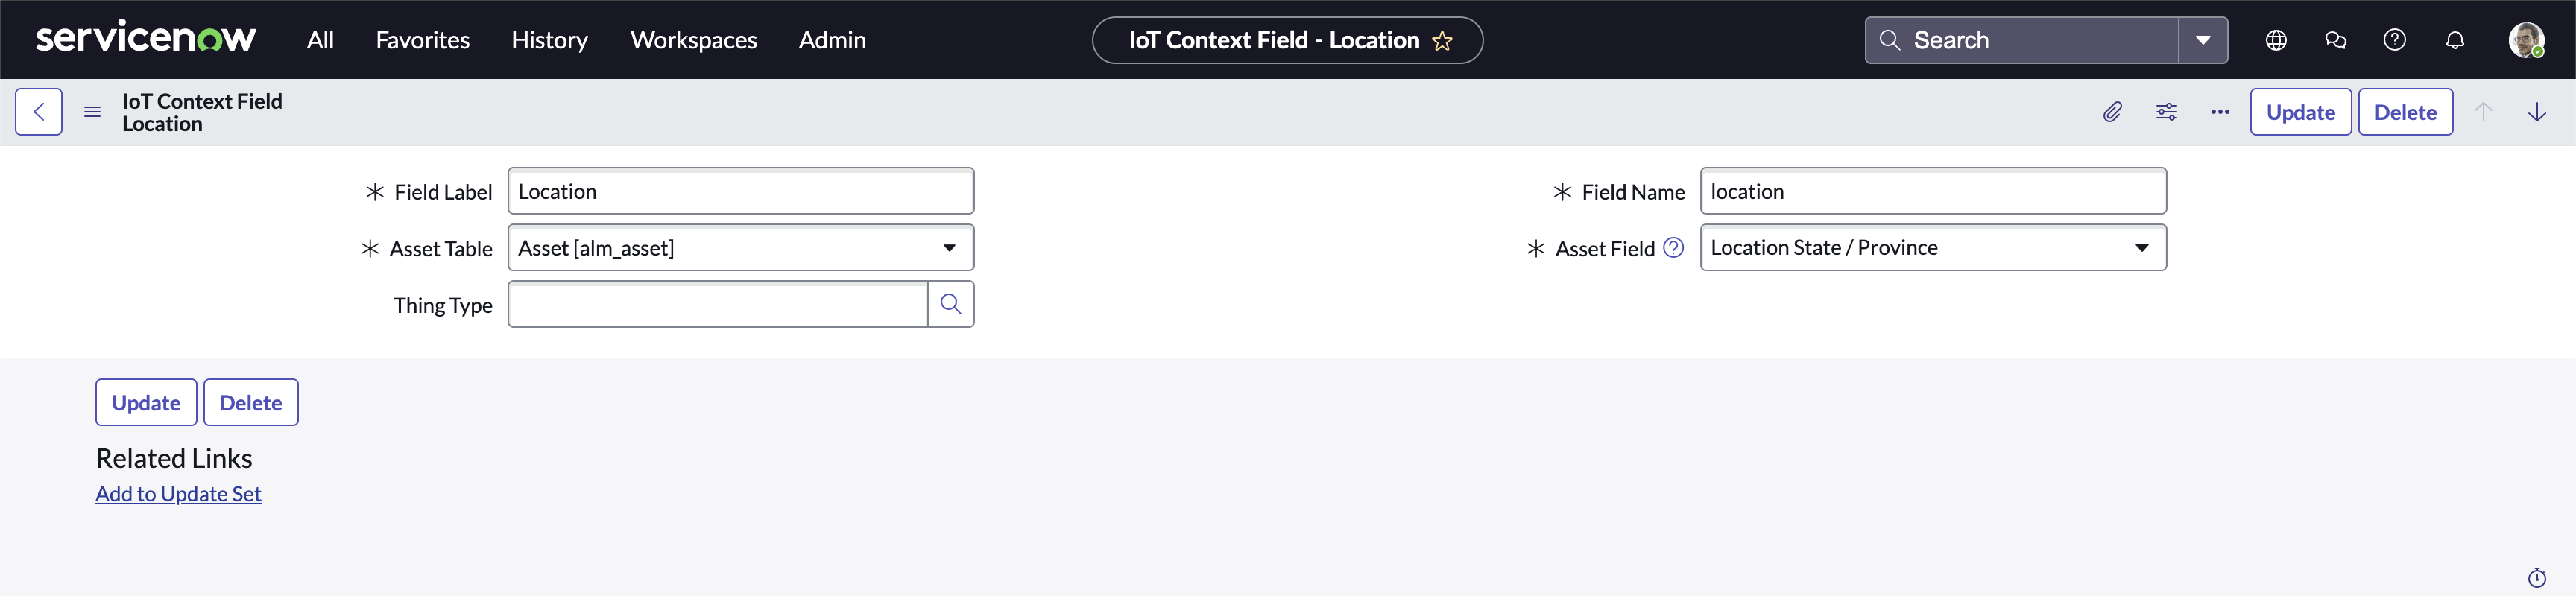
Context Data Record Page
Global Context Fields
IoT Context Fields without a specified Thing Type are known as Global Context Fields. Global Context Fields are synced for all Connected Assets, regardless of their Thing-Type.
-
Select New.
-
In the new record screen, leave the Thing Type field empty.
-
Define the reader friendly Label for the field.
-
Define the Field Name to use in calculations and alerts.
Name Restrictions
- Must start with a letter.
- Can only contain letters, numbers, and
_. - Must not contain any spaces.
-
Select the Asset Table corresponding to the asset type for your connected asset.
-
Select the Asset Field to associate a field on the Asset Table with this IoT Context Field.
Thing-Type IoT Context Fields
Thing-Type IoT Context Fields are only synced for Connected Assets which match the Thing-Type specified.
Steps for Thing-Type IoT Context Fields are the same as for Global Context fields, except Step 2: select the desired Thing-Type in the Thing Type field.
Context Synchronization
The sync schedule for IoT Context Fields is managed in the IoT_Context_Job scheduled job. This can be found in All -> System Definition -> Scheduled Jobs.
- In the Run field, select the desired frequency.
- Periodically: Define the time between runs.
- Daily: Define the time of day.
- Weekly: Define the day of the week and time of day.
- Monthly: Define which day of the month and the time of day.
- In the field that shows up depending on your choice, fill out the appropriate values according to your desired frequency.
- Select Active.
- Save the record.
Remove IoT Context Field
- Open the desired IoT Context Field record to be deleted.
- Select the Delete button toward the top of the record.
Sensor Data
Sensor data typically lives solely in the IoT Cloud. We realize there are some workflows which required importing data into ServiceNow Tables. For such workflows, we enable a Sensor Data Sync which pulls the latest sensor data from the IoT Cloud into the Asset Attributes Table.
Sensor Synchronization
The sync schedule for the Sensor Data is managed in the IoT_Attributes_Job scheduled job. This can be found in All -> System Definition -> Scheduled Jobs.
- In the Run field, select the desired frequency.
- Periodically: Define the time between runs.
- Daily: Define the time of day.
- Weekly: Define the day of the week and time of day.
- Monthly: Define which day of the month and the time of day.
- In the field that shows up depending on your choice, fill out the appropriate values according to your desired frequency.
- Select Active.
- Save the record.
Auto Registration
IoT Registration
IoT Registration records will be auto-created by the IoT Cloud as unrecognized Connected Assets are detected, or they can also be created in ServiceNow by an integration or any other automation. As the Auto-Registration Business Rule runs it will try to assign any missing data and then call the IoT Cloud API to Register the Connected Asset. By default, IoT Registration records contain text fields containing the IoT Thing ID and the Gateway ID. A flow must be created to fill in the fields for an Asset record, a Gateway Record, and a Thing Type record based on these two fields. This process will be different for every Client due to different naming conventions and preferences. Once these fields are updated on the record, the Auto-Registration Business Rule will check the record fr any missing data. If there is missing data, the Business Rule will set the Missing Data field to true and will provide details in the Results field. If the necessary fields are not missing, the Business Rule will create a Connected Asset record and register it with the IoT Cloud.
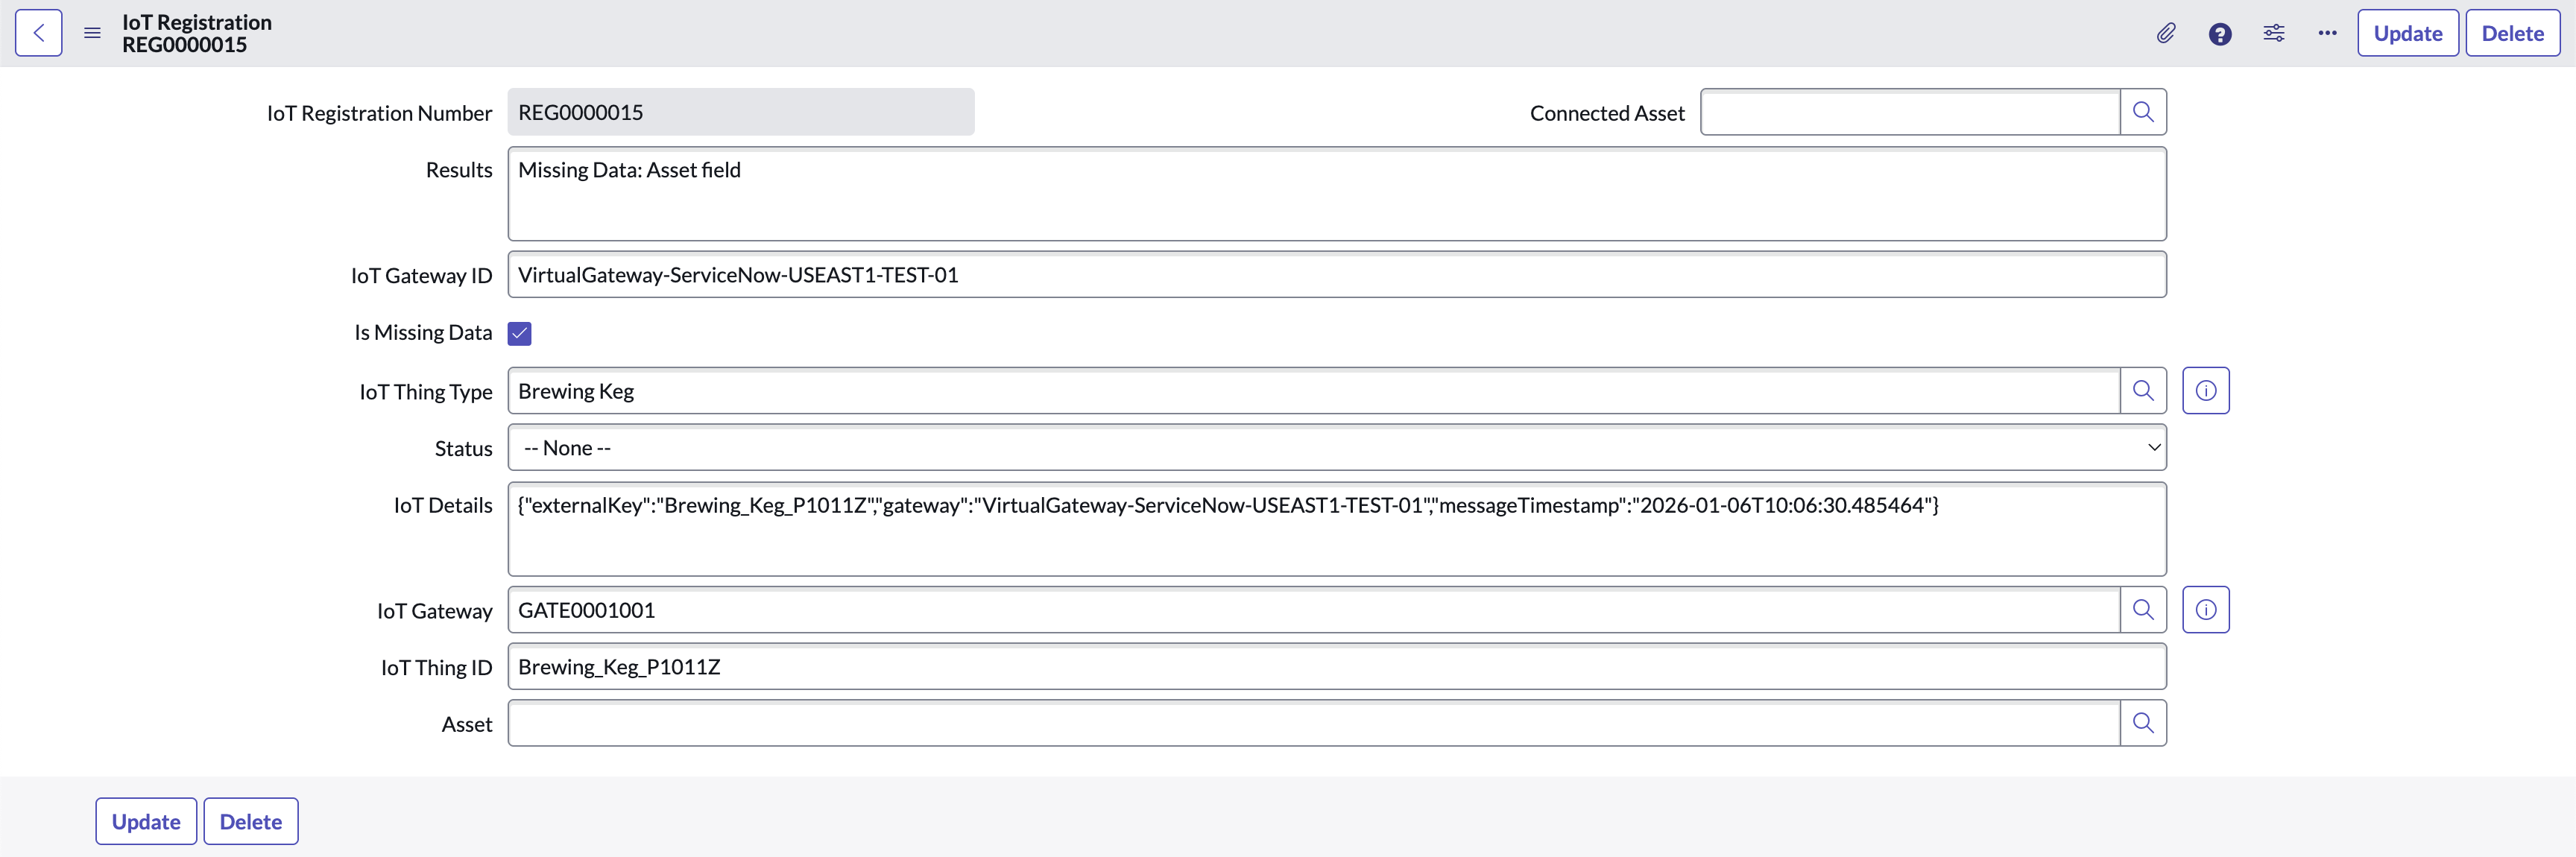
Registration Record with a Missing Asset Field
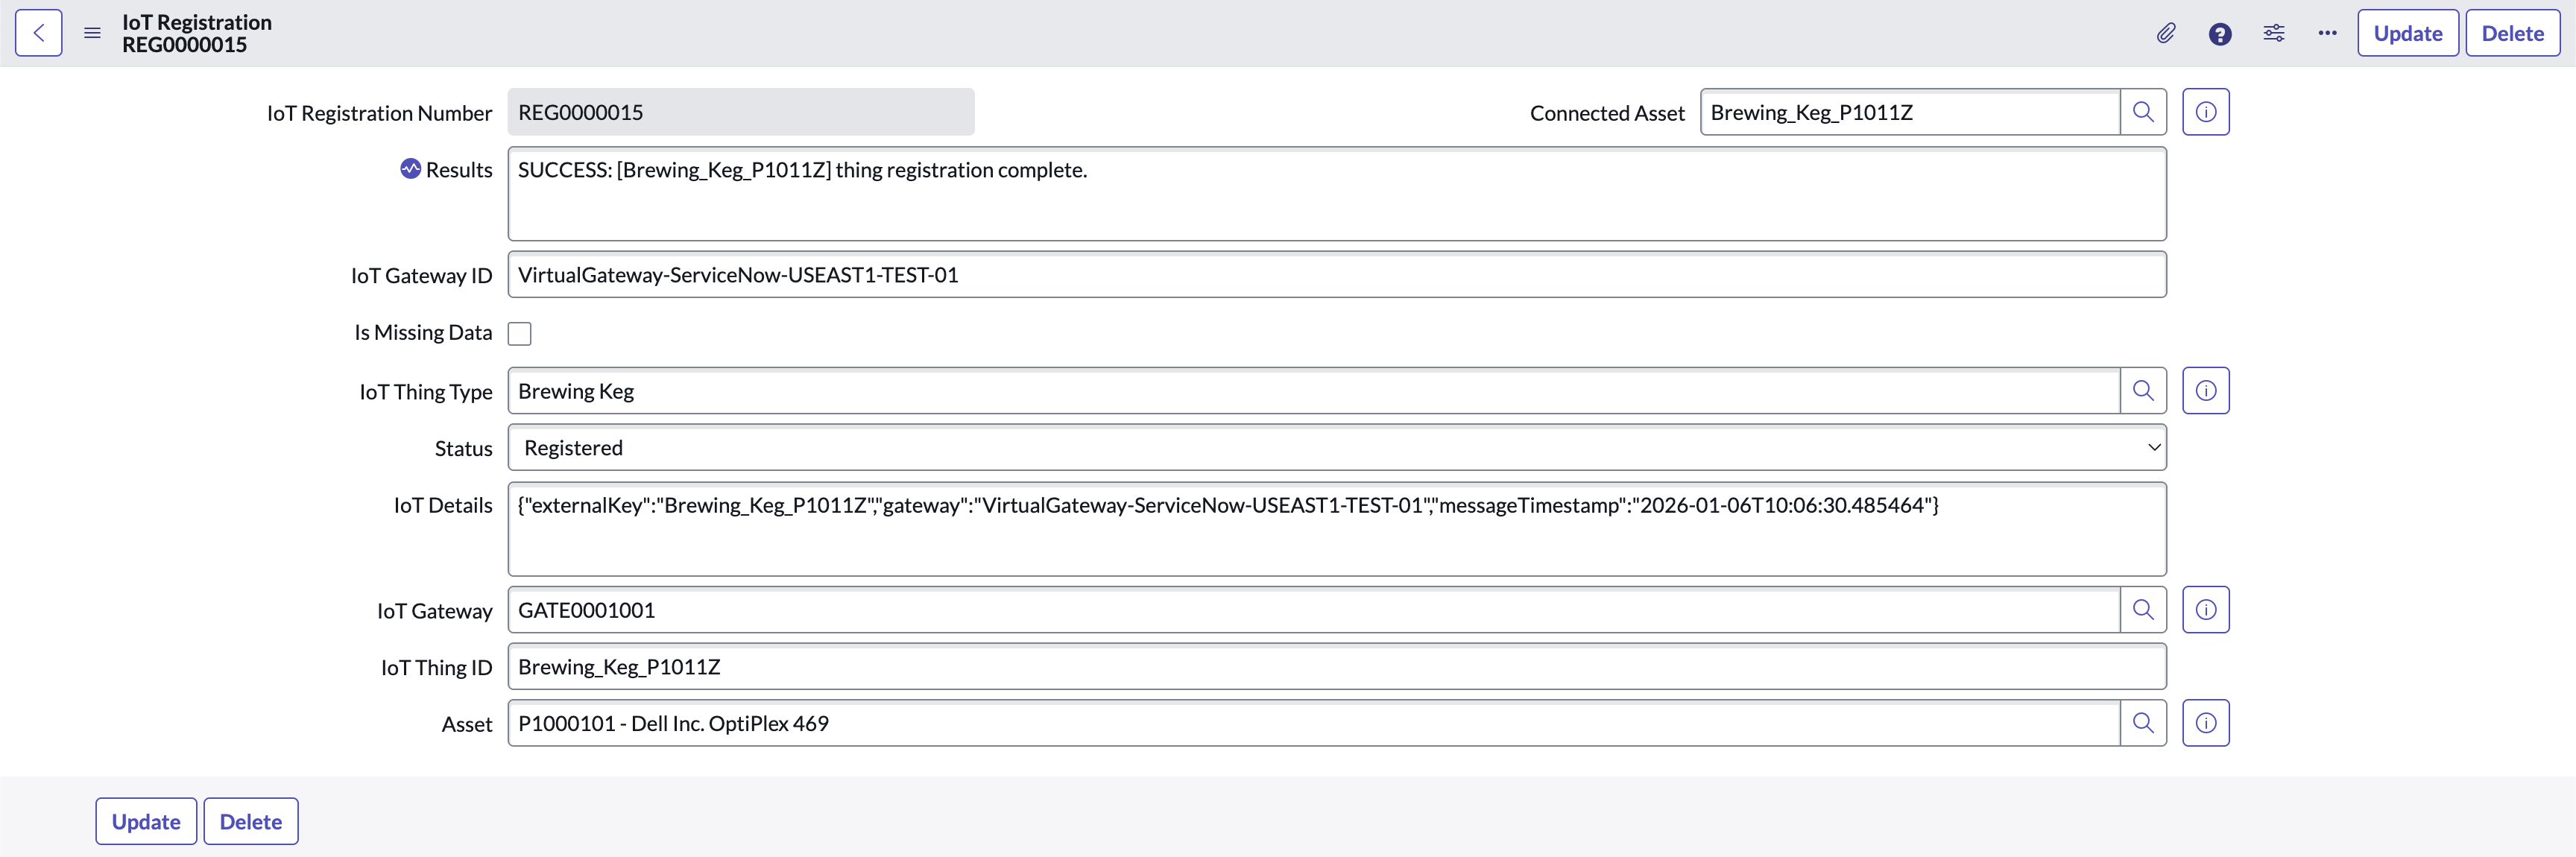
Successful Registration Record
NOTE
Any update to an IoT Registration record will cause the Auto-Registration Business Rule to check the updated record and attempt to create and register an Asset. For example, manually adding an Asset to an IoT Registration record that is only missing an Asset field will result in the Auto-Registration Business Rule to attempt to create and register a Connected Asset.Example Auto-Registration Flow
The provided example is not the only way to implement this. As long as the Asset, Gateway, and Thing Type fields are filled in and the IoT Registration record is updated, the Auto-Registration Business Rule will attempt to create and register a Connected Asset.
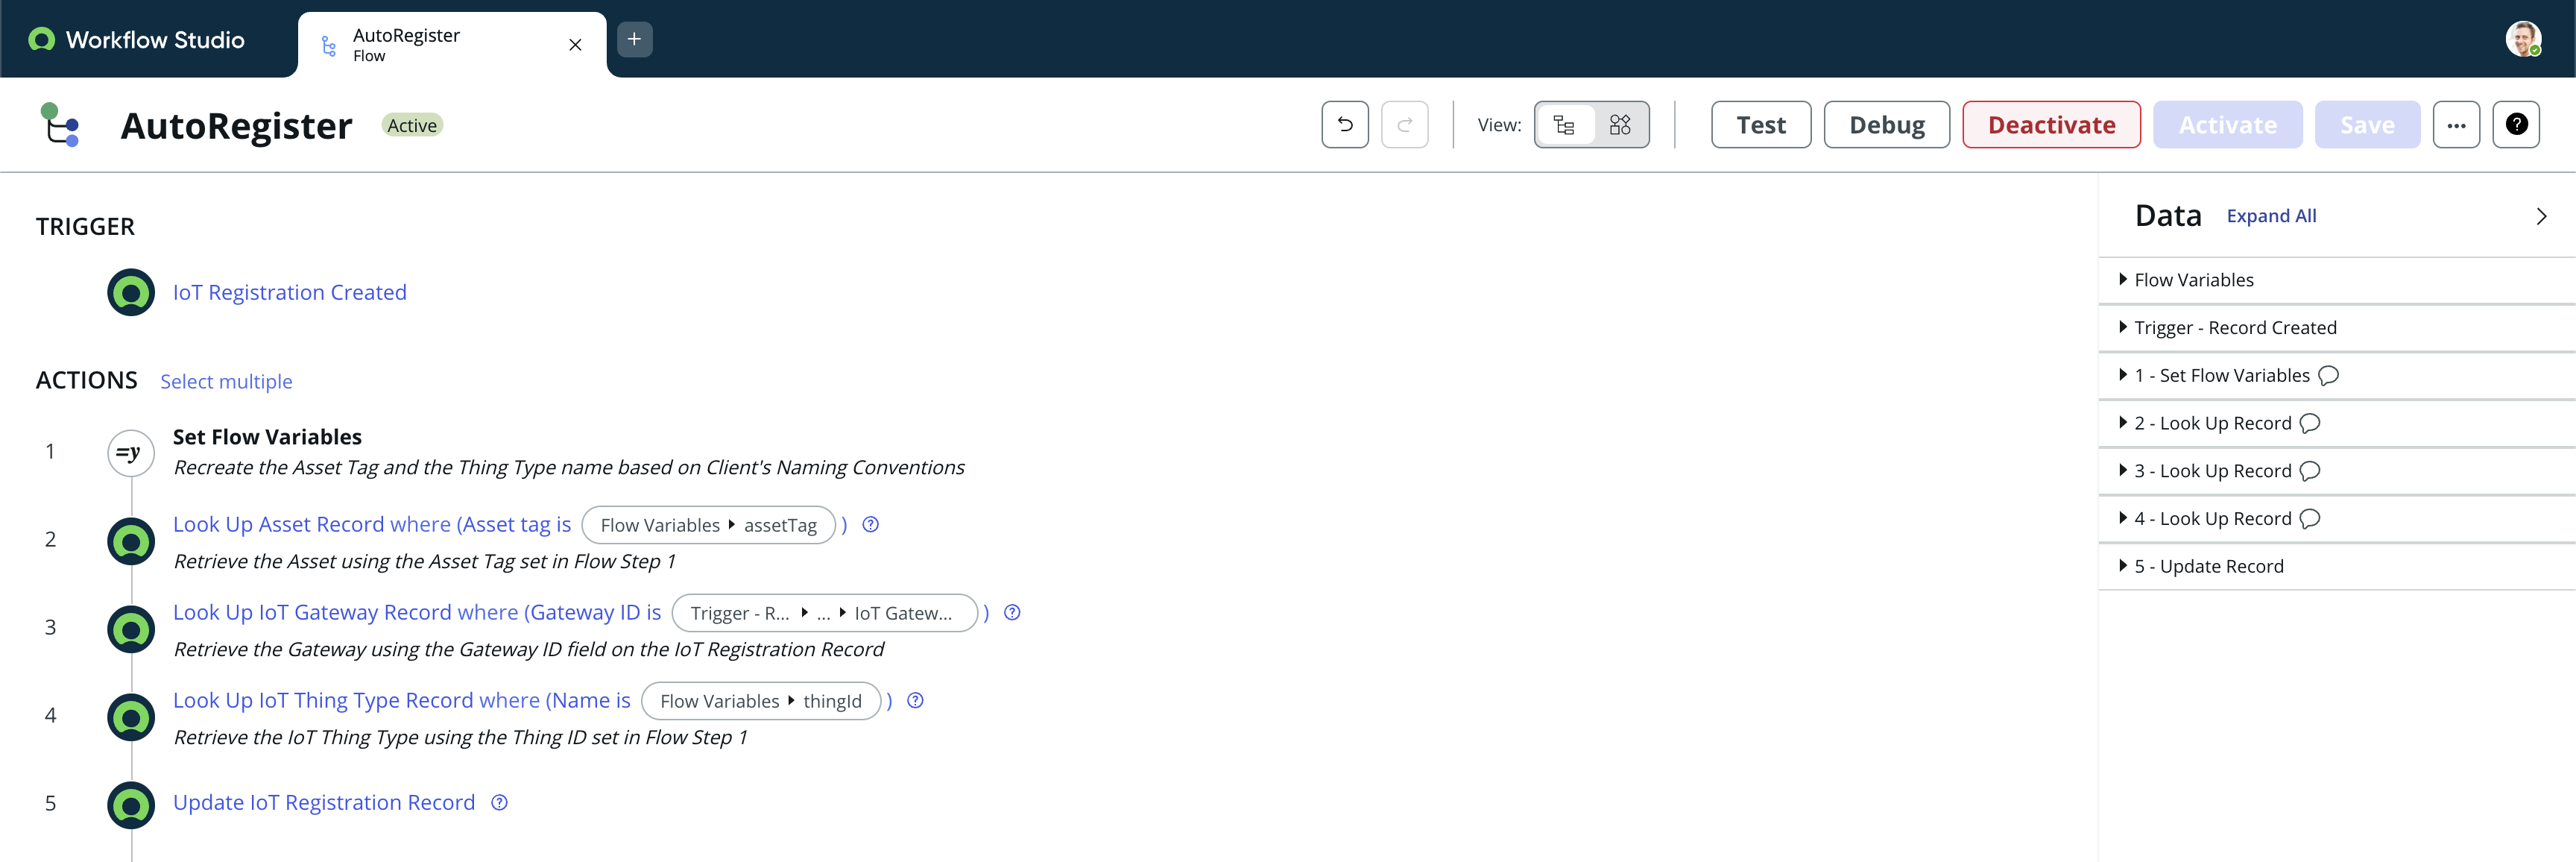
Example Auto Registration Flow
For the following example implementation for Flow Step 1 above, the Client has a unified naming rule set for all Assets, Connected Assets, and Thing Types as follows:
- Connected Asset’s IoT Thing ID’s always begin with the Thing Type name
- Asset Tags always start with “P1” (ex: P10001, P10002, P19993, etc)
- Connected Asset’s IoT Thing ID’s always have “_P1” followed by the Asset Tag they relate to after the Thing Type name (ex: Brewing_Keg_P10001, Brewing_Keg_P10002, Brewing_Keg_P19993, etc)
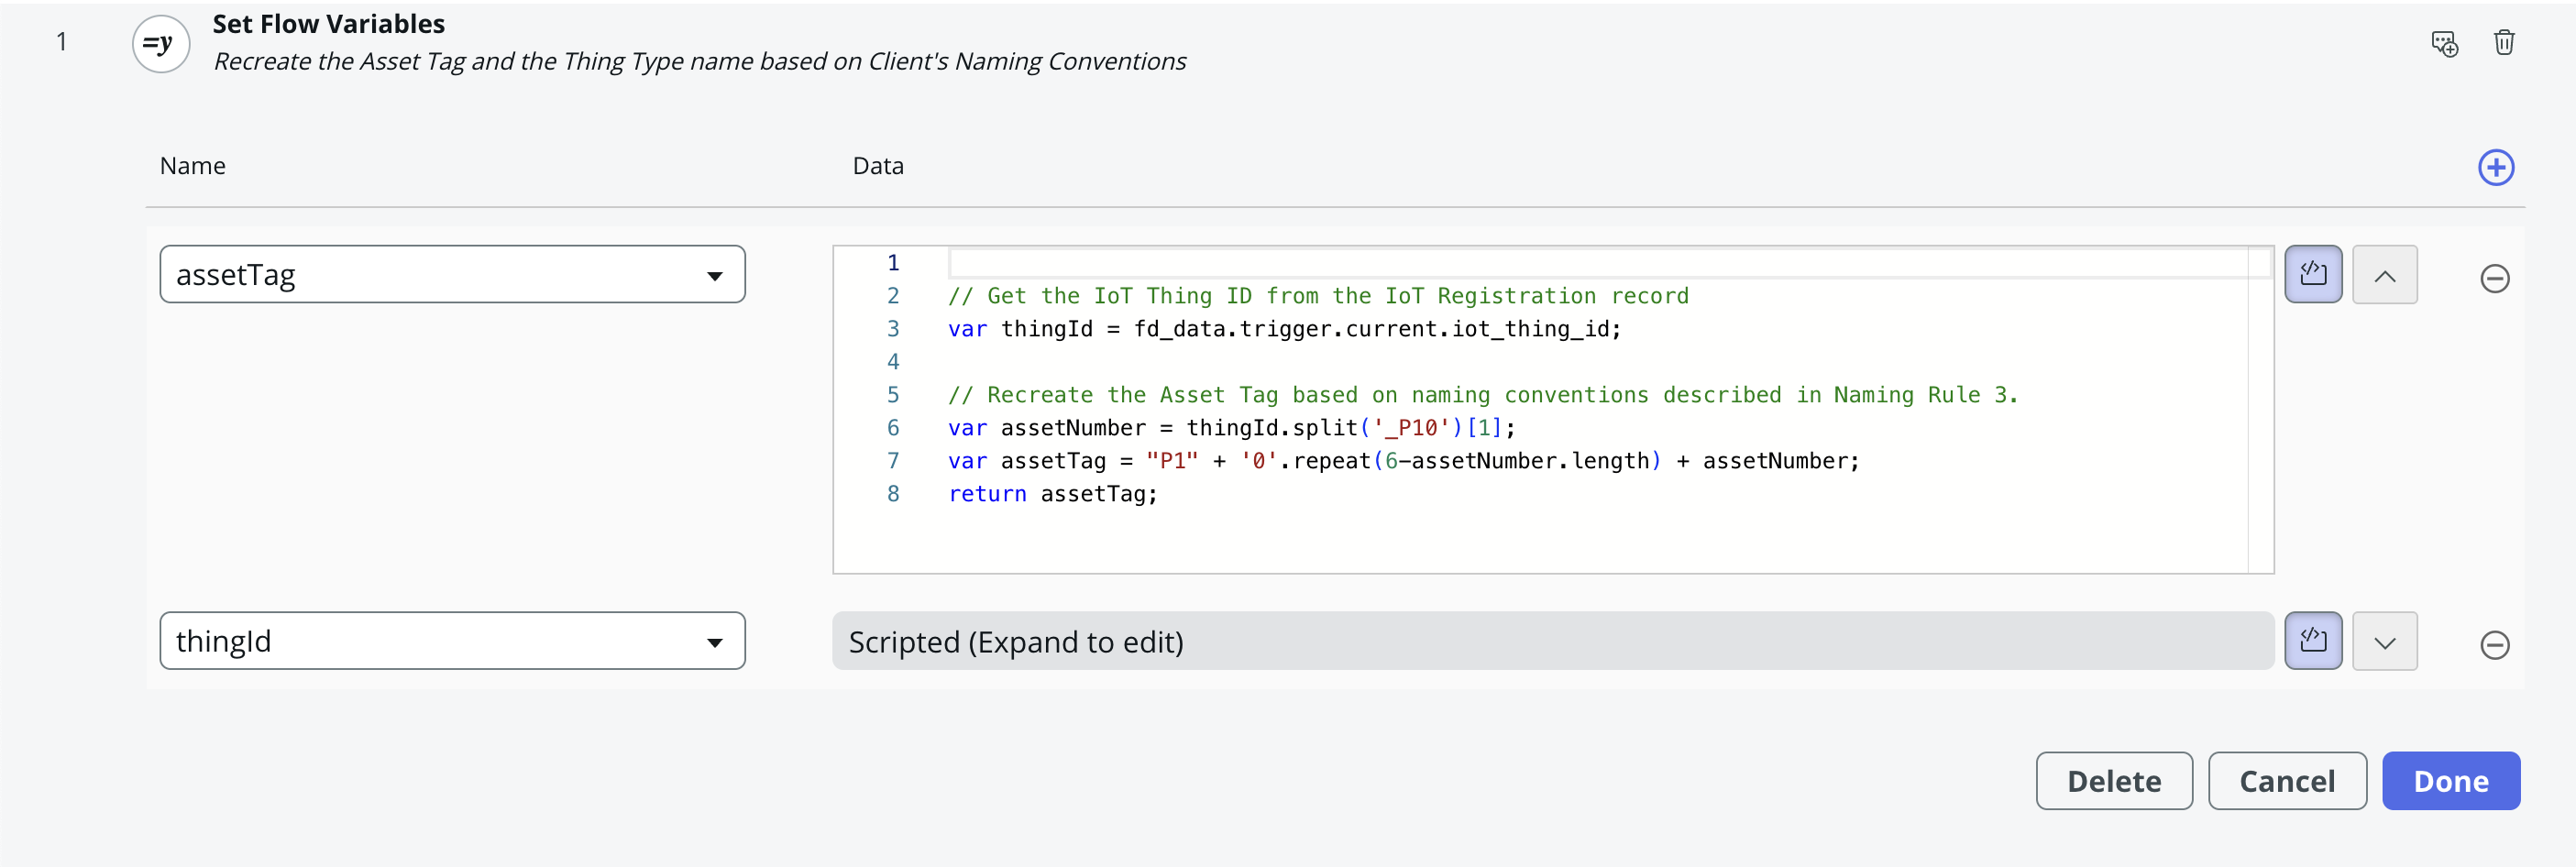
Example Auto Registration Flow
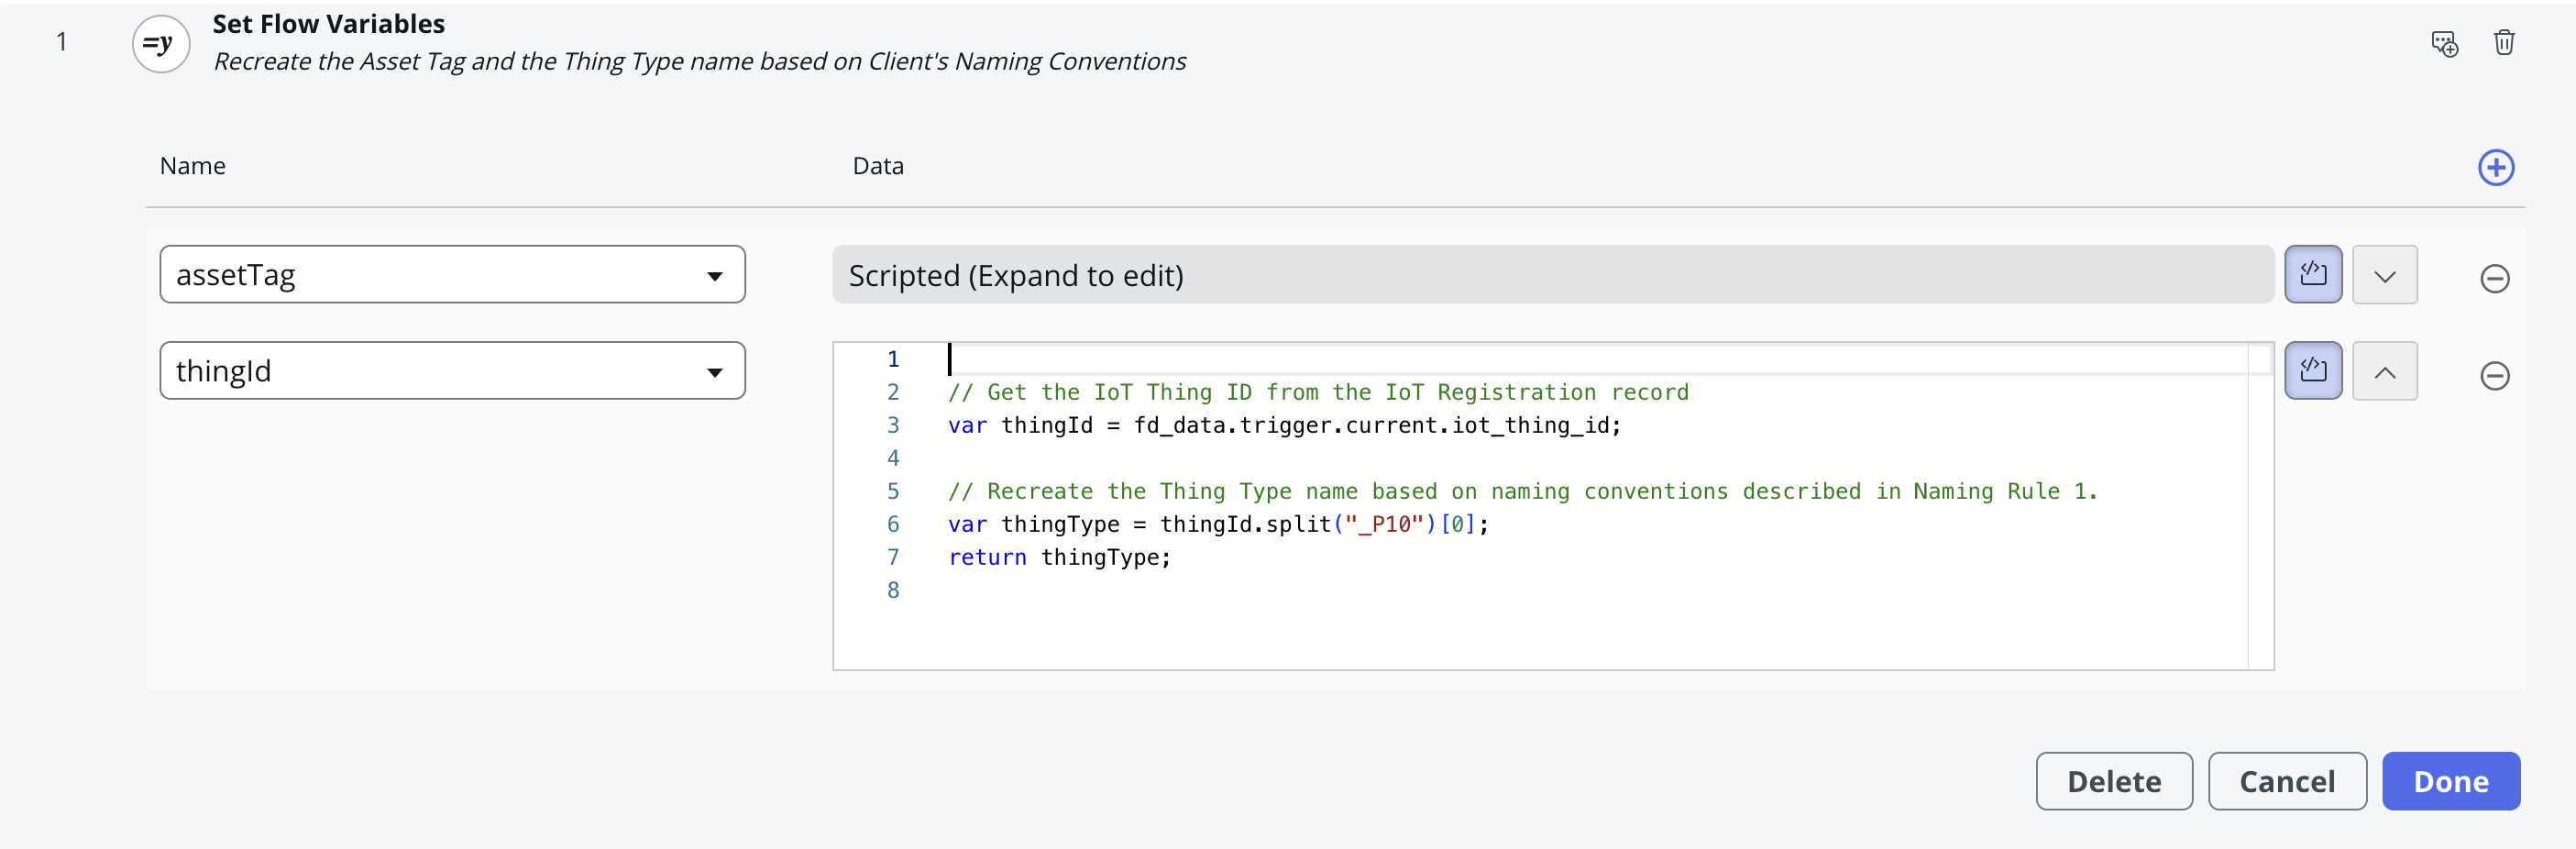
Example Auto Registration Flow
Alert History
Bolt Data Connect is configured to send IoT Alerts from the IoT Cloud to ServiceNow when certain conditions or signals are received from the IoT Connected Assets. These alerts create IoT Alert History records, and can be processed in real time using Flows with Record Created Triggers.
Here is a sample Flow which creates a Work Order that can customize and automate alerts in any way.
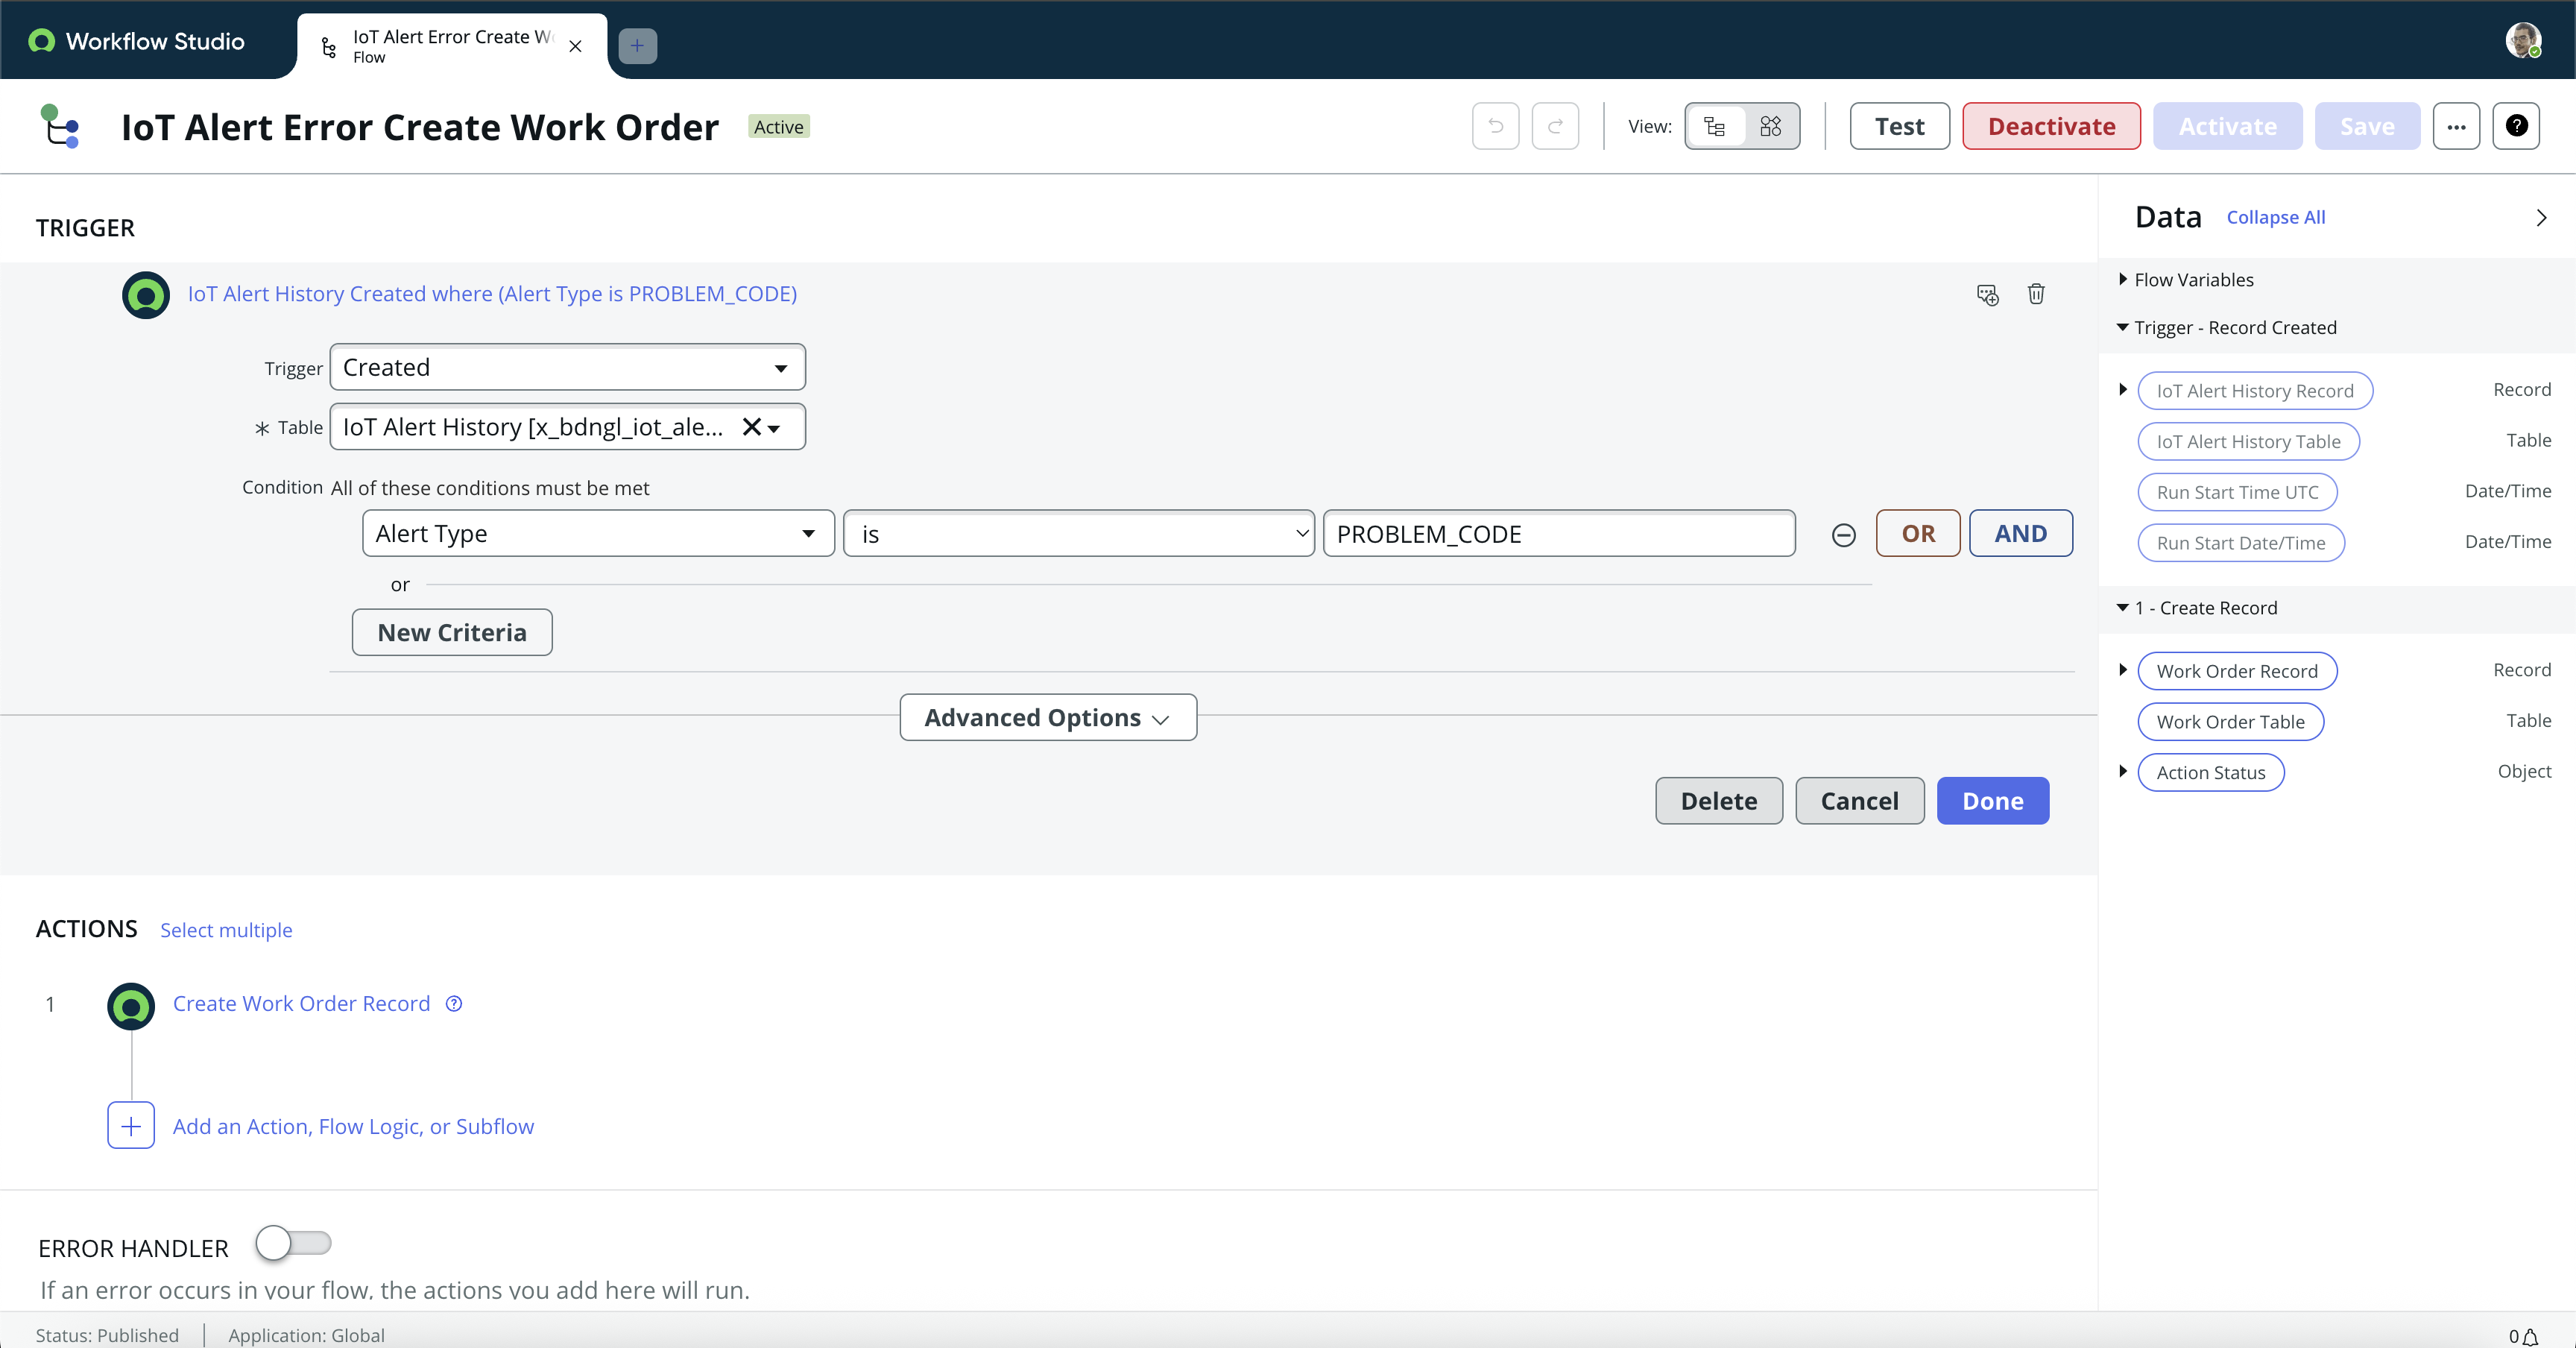
Record Create Trigger in Flow Designer
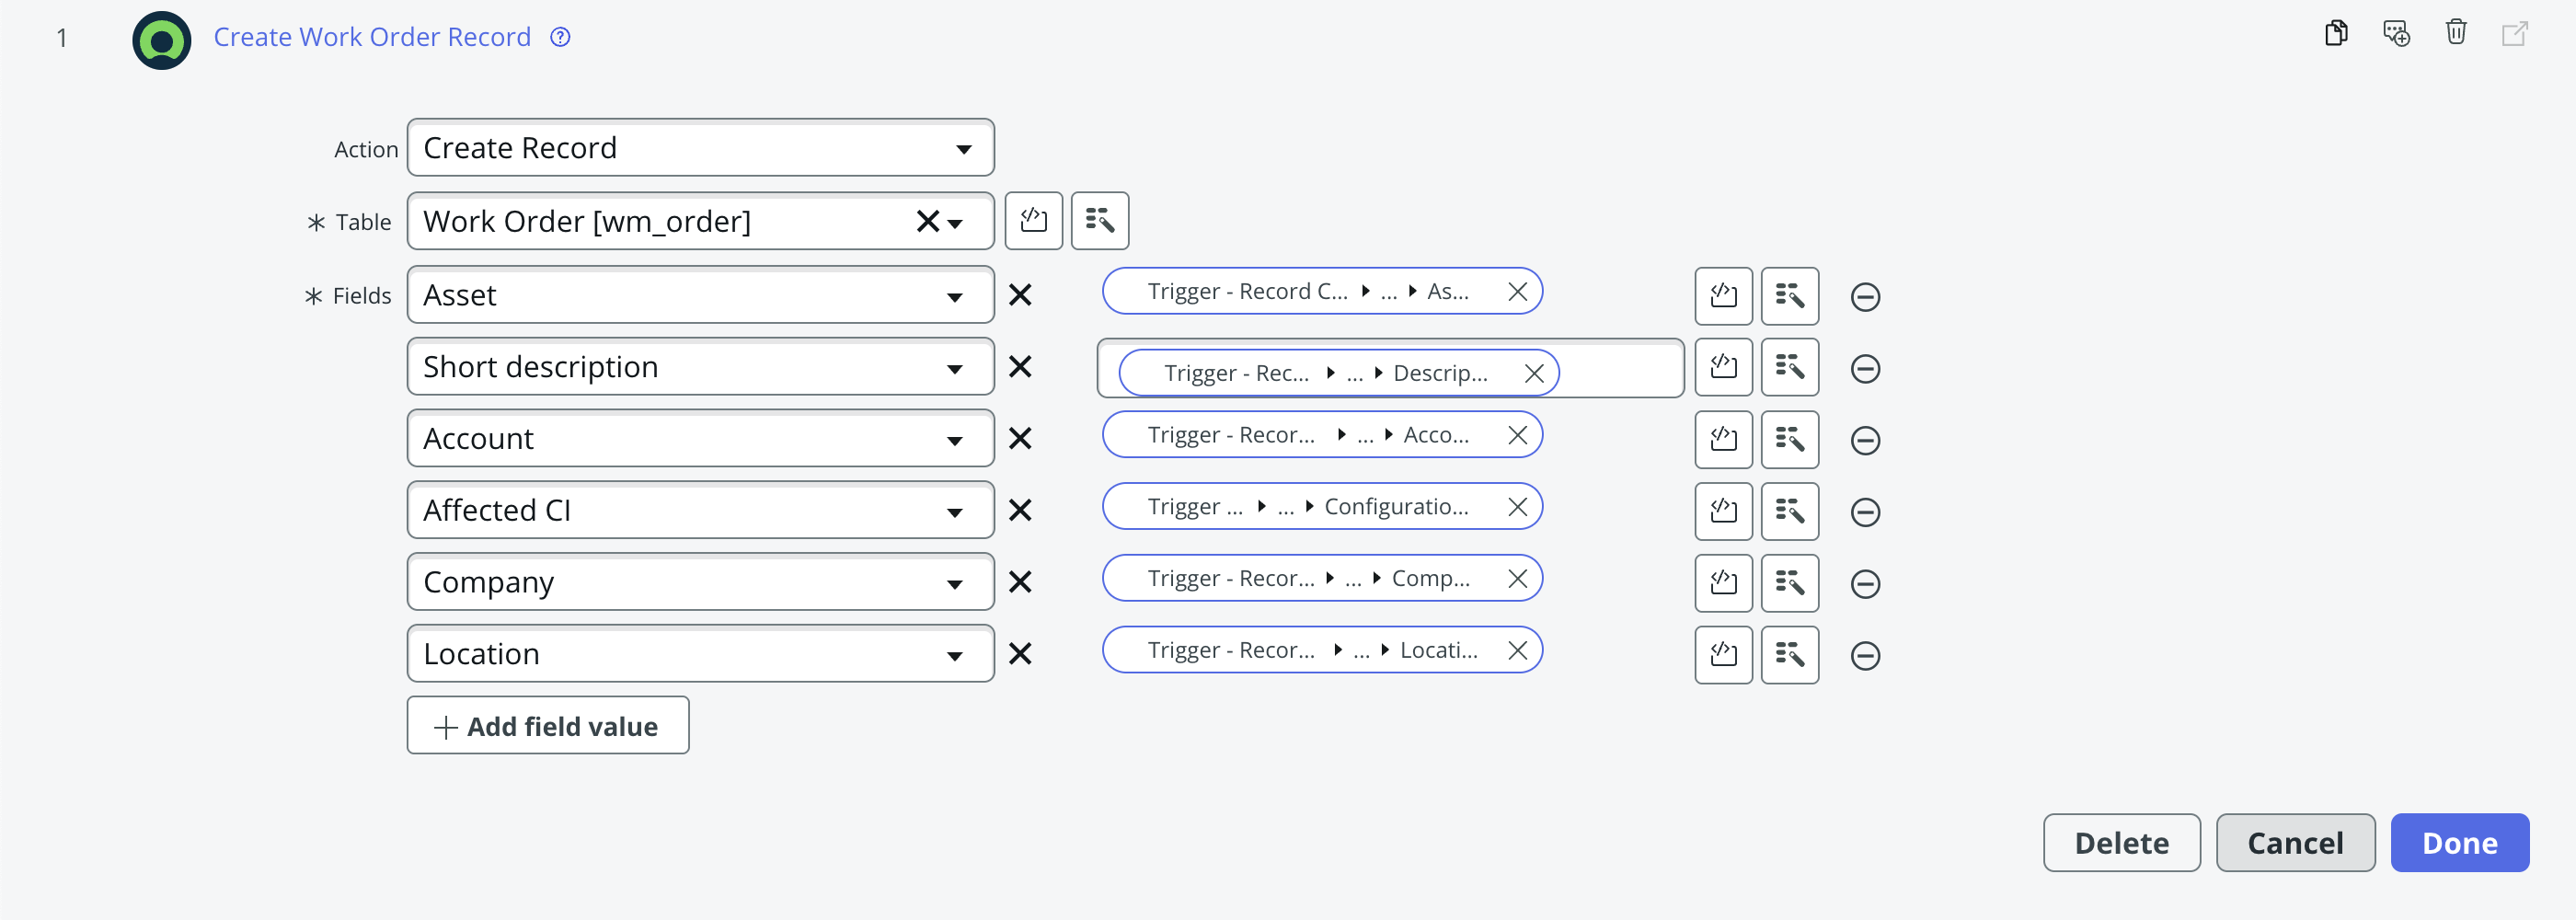
Create Workflow in Flow Designer
User Setup
This section provides details on how to setup ServiceNow Users for Bolt Data Connect.
Roles
Included with the app are two Roles which can be used as-is:
- IoT Admins
x_bdngl_iot.admin: Full Admin access to all Bolt Data Connect features including the IoT Settings page. - IoT Users
x_bdngl_iot.user: Access to Bolt Data Connect data, visualizations, and interactions.
Each Bolt Data Connect User should be assigned to one of the above Roles.
OAuth
For Users to setup the OAuth access, allowing the IoT Cloud to send alerts and other data into ServiceNow, you will need to access the following tables:
- sys_alias
- aws_credentials
- auth_algorithm
For more details, see Authorize the ServiceNow Instance to access the IoT Cloud
Machine Learning
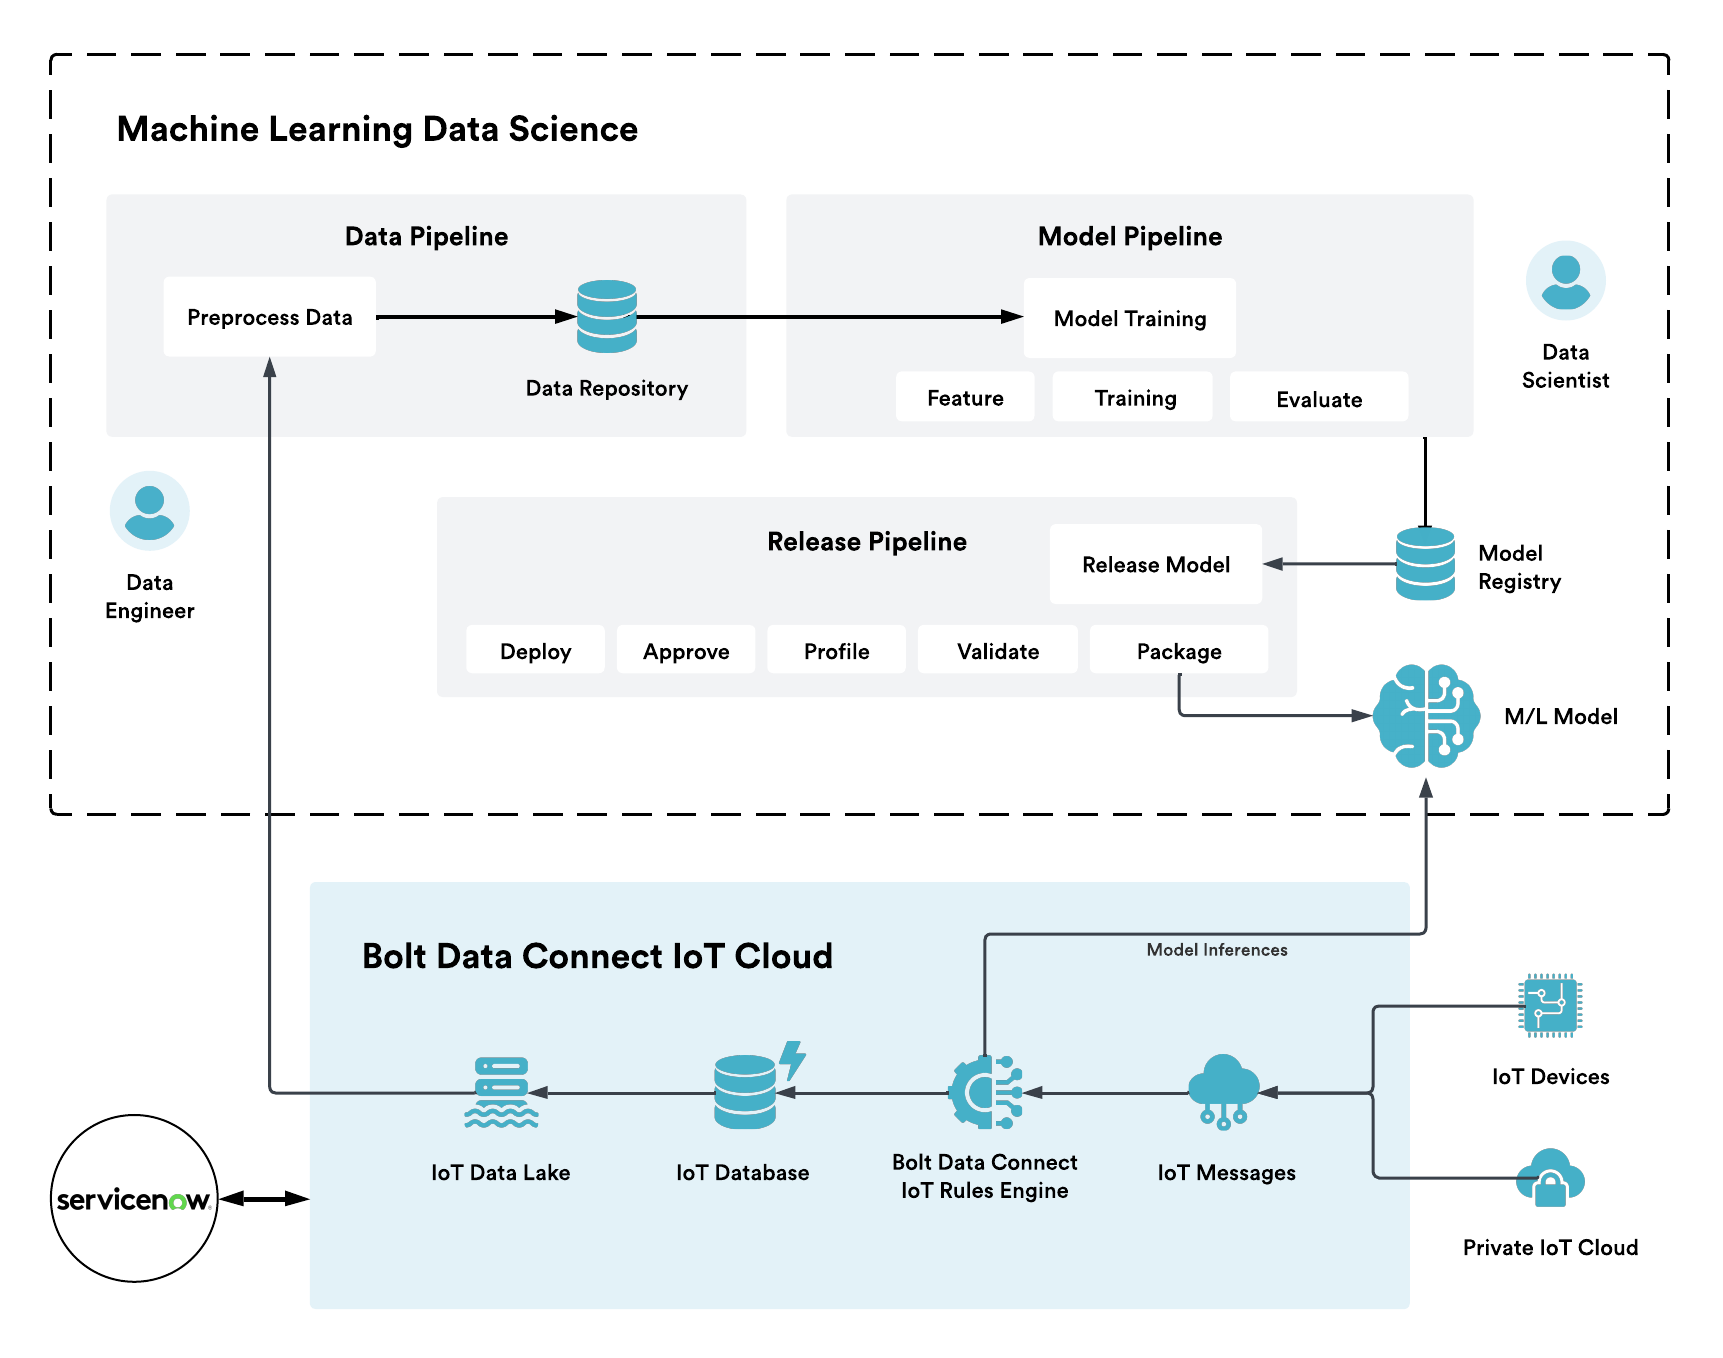
Machine Learning in BDC IoT Cloud
The diagram illustrates the integration of Machine Learning (ML) Data Science with a BDC IoT Cloud ecosystem, involving various components responsible for data processing, model training, and IoT operations.
Machine Learning Model Process
The machine learning model process involves data engineering, where raw data is prepared and then stored in a repository. Data scientists build and train machine learning models using this data. The trained ML models generate inferences based on IoT data, enabling the BDC IoT Cloud to manage and automate IoT devices through the Rules-Engine. ServiceNow provides external business integration to align IoT operations with business processes.
Data Pipeline (Data Engineering)
-
Preprocess Data: Raw data is collected and preprocessed for quality and format consistency by a Data Engineer.
-
Data Repository: Once preprocessed, the data is stored in a repository, which serves as input for the Model Pipeline.
Model Pipeline (Data Science)
- Feature Engineering and Training: The Data Scientist processes data from the repository, applying feature engineering techniques and training machine learning models.
- Evaluation: After training, the model undergoes evaluation to ensure its performance on test datasets.
Release Pipeline
-
The Release Pipeline handles the deployment of the trained and evaluated model. This process includes:
- Deploy: Deploying the model to production infrastructure.
- Approve: Stakeholder approval.
- Profile: Analyzing the model’s performance.
- Validate: Ensuring the model meets functional and performance requirements.
- Package: Packaging the final model for release.
-
The model is stored in the Model Registry, which serves as a centralized repository for managing and tracking machine learning models. The Model Registry ensures that every version of the model, along with its metadata (such as deployment versions, and associated configurations) is easily accessible for future use or updates.
BDC Data Cloud and ServiceNow
-
The ML Model developed in the Machine Learning Data Science section produces Model Inferences based on IoT data. These inferences are fed into the BDC IoT Rules-Engine, where they help automate processes within the BDC IoT Cloud by applying decision-making logic.
-
The interation between ServiceNow and BDC IoT Cloud helps to synchronize customer data, device management, and analytics with business processes.
Scripting
This section provides details on writing scripts in Calculations and Alerts.
Writing Formulas
Edge processing takes sensor data, aggregates it, and computes all the Calculations and Alerts all according to your Thing Type Specifications.
The following section describes the syntax for writing these functions. The base syntax for all these formulas is JavaScript (specifically Node.js).
Function Basics
Let’s assume our Example IoT Connected Asset produces a message which looks like this:
interface thing_message {
  pressure_volts: number;
  temperature: number;
  state: string;
}
The Gateway starts building the following message:
const message = {
  sensor: {
    pressure_volts: 5,
    temperature_volts: 6,
    state: "on",
  },
};
Let’s write the function for a Calculation named pressure_psi:
(sensor.pressure_volts * 20) / 10;
Sensor Namespace
In the above formula we have access to the current IoT Connected Asset’s aggregated sensor data under the namespacesensor. There are 4 additional namespaces covered
in Namespaces.
The Gateway message now looks like:
const message = {
  sensor: {
    pressure_volts: 5,
    temperature_volts: 6,
    state: "on",
  },
  calculation: {
    pressure_psi: 10,
  },
};
Now let’s write a formula for an alert on pressure named overpressure:
sensor.state === "on" && calculation.pressure_psi > 15;
JavaScript
Any valid JavaScript which returns a value can be used in these Calculations and Alerts. Take a look at JavaScript Basics for help on basic operators.Our Gateway message now looks something like:
const message = {
  sensor: {
    pressure_volts: 5,
    temperature_volts: 6,
    state: "on",
  },
  calculation: {
    pressure_psi: 10,
  },
  alert: {
    overpressure: false,
  },
};
This is the basic structure you’re putting together when building your Thing Type specification.
Namespaces
There are 5 base namespaces which can be used to access data from these formulas:
sensor- Provides access to all the latest aggregated sensor values. Aggregation is
defined by the
Thing Type specificationSalesforce, ServiceNow. calculation- Provides access to all the latest calculated values. Calculations are defined by
the
Thing Type specificationSalesforce, ServiceNow. alert- Provides access to all the latest alert values. Alerts are defined by the
Thing Type specificationSalesforce, ServiceNow. context- Provides access to all the latest context values. Context is defined by the
Context settingsSalesforce, ServiceNow.
twin- Provides access to all the the following values:
-
role- the Digital Twin role for the referenced IoT Connected Asset
Priority
When specifying calculations and alerts in the thing-type specification (Salesforce, ServiceNow), the priority defines the execution order of each calculation/alert. Alerts are always evaluated after all calculations. Within each group (calculations and alerts), formulas are evaluated in priority order from smallest (0) to largest (infitinity). A calculatoin with priority 0 will be evaluated before a calculation with priority 1 and so on. For elements with equal priority, their order relative to each other is arbitrary. So in the following example:
calcA: priority = 0calcB: priority = 10calcC: priority = 10calcD: priority = 11
… calcA is evaluated first followed by calcC and calcB (in no defined order), then finally calcD is evaluated. Once all the calculations are evaluated, the alerts are then evaluated.
When referring to calculations which are evaluated later in the cycle from within calculations which happen earlier, there will be a unit-delay in the value retrieved.
Example:
calcA: priority = 0, formula =(calculation.calcB === undefined) ? 0 : calculation.calcB + 1calcB: priority = 1, formula =calculation.calcA + 1
- On the first pass,
calculation.calcBwill beundefined, socalcAwill be0,calcBis then1- On the second pass,
calcAwill be2,calcBwill be3- … and so on
Specification Metadata Access
In general, when you reference a sensor, calculation, or alert within a formula, it implicitly retrieves it’s current value (i.e. calculation.calcAbc implicitly becomes calculation.calcAbc.value). Alternatively, there are other metadata which can be retrieved from the given element.
In addition to the implicit value, the following parameters are available:
- Sensor
- name: the calculation name (e.g.
sensor.sensorAbc.name = "sensorAbc") - label: the calculation label (e.g.
sensor.sensorAbc.label = "Sensor ABC") - dataType: the calculation data-type (e.g.
sensor.sensorAbc.dataType = "Number") - aggregateType: the sensor’s aggregation-type (e.g.
sensor.sensorAbc.aggregateType = "Seconds") - aggregateFunction: the sensor’s aggregation-function (e.g.
sensor.sensorAbc.aggregateFunction = "MAX") - aggregateInterval: the sensor’s aggregation-interval (e.g.
sensor.sensorAbc.aggregateType = 300) - isStored: true if the sensor is stored in the cloud (e.g.
sensor.sensorAbc.isStored = true) - storageDataType: the cloud storage type (e.g.
sensor.sensorAbc.isStored = "Double")
- name: the calculation name (e.g.
- Calculation
- name: the calculation name (e.g.
calculation.calcAbc.name = "calcAbc") - label: the calculation label (e.g.
calculation.calcAbc.label = "Calculation ABC") - formula: the calculation formula (e.g.
calculation.calcAbc.formula = "1 + 1") - priority: the calculation priority (e.g.
calculation.calcAbc.priority = 14) - isActive: true if the calculation is active (e.g.
calculation.calcAbc.isActive = true) - isStored: true if the calculation is stored in the cloud (e.g.
calculation.calcAbc.isStored = true) - storageDataType: the cloud storage type (e.g.
calculation.calcAbc.isStored = "Double")
- name: the calculation name (e.g.
- Alert
- name: the alert name (e.g.
alert.alertAbc.name = "alertAbc") - label: the alert label (e.g.
alert.alertAbc.label = "Alert ABC") - alertType: the alert-type (e.g.
alert.alertAbc.alertType = "Threshold") - alertInterval: the interval which the alert re-drives to ServiceNow (e.g.
alert.alertAbc.alertInterval = 3600) - formula: the alert formula (e.g.
alert.alertAbc.formula = "calculation.calcAbc > 1") - priority: the alert priority (e.g.
alert.alertAbc.priority = 14) - isActive: true if the alert is active (e.g.
alert.alertAbc.isActive = true) - isStored: true if the alert is stored in the cloud (e.g.
alert.alertAbc.isStored = true)
- name: the alert name (e.g.
Examples
Example 1 Constant
Name: example1
Description: Always return a constant value for the calculation or alert.
Formula:
"hello world";
Result: constant { ... example1: 'hello world' ... } in each message
Example 2 Basic Arithmetic
Name: example2
Description: Scale sensorA
Formula:
sensor.sensorA * 10 + 2;
Result:
{
  "sensorA": 3,
  "example2": 32
}
Example 3 Conditional
Name: example3
Description: If the IoT Connected Asset’s sensorA is over 10, calculate, otherwise return 0.
Formula:
sensor.sensorA > 10 ? sensor.sensorB * 50 : 0;
Results:
{
  sensorA: 3,
  sensorB: 6,
  example3: 0
}

{
  sensorA: 11,
  sensorB: 6,
  example3: 300
}
Alternate
if (sensor.sensorA > 10) {
  return sensor.sensorB * 50;
} else {
  return 0;
}
Example 4 Digital Twin
Name: example4
Description: If the IoT Connected Asset’s parent is powered on, calculate, otherwise return 0.
Formula:
$parent.calculation.powerOn ? sensor.sensorB / $parent.sensor.inputVoltage : 0;
Results:
parentId: {
  sensor: {
    inputVoltage: 12
  },
  calculation: {
    powerOn: true
  }
}
{
  "sensorB": 6,
  "example4": 0.5
}
parentId.sensor.inputVoltage: 0
parentId.calculation.powerOn: false
{
  "sensorB": 6,
  "example4": 0
}
Alternate
if ($parent.calculation.powerOn) {
  return sensor.sensorB / $parent.sensor.inputVoltage;
} else {
  return 0;
}
Example 5 Context
Name: example5
Description: If the IoT Connected Asset’s entitlement level is either Platinum or Gold, evaluate the threshold, otherwise return false.
Formula:
["platinum", "gold"].includes(context.entitlementLevel.toLowerCase())
  ? calculation.someValue > 100
  : false;
Results:
context.entitlementLevel = "Gold";
{
  "someValue": 101,
  "example5": true
}
context.entitlementLevel = "Silver";
{
  "someValue": 101,
  "example5": false
}
Alternates
if (["platinum", "gold"].includes(context.entitlementLevel.toLowerCase())) {
  return calculation.someValue > 100;
} else {
  return false;
}
function isCovered(level) {
  const coveredLevels = ["platinum", "gold"];
  return coveredLevels.includes(level.toLowerCase());
}

if (isCovered(context.entitlementLevel)) {
  return calculation.someValue > 100;
} else {
  return false;
}
Javascript Basics
Additional Resources
Documentation on JavaScript is plentiful. Below are some great resources to get the latest or dig deeper into the features of the language.
Or check out our curated list of basic JavaScript functionality.
Quick Reference
Expressions & Operators
Arithmetic
+- Addition
const newNumber = 1 + 1; // 2
const newString = "1" + "1"; // '11'
-- Subtraction
const newNumber = 1 - 1; // 0
const newString = "1" - "1"; // 0 - number-like strings are 'coerced' into numbers
const newString = "1" - "one"; // NaN (or 'Not-a-Number')
/- Division
const newNumber = 1 / 2; // 0.5
const newString = "1" / "2"; // 0.5
const newString = "1" / "two"; // NaN
*- Multiplication
const newNumber = 1 * 2; // 2
const newString = "1" * "2"; // 2
const newString = "1" * "two"; // NaN
%- Remainder (Modulo)
const newNumber = 2.3 % 1; // 0.3
const newString = "2.3" % "1"; // 0.3
const newString = "2.3" % "one"; // NaN
**- Exponentiation
const newNumber = 2 ** 3; // 8
const newString = "2" ** "3"; // 8
const newString = "2" ** "three"; // NaN
Relational
in- Object contains property (looking at keys only)
const hasSomething = "something" in { something: 1, another: 2 }; // true
const hasElephant = "something" in { something: 1, another: 2 }; // false
const hasOne = 1 in { something: 1, another: 2 }; // false
<- Less-than
const isSmall = 1 < 2; // true
const notSmall = 1 < 1; // false
const notSmall = 1 < 0; // false
<=- Less-than-or-equal-to
const isSmall = 1 <= 2; // true
const notSmall = 1 <= 1; // true
const notSmall = 1 <= 0; // false
>- Greater-than
const isSmall = 1 > 2; // false
const notSmall = 1 > 1; // false
const notSmall = 1 > 0; // true
>=- Greater-than-or-equal-to
const isSmall = 1 >= 2; // false
const notSmall = 1 >= 1; // true
const notSmall = 1 >= 0; // true
Equality
==- Equality (allowing coercion)
const notEqual = 1 == 2; // false
const equalNumbers = 1 == 1; // true
const similarString = 1 == "1"; // true
const similarBool = 1 == true; // true
!=- Inequality (allowing coercion)
const notEqual = 1 != 2; // true
const equalNumbers = 1 != 1; // false
const similarString = 1 != "1"; // false
const similarBool = 1 != true; // false
===- Identity (disallowing coercion)
const notEqual = 1 === 2; // false
const equalNumbers = 1 === 1; // true
const similarString = 1 === "1"; // false
const similarBool = 1 === true; // false
!==- Nonidentity (disallowing coercion)
const notEqual = 1 !== 2; // true
const equalNumbers = 1 !== 1; // false
const similarString = 1 !== "1"; // true
const similarBool = 1 !== true; // true
Logical
&&- Logical AND
const allTrue = true && true; // true
const someFalse = false && true; // false
const allFalse = false && false; // false
||- Logical OR (also a falsy-coalescing operator)
const allTrue = true || true; // true
const someFalse = false || true; // true
const allFalse = false || false; // false

// Falsy-Coalescing is used to return the first non-falsy value
const firstIsGood = "first" || "second"; // 'first'
const firstIsUndefined = undefined || "second"; // 'second'
const firstIsNull = null || "second"; // 'second'
const firstIsFalse = false || "second"; // 'second'
const firstIs0 = 0 || "second"; // 'second'
Assignment
=- Assignment
const a = 1; // 1
const b = a; // 1
*=- Multiplication assignment
const a = 2; // 2
const a *= 2; // 4 (a = a * 2)
/=- Division assignment
const a = 2; // 2
const a /= 2; // 1 (a = a / 2)
+=- Addition assignment
const a = 2; // 2
const a += 2; // 4 (a = a + 2)
-=- Subtraction assignment
const a = 2; // 2
const a -= 2; // 0 (a = a - 2)
[a, b] = [1, 2],{a, b} = {a: 1, b: 2}- Destructuring assignment
const anArray = [1, 2];
const anObject = { aKey: 1, bKey: 2 };
const [first, second] = anArray; // first = 1, second = 2
const { aKey } = anObject; // aKey = 1
,- Evaluate multiple, return last
const result = ((x = 1), (x += 2), (x /= 4), x); // 0.75
Miscellaneous
(condition ? ifTrue : ifFalse)- ternary operator
const getFirst = 1 >= 0 ? "first" : "second"; // 'first'
const getSecond = 1 >= 2 ? "first" : "second"; // 'second'
?.- optional chaining operator
const something = {
  nullChild: null;
};
// Note: (`something.child` is `undefined`)
const undefinedChainOkay = something.child?.grandchild; // returns `undefined`
const undefinedChainError = something.child.grandchild; // throws error (trying to access `grandchild` of `undefined`)

const nullChainOkay = something.nullChild?.grandchild; // returns `undefined`
const nullChainError = something.nullChild.grandchild; // throws error (trying to access `grandchild` of `null`)
Statements
Declarations
let- Block-scoped variable
{
  let someVar;
  let someOtherVar = 10;

  {
    someVar = 20; // sub-scopes have access to variables from parent scope
    let subScopedVar = 40;
  }

  // subScopedVar => undefined, since it was defined in a child scope
}
const- Block-scoped constant
{
  const someVar; // NOT VALID, const variables must be assigned at declaration
  const someOtherVar = 10;

  {
    someOtherVar = 20; // NOT VALID, can't assign a value to a const variable
    const subScopedVar = 40;
  }

  // subScopedVar => undefined, since it was defined in a child scope
}
Flow control
try...catch- Handle errors
try {
  // do something 'risky'
} catch (error) {
  // gracefully handle error, return some default
}
if...else- Conditional
if (someCondition) {
  // do something
} else if (anotherCondition) {
  // do something else
} else {
  // just do this
}
switch- Conditional
switch (someInput) {
  case firstValue:
    // do something when `someInput === firstValue`
    break; // exits this switch-case and continue execution after the switch
  case secondValue:
  // do something when `someInput === secondValue`

  // without a `break` execution will "fall-through" to the next block even if
  // `someInput !== thirdValue`
  case thirdValue:
    // do something when `someInput === thirdValue` (or since there's no `break`
    // above, also `someInput === secondValue`)
    break;
  case fourthValue:
  case fifthValue:
    // do something when `someInput === fourthValue || someInput === fifthValue`
    return anotherValue; // can be used in place of break, this will return
  // `anotherValue` to the caller
  default:
    // do something if `someInput` hasn't matched any of the other cases
    break;
}
Iteration
for- standard for-loop
for (let i = 0; i < 9; i++) {
  // do something while `i` iterates through [0, 1, 2, 3, 4, 5, 6, 7, 8]

  if (someCondition) {
    break; // exit early if some `someCondition` happens
  }

  if (someOtherCondition) {
    continue; // stop executing this loop and start next iteration (don't execute MORE below)
  }

  /* MORE */
}
for...in- object property for-loop
const someObject = { first: 1, second: 2, third: "three" };
for (const key in someObject) {
  // do something while `key` iterates through ['first', 'second', 'third'] (order not guaranteed)
  const currentValue = someObject[key];

  if (someCondition) {
    break; // exit early if some `someCondition` happens
  }

  if (someOtherCondition) {
    continue; // stop executing this loop and start next iteration (don't execute MORE below)
  }

  /* MORE */
}
for...of- iterable for-loop
const someArray = ["a", "b", "c"];
for (const item of someArray) {
  // do something while `item` iterates through ['a', 'b', 'c']

  if (someCondition) {
    break; // exit early if some `someCondition` happens
  }

  if (someOtherCondition) {
    continue; // stop executing this loop and start next iteration (don't execute MORE below)
  }

  /* MORE */
}
while- while-loop
let done = false;
while (!done) {
  // do something

  if (someCondition) {
    break; // exit early if some `someCondition` happens
  }

  if (someOtherCondition) {
    continue; // stop executing this loop and start next iteration (don't execute MORE below)
  }

  /* MORE */

  if (finallyCondition) {
    done = true;
  }
}
do...while- do-while-loop (like a while-loop, except the body executes at least once)
let done = true;
do {
  // do something
  done = false;

  if (someCondition) {
    break; // exit early if some `someCondition` happens
  }

  if (someOtherCondition) {
    continue; // stop executing this loop and start next iteration (don't execute MORE below)
  }

  /* MORE */

  if (finallyCondition) {
    done = true;
  }
} while (!done);
Standard Objects
The following JavaScript standard objects are available for use in Calculations and Alerts.
Values
Infinity- Numeric property representing infinity
const a = Infinity;
const b = -Infinity;

return a === Infinity; // true
NaN- Property representing something that is not a number
const a = 1 - "string"; // NaN

return a === NaN; // true
undefined- Property representing something that is not defined
const someObject = { a: 1, b: 2 };

return someObject.c === undefined; // true
Functions
isFinite- Check if number is not Infinity
isFinite(Infinity); // false
isFinite(-Infinity); // false
isFinite(10 / 0); // false (divide by zero)
isFinite(42); // true
isFinite("abc"); // false
isNaN- Check if value is Not-A-Number
isNaN(1 - "string"); // true
isNaN(-Infinity); // false ... debatable
isNaN(42); // false
isNaN("abc"); // true
parseFloat- Parse a number from a string as a float
parseFloat("1.234"); // 1.234
parseFloat("1"); // 1.0
parseFloat("a1"); // NaN
parseInt- Parse a number from a string as an integer
parseFloat("1.234"); // 1
parseFloat("1"); // 1
parseFloat("a1"); // NaN
decodeURI- Decode a URI encoded string
const encoded = "%7B%22a%22:1,%20%22b%22:2%7D";
decodeURI(encoded); // {"a":1, "b":2}
encodeURI- Encode a string for URI
const raw = '{"a":1, "b":2}';
encodeURI(raw); // %7B%22a%22:1,%20%22b%22:2%7D
Fundamentals
Error- The standard Error Object in JavaScript
try {
  const e = new Error("Im an Error");

  // Properties & Methods
  e.name; // 'Error'
  e.message; // 'Im an Error'
  e.toString(); // 'Error: Im an Error'

  throw e;
} catch (error) {
  console.log(error); // 'Error: Im an Error'
}
Numbers & Dates
Number- Wrapper Object for a number
const a = 123; // 123
const b = Number("123"); // returns the number 123
a === b; // true

Number("unicorn"); // NaN
Number(undefined); // NaN

// Properties & Methods
const c = 123.456789;
c.toExponential(3); // '1.235e+2'
c.toFixed(2); // 123.46
c.toPrecision(4); // 123.4
c.toString(); // '123.456789'
BigInt- Wrapper Object for integers larger than can be stored in Number
const a = 1n; // 1, note the `n` in the literal specifies this is a **BigInt**

a === 1; // false
a == 1; // true
a < 3; // true
a > 0; // true
// ... relational comparison to Number works intuitively

const b = BigInt(Number.MAX_SAFE_INTEGER); // 9007199254740991n
b * 2n; // 18014398509481982n

// Properties & Methods
const c = 123n;
c.toString(); // '123'
Date- Represents a date object. Fundamentally represented as an integer of the number of milliseconds since January 1, 1970 00:00:00 UTC
const a = Date.now(); // 1607096922047, number of milliseconds from 1/1/1970 to
// the time the statement executes
Date.parse("2020-12-04T15:52:32.939Z"); // returns a Date object for the time
// specified by the input string

new Date(); // Date object representing 'now';
new Date(value); // Date object for the milliseconds `value`
new Date(dateString); // Date object by parsing `dateString`
new Date(year, monthIndex, day, hours, minutes, seconds, milliseconds); // Date object by specifying elements
/* | -- optional -----------------------------| */

b = new Date(); // Date: 2020-12-04T15:59:00.946Z
b.getTime(); // 1607097540946
b.getUTCDate(); // 4 (day of the month 1-31)
b.getUTCDay(); // 5 (day of the week 0-6)
b.getUTCFullYear(); // 2020
b.getUTCHours(); // 15
b.getUTCMilliseconds(); // 946
b.getUTCMinutes(); // 59
b.getUTCMonth(); // 11 (month of the year 0-11)
b.getUTCSeconds(); // 0
b.toUTCString(); // 'Fri, 04 Dec 2020 15:59:00 GMT'
b.toString(); // 'Fri Dec 04 2020 09:59:00 GMT-0600 (Central Standard Time)'
b.toISOString(); // '2020-12-04T15:59:00.946Z'
b.toDateString(); // 'Fri Dec 04 2020'
b.toTimeString(); // '09:59:00 GMT-0600 (Central Standard Time)'
… plus many more: see Mozilla: Date
Math- Collection of mathematical properties and methods (works with
Number, but notBitInt)
// Constants
Math.E; // Euler's constant and the base of natural logarithms; approximately 2.718.
Math.PI; // Ratio of the a circle's circumference to its diameter; approximately 3.14159.

// Functions
Math.abs(x); // Returns the absolute value of x.
Math.ceil(x); // Returns the smallest integer greater than or equal to x.
Math.floor(x); //Returns the largest integer less than or equal to x.
Math.round(x); // Returns the value of the number x rounded to the nearest integer.

Math.sin(x); // Returns the sine of x.
Math.cos(x); // Returns the cosine of x.
Math.tan(x); // Returns the tangent of x.
Math.asin(x); // Returns the arcsine of x.
Math.acos(x); // Returns the arccosine of x.
Math.atan(x); // Returns the arctangent of x.
Math.atan2(y, x); // Returns the arctangent of the quotient of its arguments.

Math.exp(x); // Returns Ex, where x is the argument, and E is Euler's constant (2.718…, the base of the natural logarithm).
Math.log(x); //Returns the natural logarithm (ln) of x.
Math.log10(x); //Returns the base-10 logarithm of x.
Math.log2(x); //Returns the base-2 logarithm of x.

Math.max(x, ...); //Returns the largest of zero or more numbers.
Math.min(x, ...); //Returns the smallest of zero or more numbers.

Math.pow(x, y); //Returns base x to the exponent power y (that is, xy).
Math.sqrt(x); // Returns the positive square root of x.

Math.sign(x); // Returns the sign of the x, indicating whether x is positive, negative, or zero.

Math.random(); // Returns a pseudo-random number between 0 and 1.
… plus many more: see Mozilla: Math
Text
String- Wrapper Object for a string
const a = "A string   ";
const b = "A string using double quotes";
const typeOfQuotes = "back-tick";
const c = `A format string using ${typeOfQuotes} quotes`; // 'A format string using back-tick quotes'
const d = new String("Another string"); // 'Another string'

a.length; // 8
a.charAt(3); // 't'
a.charCodeAt(3); // 116
a.includes("str"); // true
a.startsWith("A "); // true
a.endsWith("ing"); // false
a.indexOf("str"); // 2
a.indexOf("who"); // -1

// Return a new string ... (doesn't modify `a`)
a.toLowerCase(); // a string
a.toUpperCase(); // A STRING
a.replace("ing", "ong"); // 'A strong   '
a.concat("with some more string"); // 'A string   with some more string'
a.repeat(4); // 'A string   A string   A string   A string   '
a.trim(); // 'A string'
a.trimStart(); // 'A string   '
a.trimEnd(); // 'A string'
a.split(" "); // [ 'A', 'string', '', '', '' ]
Indexed Collections
Array- Array of JavaScript elements
const items = ['a', 'b', 3];
const items2 = new Array(); // []
const items3 = new Array(5); // [ undefined, undefined, undefined, undefined, undefined ]

items[0]; // 'a'
Array.isArray(items); // true
Array.isArray('a'); // false

const newArray = items.concat([4, 5, 'f']); // ['a', 'b', 3, 4, 5, 'f']

newArray.every((item) => typeof item === 'string'); // false
newArray.forEach((item) => /* do something */); // returns void
newArray.map((item) => /* do something */); // returns an array with each result of `do something`

newArray.includes('b'); // true
newArray.includes('c'); // false
newArray.indexOf('b'); // 1
newArray.indexOf('c'); // -1
newArray.find((item) => item === 'b'); // 'b'
newArray.find((item) => item === 'c'); // undefined
newArray.find((item) => item > 3); // 4
newArray.findIndex((item) => item === 'b'); // 1
newArray.findIndex((item) => item === 'c'); // -1
newArray.findIndex((item) => item > 3); // 3

newArray.join(':'); // 'a:b:3:4:5:f'

const lastElement = newArray.pop(); // 'f', newArray = ['a', 'b', 3, 4, 5]
newArray.push('g'); // ['a', 'b', 3, 4, 5, 'g']

const firstElement = newArray.shift(); // 'a', newArray = ['b', 3, 4, 5, 'g']
newArray.unshift(1); // [1, 'b', 3, 4, 5, 'g']

const subArray = newArray.slice(2, 4); // [3, 4] from index 2 to less than 4 (newArray is unmodified)

const deletedElements = newArray.splice(2, 4); // [3, 4, 5, 'g'] from index 2 delete 4 elements (newArray = [1, 'b'])
const noDeletedElements = newArray.splice(2, 0, 'c', 'd', 'e'); // [] from index 2 delete 0 elements, then insert 'c', 'd', 'e' (newArray = [1, 'b', 'c', 'd', 'e'])

newArray.toString(); // '1,b,c,d,e'

newArray.reverse(); // [ 'e', 'd', 'c', 'b', 1 ] (newArray = [ 'e', 'd', 'c', 'b', 1 ])
… plus many more: see Mozilla: Array
The following typed Arrays are also available: Int8Array, Uint8Array, Uint8ClampedArray, Int16Array, Uint16Array, Int32Array, Uint32Array, Float32Array, Float64Array, BigInt64Array, and BigUint64Array
Keyed Collections
- Map
- See Mozilla Map
- Set
- See Mozilla Set
- WeakMap
- See Mozilla WeakMap
- WeakSet
- See Mozilla WeakSet
Miscellaneous
JSON- serialize / deserialize JSON
JSON.parse('{"a":1, "b": 2}'); // {a:1, b: 2}
JSON.stringify({ first: "first", second: "second" }); // '{"first":"first","second":"second"}'
JSON.stringify(["a", "b", "c"]); // '["a","b","c"]'
Core Libraries
This section provides details on using the Core libraries in Calculations and Alert Conditions.
Generally these libraries are available under the core namespace.
Example
Here we describe a calculation which will latch to true if sensor > 10 and stay true until sensor < 8
calculation = core.logic.latchROS(sensor > 10, sensor < 8)
Available Libraries
Delay
Available Functions
samples(signal, delay, initial)
Delay a signal by some amount of “samples”
Usage
core.delay.samples(signal, delay);
core.delay.samples(signal, delay, initial);
Arguments
- signal
- [any] raw value
- delay
- [number] number of samples to delay the output
- initial
- [any] (optional) value to use for the first
delayseconds (defaults to first received value)
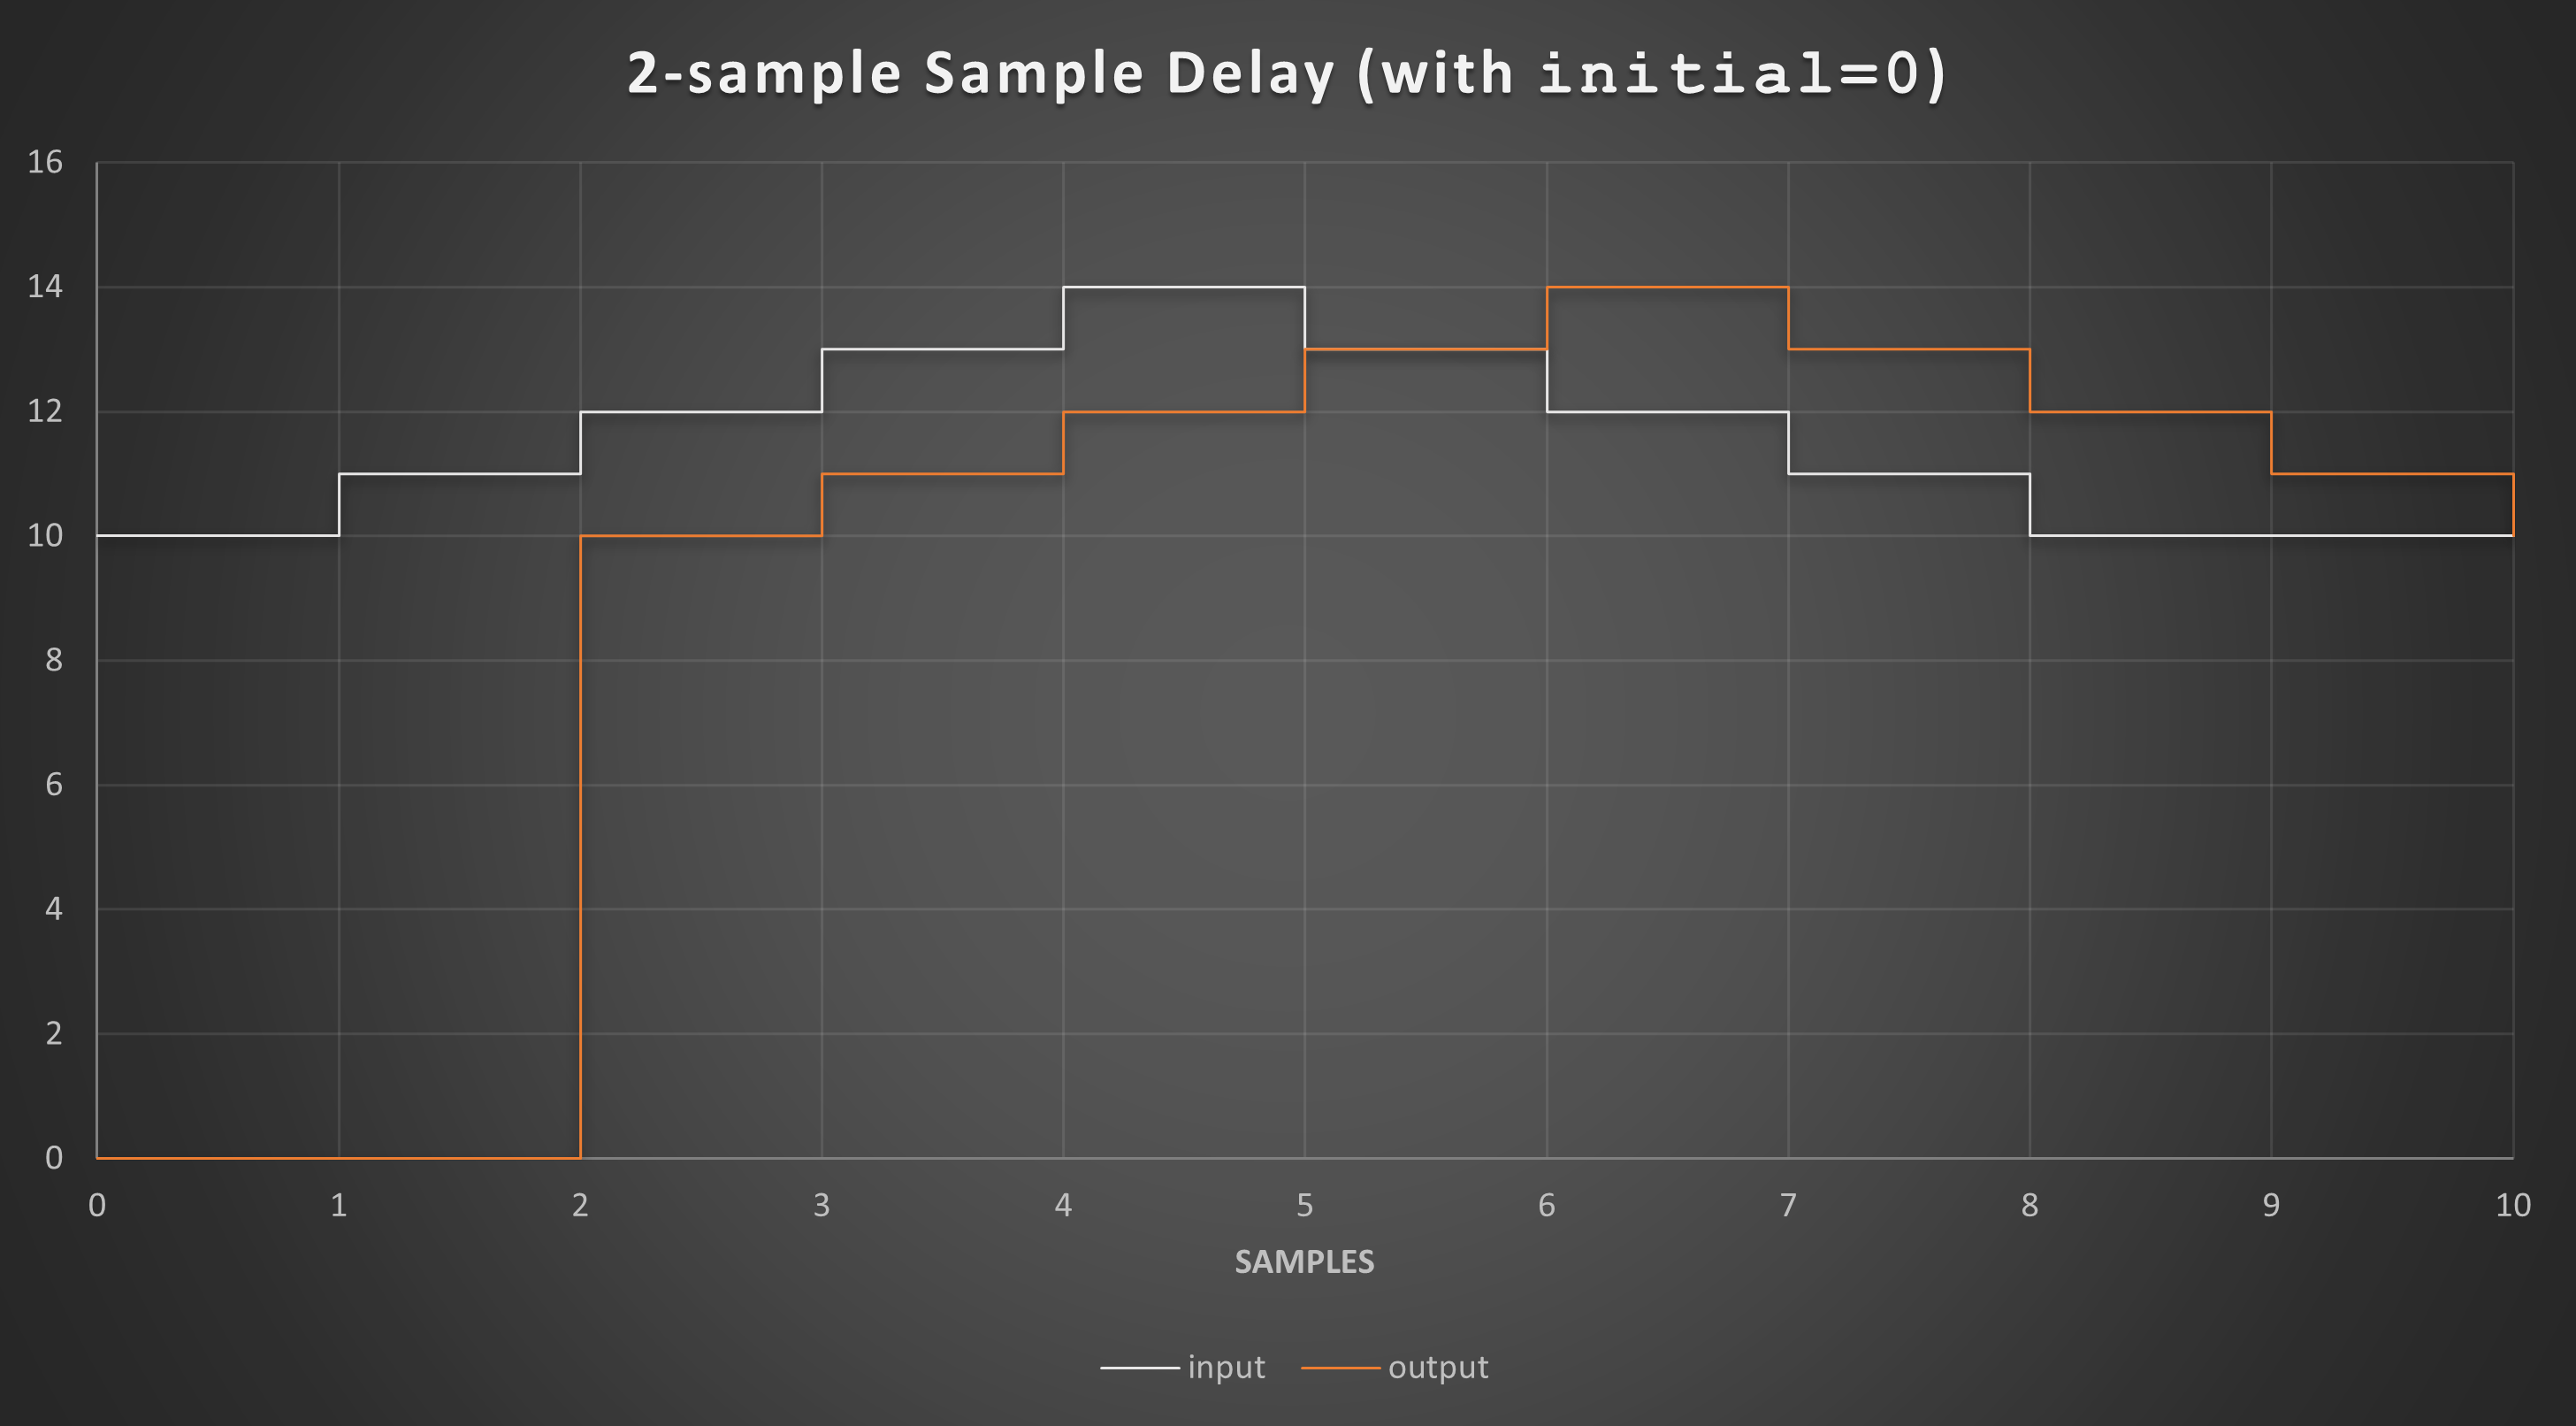
time(signal, delay, initial)
Delay a signal by some amount of time
Usage
core.delay.time(signal, delay);
core.delay.time(signal, delay, initial);
Arguments
- signal
- [any] raw value
- delay
- [number] time, in seconds, to delay the output
- initial
- [any] (optional) value to use for the first
delayseconds (defaults to first received value)
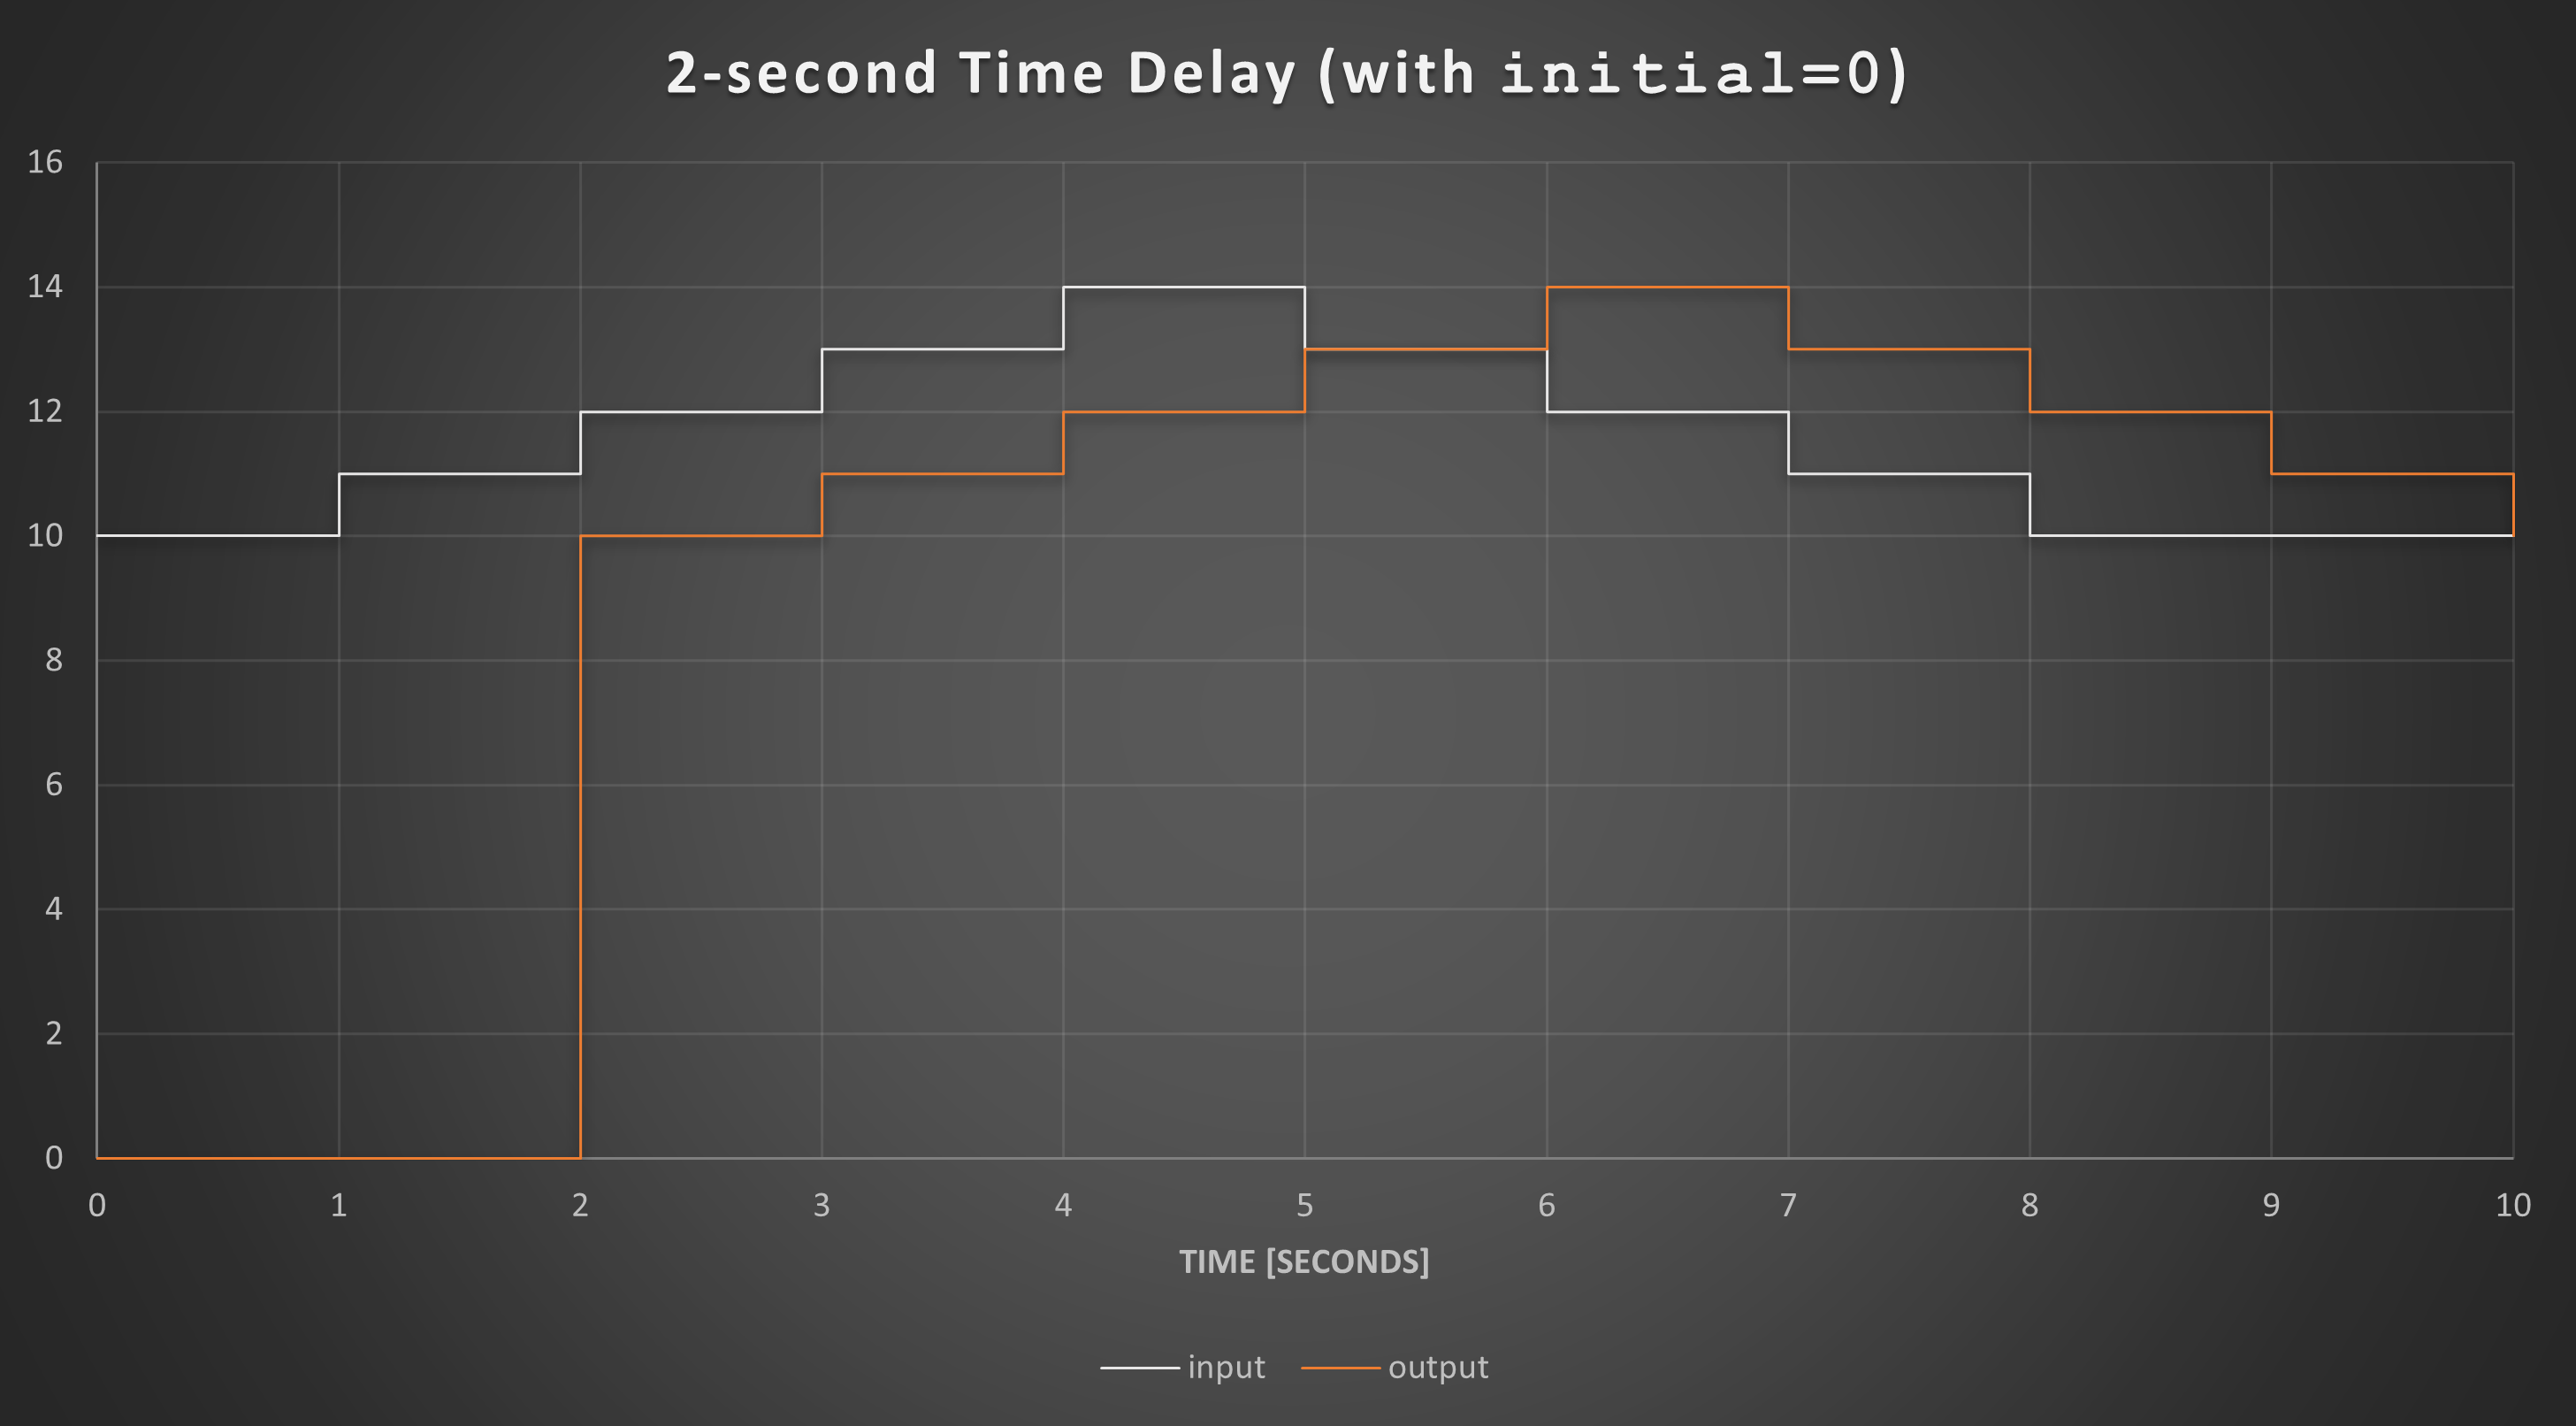
timeToTrue(signal, delay)
Delay the rising edge of a signal for delay seconds. Falling edges are passed through without delay. The output takes the value of the input after delay seconds from the last rising edge. So if the input is false at delay seconds, the output stays false.
Usage
core.delay.timeToTrue(signal, delay);
Arguments
- signal
- [boolean] raw value
- delay
- [number] time, in seconds, to delay the output rising edge
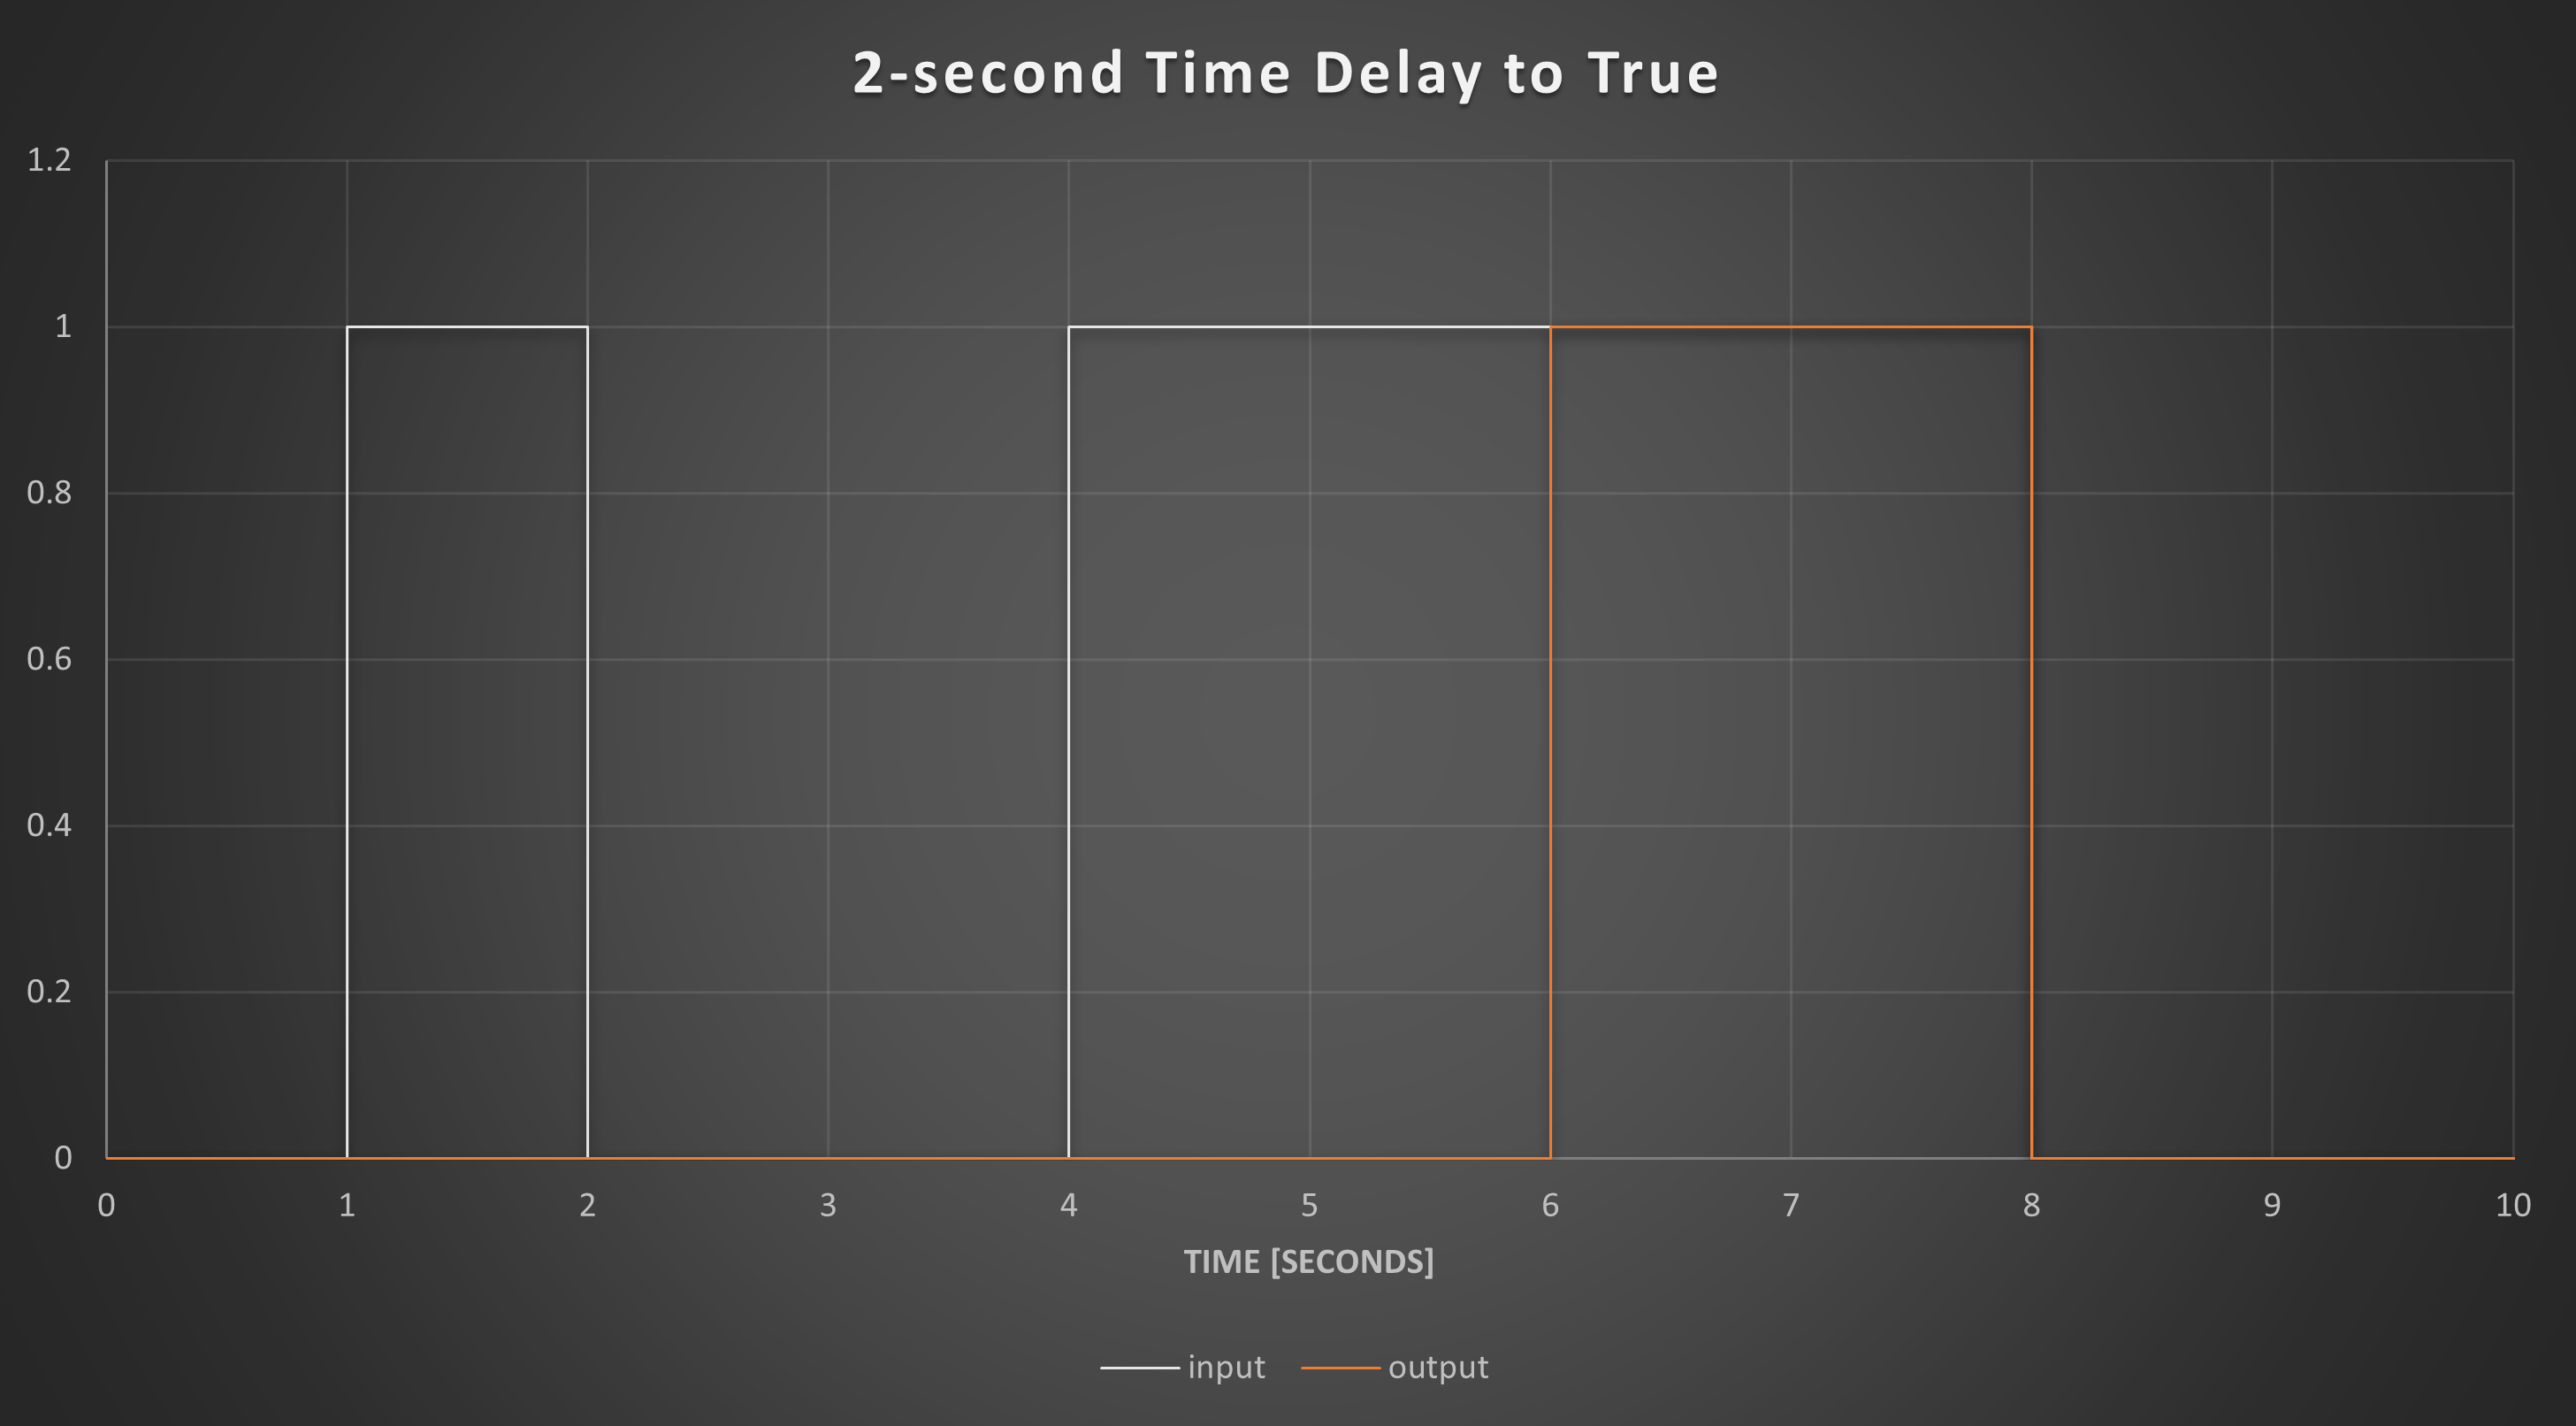
timeToFalse(signal, delay)
Delay the falling edge of a signal for delay seconds. Rising edges are passed through without delay. The output takes the value of the input after delay seconds from the last rising edge. So if the input is true at delay seconds, the output stays true.
Usage
core.delay.timeToFalse(signal, delay);
Arguments
- signal
- [boolean] raw value
- delay
- [number] time, in seconds, to delay the output falling edge
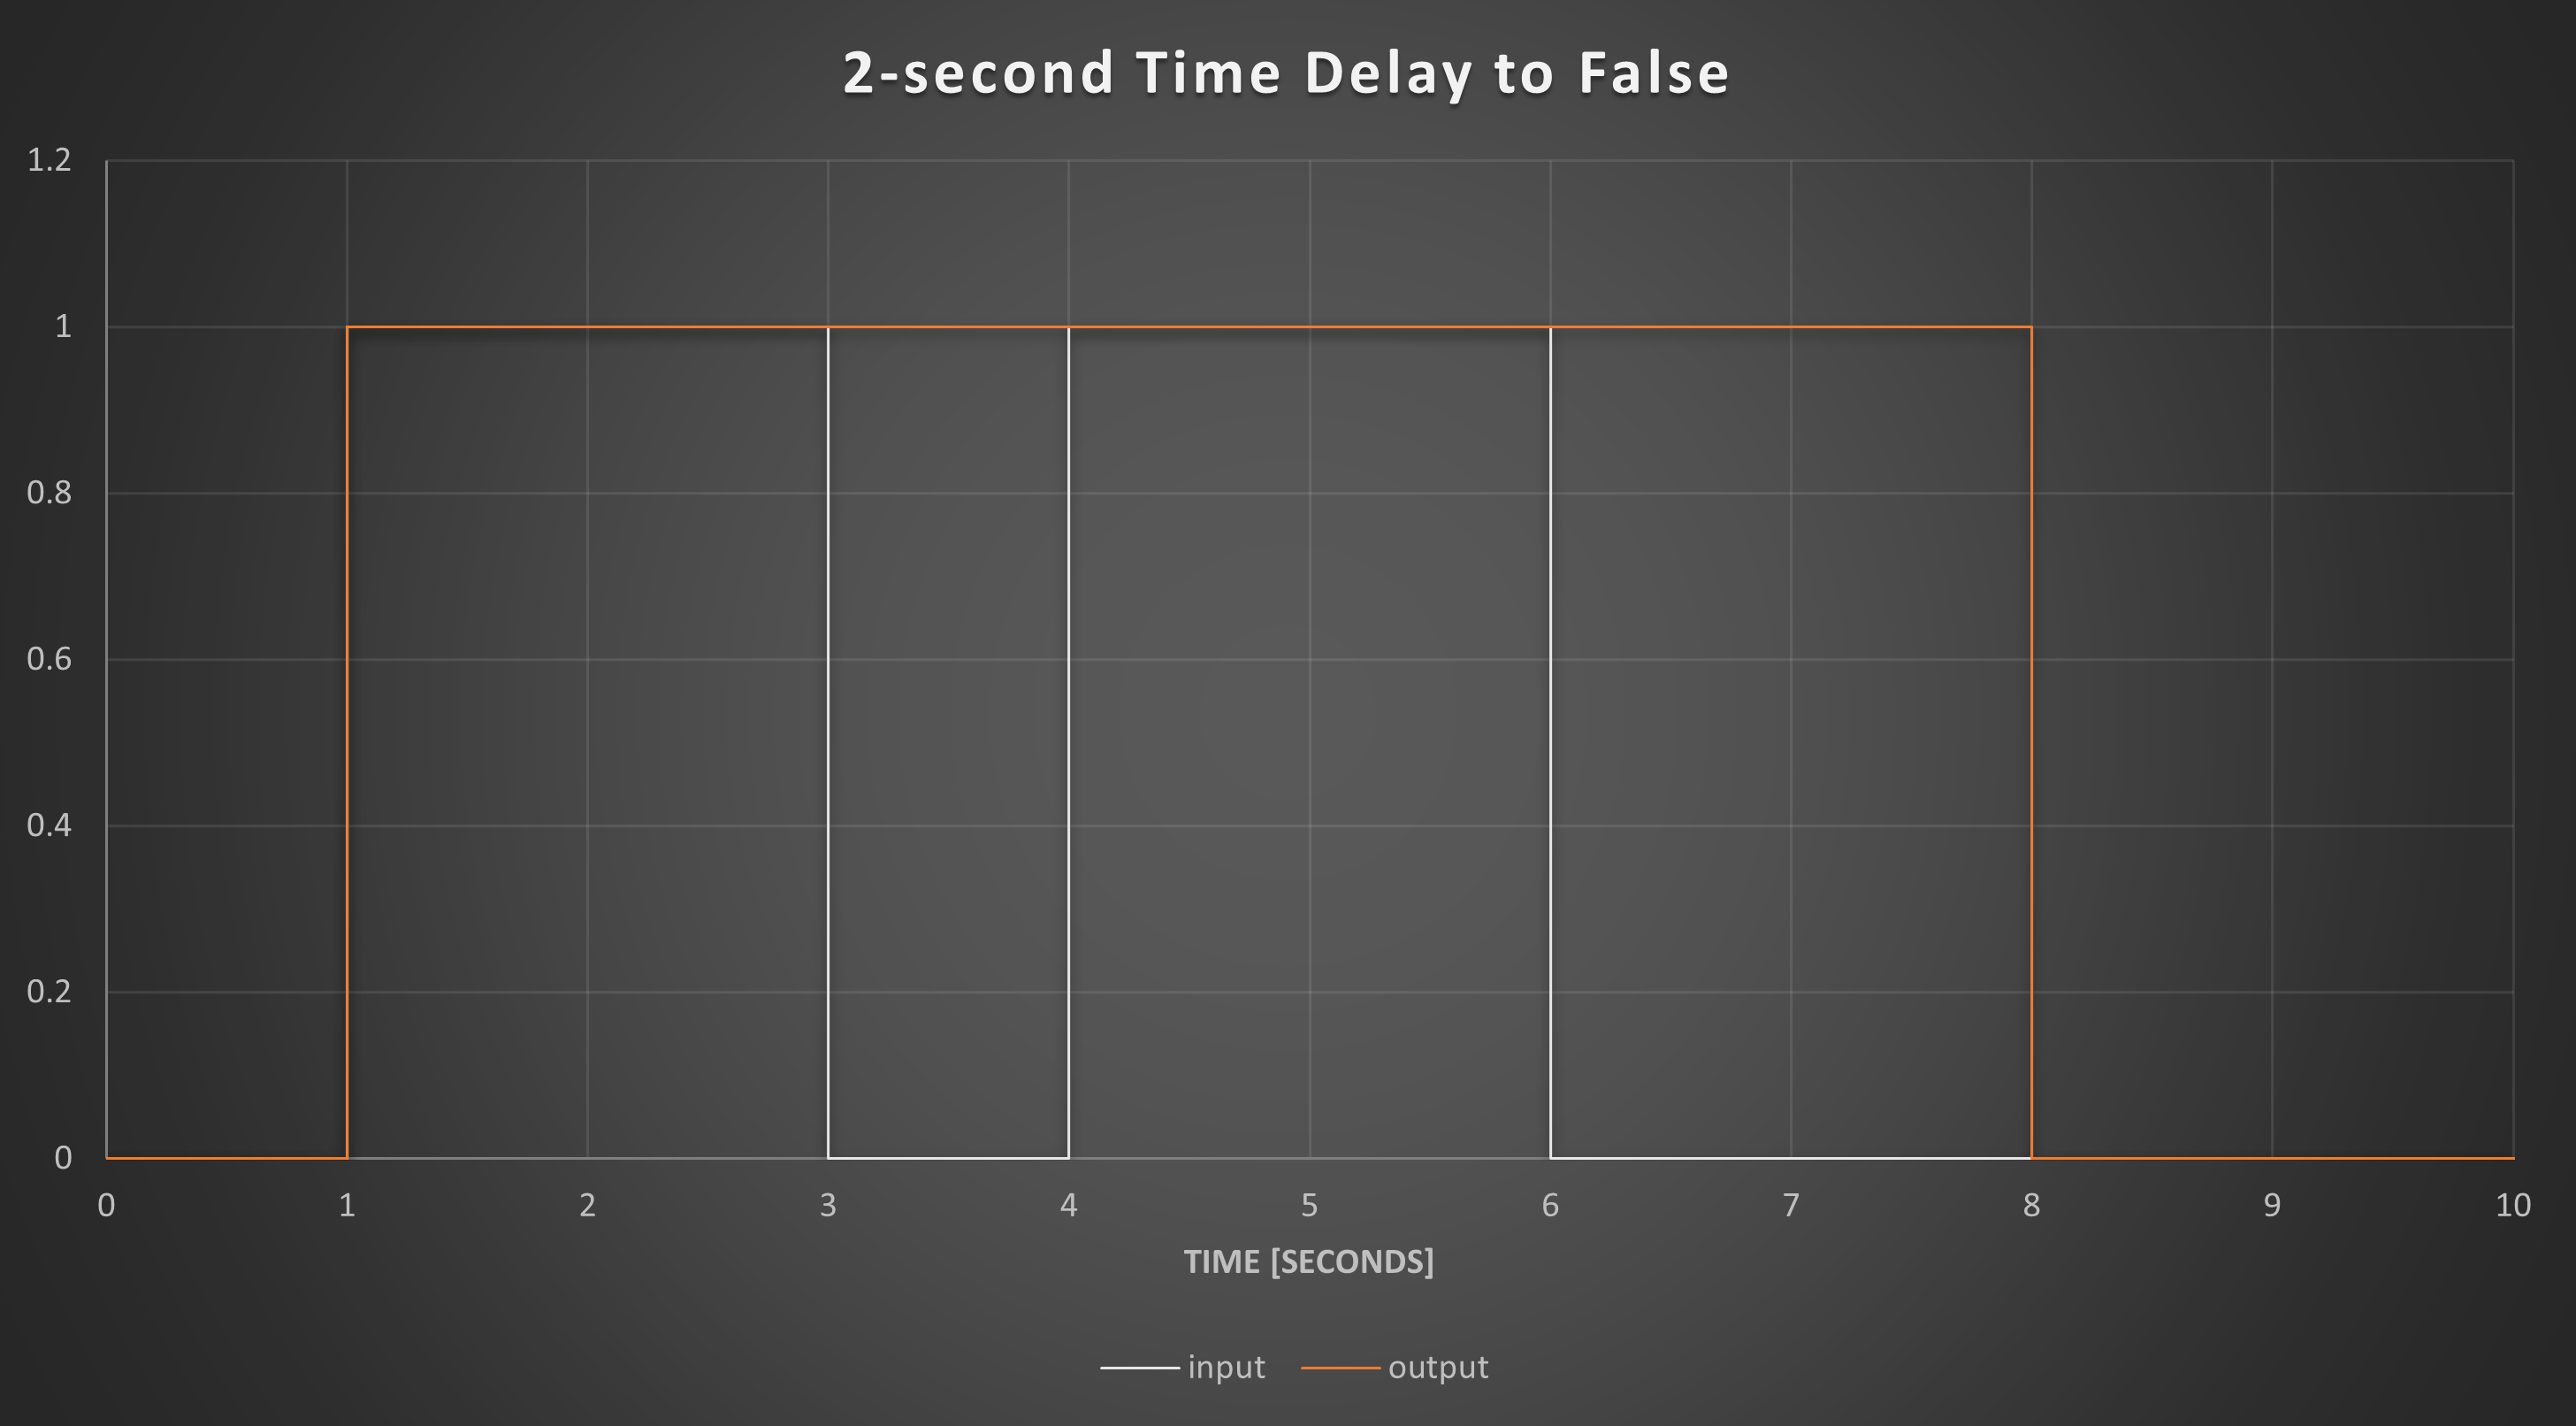
Filter
Available Functions
firstOrderLag(signal, tau)
Filter a signal using a first-order low-pass filter.
Usage
core.filter.firstOrderLag(signal, tau);
Arguments
- signal
- [number] unfiltered value
- tau
- [number] time-constant. Large values result in more filtering.
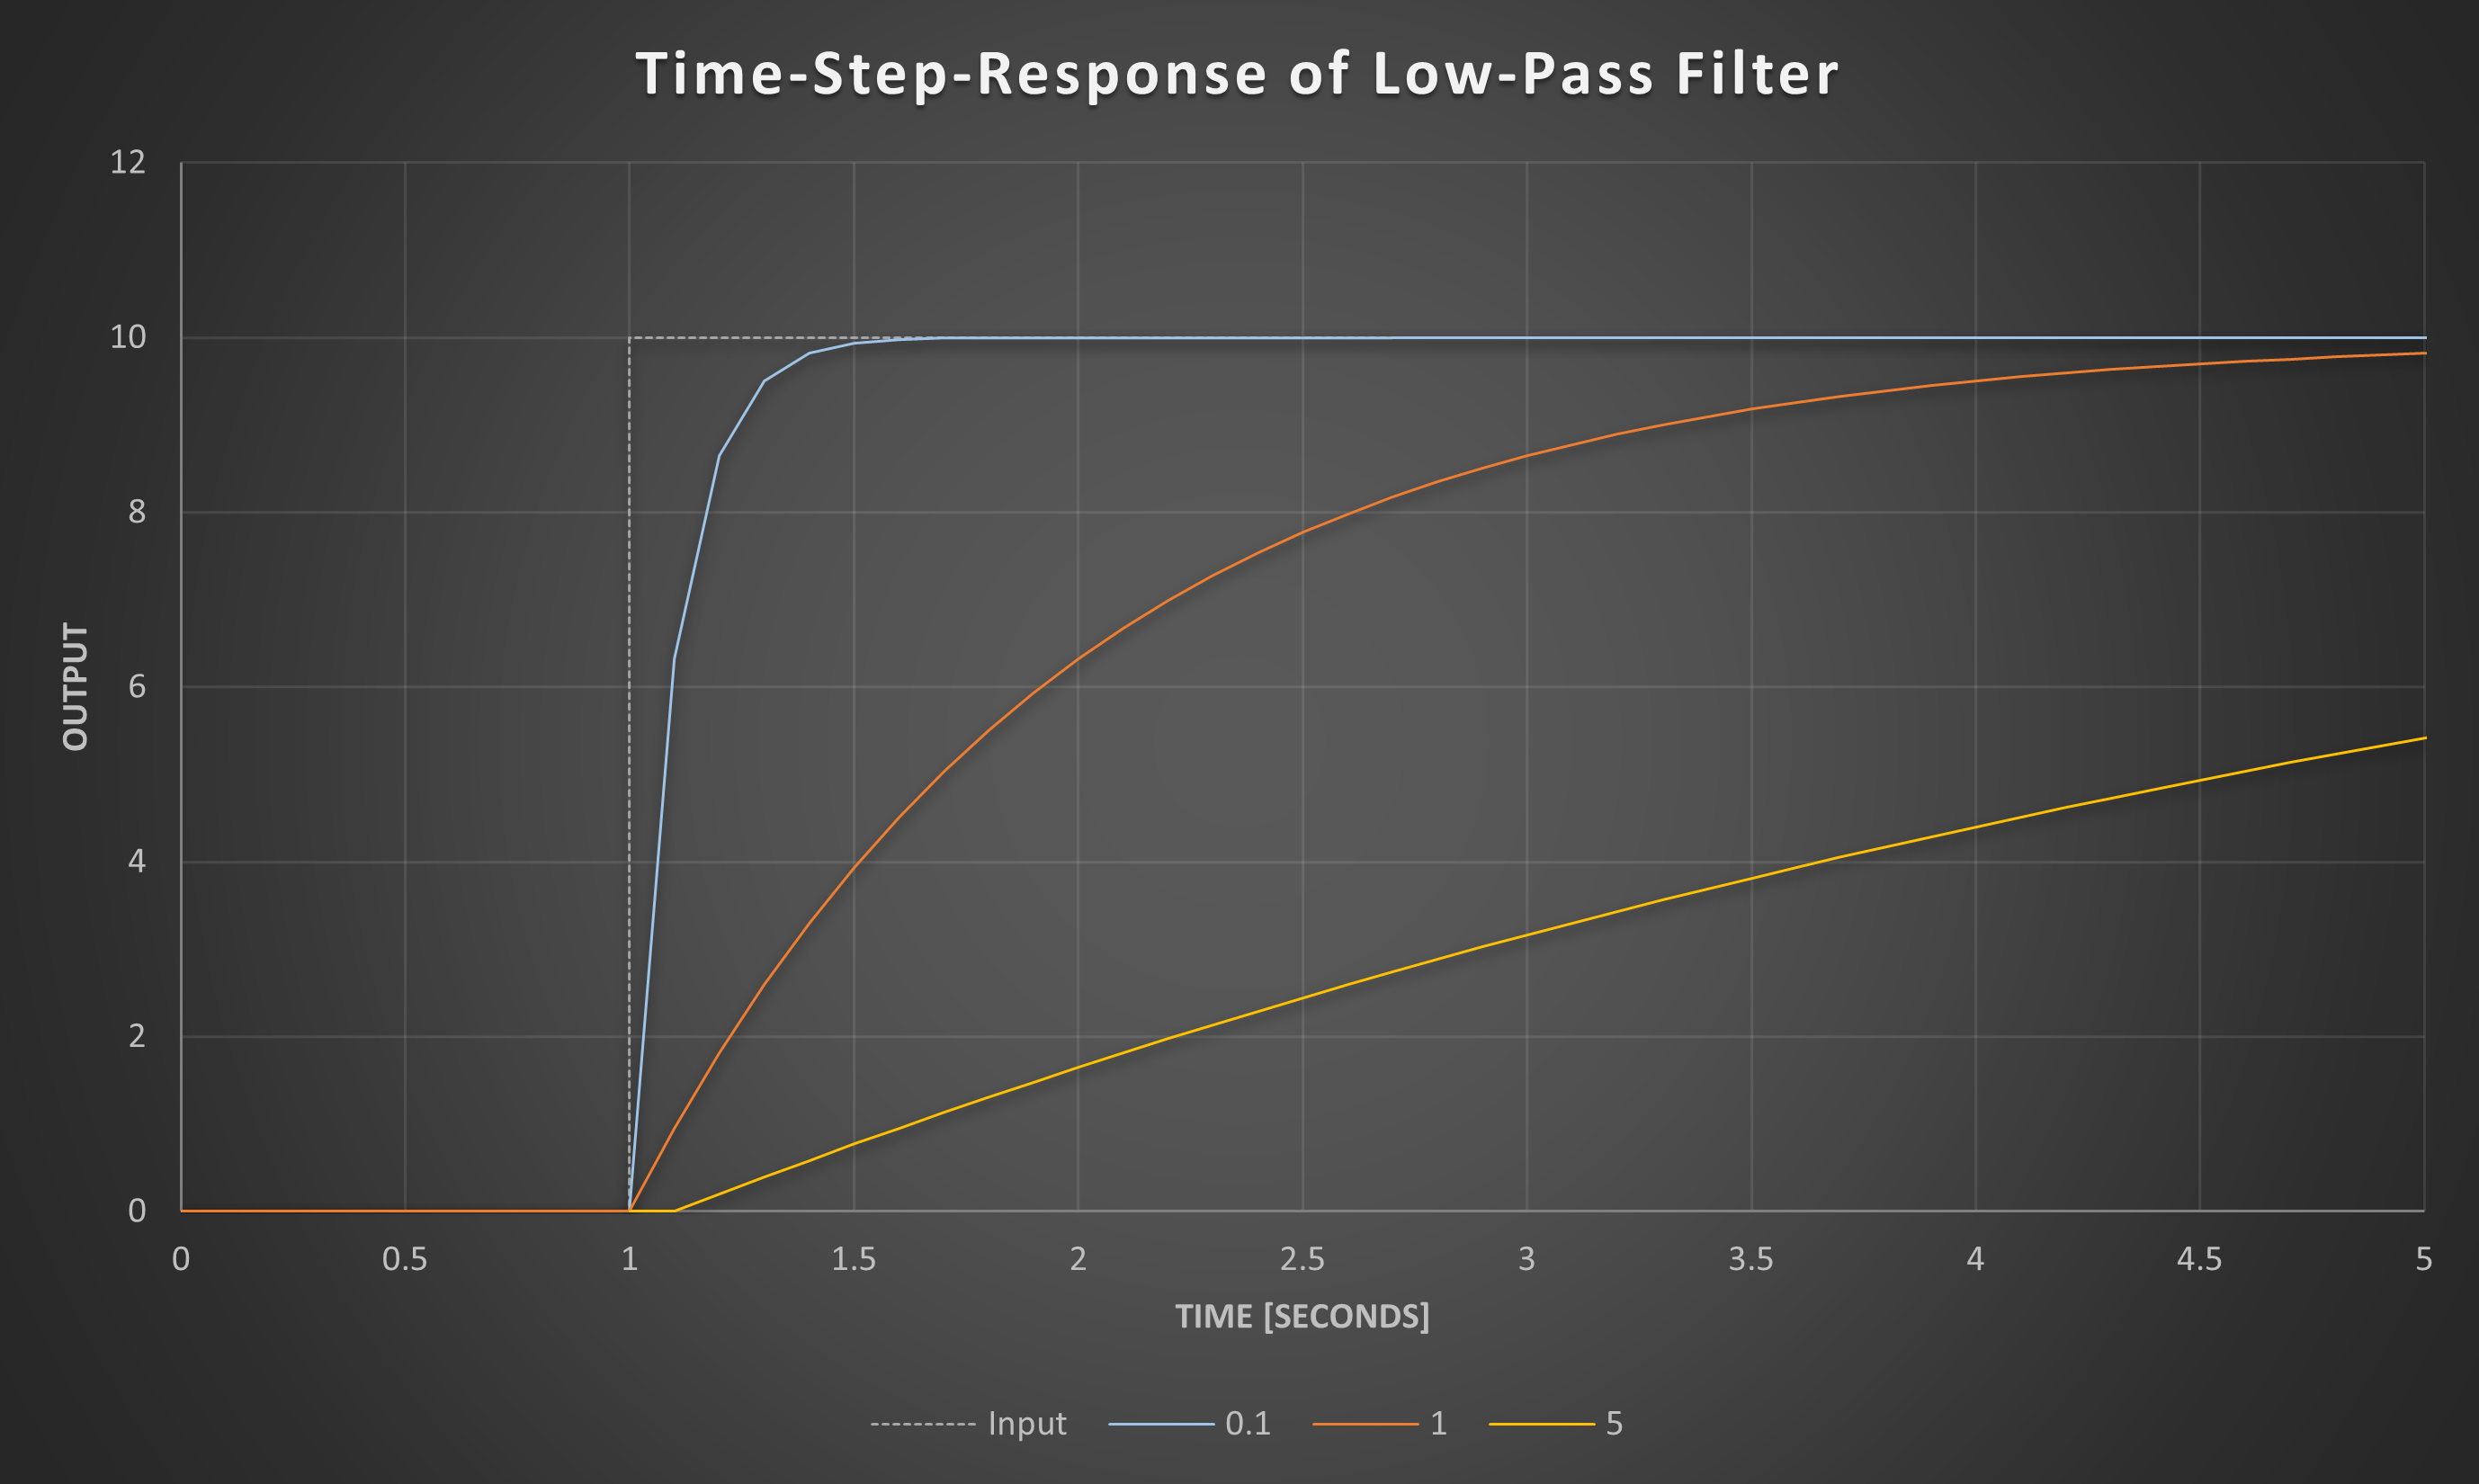
Effect of tau on time-response
Logic
Available Functions
latchROS(set, reset)
Latch output to true when the set argument is true. Reset the output to false when reset is true. Prioritize reset over set if both inputs are true.
Usage
core.logic.latchROS(set, reset);
Arguments
- set
- [boolean] latches the output to
true - reset
- [boolean] resets the output to
falseregardless of the value of set
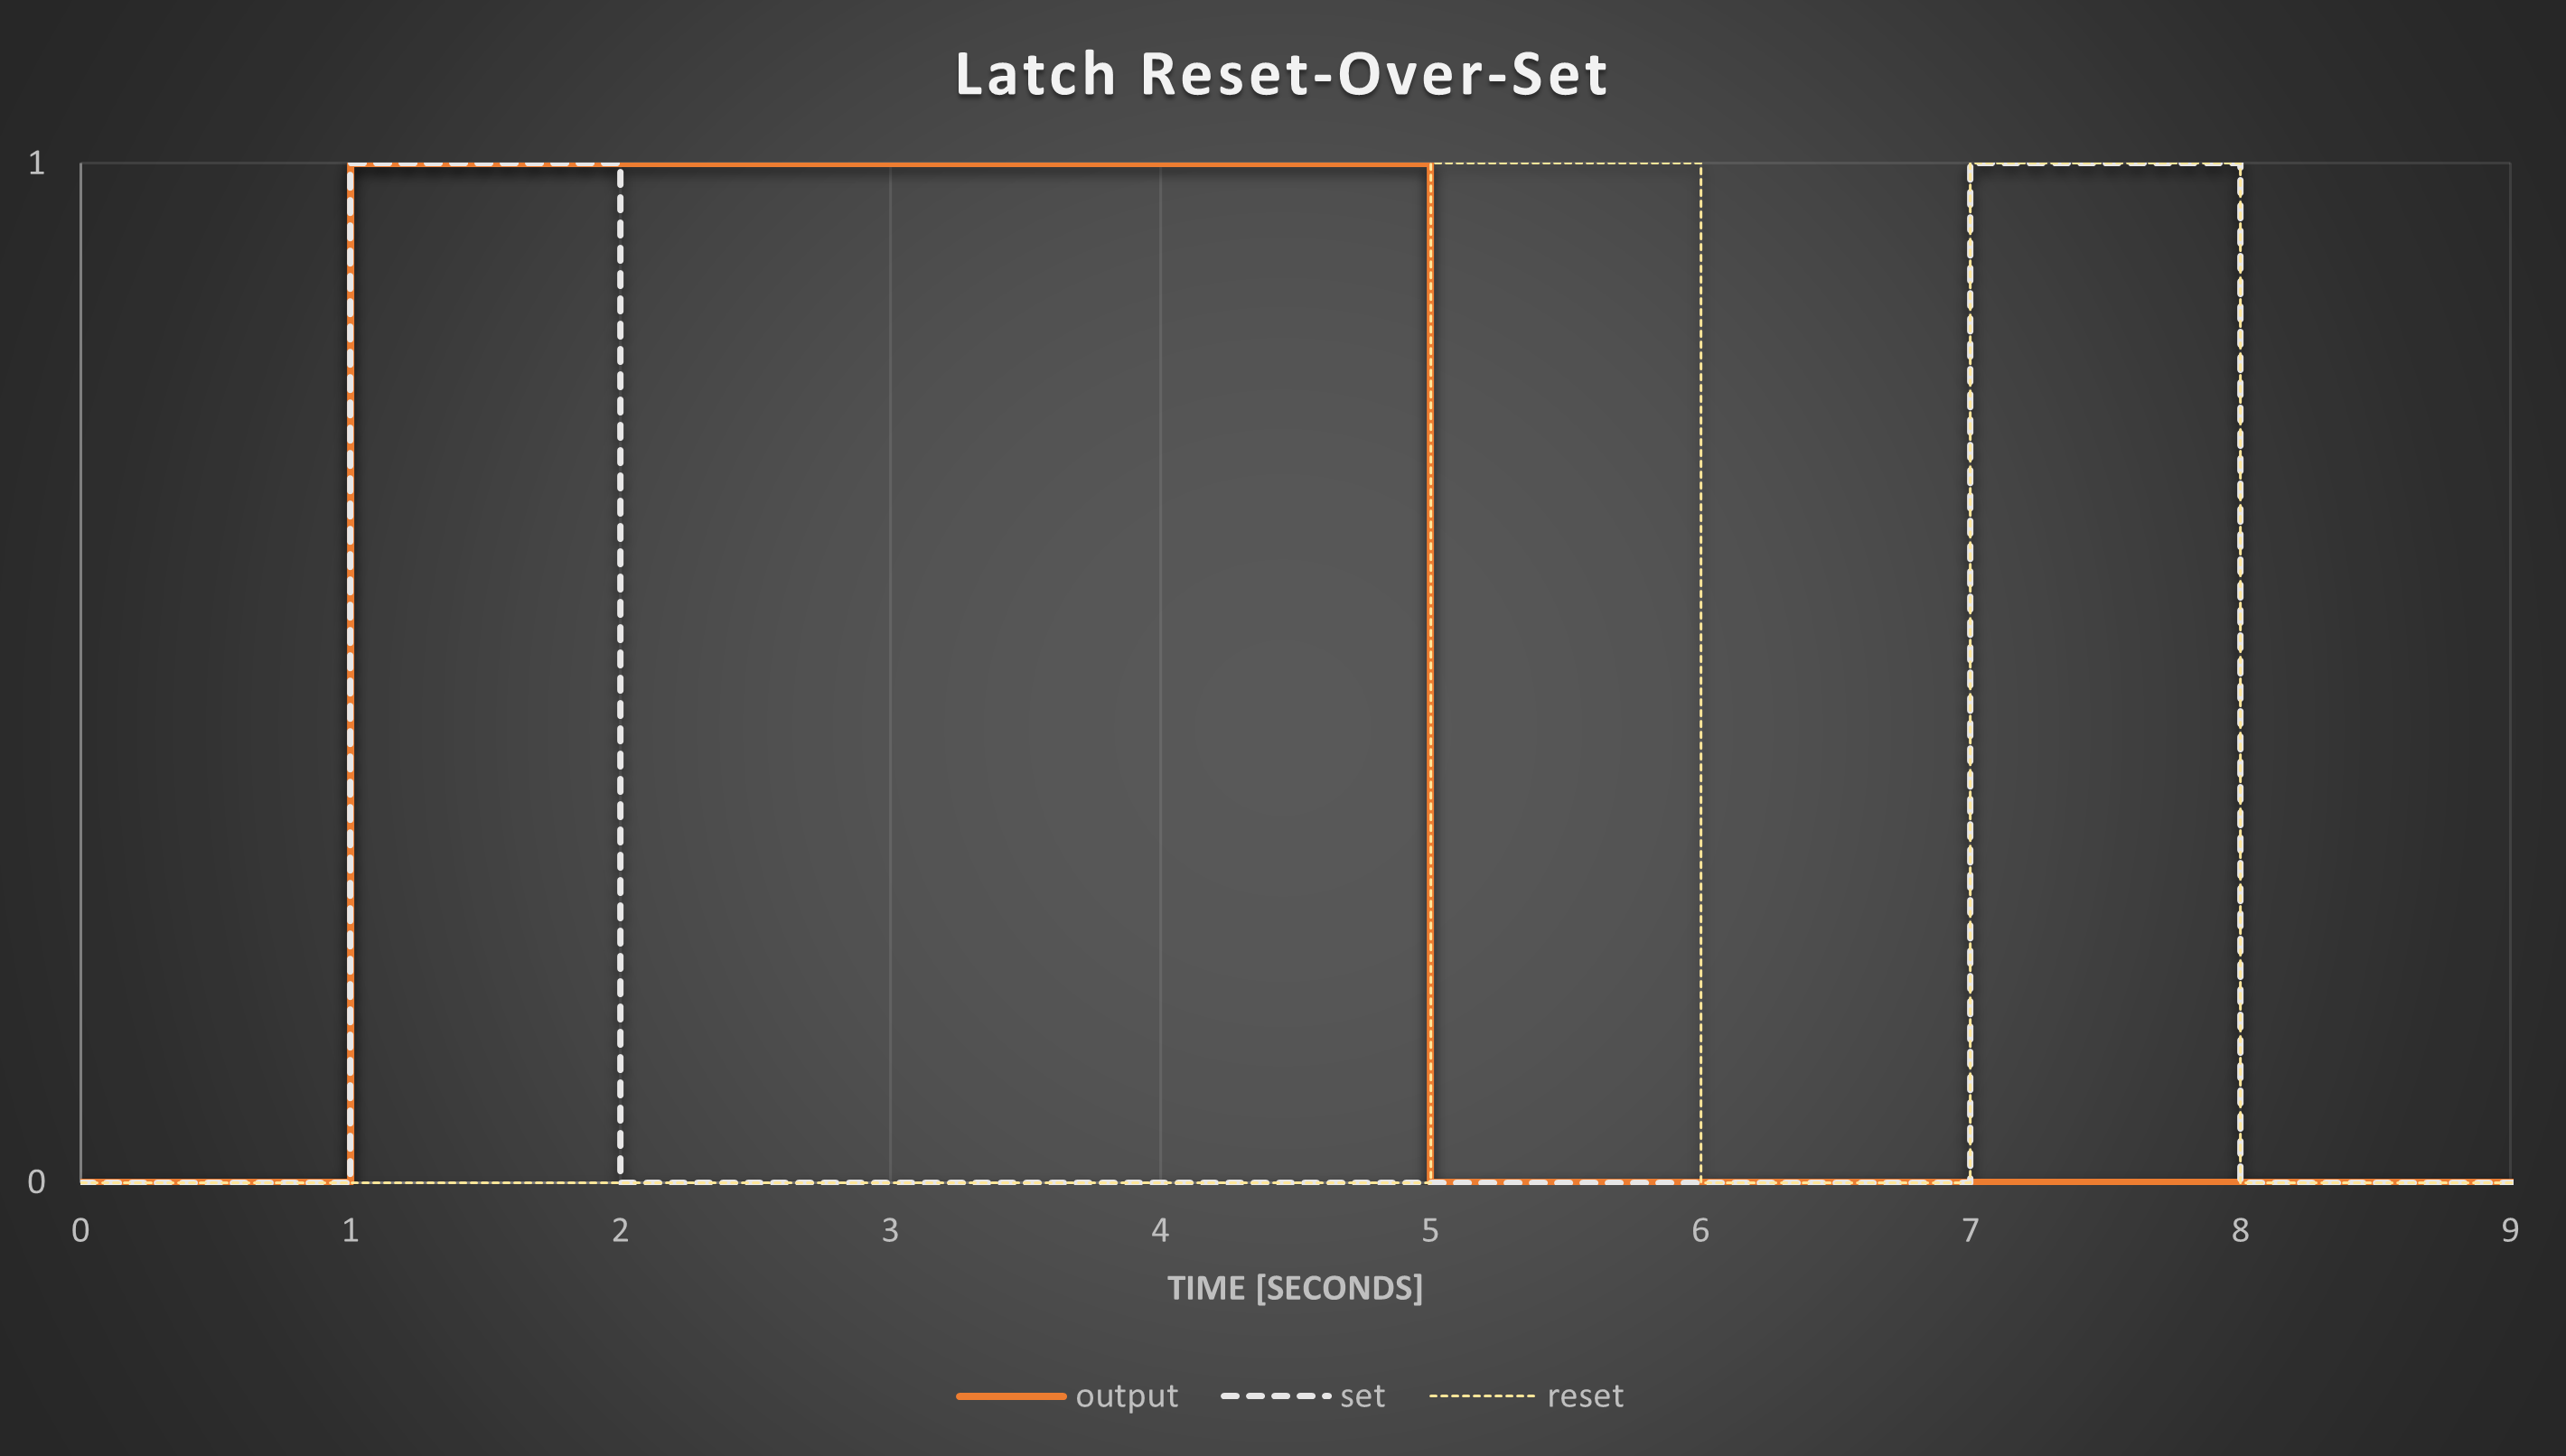
latchSOR(set, reset)
Latch output to true when the set argument is true. Reset the output to false when reset is true. Prioritize set over reset if both inputs are true.
Usage
core.logic.latchROS(set, reset);
Arguments
- set
- [boolean] latches the output to
true - reset
- [boolean] resets the output to
falseonly if set is false
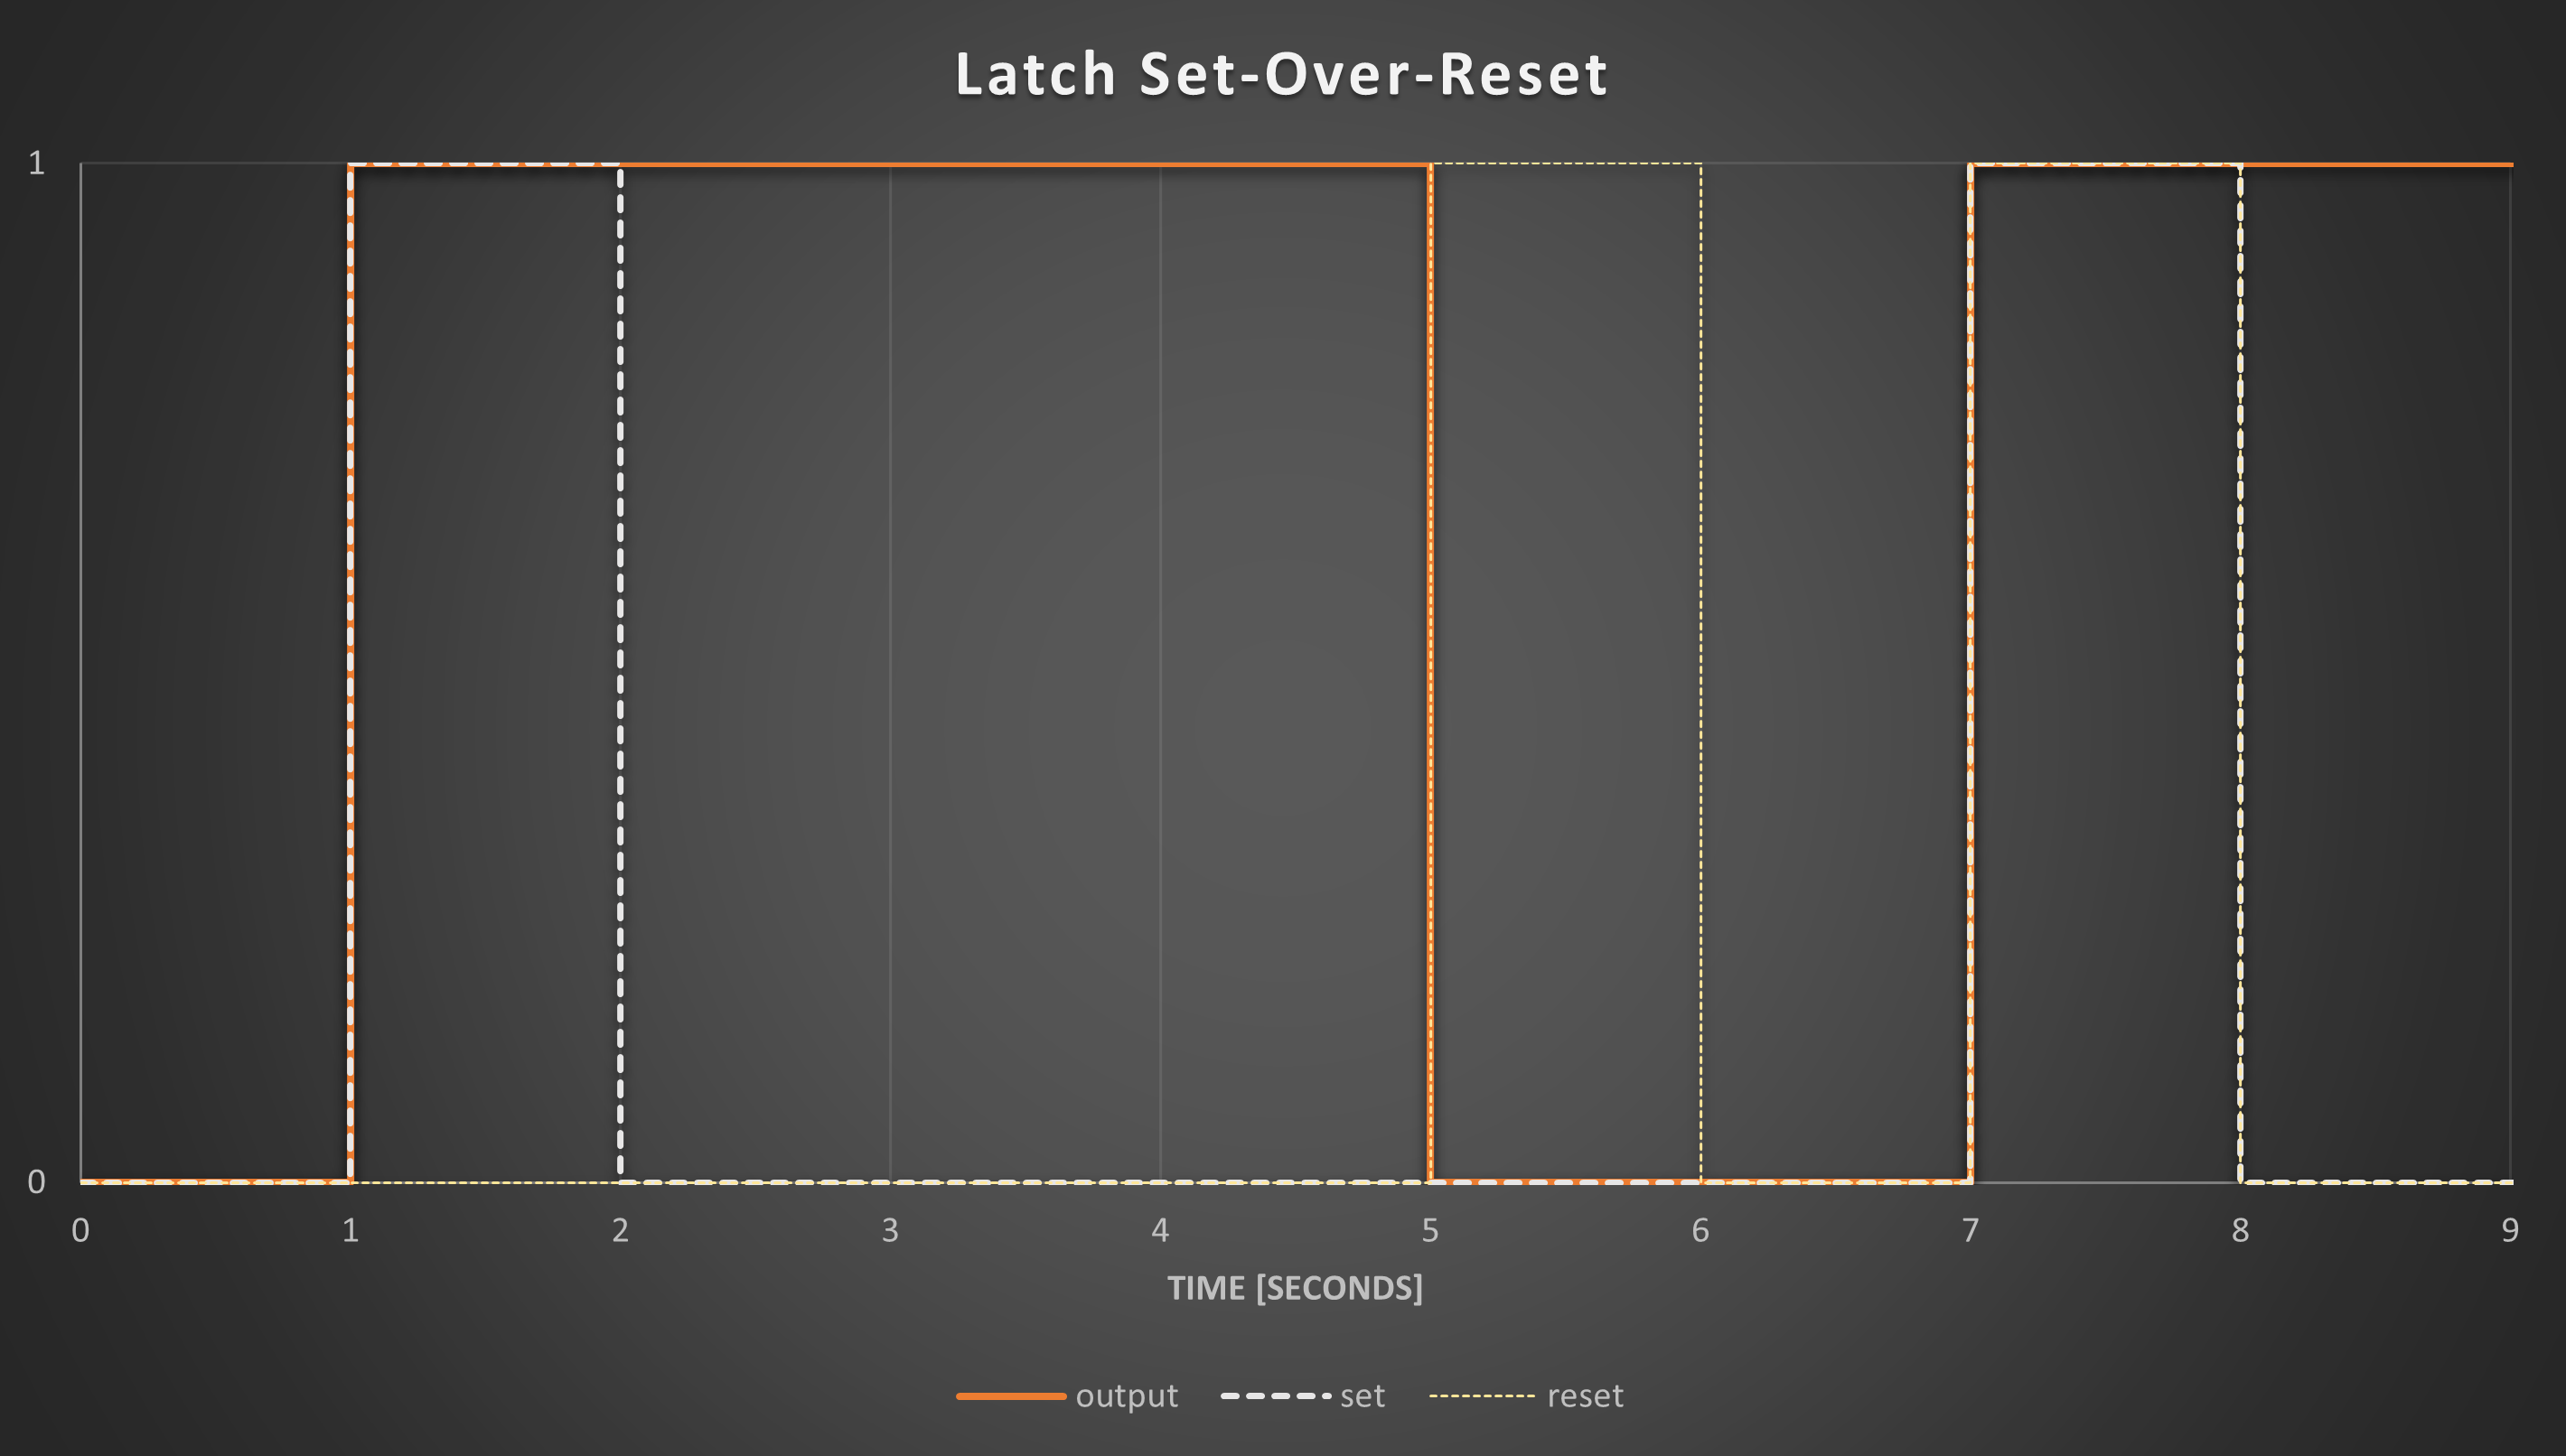
State
Core Concepts
For more information on the core concepts surrounding the usage of state machines see State Machine Concepts.
State Machine Editor
In the 1.10 Release, a new State Machine Editor was introduced. With this editor, creating state machines is now even easier and all of the scripting below is generated by the GUI editor. See State Machine Editor. The following page is primarily useful only if you’re manually reviewing the state-machine created with the new editor.Conceptual Components Applied
Machines
Machines are created using core.state.createMachine(),
which returns a Machine Object. Refer to the
Machine Class Definition for more details on the available methods.
When referring to a machine in other calculations and alerts (e.g.
calculation.myStateMachine), the returned value will be the string
representation of the active state using dot-notation for the current active
hierarchy (e.g. 'B.A.B').
States
States are added to a Machine prior to initialization(). The encapsulate a set
of Actions and Transitions. The current active state can be accessed by
referencing the state-machine directly in other calculations and alerts (e.g.
calculation.myStateMachine).
Actions
Actions are be evaluated at state-entry, during-state-execution, and at state-exit. Actions define an arbitrary set of logic to be evaluated at the specified time.
For more information see:
.addEntryAction(stateName, action).addDuringAction(stateName, action).addExitAction(stateName, action)
The primary use-case for actions will likely be to update the state-machine’s
local variables. Every State-Action is passed 3 positional arguments when
evaluated: local, event, and state (see StateAction for
more details on the contents of these arguments).
Transitions
Transition conditions are evaluated at the start of each “step” while the
From-State is active. Transitions can be added between states with the
.addTransition(from, to, options)
function. Users can optionally define a condition in which to take the
transition. If a condition isn’t specified, the transition is automatically
taken on the “step” after the From-State becomes active. It is also possible to
define TransitionActions which are evaluated when a transition is evaluated,
however it is recommended to use StateActions unless TransitionAction is
the only way to satisfy the requirement.
Simple Applied Example
For this example, we’ll create the following state-machine:
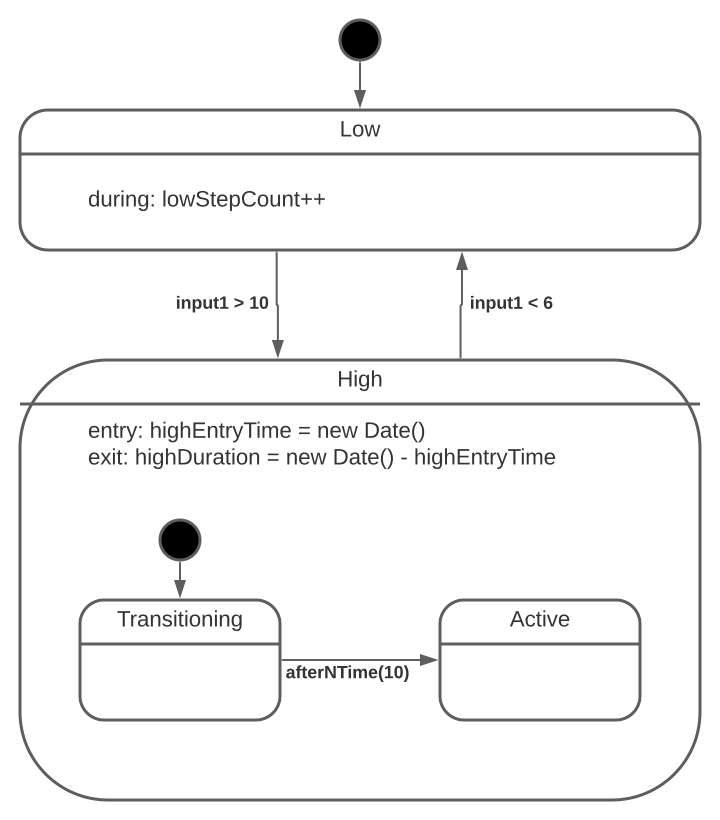
Simple State-Machine Example
The calculated field for the myStateMachineCalculation calculation:
// #region initialize
core.state
  .createMachine()
  .addState("High")
  .addState("Low", { initial: true })
  .addState("High.Transitioning", { initial: true })
  .addState("High.Active")
  .addTransition("High", "Low", {
    condition: (local, event, state) => local.input1 < 6,
  })
  .addTransition("Low", "High", {
    condition: (local, event, state) => local.input1 > 10,
  })
  .addTransition("High.Transitioning", "High.Active", {
    condition: (local, event, state) => after(local.transitionTimeSec, "sec"),
  })
  .addDuringAction("Low", (local, event, state) => local.lowStepCount++)
  .addEntryAction(
    "High",
    (local, event, state) => (local.highEntryTime = new Date())
  )
  .addExitAction(
    "High",
    (local, event, state) =>
      (local.highDuration =
        new Date().getTime() - local.highEntryTime.getTime())
  )
  .withLocal({
    transitionTimeSec: 10,
    input1: sensor.sensorA,
    input2: calculation.otherCalculation,
  })
  .initialize();
// #endregion initialize

// #region step
core.state.stepMachine({
  local: {
    input1: sensor.sensorA,
    input2: calculation.otherCalculation,
    otherMachineState: calculation.otherMachine, // this will be the string-value of the active state in the "otherMachine" state-machine
    otherMachineInternalVariable: core.state.getLocal(
      "otherMachine",
      "otherMachineInternalVariable"
    ),
  },
});
// #endregion step
withLocalis used to set any local variables which may be required during initialization or isn’t updated duringstepMachine.
- Example 1: the machine has an Action on an initial transition which reads a local variable
withLocal.- Example 2: the machine has local variables which are “constant” and aren’t updated as part of
stepMachine.
The internal variable highDuration can be accessed in other calculations / alerts by using the following:
core.state.getLocal("myStateMachineCalculation", "highDuration");
Available Functions
createMachine()
Create a new state machine.
This machine is created using the name of the calculation to which it is assigned to (e.g. if
calculation.myStateMachine = core.state.createMachine() ..., the machine will be namedmyStateMachine, seecore.state.getLocal)
Usage
core.machine.createMachine();
Arguments
None
stepMachine(options)
Step the machine using the options provided.
Usage
core.state.stepMachine({
  local: {
    variableA: 1,
    variableB: sensor.sensorA,
  },
  event: {
    timestamp: new Date("2021-09-07T19:20:24.611Z"),
    type: "MY_SUPER_EVENT",
  },
});
Arguments
- options
- [dictionary] dictionary with the following fields:
- local: [dictionary] key:values to update the machine local variables
- event: [Event] an event definition for event-driven state-machines
getLocal(machine, variable)
Retrieve data from the local variables of a state-machine.
Usage
core.state.getLocal("myStateMachine", "variableA");
Arguments
- machine
- [string] the name of the machine to fetch data from (i.e. the calculation name)
- variable
- [string] the name of the local variable to fetch
Available Condition Functions
after(count, unit)
Evaluates to true after the specified time since the current state has been activated.
Usage
.addTransition('from', 'to', {condition: (local, event, state) => after(10, 'sec')})
Arguments
- count
- [number] the number of units to wait before returning
true - unit
- [‘min’ | ‘sec’ | ‘msec’] (default: ‘sec’) the time-unit of
count
afterEvent(count, unit, event)
Evaluates to true after the specified time since the specified event was last received.
Usage
.addTransition('from', 'to', {condition: (local, event, state) => afterEvent(10, 'sec', 'MY_EVENT_NAME')})
Arguments
- count
- [number] the number of units to wait before returning
true - unit
- [‘min’ | ‘sec’ | ‘msec’] (default: ‘sec’) the time-unit of
count - event
- [string] the name of the event to trigger on
Available Classes
Machine
The primary state-machine class used to track and manage a given state machine.
Usage
const myMachine = new Machine(name, options);
Arguments
- name
- [string] the name of the state-machine
- options
- [dictionary] with the following fields:
- parallel [boolean] if the top-level states are parallel states (default: false)
- currentTime [Date] the initial time used within the machine
Machine.withLocal(variables)
Fully override the state-machine’s local variables with that provided.
Usage
myMachine.withLocal({
  variableA: 1,
  variableB: 2,
});
Arguments
- variables
- [dictionary] key:values to update the machine local variables
Machine.setLocal(variables)
Override specific keys within a state-machine’s local variables.
Usage
myMachine.setLocal({
  variableA: 3,
});
Arguments
- variables
- [dictionary] key:values to update the machine local variables
Machine.addState(name, options)
Add a state to the state-machine.
Usage
myMachine
  .addState("State1", { initial: true })
  .addState("State1.ChildA", {
    initial: true,
    initialTransitionActions: (local, event, state) => {
      local.variableA = 0;
    },
  })
  .addState("State1.ChildB");
Arguments
- name
- [string] the fully qualified name of the state (using dot-notation (
.) for nested states) options - [dictionary] dictionary with the following fields:
- initial: [boolean] determines if the state is the initial when it’s parent becomes active (from inactive)
- initialTransitionActions: [TransitionAction | Array<TransitionAction>] the action(s) to execute when the initial-transition is taken
Machine.addEntryAction(stateName, action)
Machine.addDuringAction(stateName, action)
Machine.addExitAction(stateName, action)
Machine.addTransition(from, to, options)
Add a transition to the state-machine.
Usage
myMachine.addTransition("State1.ChildA", "State1.ChildB", {
  condition: (local, event, state) => event.type === "MY_SUPER_EVENT",
});
Arguments
- from
- [string] the fully qualified name of the from-state
- to
- [string] the fully qualified name of the to-state
- options
- [dictionary] dictionary with the following fields:
- condition: [Condition] The condition on which to take the transition
- actions: [TransitionAction | Array<TransitionAction>] the action(s) to execute when the initial-transition is taken
- priority: [number] the order in which this transition-condition is evaluated with respect to all transitions out of the active state
Machine.initialize()
Initialize a state-machine.
Usage
myMachine.initialize();
Arguments
None
Available Types
StateAction
A callable function to evaluate during one of the 3 execution phases of a state.
Interface
(local, event, state) => Promise<void> | void
Arguments
- local
- the current local-variables of the state-machine are passed into this positional argument at evaluation
- event
- the active event (if any) of the state-machine is passed into this positional argument at evaluation
- state
- [dictionary] with the following fields:
- stepCount: [number] represents the total steps taken since the entry of into the active state
- entryTime: [Date] represents the machine-time in which the state was activated
- currentTime: [Date] represents the current machine-time
- events: [dictionary] key:values with keys representing all events which have occurred during the current state and their EventStats
TransitionAction
A callable function to evaluate during the execution of the transition.
Interface
(local, event) => Promise<void> | void
Arguments
- local
- the current local-variables of the state-machine are passed into this positional argument at evaluation
- event
- the active event (if any) of the state-machine is passed into this positional argument at evaluation
Condition
A callable function to evaluate to determine if a condition is true or false.
Interface
(local, event, state) => Promise<boolean> | boolean;
Arguments
same as StateAction
Event
An interface defining a Machine Event
Interface
interface Event {
  timestamp: Date;
  type: string;
}
EventStats
An interface defining statistics of a given Event
Interface
interface Event {
  latestTimestamp: Date;
  count: number;
}
Digital Twin
To reference data from other IoT Connected Assets from a given IoT Connected Asset’s calculations and alerts, the following keys provide a way of traversing your Digital Twin hierarchy. From any of the following keys, you can define a role-path to the role which you are interested in.
Available Keys
$self
Retrieve a reference to another component with respect to “myself”.
Usage
// Get Reference to My Child's Child
$self.child_A.childs_child;

// Get Reference to My Child's Child
// **Note** this is illustrative only, as you can access sensors /
// calculations / directly without this
$self;

// Use reference to access the aggregated value of `sensorA`
$self.child_A.childs_child.sensor.sensorA;
$parent
Retrieve a reference to another component with respect to “my parent”.
Usage
// Get Reference to My Sibling
$parent.sibling_A;

// Get Reference to My Parent directly
$parent;

// Use reference to access the aggregated value of `sensorA`
$parent.sibling_A.sensor.sensorA;
$root
Retrieve a reference to another component with respect to “my top-level root”.
Usage
// Get Reference to My Family Member
$root.someRole.subassembly;

// Get Reference to My Root directly
$root;

// Use reference to access the aggregated value of `sensorA`
$root.someRole.subassembly.sensor.sensorA;
$context
Retrieve a reference to another component by referencing an External ID defined
in a Context Field. When using the $context key, you must supply a context
field name. Formula processing will assume the referenced field is the External
ID to another IoT Connected Asset and attempt to access its data.
Usage
// Get Reference to an arbitrary IoT Connected Asset's child
$context.contextFieldName.child_A;

// Get Reference to an arbitrary IoT Connected Asset directly
$context.contextFieldName;

// Use reference to access the aggregated value of `sensorA`
$context.contextFieldName.sensor.sensorA;
Examples
Digital Twin Definition
Let’s assume we have the following Digital Twin Role Hierarchy:
(role : thingType)
bike : Bicycle
  ├ rearWheel : Wheel
  │   ├ brake : Brake
  │   └ tire : Tire
  │
  ├ frontWheel : Wheel
  │   ├ brake : Brake
  │   └ tire : Tire
  │
  └ bottomBracket : BottomBracket
      ├ crank : Crank
      ├ bearing : Bearing
      ├ leftPedal : Pedal
      └ rightPedal : Pedal
Digital Twin Instantiation
Let’s then assume the following instance of this Digital Twin:
(externalID : role)
BIKE001 : bike
  ├ WHEEL001 : rearWheel
  |   ├ BRAKE001 : brake
  |   └ TIRE001 : tire
  |
  ├ WHEEL002 : frontWheel
  |   ├ BRAKE002 : brake
  |   └ TIRE002 : tire
  |
  └ BRACKET001 : bottomBracket
      ├ CRANK001 : crank
      ├ BEARING001 : bearing
      ├ PEDAL001 : leftPedal
      └ PEDAL002 : rightPedal
Referencing Data
On the Bicycle thing type let’s write the formula for a Calculation named
tirePressureDifference:
$self.frontWheel.tire.sensor.pressure - $self.rearWheel.tire.sensor.pressure;
Then in the Tire Thing Type (which will execute for each tire) let’s add
the following formula for an Alert named tirePressureAbnormal:
if ($root.calculation.tirePressureDifference > 10) {
  // if parent is 'rearWheel', sibling is 'frontWheel' else sibling is 'rearWheel'
  const siblingPressure =
    $parent.twin.role === "rearWheel"
      ? $root.frontWheel.sensor.pressure
      : $root.rearWheel.sensor.pressure;

  // check if I'm the "low" one
  return sensor.pressure < siblingPressure;
} else {
  return false;
}
Some further examples of traversing this Digital Twin:
- From
PEDAL001
$parent; // BRACKET001

$parent.bearing; // BEARING001

$parent.$parent.frontWheel; // WHEEL002

$root.frontWheel; // WHEEL002
- From
WHEEL002
$root.bottomBracket; // BRACKET001

$self.tire; // TIRE002
State Machines
Components
Machines
A collection of States, Transitions and Actions. At the end of any given step each serial-sub-state within a machine will contain exactly one active state.
States
A state encapsulates a set of logic to be evaluated when active. States can be
hierarchical. A parent state is active if any of its child-states are active.
Each state has three phases of execution, entry, during, and exit. When a
State changes from inactive to active, its entry actions are evaluated. When a
State starts active and ends active (in a given step), its during actions are
evaluated. When a State changes from active to inactive, its exit actions are
evaluated.
Actions
Actions define processing within various scopes. Actions can be used to update the Machine local variables, set global variables, or make call-outs to external web services.
Transitions
The Transition defines a path between two states, the From-State and the To-State. Once a transition is executed, the From-State becomes inactive and the To-State becomes active. Transitions can include Actions which are evaluated once the transition is executed
Events
An alternate input-scheme which can be used instead-of or alongside local variables. Events can be useful if your approach includes combining several calculations ahead of evaluating the state-machine. The catch is that only a single Event can be handled by the state-machine for any given step.
Execution
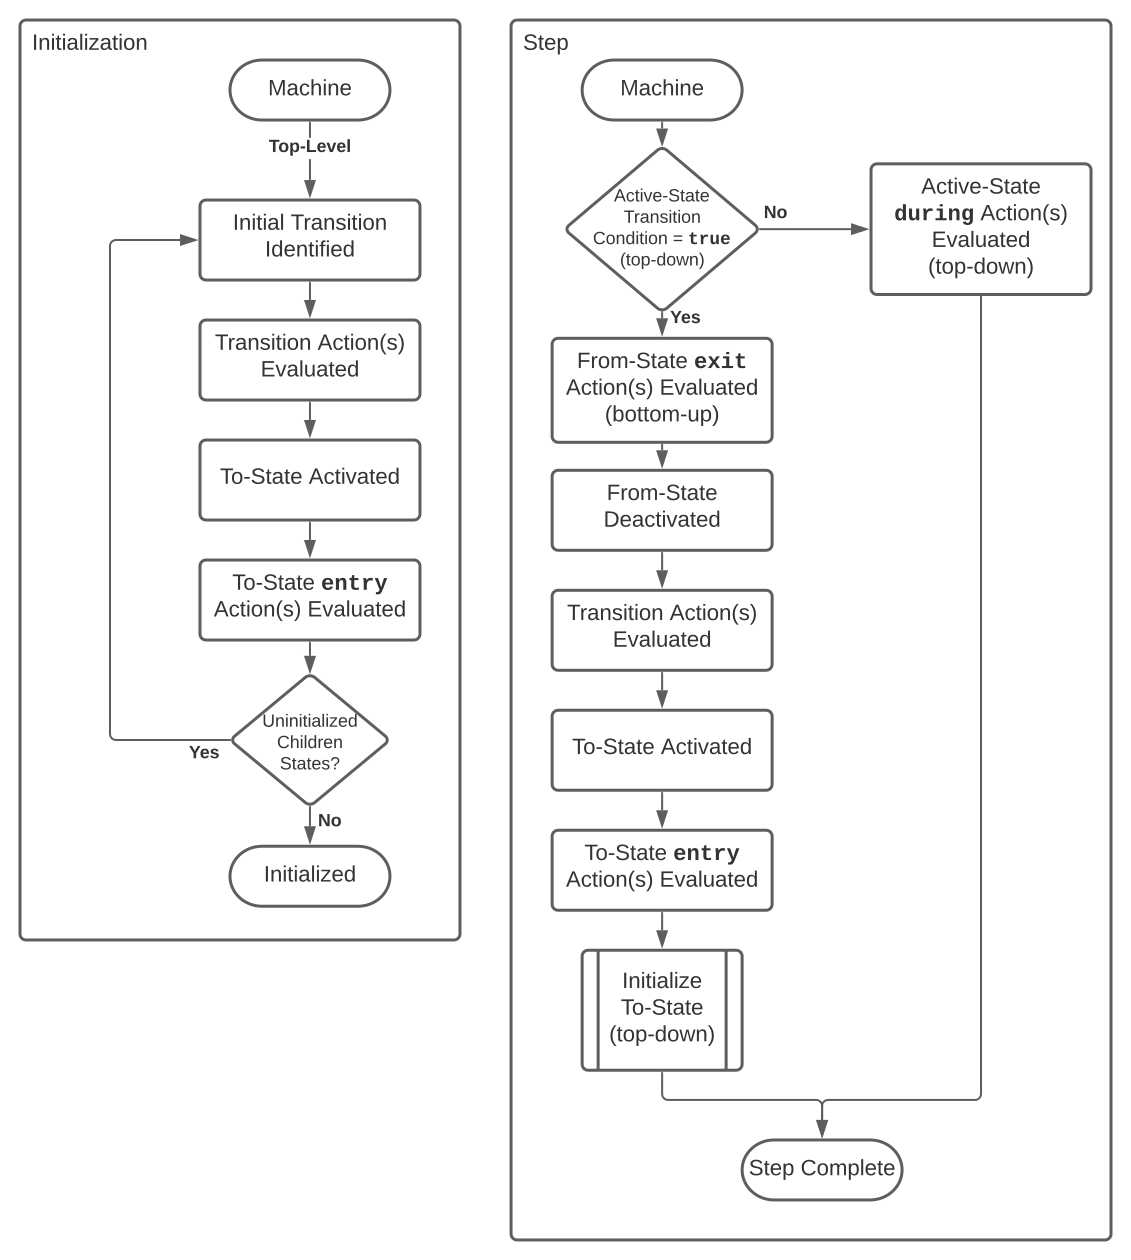
State Machine Execution
Initialization
Once a Machine is created, it will sit in an uninitialized state, whereby no
state is active and no transitions have been evaluated. If the first call to
myMachine.step() happens before the machine is initialized, it will automatically
initialize the Machine. It’s best practice to explicitly initialize the Machine,
once construction is complete by calling myMachine.initialize().
During initialization, at each level in the hierarchy, the initial state is
determined during construction by explicitly specifying {initial: true} in the
desired state
if two states at the same level are specified as
initial, the last one specified wins
From the top of the hierarchy down, each initial-transition is identified and evaluated. The machine is fully initialized once every state has the appropriate number of active states as defined by it’s Decomposition (serial vs parallel).
Step
Once a Machine is initialized, it can be “stepped” through time. Each step represents a discrete point in time (in our specific case, the machine is “stepped” upon receipt of each IoT Message).
During the step, all Transitions from the active state hierarchy are evaluated
from the top, down. That is to say, given active state, B.B.B, all Transitions
out of the top state B are evaluated in priority order, executing the first
Transition who’s condition expression evaluates to true or who’s condition
doesn’t exists (i.e. an Unconditional Transition). If no Transitions at level
B are to be executed, all Transitions at the B.B level are evaluated in the
same manor until either a Transition is identified to evaluate, or no
Transitions are to be taken.
If a Transition is identified to evaluate, first the exit actions in the
lowest level From-State are evaluated, then the exit actions are evaluated up
the hierarchy until the lowest-common State between From-State and To-State.
Meaning in a transition from B.B.B to B.B.A, only the exit actions from
B.B.B are evaluated (since B.B is never exited during the transition).
Whereas if transitioning from B.B.B to A.B, the exit actions at B.B.B,
B.B, and B are evaluated.
If no Transitions are to be evaluated, the during actions of the current
active state are evaluated from the top, down.
Examples
Full Example
Illustrative (not functional) State Machine containing all possible features of the State Machine library.
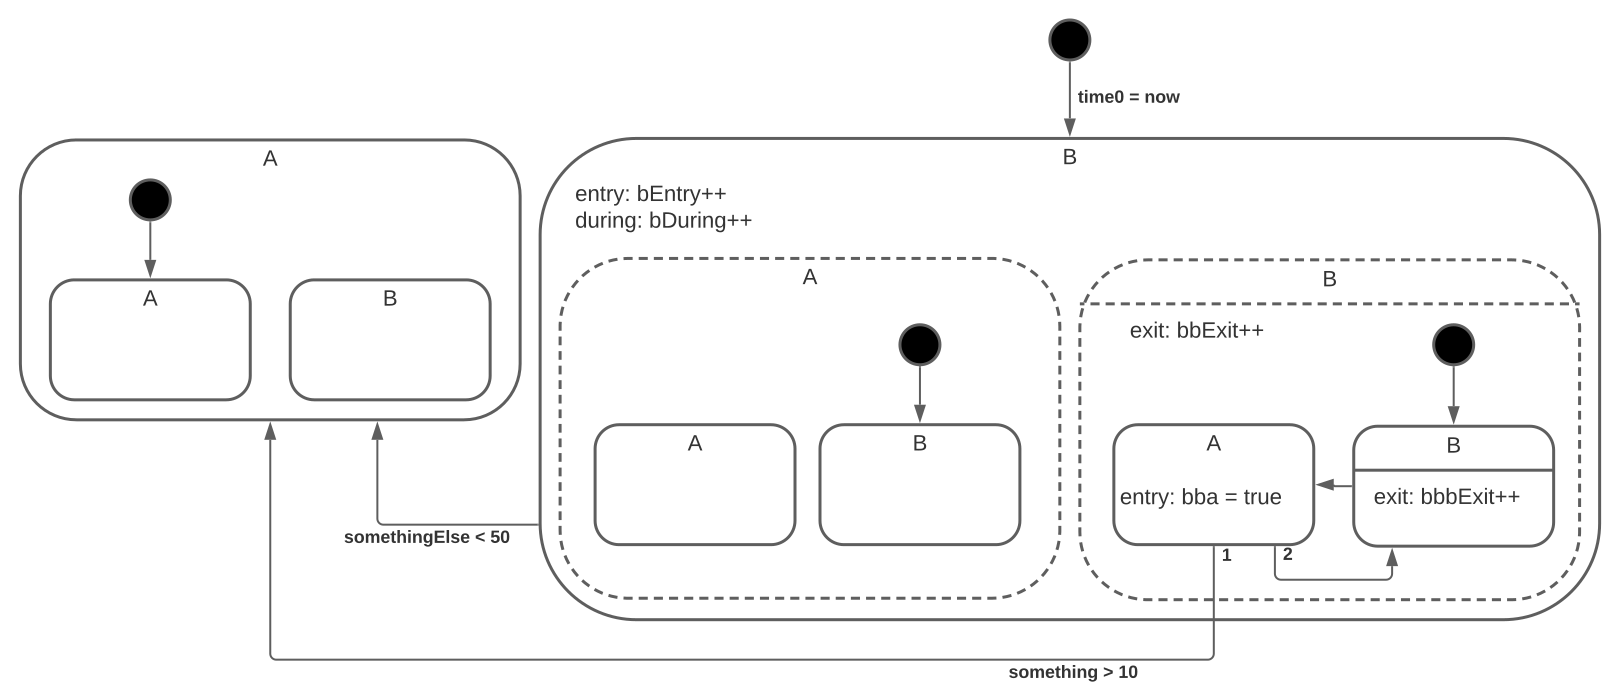
Initialization:
- The initial transition into B is evaluated and the local variable,
time0is set tonow. - B is activated.
- B entry actions are evaluated, incrementing the machine variable,
bEntry - States B.A and B.B run in parallel (indicated by the dashed border). B.A and B.B are activated.
- So, the initial transitions into B.A.B and B.B.B are executed.
- Both B.A.B and B.B.B are activated.
Step 1:
- Both B.A.B and B.B.B are active.
- First there exists a transition at the top level,
somethingElse < 50. If this evaluates totrue, then all active children ofBare exited and deactivated from the bottom up. For this example let’s assumesomethingElse = 100, so this transition will not be executed. - Since the transition from B.B.B to B.B.A is unconditional, it is marked for evaluation.
- B.B.B exit actions are evaluated (local variable,
bbbExitis incremented) - B.B.B is deactivated
- If there were any actions defined on this transition, they’d be evaluated here.
- B.B.A is activated
- B.B.A entry actions are evaluated (local variable,
bbais nowtrue) - B during actions are evaluated (
bDuringis incremented)
Step 2:
- Both B.A.B and B.B.A are active.
- There are two transitions out of B.B.A (priority can be set on
transitions to handle this case). If
something < 10, then transition 1 would be marked for evaluation, otherwise, transition 2 is unconditional, so it will be marked for evaluation by default. For this example, let’s saysomething = 6, so transition 1 is marked for evaluation. - B.B.A is deactivated
- B.A.B is deactivated
- B.A is deactivated
- B.B is deactivated
- B.B exit actions are evaluated (
bbExitis incremented) - B is deactivated
- If there were any actions defined on this transition, they’d be evaluated here.
- A is activated
- A.A is activated
Advanced Topics
State-Decomposition
At any given level in the state-hierarchy, there are two possible modes of
execution: Serial (default) and Parallel. Serial decomposition defines that at
a given level, there is only ever a single active state at the end of any
give step. Contrary, Parallel decomposition defines that all states at a given
level are active. In the examples below, the Serial State Machine will only
ever have a single active state (e.g. 'A.B' or 'B.A.B'), whereas the
Parallel State Machine will have 3 active states at any given time (e.g.
['A.A', 'B.A.B', 'B.B.A'] etc.)
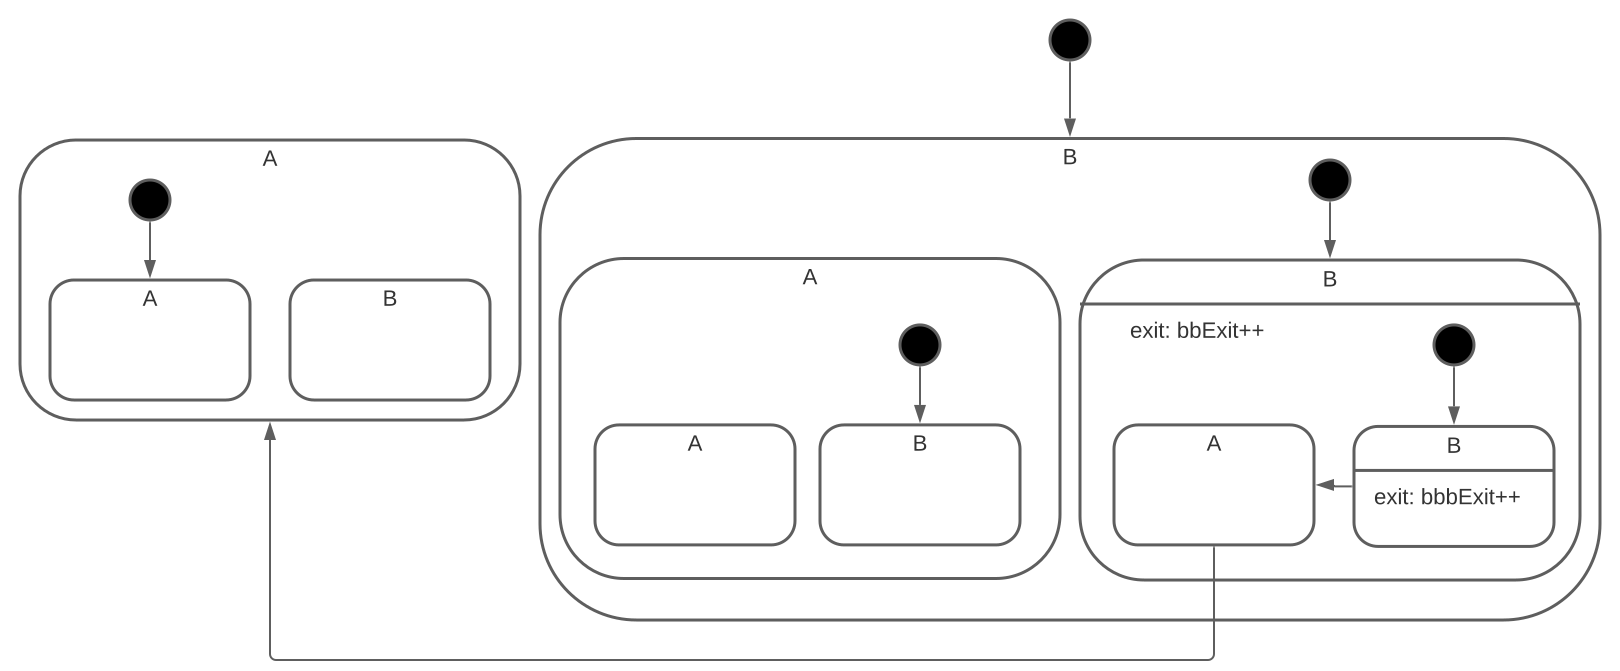
Serial State Machine
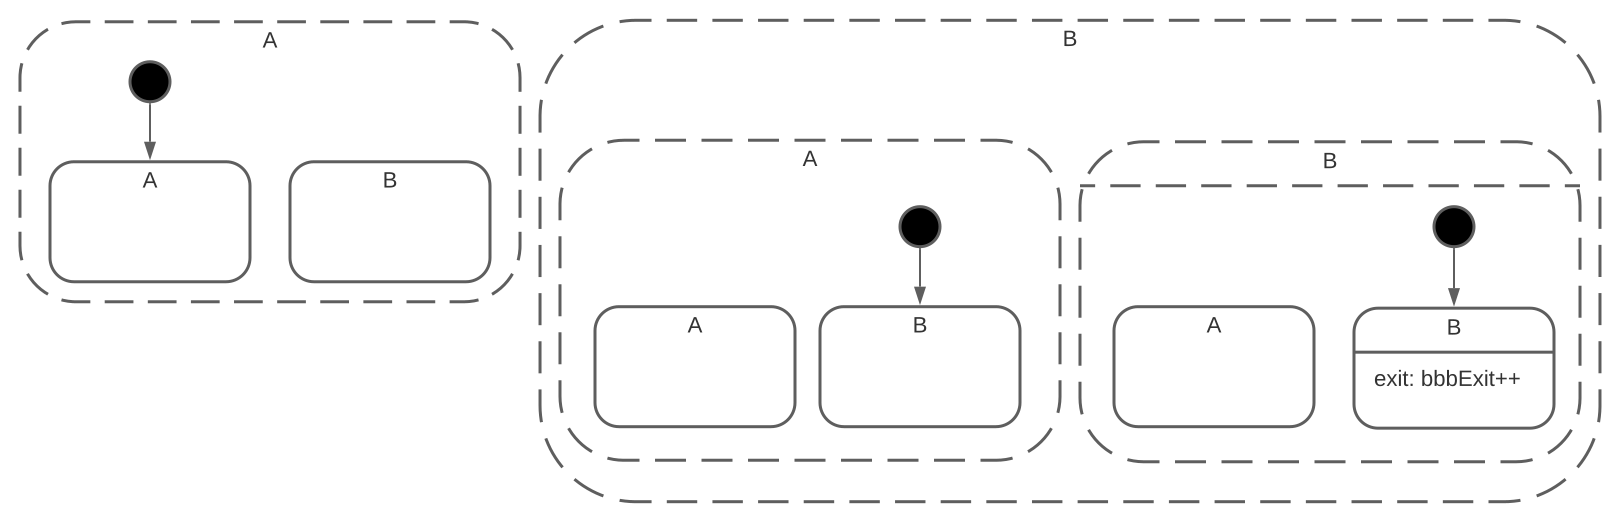
Parallel State Machine
ServiceNow Mobile Agent
We’ve built features from our ServiceNow Desktop Application into the ServiceNow Mobile Agent App.
Navigation
There are three navigation tabs in the Mobile Agent App. They are All Connected Assets, All Alert Histories,and All Asset Attributes. These tabs enable you to view their respecive lists in the Mobile App. Record Cards can be tapped to view more information about each record.
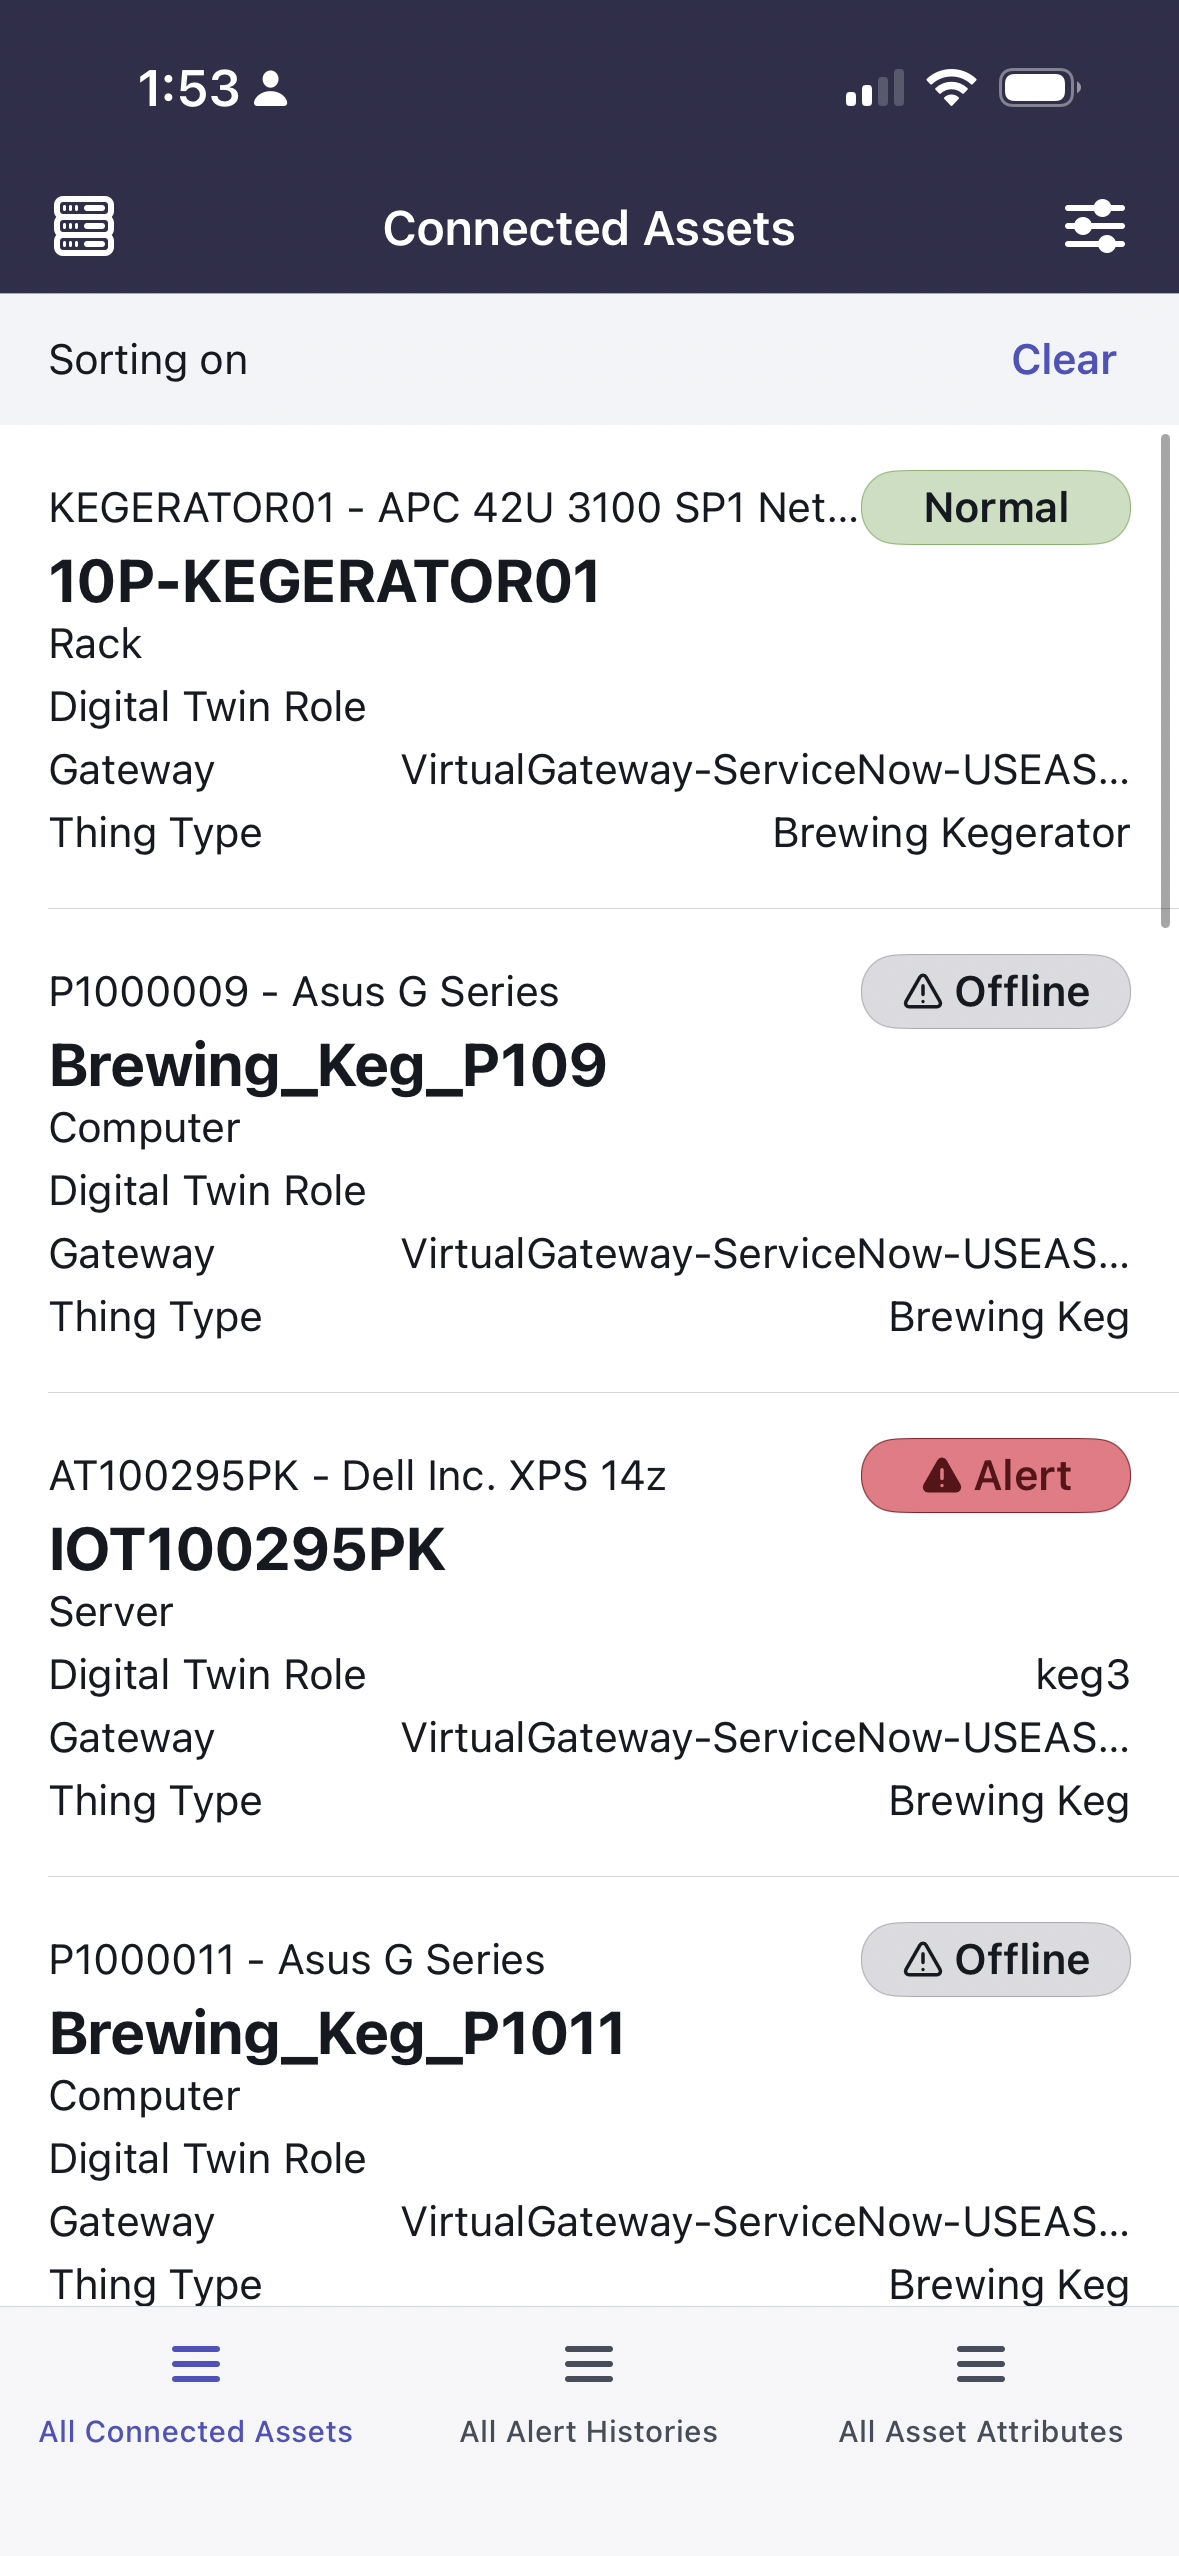
Mobile Agent All Connected Assets Tab
On the All Connected Assets tab, each record has two additional actions. You can swipe left and right on each record to display additional actions related to each record. Sliding Right reveals buttons to navigate to two related lists. These lists are the Alert Histories and the Asset Attributes for the record.
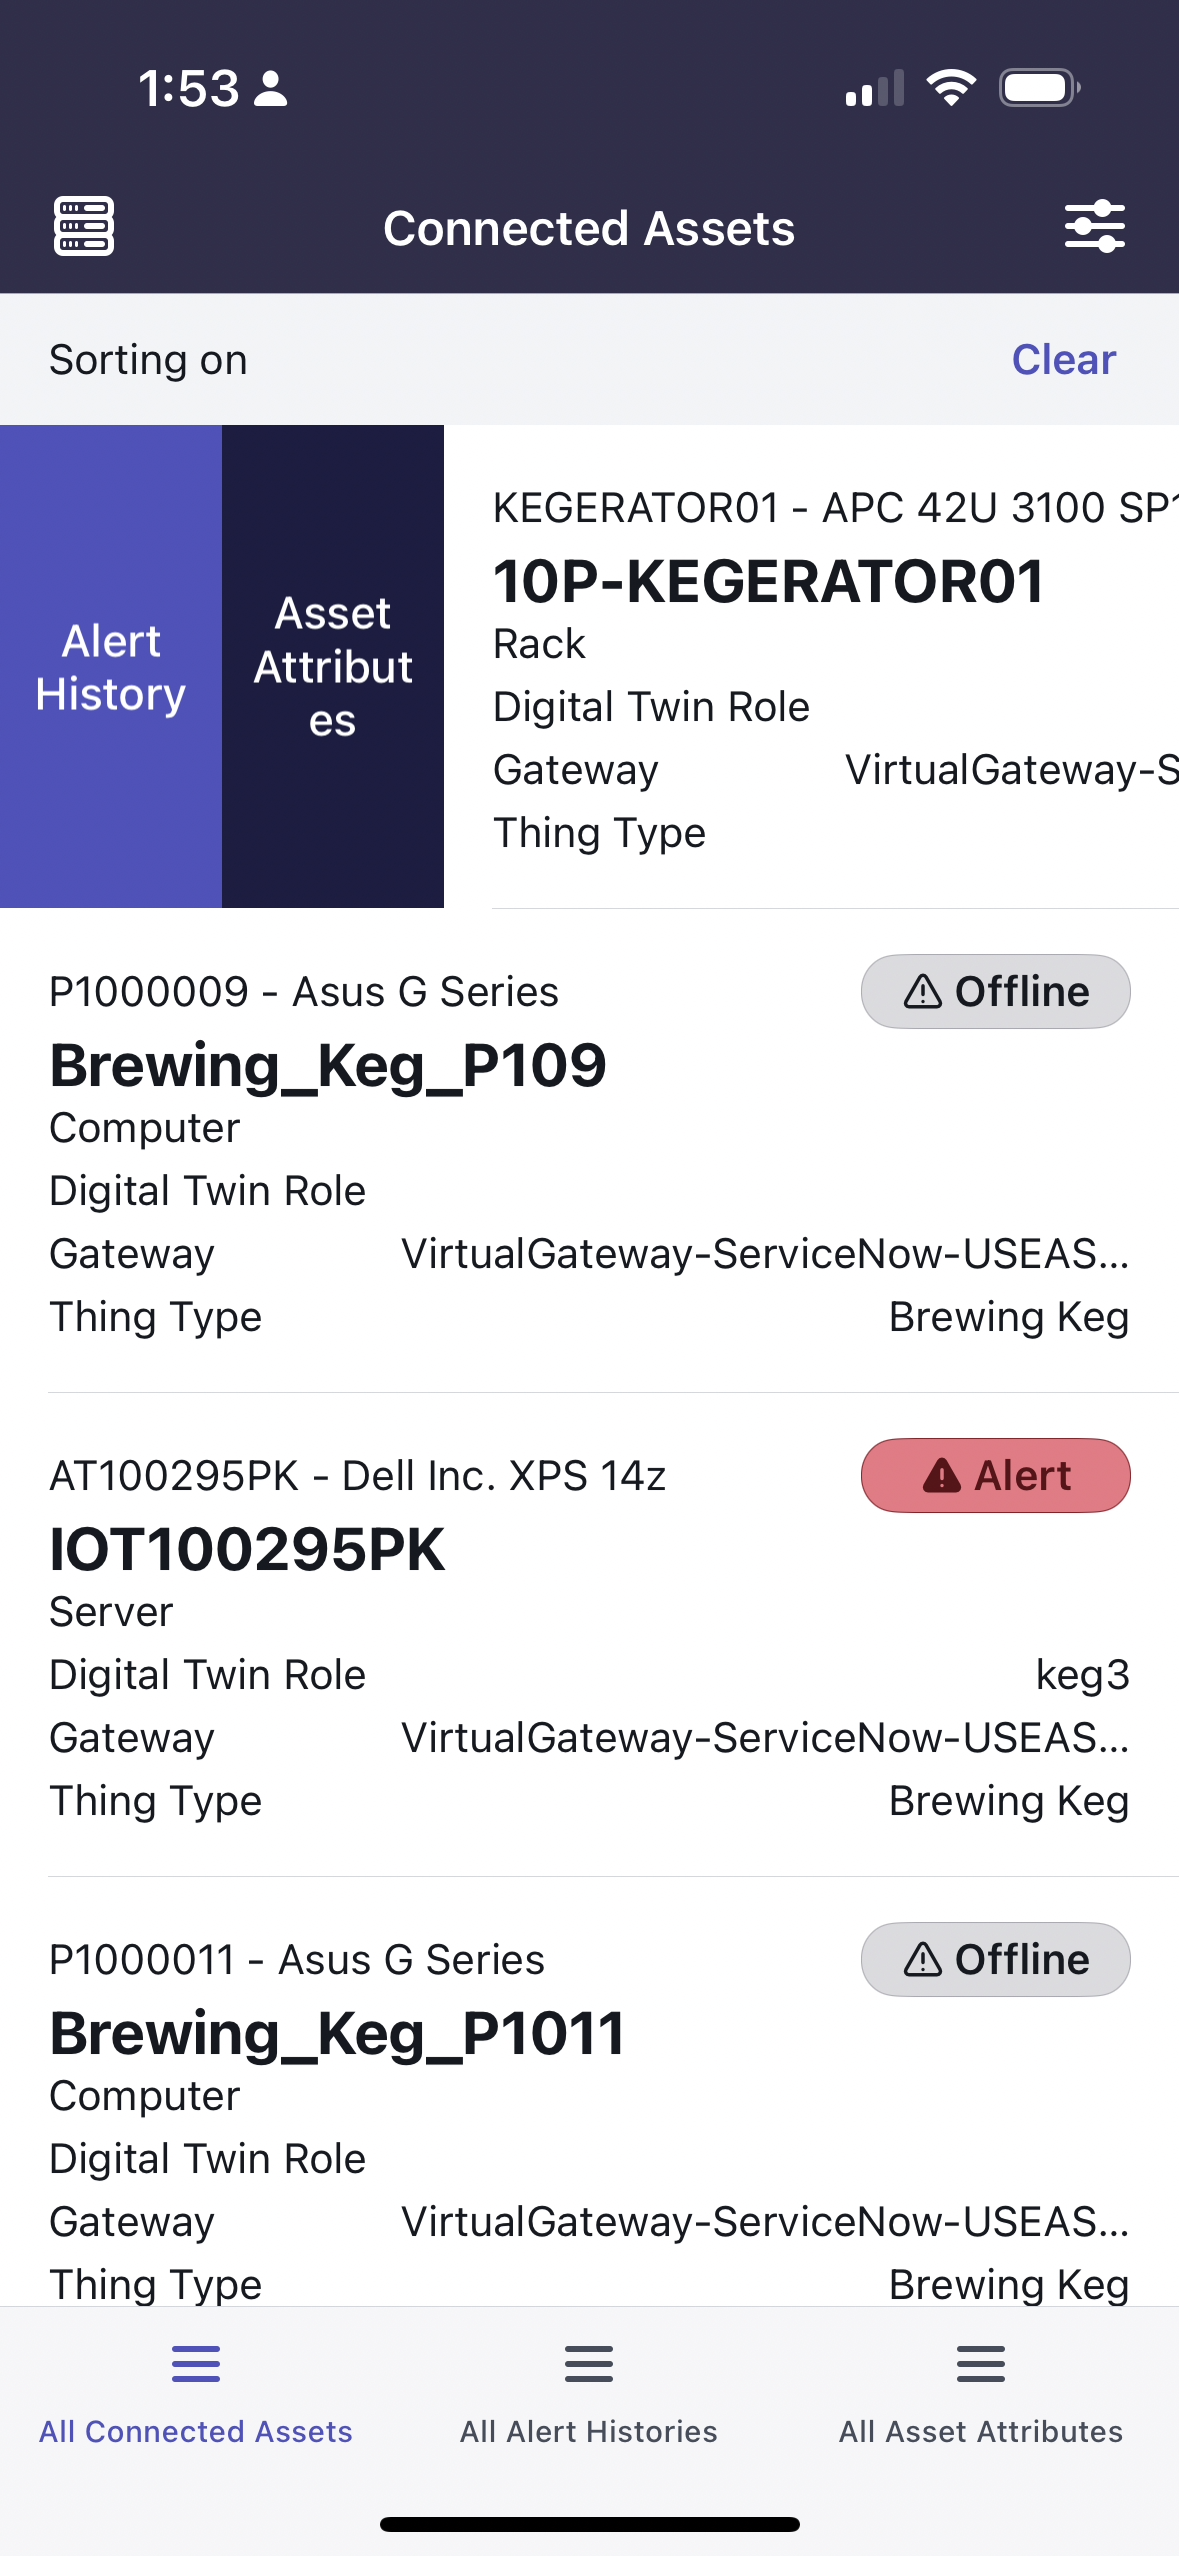
Sliding Right on Records
Sliding left reveals buttons to open the IoT Copilot chat, the Thing Chart, and the Digital Twin.
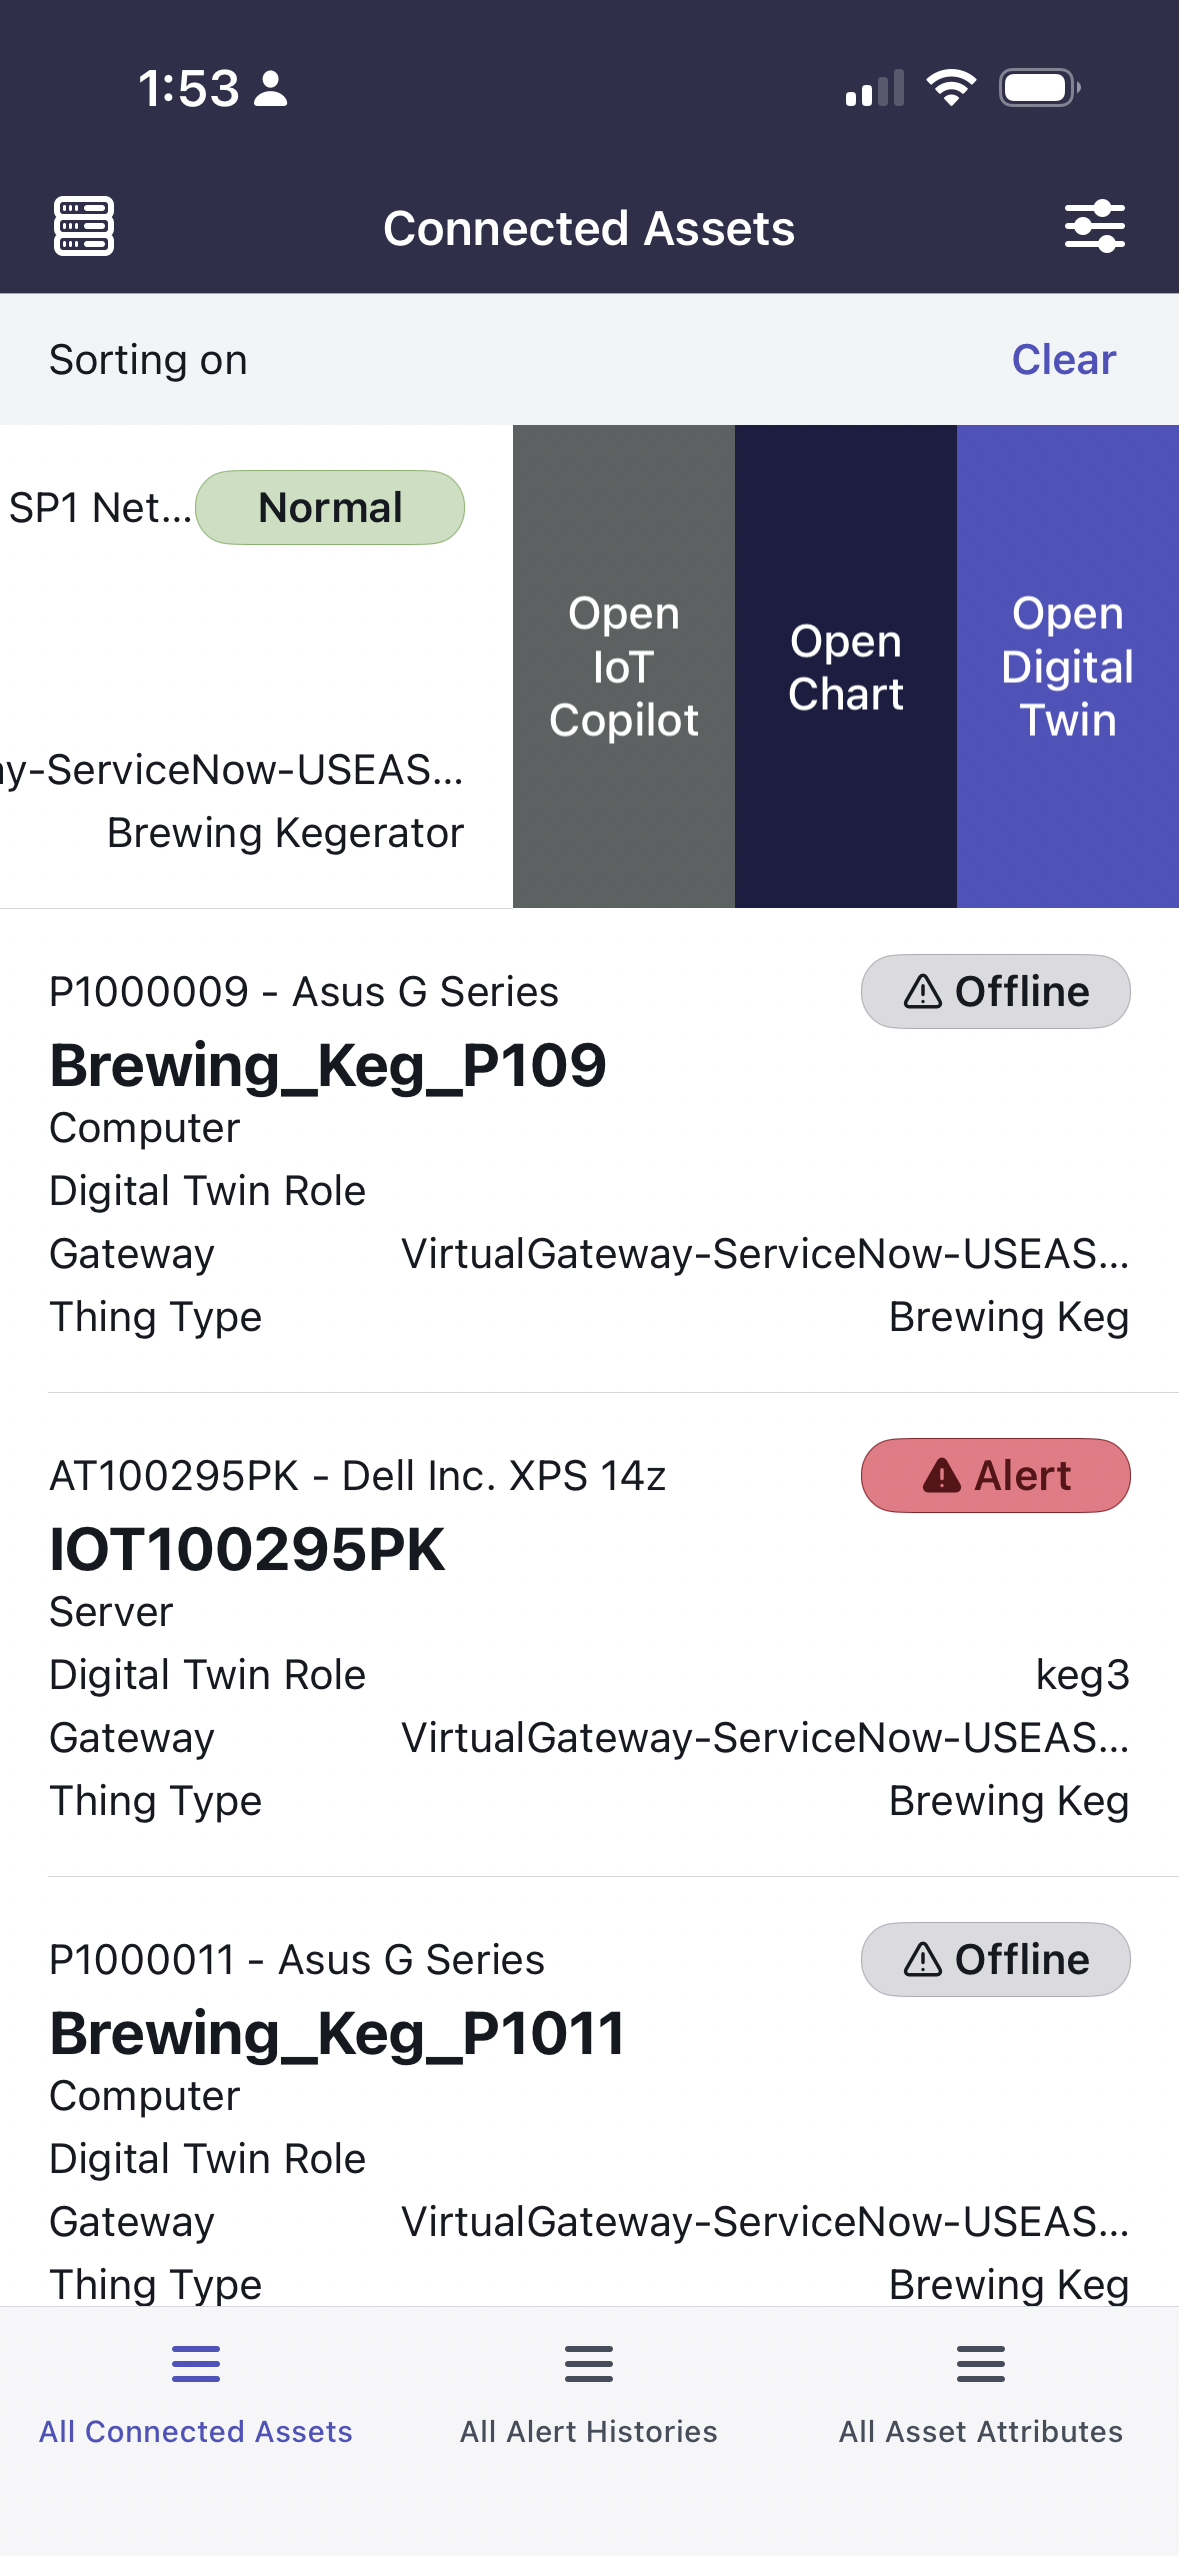
Sliding Left on Records
The following Mobile Components can do everything the Desktop variantes can do except for attaching chart or digital twin data to the IoT Copilot.
Mobile IoT Copilot
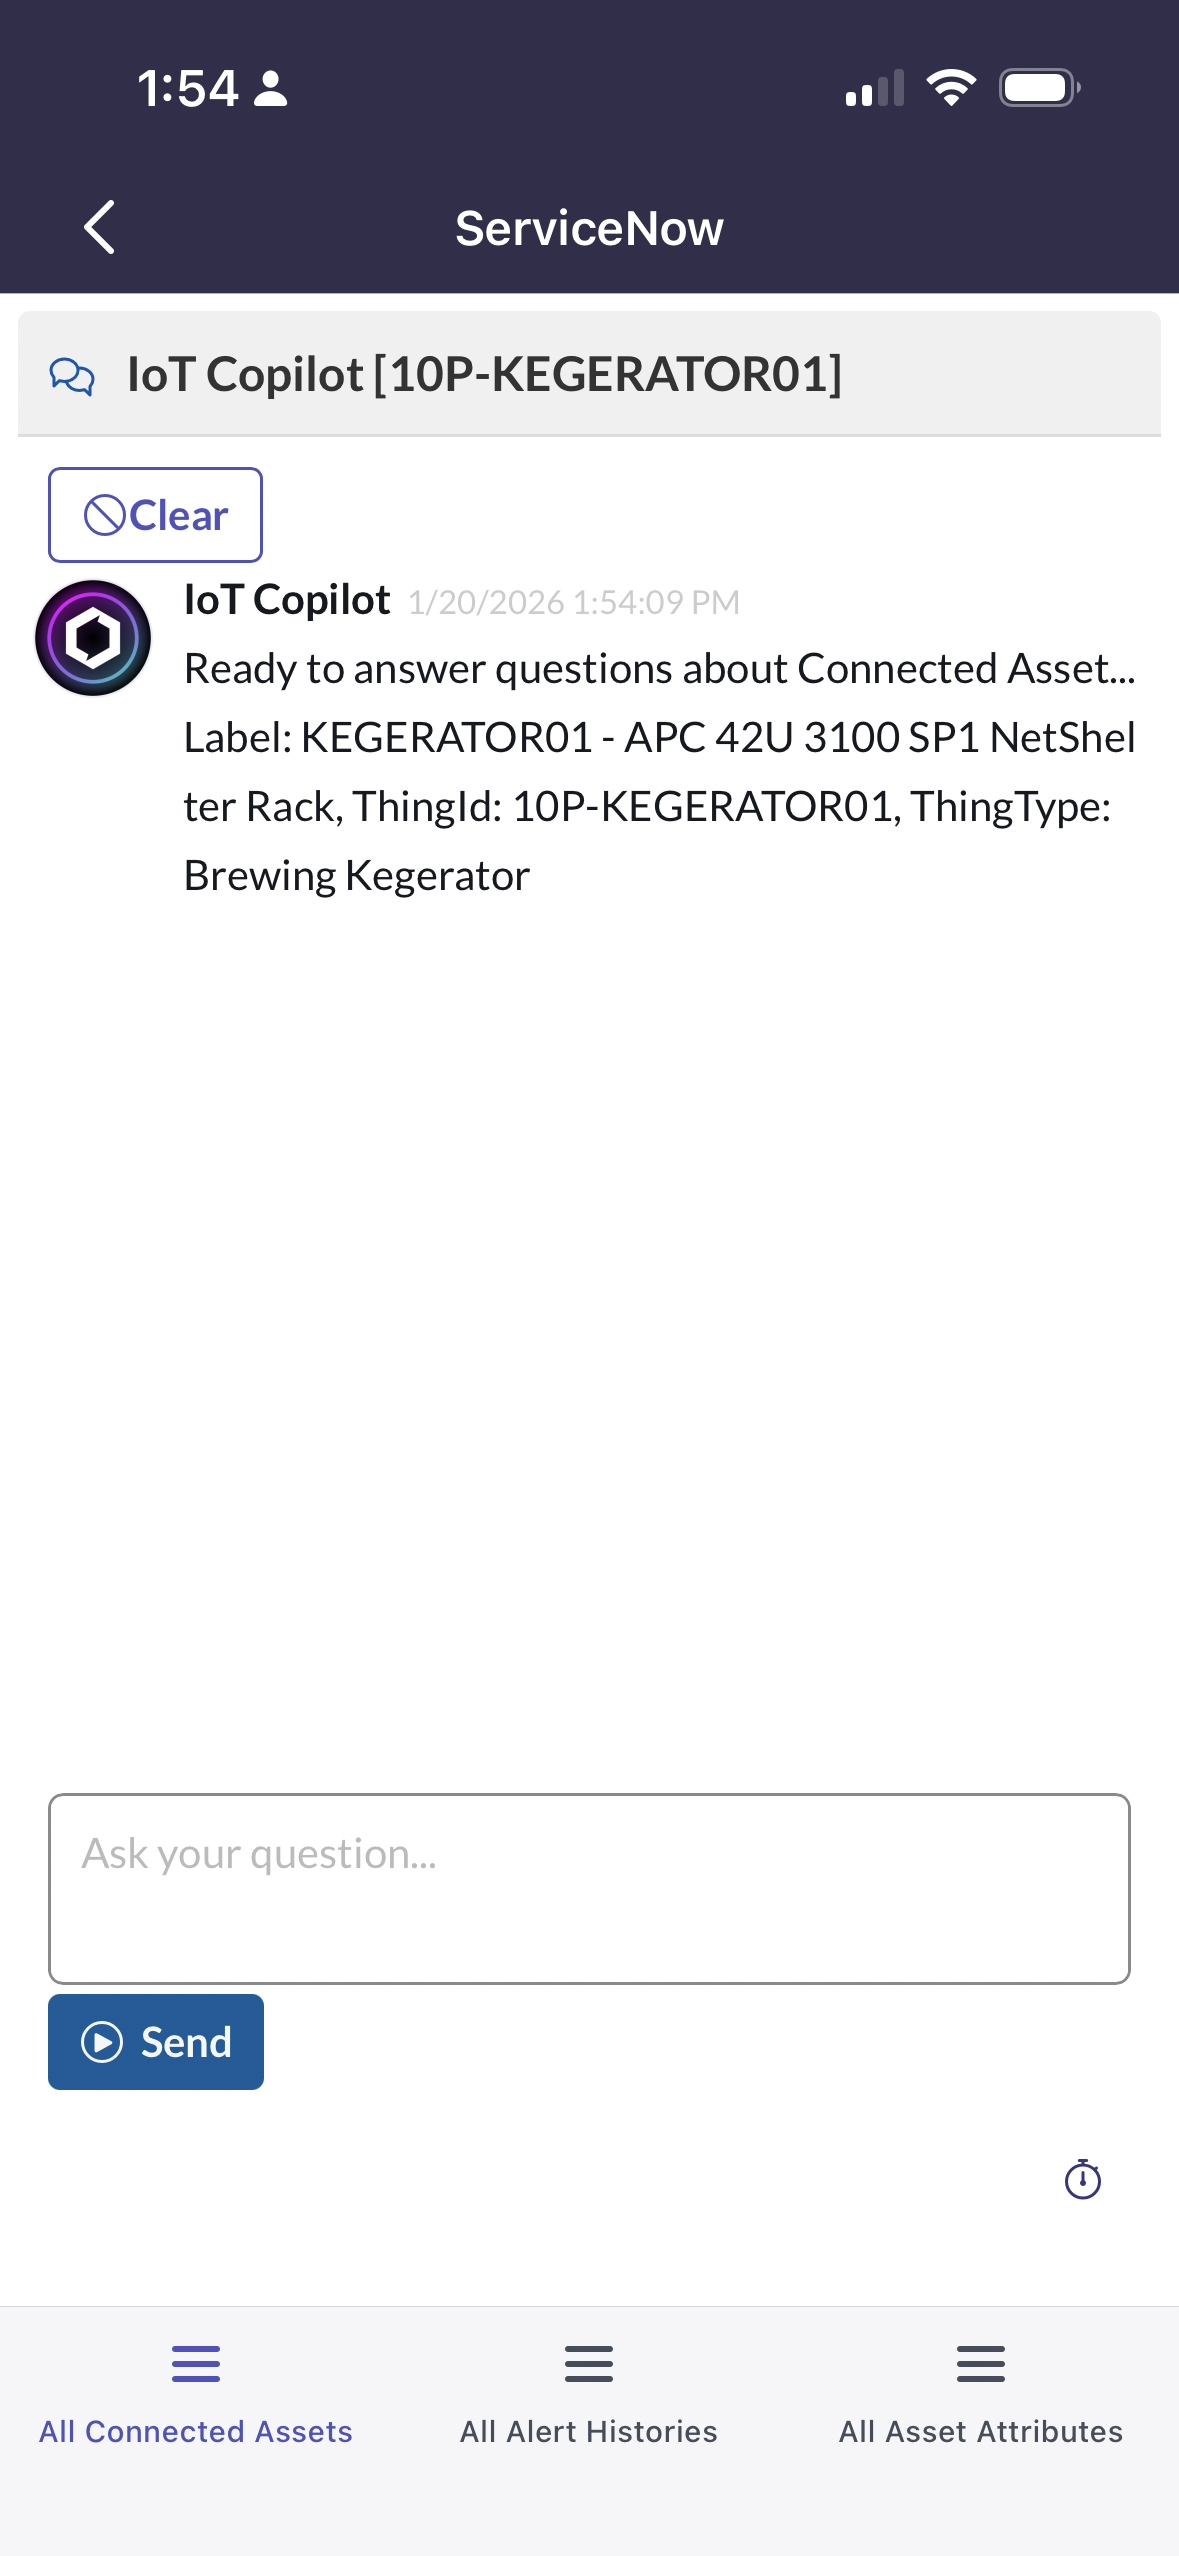
Movile IoT Copilot Display
Mobile Thing Chart
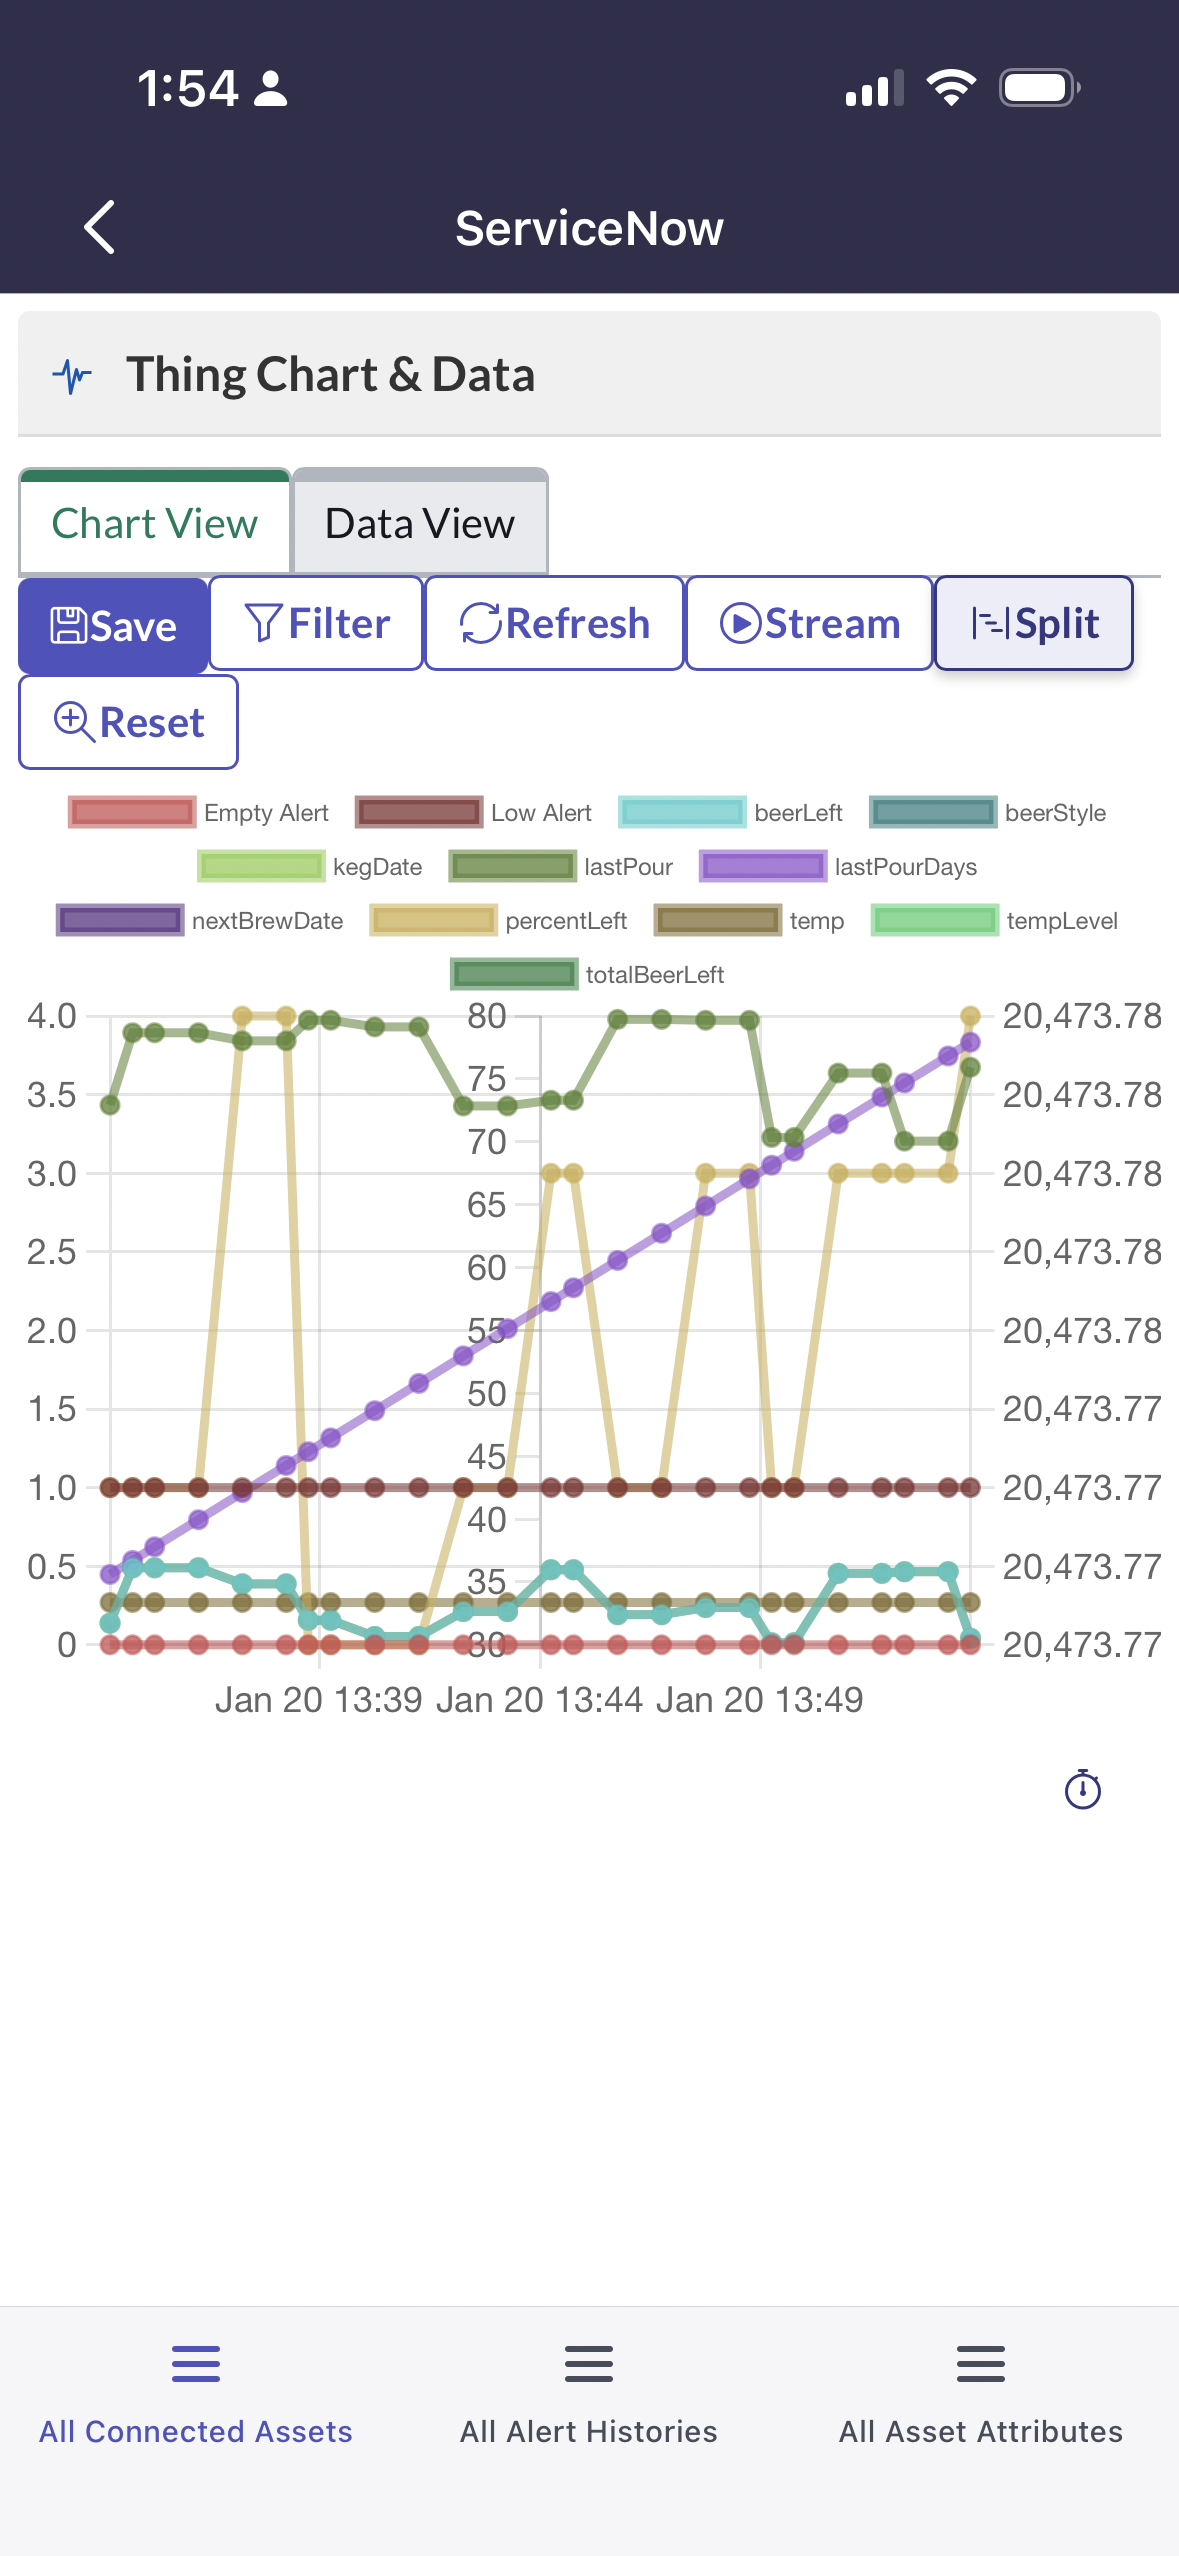
Mobile Thing Chart Display
Mobile Digital Twin
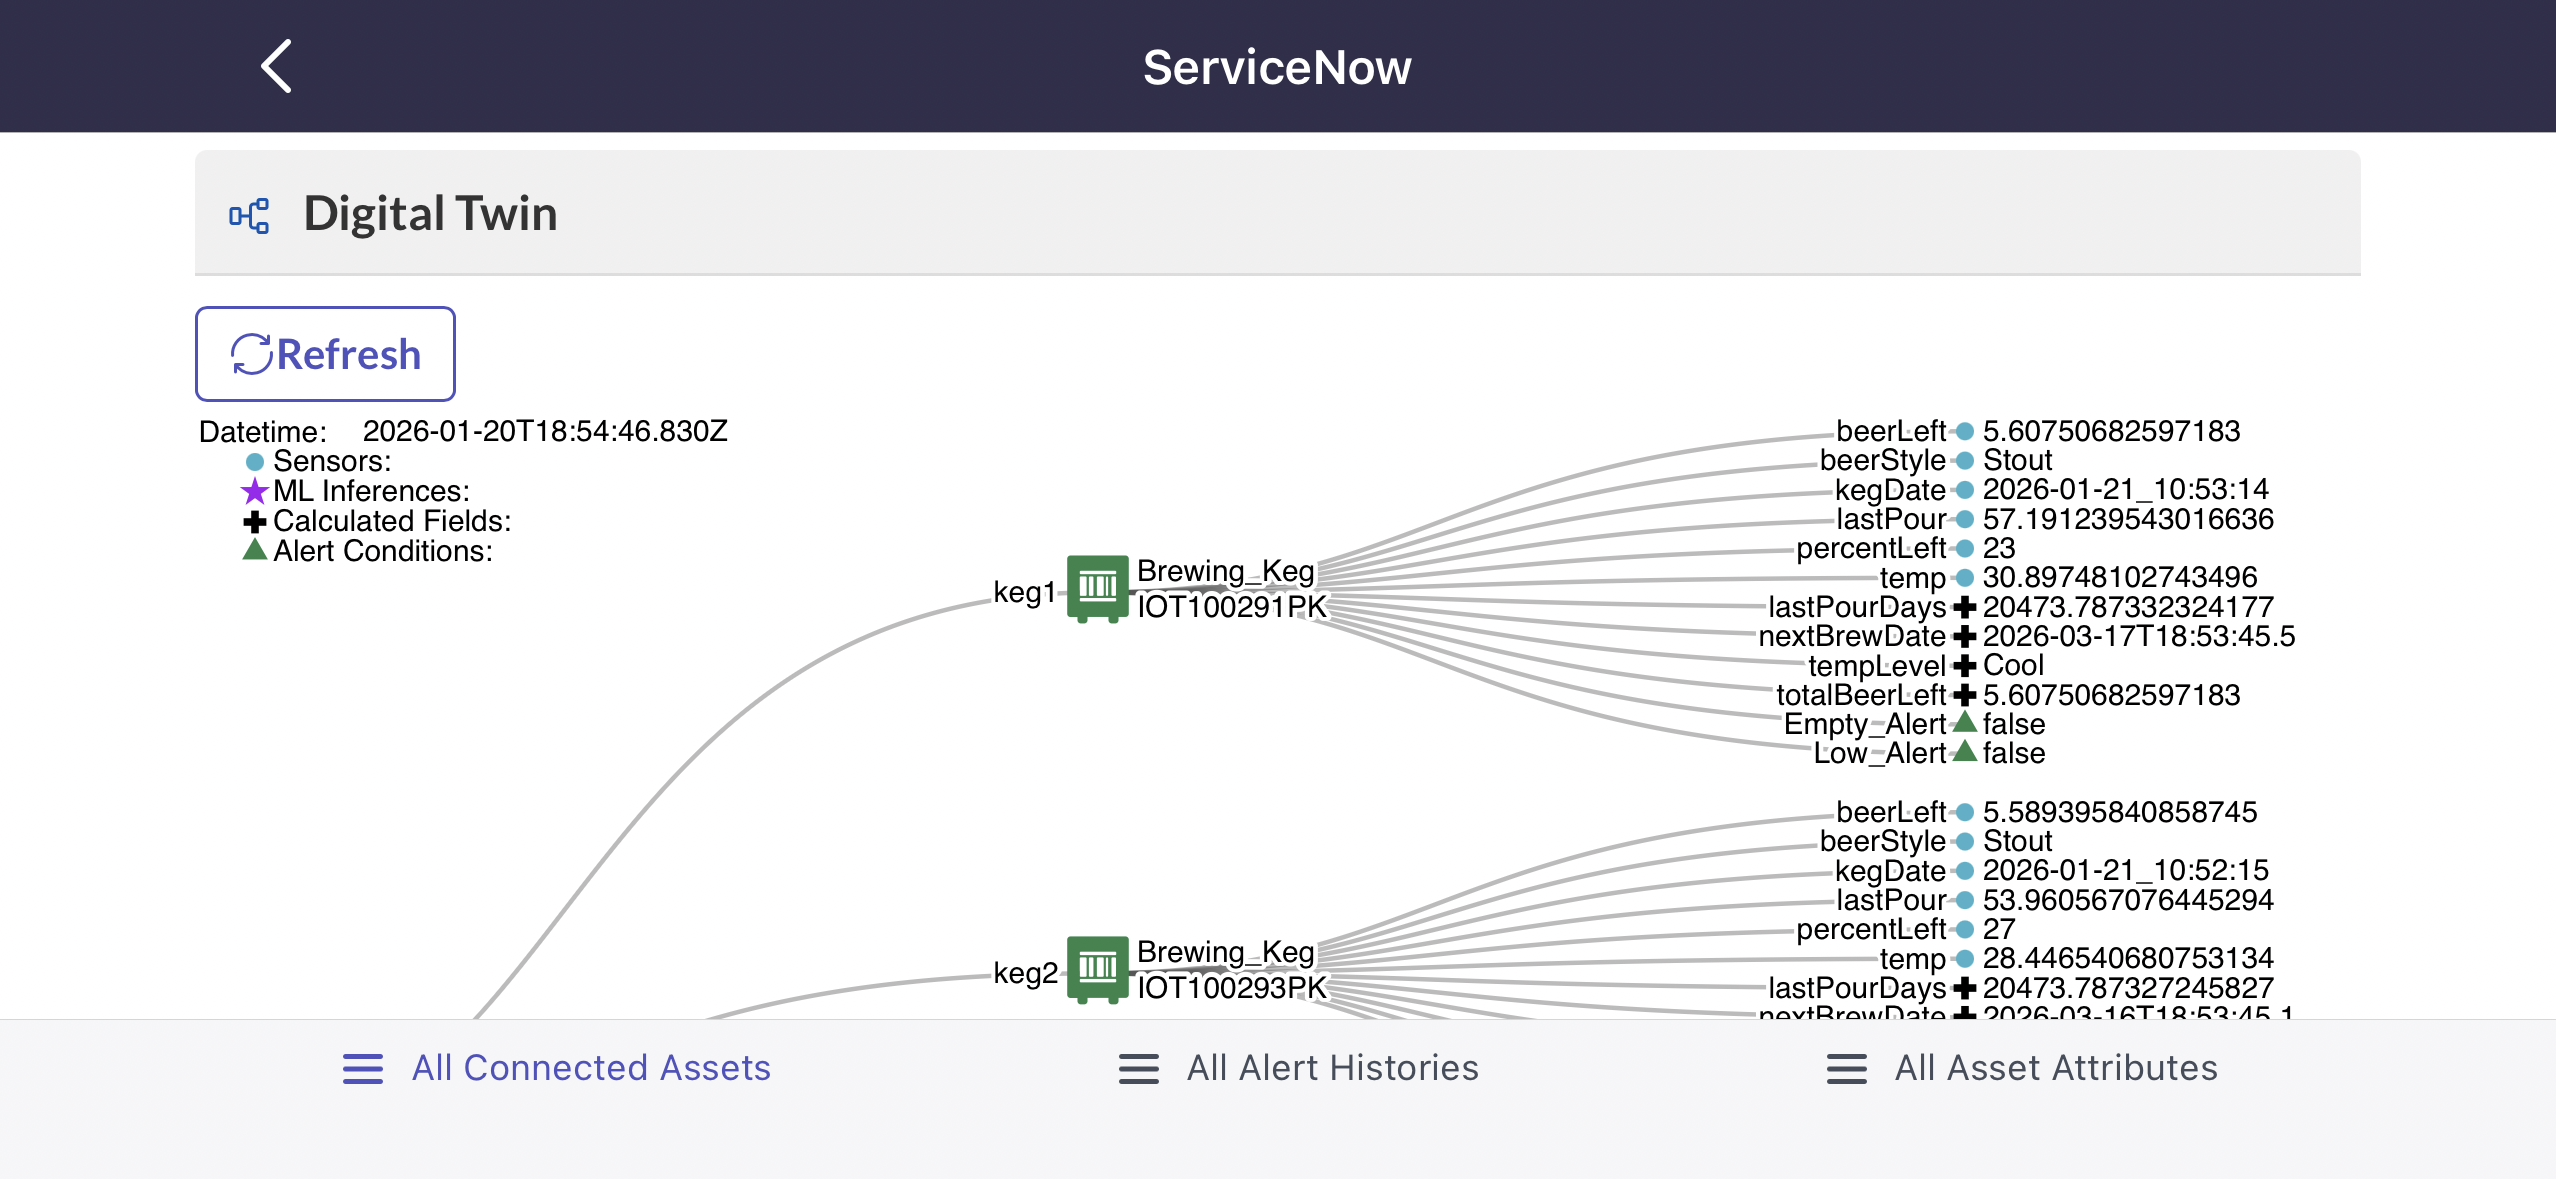
Mobile Digital Twin Display Part 1
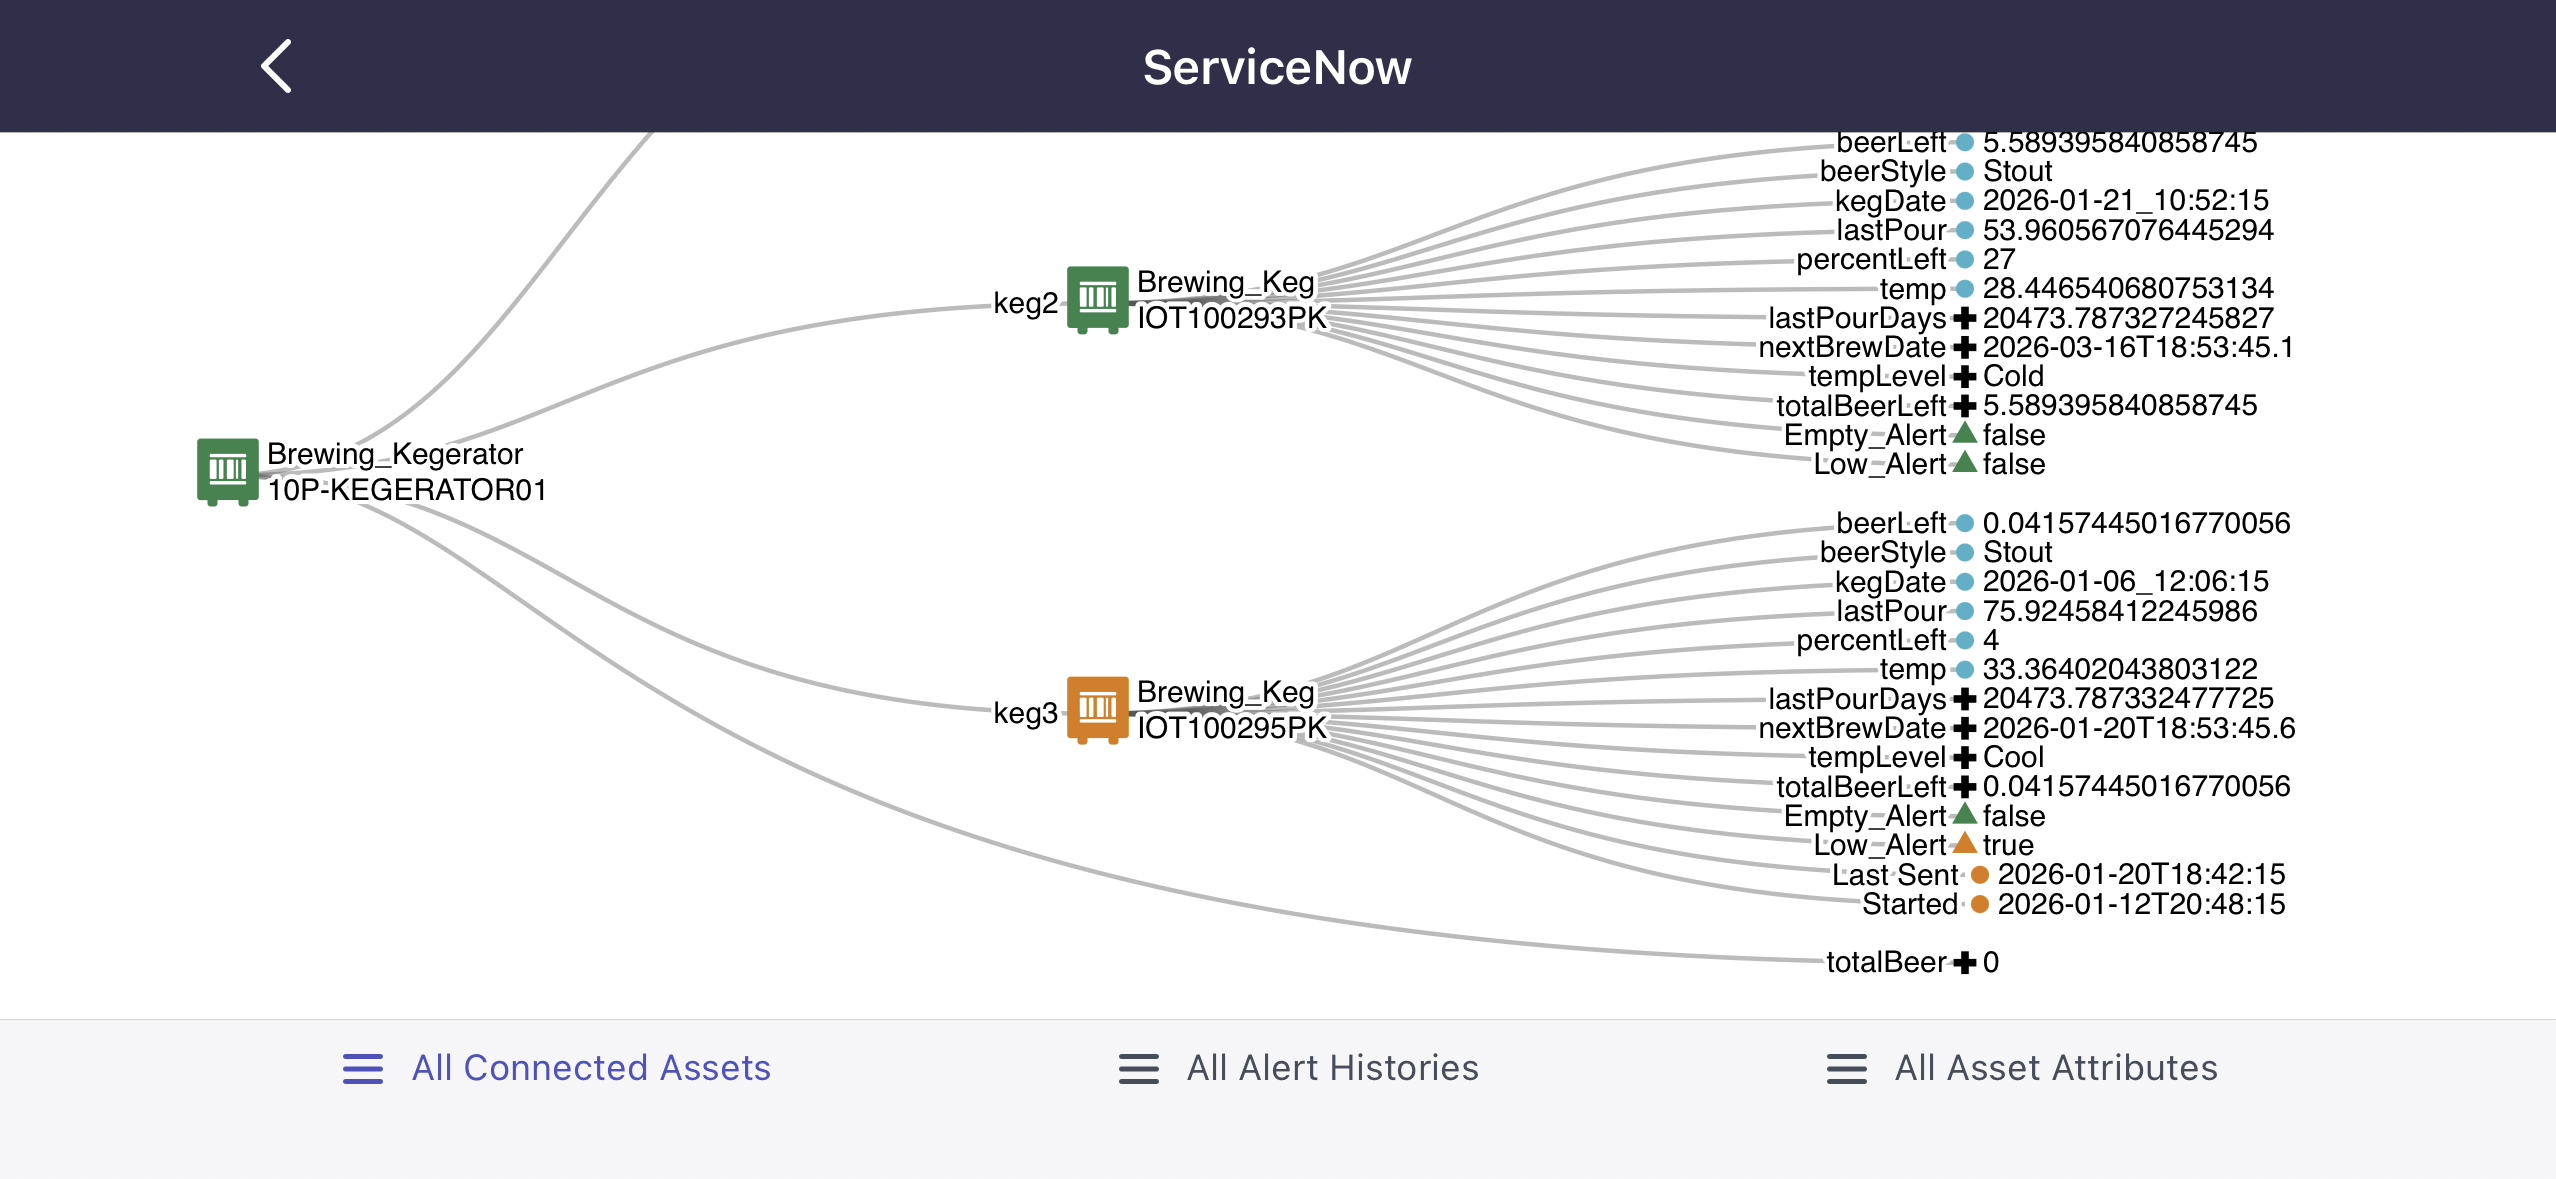
Mobile Digital Twin Display Part 2
Release Notes
Release 1.0 (Fall '25)
Initial Release Features:
- IoT Settings: Easily configure the settings and security for the Bolt Data Connect app.
- Global Settings: Configure the Settings for the app
- OAuth: Authorize the IoT Cloud to interact with ServiceNow
- License Visibility: View the IoT Device License usage
- Scheduled Jobs: We included the following Scheduled Jobs
- Context: Synchronizes the Context Field values from ServiceNow to the IoT Cloud
- Attributes: Synchronizes the latest IoT Values from the IoT Cloud into the Asset Attributes table.
- Simulators: Runs the Simulators and sends messages to the IoT Cloud
- Thing Type Editor: Edit the Thing Types to control how different types of assets are processed in the IoT Cloud.
- Thing Type Syncing Sync the Thing Type configurations to the IoT Cloud
- Connected Assets: Custom table to wrap your Assets with IoT Visualizations, Interactions and Data.
- Thing Chart: IoT Telemetry Chart with Data Streaming.
- Digital Twins: Asset Hierarchy with IoT Values as a Dendogram Diagram.
- IoT Alert History: Track the IoT Alerts that have been received in the IoT Cloud for each Connected Asset. Easily configure Alert Responses as ServiceNow Flows.
- Connected Asset Agent: Generative AI chat-bot used to ask Natural Language questions about the Connected Asset and it’s IoT data.
Release 1.1 (Winter '26)
New Features:
-
Auto-Registration The IoT Cloud will auto create IoT Registration records as new Connected Assets are discovered. These records can easily be automated with a Flow to map Assets, Gateways, and Thing Types to fully enable Auto-Registration.
-
Thing Type Editor: We’ve made improvements to our Thing Type editing experience:
- Import You can now Import Thing Type records and all of their dependencies from either a local file or Remote Configurations from the IoT Cloud.
- Export You can now export thing type configurations with their Sensors, Calculated Fields, Alert Conditions, Context Fields, and Digital Twin Roles to a local file.
- IoT Audit Trail You can see a history of changes for each thing type and you can revert to a specific version saved to the IoT Cloud.
- Formula Data Pills There are now Formula Data Pills on the Formula Pages to show possible values.
- Simulator Editor You can now use the simulator editor to configure simulators in a graphical interface.
-
IoT Console The new IoT Console in the Connected Assets Workspace allows you to filter and visualize all of your Connected Assets.
- Map View Interactive Map View providing an easy to use drill down interface.
- List View Full-featured, configurable list views.
- Card View Intuitive Card View with multiple navigational links to the Connected Asset and its related records.
- Classic Map View The Map Module lets you view your Connected Assets in an out of the box Map Page which uses your Google Maps credentials.
-
IoT Copilot
- Agent Chat has been Rebranded to IoT Copilot, and improves on the way you interact with connected assets in Bolt Data Connect.
- Copilot Instructions Each Thing Type can also define natural-language IoT Copilot Instructions, to provide context and insight.
- Ask IoT Copilot about Digital Twin or Thing Chart data views with a single click!
-
IoT Interactions:
- Thing Commands This allows you to send a Command to a Connected Asset.
- Gateway Commands This allows you to send a Command to a Gateway.
-
Connected Assets:
- Digital Twins now show the Last Sent and Started from each active IoT Alert.
- Unified Map There is now an interactive Unified Map to visualize and search through Digital Twins.
- Sensor Gauges Sensor Gauges can now be configured and added to Thing Types to help visualize data stored on the IoT Cloud.
- Manual Sensor Entry The Connected Asset Page allows you to manually submit Sensor Values for this specific Connected Asset to the IoT Cloud.
-
ServiceNow Mobile Agent Support You can now see all of your Connected Assets within the Mobile App.